Archives For November 30, 1999

This tutorial shows you how to install the beautiful Malys-Deda GTK Theme in Ubuntu 13.04, Ubuntu 12.10, Ubuntu 12.04 and Linux Mint.

malys deda gtk theme

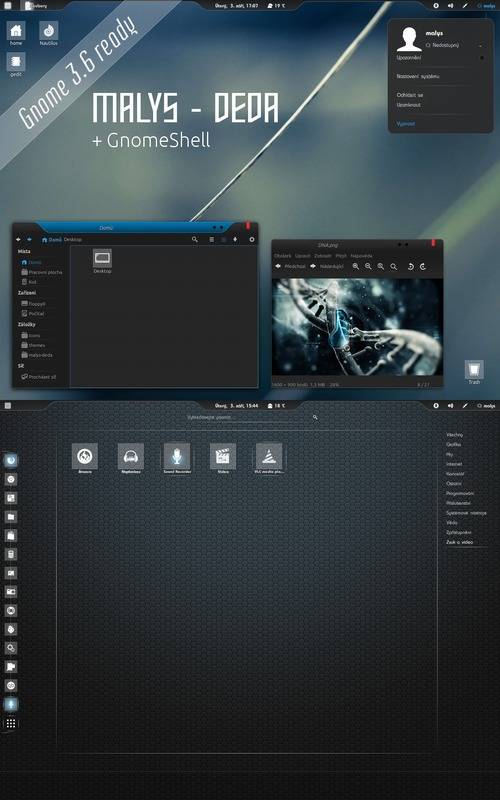
The installation is very easy, just download the theme and put the extracted folder to themes folder and finally you can apply it via gnome tweak tool or unity tweak tool. Follow the steps below to get started:

1.) Open Ubuntu Software Center, search for and install gtk3-engines-unico or gtk2-engine-pixbuf

2.) Clike to download Malys-Deda GTK Theme

3.) Extract the download package. Copy the result folders (malys-deda & malys-dedaGS) and paste to:

  • user Home -> .themes # For local user only, press Ctrl+H to see hidden folders. Create .themes folder if not exist.
  • /usr/share/themes # For global. You need to press Alt+F2 and type to run gksudo nautilus to open file manager with root privilege.

4.) Open Unity Tweak Tool or Gnome Tweak Tool, go to Themes and choose Malys-Deda.

The Cloud music player Nuvola 2.2 added new service Bandcamp & Libre.fm. Here’s how to install or upgrade Nuvola Player 2.2 in Ubuntu 13.10, Ubuntu 13.04, Ubuntu 12.04, Ubuntu 12.10 and their derivatives such as Linux Mint and Elementary OS Luna.

New features in Nuvola 2.2:

Nuvola now supports Bandcamp. Bandcamp is an online music store, as well as a platform for artist promotion, that caters mainly to independent artists. Artists on Bandcamp have a customizable microsite with the albums they upload. All tracks can be played for free on the website and some artists offer free music downloads.

bandcamp

Nuvola Player supports scrobling to Libre.fm, a free Last.fm alternative.

Last.fm love and ban actions are available from the main menu (control), tray icon and Unity quick list.

Some services allow you to download songs, but file downloads were not supported by Nuvola Player. File downloads have been enabled and a simple downloads manager has been created to address this issue.

nuvola download manager

Other changes:

  • File INSTALL: Added information how to run Nuvola Player from source directory.
  • Google Play: Fixed detection of playback status.
  • Google Play: Enable links to song downloading.
  • Updated translations.
  • Updated translations template.
  • Deezer: Fixed metadata and playback status parsing.

Install Nuvola Player 2.2:

Nuvola Player Stable PPA is ready. Press Ctrl+Alt+T on your keyboard to open terminal. When it opens, run below commands one by one to install it on your system:

sudo add-apt-repository ppa:nuvola-player-builders/stable

sudo apt-get update

sudo apt-get install nuvolaplayer nuvolaplayer-flashplugin

gnu emacsThis tutorial shows how to install the latest stable GNU Emacs (so far, it’s 24.3) in Ubuntu 13.04 Raring, Ubuntu 12.10, Ubuntu 12.04 Precise and their deviratives such as Linux Mint and Elementary OS Luna via PPA.

Highlights of Emacs 24.3 include:

  • Generalized variables are now in core Emacs Lisp.
  • An update for the Common Lisp emulation library.
  • A new major mode for Python.

There are many more changes; for a summary see the etc/NEWS file, which you can view from Emacs with `C-h n’.

Install / Upgrade Emacs 24.3 via PPA:

Press Ctrl+Alt+T on your keyboard to open terminal. When it opens, run below command to add the PPA:

sudo add-apt-repository ppa:cassou/emacs

Then update package lists on your system:

sudo apt-get update

After that, you can install or upgrade via synaptic package manager, which is available in Ubuntu Software Center. Or just run below command:

sudo apt-get install emacs24

Enjoy!

linux kernel logoThe first maintenance release for the 3.11 LTS has been released. All users of the 3.11 kernel series are urged to upgrade as soon as possible. Here’s how to do it in Ubuntu 13.10 Raring, Ubuntu 12.10 Quantal, Ubuntu 12.04 Precise and Linux Mint.

Except from a x86 fix and two sound enhancements, Linux kernel 3.11.1 introduces only updated drivers, including USB, hwmon, and iSCSI. See the official announement.

Install / Upgrade Kernel 3.11.1

The DEB packages are available in Kernel PPA. Press Ctrl+Alt+T on your keyboard to open terminal. When it opens, run below commands to download them:

for 32-bit system:

wget http://kernel.ubuntu.com/~kernel-ppa/mainline/v3.11.1-saucy/linux-headers-3.11.1-031101-generic_3.11.1-031101.201309141102_i386.deb

wget http://kernel.ubuntu.com/~kernel-ppa/mainline/v3.11.1-saucy/linux-headers-3.11.1-031101_3.11.1-031101.201309141102_all.deb

wget http://kernel.ubuntu.com/~kernel-ppa/mainline/v3.11.1-saucy/linux-image-3.11.1-031101-generic_3.11.1-031101.201309141102_i386.deb

for 64-bit system:

wget http://kernel.ubuntu.com/~kernel-ppa/mainline/v3.11.1-saucy/linux-headers-3.11.1-031101-generic_3.11.1-031101.201309141102_amd64.deb

wget http://kernel.ubuntu.com/~kernel-ppa/mainline/v3.11.1-saucy/linux-headers-3.11.1-031101_3.11.1-031101.201309141102_all.deb

wget http://kernel.ubuntu.com/~kernel-ppa/mainline/v3.11.1-saucy/linux-image-3.11.1-031101-generic_3.11.1-031101.201309141102_amd64.deb

Once downloaded, both 32-bit & 64-bit run below command to install them:

sudo dpkg -i linux-headers-3.11.1*.deb linux-image-3.11.1*.deb

(Optional) To remove this kernel, run below command:

sudo apt-get purge linux-image-3.11.1*

Kernel PPA: http://kernel.ubuntu.com/~kernel-ppa/mainline/

The latest Linux Kernel 3.10.12 LTS has been released. All users of the 3.10 kernel series must upgrade. Here’s how to install or upgrade in Ubuntu 13.04, Ubuntu 12.04, Ubuntu 12.10 and Linux Mint.

Linux Kernel 3.10.12 Ubuntu

Linux kernel 3.10.12 brings mostly networking fixes, especially for IPv4 and IPv6 protocols, and lots of updated or patched drivers, also networking related. See the official announcement.

Install / Upgrade Kernel 3.10.12

The Deb packages is available in Kernel PPA for Ubuntu based systems. Press Ctrl+Alt+T on your keyboard to open terminal. When it opens, run below commands to download the Debs:

for 32-bit system:

wget http://kernel.ubuntu.com/~kernel-ppa/mainline/v3.10.12-saucy/linux-headers-3.10.12-031012-generic_3.10.12-031012.201309141044_i386.deb

wget http://kernel.ubuntu.com/~kernel-ppa/mainline/v3.10.12-saucy/linux-headers-3.10.12-031012_3.10.12-031012.201309141044_all.deb

wget http://kernel.ubuntu.com/~kernel-ppa/mainline/v3.10.12-saucy/linux-image-3.10.12-031012-generic_3.10.12-031012.201309141044_i386.deb

for 64-bit system

wget http://kernel.ubuntu.com/~kernel-ppa/mainline/v3.10.12-saucy/linux-headers-3.10.12-031012-generic_3.10.12-031012.201309141044_amd64.deb

wget http://kernel.ubuntu.com/~kernel-ppa/mainline/v3.10.12-saucy/linux-headers-3.10.12-031012_3.10.12-031012.201309141044_all.deb

wget http://kernel.ubuntu.com/~kernel-ppa/mainline/v3.10.12-saucy/linux-image-3.10.12-031012-generic_3.10.12-031012.201309141044_amd64.deb

Then install them via:

sudo dpkg -i linux-headers-3.10.12-*.deb linux-image-3.10.12*.deb

Once installed, restart your computer.

Kernel PPA: http://kernel.ubuntu.com/~kernel-ppa/mainline/

The FFmpeg 2.0 has been released for months. If you don’t want to build it from source, now you can install in Ubuntu 13.10 Saucy, Ubuntu 13.04 Raring, and Ubuntu 12.10 Quantal via a PPA repository.

ffmpeg logo

As you may know, FFmpeg is a complete, cross-platform solution to record, convert and stream audio and video. It includes libavcodec – the leading audio/video codec library. Version 2.0 is a major release which brings FTP Protocol support and filter graph description readable from file just to name two. Read more at www.ffmpeg.org

Install FFmpeg 2.0 via PPA:

Press Ctrl+Alt+T on your keyboard to open terminal. When it opens, run below command to add the ppa:

sudo add-apt-repository ppa:samrog131/ppa

Then update package lists and install ffmpeg:

sudo apt-get update; sudo apt-get install ffmpeg

The PPA also contains other packages that you may not want. Remove the ppa after installation by:

sudo apt-add-repository --remove ppa:samrog131/ppa; sudo apt-get update

Enjoy!

hexchat logoHexChat is an IRC client based on XChat, it was originally called XChat-WDK. The latest HexChat 2.9.6 has been released with many improvements and bug fixes.

HexChat 2.9.6 expanded SASL support to include BLOWFISH and AES encryption and EXTERNAL for using client certs, added server-time support so bouncers like ZNC can print their playback and show native timestamps. See the ChangeLog:

  • redesign edit window in network list
  • rename favorites to autojoin
  • improve url detection yet again (this time w/ more ipv6!)
  • implement /exec -o on Windows
  • improvements to the dcc window
  • improvements to sysinfo on unix, including -e to print info instead of saying
  • add support for BLOWFISH, AES, and EXTERNAL SASL mechanisms
  • add reload command and button in plugingui
  • add support for server-time and znc.in/server-time[-iso] capabilities
  • add attributes to hook_print/server and emit_print for information such as server-time
  • add support for QuakeNet’s challangeauth
  • add chanopt for stripping colors
  • add copy option to banlist entries
  • add autoconnect option to context menu of networks
  • add option for omitting alerts while window is focused
  • add python3 support along with various bugfixes
  • add libcanberra support on unix
  • add tracking of users accounts
  • add %u to userlist popups for accounts
  • add channelkey to channel lists in plugin api
  • add MONITOR support for the friends list
  • add QUIET and UNQUIET commands
  • add support for the away-notify, account-notify, and extended-join capabilities
  • add notifications for friends away status (requires away-notify)
  • add events for quiet, unquiet, and quietlist
  • add Ctrl+N (New Server Window) keybinding
  • add ctrl+home/end keybinding for scrolling to top/bottom
  • add theme manager to unix build system
  • fix compilation on FreeBSD
  • fix running as root
  • fix splitting ctcps and notices
  • fix alerts and scrollback chanopts
  • fix crash when attaching/detaching tabs
  • fix sending limited channel messages (op messages) to the wrong tab
  • change /load -e to load from config dir
  • remove Ctrl+L (Clear Text) keybinding
  • remove custom sound applications
  • remove away announce, replaced by away-notify on supported servers. (alternative python script)
  • update network list

Install HexChat via PPA:

The PPA supports for Ubuntu 13.10 Saucy, Ubuntu 13.04 Raring, Ubuntu 12.10 Quantal, Ubuntu 12.04 Precise and their derivatives such as Linux Mint and Elementary OS.

Press Ctrl+Alt+T on your keyboard to open terminal. When it opens, run below command to add the PPA:

sudo add-apt-repository ppa:gwendal-lebihan-dev/hexchat-stable

Then update and install it:

sudo apt-get update; sudo apt-get install hexchat

Want to display a history of notifications on your Ubuntu desktop? Well, it’s easy to do it with an indicator called recent notifitions.

Recent Notifications is a GNOME applet that collects recent messages sent with libnotify to a notification daemon and display as an indicator applet on your panel.

notifications-history

This indicator works on Ubuntu 13.04, Ubuntu 12.10, Ubuntu 12.04, but not in Elementary OS because it uses Pantheon-notify.

Install Recent Notifications

Press Ctrl+Alt+T on your keyboard to open terminal. When it opens, run below command to add the PPA:

sudo add-apt-repository -y ppa:jconti/recent-notifications

After that, update and install the applet:

sudo apt-get update; sudo apt-get install indicator-notifications

You can download and install the .DEB package from launchpad page if you don’t want to add the ppa.

Once installed, log out and back in. You’ll see the icon on panel.

This simple tutorial will show you how to disable the mouse-over tooltip messages in Ubuntu 13.04 Raring and Ubuntu 13.10 Saucy using CCSM.

tooltip

It’s easy to do it using the CompizConfig Settings Manager by setting totally transparent tooltips. So that you can see them. NOTE: This method won’t work for the tooltips for Unity Launcher.

To get started, install CCSM in Ubuntu Software Center. You don’t have to do something special, just search for and install CompizConfig Settings Manager. Then you can open it from Unity Dash.

Open CCSM, click on ‘Opacity, Brightness and Saturation’ to go to its configuration page. Then enable this plugin, click new to add a rule, type in Tooltip and set the value to 0 and finally close it.

disable tooltips ubuntu

That’s it. To restore, just remove the rule in the plugin’s configuration page. Enjoy!

Have a HP printer connected with your Ubuntu machine? Well, here’s how to install HP Linux Printer Driver in Ubuntu 13.10 Saucy, Ubuntu 13.04 Raring, Linux Mint and Elementary OS.

HP Linux Printer Driver (HPLIP) is an HP developed solution for printing, scanning, and faxing with HP inkjet and laser based printers in Linux.

The HPLIP project provides printing support for over 2,080 printer models–including; Deskjet, Officejet, Photosmart, PSC (Print, Scan, Copy), Business Inkjet, LaserJet, Edgeline MFP, and LaserJet MFP.

hp logo

The latest HPLIP 3.13.9 added Support for the Following New Printers:

  • HP Designjet Z5400 44-in PostScript ePrinter
  • HP Deskjet Ink Advantage 1018 Printer
  • HP Deskjet Ink Advantage 1518 All-in-One Printer
  • HP Deskjet Ink Advantage 2540 All-in-One Printer Series
  • HP Deskjet Ink Advantage 2545 All-in-One Printer
  • HP Deskjet Ink Advantage 2546 All-in-One Printer
  • HP DeskJet Ink Advantage 4515 e-All-in-One Printer
  • HP DeskJet Ink Advantage 4518 e-All-in-One Printer
  • HP Envy 4504 e-All-in-One
  • HP LaserJet Pro MFP M435nw
  • HP Officejet 4630 e-All-in-One
  • HP Officejet 4632 e-All-in-One Printer
  • HP Officejet 4635 e-All-in-One Printer
  • HP OfficeJet Pro 8600 Premium e-AiO N911n
  • HP Photosmart 5521 e-All-in-One Printer

Download & Install HP Linux Printer Driver

Press Ctrl+Alt+T on your keyboard to open terminal. When it opens, run below command to download hplip 3.13.9:

cd ~/Downloads && wget http://prdownloads.sourceforge.net/hplip/hplip-3.13.9.run

Or you can check out the latest version on this page.

Once downloaded, execute command to start the installation:

sh ~/Downloads/hplip*.run

Answer the questions and wait for the installing process. It’ll properly install & configure the driver for your printer. When done, you can open the HP device manager from the panel indicator. Enjoy!