Archives For November 30, 1999

switch between Intel and Nvidia

For Ubuntu laptops with dual graphics cards, Intel graphics is being used by default. To get the best graphics performance for playing games or charting, you need to manually switch to NVIDIA graphics card.

This can be easily done after installing Nvidia graphics drivers and below steps will show you how:

1. Search for and launch “Additional Drivers” utility from Unity Dash.

additional drivers

2. When it opens, you can see a list of recommended drivers for your graphics cards:

additional-drivers1

3. Install NVIDIA proprietary driver as it shows by launching terminal (Ctrl+Alt+T) and run command:

sudo apt-get install nvidia-361

Replace nvidia-361, or just use nvidia-current instead and keep an eye on the installing process to make sure the installed driver is listed in above picture.

install-nvidia-361

You may also install Intel proprietary driver, which is not required:

sudo apt-get install intel-microcode

4. After installed graphics drivers, re-launch Additional Drivers utility and apply new installed drivers, so it looks like:

additional drivers

5. Finally switch graphics card by launching NVIDIA X Server Settings and select a GPU you want at PRIME Profiles tab.

Switch Graphics Card in Ubuntu

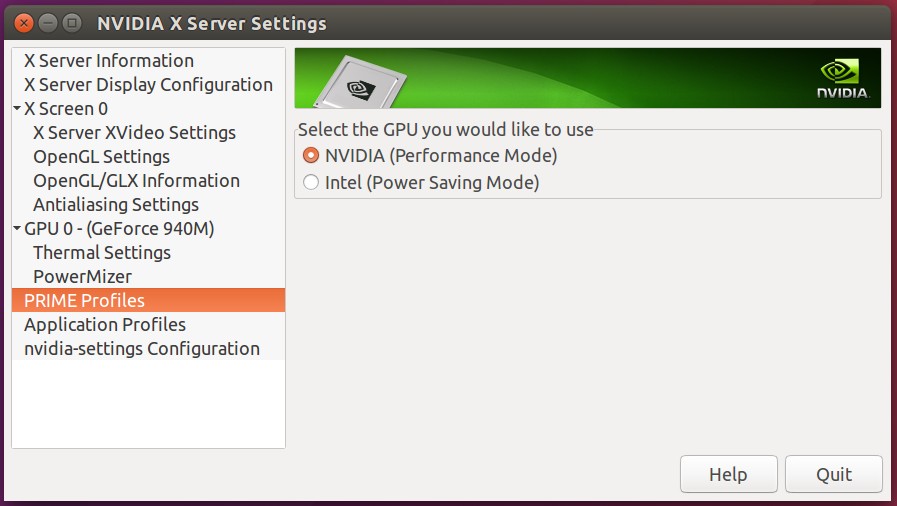
To apply changes, log out and back in.

Remove Guest Session

This is a quick guide for beginners that shows how to remove / disable the Guest account login from Ubuntu 16.04 Unity Greeter.

LightDM configuration files are located in /usr/share/lightdm and /etc/lightdm. Disabling Guest account can be easily done by adding a rule into one of the two directories. And below I made a change in /etc/lightdm:

1. Open terminal from Unity Dash, or via Ctrl+Alt+T combination key.

When it opens, paste below command and run to create a sub folder:

sudo mkdir /etc/lightdm/lightdm.conf.d

lightdmconf

Type in your password (no visual feedback on typing) when it asks and hit Enter to continue.

2. Running below command to create a “50-no-guest.conf” file under this folder and write the rule allow-guest=false.

sudo sh -c 'printf "[SeatDefaults]\nallow-guest=false\n" > /etc/lightdm/lightdm.conf.d/50-no-guest.conf'

allow-guest

Now restart your computer and the Guest session disappeared.

Guest Session Removed

3. To revert the changes, just remove the configuration file via command:

sudo rm /etc/lightdm/lightdm.conf.d/50-no-guest.conf

That’s it. Enjoy!

Grub Customizer

Grub Customizer, a graphical configuration tool for Grub and BURG boot-loader, has recently reached the 5.0.x series with Ubuntu 16.04 support and a few fixes.

Grub Customizer provides a graphical interface to make it easy to:

  • create, move, remove, edit Grub menu entries
  • set default OS
  • show or hide Grub menu and change the time delay.
  • change background image, resolution, fonts, etc.
  • install Grub boot-loader to Windows’ MBR, and more.
Grub Customizer, edit menu entries

Grub Customizer, edit menu entries

Grub Customizer General Settings

Grub Customizer General Settings

grub customizer theme settings

grub customizer theme settings

How to Install Grub-Customizer in Ubuntu 16.04:

This open-source application is available in the developer’s PPA repository for all current Ubuntu releases and their derivatives.

Install Grub Customizer and receive future updates via Software Updater:

1. Open terminal from App Launcher or via Ctrl+Alt+T keys. When it opens, paste below command to add PPA:

sudo add-apt-repository ppa:danielrichter2007/grub-customizer

Type in password (no visual feedback when typing password) when it asks and hit Enter to continue.

Grub Customizer PPA

2. Then update package lists and install the software:

sudo apt-get update

sudo apt-get install grub-customizer

Get Grub-Customizer installer directly from PPA packages page:

For those who don’t want to add PPA, grab the .deb package for your system and click install via Software Center.

Grub Customizer PPA Package Page

download-grubcustomizer

(Optional) To remove Grub Customizer, use Synaptic Package Manager or run command in terminal:

sudo apt-get remove grub-customizer

Ubuntu 16.04 Xenial Xerus

Want to try the new Ubuntu 16.04 LTS? Here’s how to upgrade to Ubuntu 16.04 Beta 2 from your Ubuntu 15.10 desktop. You can then update to the final release a few weeks after, on April 21st.

NOTE:

1. This beta has numbers of bugs, don’t do this and wait for the final release if you want a stable system.

2. DON’T upgrade from Ubuntu 14.04 LTS. There’s a known bug upgrading from 14.04.

Preparation:

1. Always first backup your bookmarks, documents, and other data.

2. If you have the proprietary video driver installed, uninstall it and switch back to the open-source driver.

For Nvidia, depends on how you installed the driver, use the official .run from Nvidia website via --uninstall option:

sudo ./NVIDIA-Linux-x86_64-xx.xx.run --uninstall

or remove nvidia-current via command:

sudo apt-get purge nvidia-current

You may also re-install the open-source driver via PPA:

sudo apt-get install xserver-xorg-video-nouveau && sudo rm /etc/X11/xorg.conf

3. Remove/Disable third-party PPAs by going to Software & Updates -> Other Software tab.

Disable  Remove PPAs

4. In Updates tab, enable Proposed repository:

Enable Proposed repository

Upgrade Ubuntu:

1. Open terminal (Ctrl+Alt+T) and update your system by running below command:

sudo apt-get update && sudo apt-get dist-upgrade

Type in your password (no visual feedback when typing) when it asks and hit Enter to continue.

You may need to restart your computer to complete installing updates.

2. Once your system is up to date. Launch Software Updater with -d option, so it checks if upgrading to the latest devel release is possible:

sudo update-manager -d

After checking for updates, it prompts that Ubuntu 16.04 LTS is available.

upgrade-ubuntu1604

3. Click Upgrade and confirm in next window to start the upgrade process. At the end you’ll be prompted to restart your computer if everything goes well.

Tip: Once Ubuntu 16.04 final is released, run commands in step 1 to update this beta to the final release.

Ubuntu 16.04 Xenial Xerus

Finally the default Unity Desktop’s left launcher panel can be moved to the bottom of screen in Ubuntu 16.04 LTS Xenial Xerus.

Ubuntu 16.04 has reached its final beta today. One of the great new features is that the left launcher panel now is movable: to Left or to Bottom.

Unity Launcher in Left

Unity Launcher in Left

Unity Launcher in Bottom

Unity Launcher in Bottom

How to Move Unity Launcher in Ubuntu 16.04:

For those prefer Linux commands, this can be done via a single command in terminal:

gsettings set com.canonical.Unity.Launcher launcher-position Bottom

gsettings-launcher-position

To revert back, run:

gsettings set com.canonical.Unity.Launcher launcher-position Left

For graphical way, do:

Unity Tweak Tool, a graphical configuration tool for Unity desktop, now has an option to move the Unity Launcher. Install it via Gnome Software, launch the tool and navigate to Unity -> Launcher:

move unity launcher via unity tweak tool

1. Launch Gnome Software from Launcher, search for and install dconf editor.

dconf-editor-gnomesoftware

2. Launch dconf editor after installation, and navigate to “com -> canonical -> unity -> launcher”. Finally change the value of “launcher-position” to select Unity Launcher position.

launcher-position

To make the bottom panel fit your screen, go to System Settings -> Appearance and change the value of Launcher icon size.

Ubuntu 16.04 Xenial Xerus

The final beta of Ubuntu 16.04 LTS, codenamed “Xenial Xerus”, has been released today!

The beta release features images for not only the Ubuntu Desktop, Server, Cloud, and Core products, but also the Kubuntu, Lubuntu, Mythbuntu, Ubuntu GNOME, Ubuntu Kylin, Ubuntu MATE, Ubuntu Studio, and Xubuntu flavours.

Ubuntu 16.04 LTS

New Features in Ubuntu 16.04 LTS:

  • based on Linux Kernel 4.4
  • python has been upgraded to the 3.5 series
  • golang toolchain was upgraded to the 1.6 series, and gcc-go was upgraded to the GCC6 branch.
  • includes a new port to 64-bit z/Architecture for IBM mainframe computers.
  • GNOME is mostly upgraded to 3.18. GLib upgraded to to 2.48 (corresponding to GNOME 3.20)
  • Ubuntu Software Center is replaced by Gnome Software.
  • Improved HiDPI support
  • Unity online searches disabled by default.
  • Unity Launcher can be moved to bottom
  • Chromium 48, Firefox 45, LibreOffice 5.1
  • See the release note for more

There is, however, one bug in this beta serious, and will be fixed before release:

In some cases, attempts to install to a hard drive that already contains a swap partition may fail in the partitioning phase. If you encounter this, the simplest workaround is to boot to the live session, start a terminal (Ctrl-Alt-T) and type “sudo swapoff -a”. You can then start the installation from the icon on the desktop and it should proceed successfully.

Download Ubuntu 16.04 Beta 2:

  • Ubuntu Desktop and Server: releases.ubuntu.com/16.04/
  • Cloud Images: cloud-images.ubuntu.com/releases/16.04/
  • Core: cdimage.ubuntu.com/ubuntu-core/releases/16.04/
  • Flavors and others: http://cdimage.ubuntu.com/
  • The final release of Ubuntu 16.04 LTS expected on April 21st, 2016.

    via: fridge.ubuntu.com

    Spotify Client for Linux

    Linux Spotify client 1.x finally goes stable! The stable Linux repository added support for Ubuntu 16.04 LTS, and Ubuntu 15.10.

    Due to lack of developers working on the Linux client, Spotify 1.x takes 9 months of development to be made into stable repository,

    In June 2015 we released version 1.x of the client for Linux in the testing repository.

    The intention was to fix a few of the bigger issues and then quickly move this to stable. That never happened, since after September, we have had no developers working on the linux client. There are still lots of problem with this version of the client for linux, but we are now seeing much more problems with the old client.

    Read the community announcement for more details.

    Spotify Client 1.0.24

    How to Install Spotify Client 1.x in Ubuntu:

    The client now is available for all current Ubuntu releases. Ubuntu 16.04 and Ubuntu 15.10 does not longer need to manually install the libgcrypt11 library.

    If you’ve the testing repository added in your system, disable/remove it first via Software & Updates -> Other Software tab.

    1. Launch terminal from App Launcher, or via Ctrl+Alt+T shortcut key. When it opens, paste below command and run to add the stable Spotify repository for Linux:

    echo deb http://repository.spotify.com stable non-free | sudo tee /etc/apt/sources.list.d/spotify.list

    Stable Spotify Repository for Linux

    Type in your password (no visual feedback when typing) when it asks and hit Enter.

    2. Add the key so that your Ubuntu will trust the packages from that repository:

    sudo apt-key adv --keyserver hkp://keyserver.ubuntu.com:80 --recv-keys BBEBDCB318AD50EC6865090613B00F1FD2C19886

    3. Finally install the client via Synaptic Package Manager (after clicked Refresh button), or by running below commands in terminal one by one:

    sudo apt-get update
    
    sudo apt-get install spotify-client

    Ubuntu 16.04 Xenial Xerus

    The default desktop wallpaper for Ubuntu 16.04 Xenial Xerus, the next LTS release, has been unveiled. Grayscale versions are in progress.

    The new default wallpapers from Grazina in the design team looks not all that different from the previous 15.10 and 15.04’s wallpapers.

    Ubuntu 16.04 default wallpaper

    Ubuntu 16.04 default wallpaper

    Here are the default wallpapers for Ubuntu 15.10 and Ubuntu 15.04:

    Ubuntu 15.10 default wallpaper

    Ubuntu 15.10 default wallpaper

    Ubuntu 15.04 default wallpaper

    Ubuntu 15.04 default wallpaper

    Download the wallpapers from link below:

    Ubuntu 16.04 Default Wallpaper

    Ubuntu 16.04

    Ubuntu 16.04 Xenial Xerus, the next LTS (Long-Term Support) release, has reached the first Beta release. Features image for opt-in flavors: Lubuntu, Ubuntu Cloud, Ubuntu GNOME, Ubuntu MATE, UbuntuKylin, Ubuntu Studio and Xubuntu.

    Beta 1 includes the Linux Kernel 4.4 (final release will ship with this kernel) and a number of software updates. As an Beta pre-release, it is only recommended for developers and those who want to test by finding, reporting, and/or fixing bugs.

    Ubuntu 16.04 LTS

    Release Highlights:

    Ubuntu Gnome:

    • GNOME Shell 3.18
    • GNOME Software has replaced Ubuntu Software Center
    • Experimental wayland session available

    Xubuntu 16.04:

    • won’t have a default media manager installed

    Ubuntu Kylin:

    • Kylin style lightdm greeter based on unity-greeter

    Download Ubuntu 16.04 Beta 1:

    For a reminder of upcoming Ubuntu 16.04 release dates see the table:

    March 24th Final Beta
    April 14th FinalFreeze, ReleaseCandidate
    April 21st Final release of Ubuntu 16.04

    via: fridge.ubuntu.com

    Ubuntu 16.04 Xenial

    The second alpha of Ubuntu 16.04 Xenial Xerus LTS has been announced one day after its scheduled release date. This release features images for Lubuntu, Ubuntu MATE, Ubuntu Kylin and the Ubuntu Cloud images.

    This Xenial Xerus snapshot includes the v4.3 kernel. 16.04 will ship with the 4.4 kernel which is available for testing. As an alpha pre-release, it is only recommended for developers and those who want to test by finding, reporting, and/or fixing bugs.

    xerus

    Download links:

    For a reminder of upcoming Ubuntu release dates see the table:

    February 25th Beta 1 (for opt-in flavors)
    March 24th Final Beta
    April 14th FinalFreeze, ReleaseCandidate
    April 21st Final release of Ubuntu 16.04

    via: fridge.ubuntu.com