Archives For November 30, 1999

This tutorial shows you how to install the most recent Rubyripper on Ubuntu 22.04, Ubuntu 20.04, and Linux Mint 21.

Rubyripper is a secure audiodisc ripper for Linux and macOS. It uses cdparanoia in a sophisticated way to make sure that a CD rip is done successfully and accurately. It is very similar to and inspired by EAC. Rubyripper is written in the ruby programming language.

Install RubyRipper in Ubuntu via PPA

Besides building the app from source code, there’s an Ubuntu PPA that so far contains the app packages for Ubuntu 23.10, Ubuntu 22.04, Ubuntu 20.04, and even Ubuntu 18.04.

1. To add the PPA, press Ctrl+Alt+T on keyboard to open up a terminal window. Then run command:

sudo add-apt-repository ppa:alex-p/rubyripper-daily

Type user password (no asterisk feedback) when it asks and hit Enter to continue.

2. Then, refresh system package cache, though it should be done automatically in current Ubuntu releases.

sudo apt update

3. Finally, run command to install the app from PPA:

sudo apt install rubyripper

Once installed, search for and launch it from either start menu or overview screen depends on your desktop environment, and enjoy!

Uninstall Rubyripper

To uninstall the app package, open terminal (Ctrl+Alt+T) and run command:

sudo apt remove --autoremove rubyripper

Also remove the Ubuntu PPA by running command:

sudo add-apt-repository ppa:alex-p/rubyripper-daily

Finally refresh cache via sudo apt update command if it’s not done automatically.

This tutorial shows you how to install ClipGrab video downloader and converter on Ubuntu 13.04, 12.10, 12.04, 10.04 & Linux Mint via PPA.

ClipGrab is a free downloader and converter for YouTube, Vimeo, Metacafe, Dailymotion and many other online video sites. It converts downloaded videos to MPEG4, MP3 or other formats in just one easy step.

It supports HTTP and Socks5 proxy.

Clipgrab

The PPA does not support Ubuntu 14.04 so far, you can grab the .deb directly from ubuntuupdates.com. Remember to install libav-tools to get HD 1080p support.

To install this utility, press Ctrl+Alt+T to open terminal, then follow the below steps:

1.) Run this command to add the ppa repository to your system:

sudo add-apt-repository ppa:clipgrab-team/ppa

2.) Update the package lists to make it available:

sudo apt-get update

3.) Finally install it via:

sudo apt-get install clipgrab

The ClipGrab website also provides non-install version for Linux, just download, extract and make it executable in file’s Properties, finally click to run.

NOTE: PeerGuardian is NO LONGER updated since 2016. This tutorial only works in old Ubuntu 16.04 and earlier.

In this tutorial I’ll show you how to install the PeerGuardian Linux (pgl) on Ubuntu 16.04 Xenial, Ubuntu 14.04 Trusty, 12.04 Precise using ppa repository.

PeerGuardian Linux (pgl) is a privacy oriented firewall application. It blocks connections to and from hosts specified in huge blocklists (thousands or millions of IP ranges). Its origin seeds in targeting aggressive IPs while you use P2P.

peerGuardian

PeerGuardian Linux is actively developed. However the team is very small and with few spare time. Contributors are welcome! Check out http://peerguardian.sourceforge.net.

A ppa repository has been created to make it easy to install for Ubuntu and Linux Mint users. Press Ctrl+Alt+T to open terminal, then follow the below steps:

1.) Run this command in terminal to add the ppa repository:

sudo add-apt-repository ppa:jre-phoenix/ppa

2.) Update the package lists to make it available:

sudo apt-get update

3.) Finally instal it:

sudo apt-get install pgld pglcmd pglgui

google_talk_large

This brief tutorial is going to show you how to install Google Talk plugin on Ubuntu 13.10, 13.04, 12.10, 12.04 from the official repository.

Update: This Tutorial is outdated, and does NOT work anymore!

Google Talk is browser plugin that allows you to make a voice and video chat with your friends via your webcam and microphone connected to the computer.

To get started, press Ctrl+Alt+T to open terminal, then follow the steps below:

1.) Run this command to add the official repository:

sudo sh -c 'echo "deb http://dl.google.com/linux/talkplugin/deb/ stable main" >> /etc/apt/sources.list.d/google-talkplugin.list'

2.) Download and install the key:

wget -q -O - https://dl-ssl.google.com/linux/linux_signing_key.pub | sudo apt-key add -

3.) Update the package lists to make it available:

sudo apt-get update

4.) Finally install the plugin via Synaptic Package Manager, or by this command:

sudo apt-get install google-talkplugin

That’s it. Enjoy!

Canon Drivers for Ubuntu and Linux Mint

Last updated: December 8, 2014

In this tutorial I’ll show you how to install official drivers of commonly used Canon Printers on Ubuntu 13.04, 12.10, 12.04, and Linux Mint.

There’s a ppa repository that provides the official drivers of Canon printers and multifunction devices which are not available on Canon’s website.

The supported Canon printers include:

  • bjf9000, bjf900, bjs300, bjs500, bjs700 series
  • e500, e510, e600, e610 series
  • i250, i255, i550, i560, i850, i860, i950, i990 series
  • ip100, ip1800, ip1900, ip2200, ip2500, ip2600, ip2700, ip3000, ip3300, ip3500, ip3600, ip4000, ip4200, ip4300, ip4500, ip4600, ip4700, ip4800, ip4900, ip5000, ip5200, ip6600, ip7200, ip7500, ip8500, ip90 series
    ix6500 series
  • mg2100, mg2200, mg3100, mg3200, mg4100, mg4200, mg5100, mg5200, mg5300, mg5400, mg6100, mg6200, mg6300, mg8100, mg8200 series.
  • mp140, mp160, mp190, mp210, mp230, mp240, mp250, mp270, mp280, mp490, mp495, mp500, mp510, mp520, mp540, mp550, mp560, mp600, mp610, mp620, mp630, mp640, mp750, mp780 series.
  • mx320, mx330, mx340, mx350, mx360, mx370, mx390, mx410, mx420, mx430, mx450, mx510, mx520, mx710, mx720, mx860, mx870, mx880, mx890, mx920 series.
  • pixmaip1000, pixmaip1500 series.
  • pixus250, pixus255, pixus550, pixus560, pixus850, pixus860, pixus950, pixus990 series
  • pixusip3100, pixusip4100, pixusip8600 series

To install the drivers:

Make sure to disconnect the Canon printer from your computer first. Press Ctrl+Alt+T to open terminal, copy and paste this command and run to add the ppa:

sudo add-apt-repository ppa:michael-gruz/canon-stable

update: For Ubuntu 14.04 and Ubuntu 13.10, please use the daily PPA (only cnijfilter-xxxseries packages available):

update 2: For Ubuntu 14.04 users, below PPA miss the packages for ScanGear MP, see this guide.

sudo add-apt-repository ppa:michael-gruz/canon-trunk

Then update:

sudo apt-get update

Install Synaptic Package Manager from Ubuntu Software Center, then open it.

Then search for and install cndrvcups-common to install Common Modules, search cnijfilter and find your driver to install. Also search and install scangearmp to install ScanGear MP.

Canon-drivers-Synaptic

Once installed, connect your printer to the computer. Your printer will be automatically detected by Ubuntu.

Change Date and Time on Ubuntu 24.04 Server

Last updated: April 22, 2024

time

This simple tutorial is going to show Ubuntu beginners how to display and change date and time on Ubuntu Linux both Server and Desktop.

UPDATE: The commands in this tutorial are tested and also works in Ubuntu 24.04.

To display data and time, use date command:

date

Sample output:

Wed Jul 3 20:59:28 CST 2013

To display calendar, use cal command:

cal

If the command not found, run sudo apt install ncal to install it.

Sample output:

July 2013
Su Mo Tu We Th Fr Sa
1 2 3 4 5 6
7 8 9 10 11 12 13
14 15 16 17 18 19 20
21 22 23 24 25 26 27
28 29 30 31

To change date and time, use command:

sudo date -s "4 June 2020 18:00:00"

NOTE: your Ubuntu server may enabled network time synchronization. The command above will NOT work until you disable it by using command:

sudo timedatectl set-ntp no

To re-enable network time synchronization, run command:

sudo timedatectl set-ntp yes

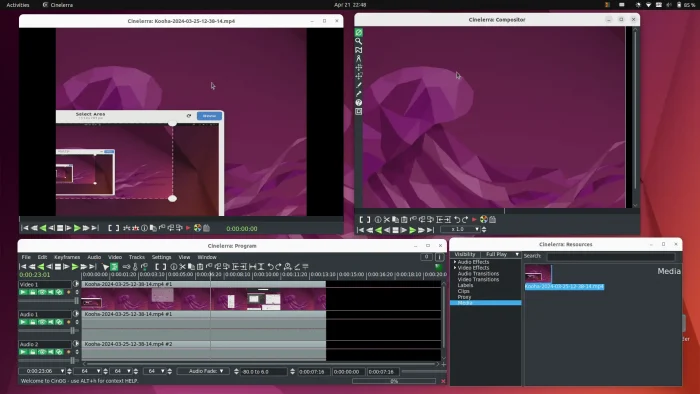
This tutorial shows how to install Cinelerra video editor in current Ubuntu 22.04 and Ubuntu 24.04.

Cinelerra is a free open-source video editor for Linux. It supports advanced composition operations such as keying and mattes, and many other professional functions depending on the variant.

Cinelerra has a few variants, including GG, CV, HV. The GG variant, which supports up to 8K video, and can also create DVDs and Blu-rays, is presently under active development and the only one that works in my case in current Ubuntu releases.

Download & Install Cinelerra GG

The GG edition now provides the official binary package for AppImage package.

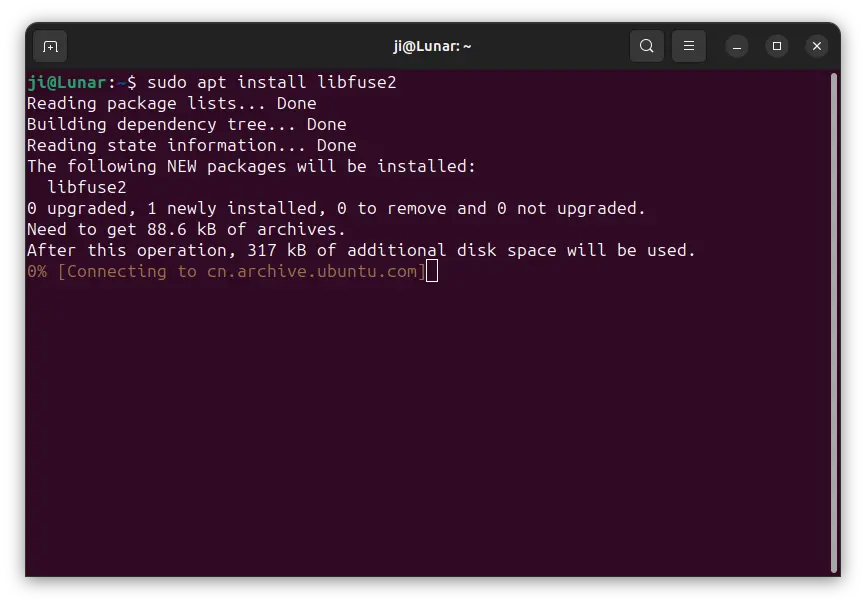
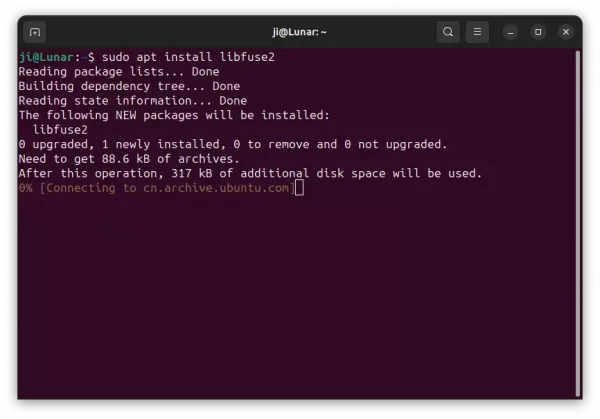
1. Ubuntu does not support AppImage out-of-the-box since 22.04. To enable it, press Ctrl+Alt+T on keyboard to open terminal, then run command:

sudo apt install libfuse2

2. Then, select download the latest version of the AppImage from its website:

Scroll down in that page and click download the latest package. At the moment of writing, it’s “CinGG-20240229-x86_64.AppImage” (for modern Intel/AMD CPUs).

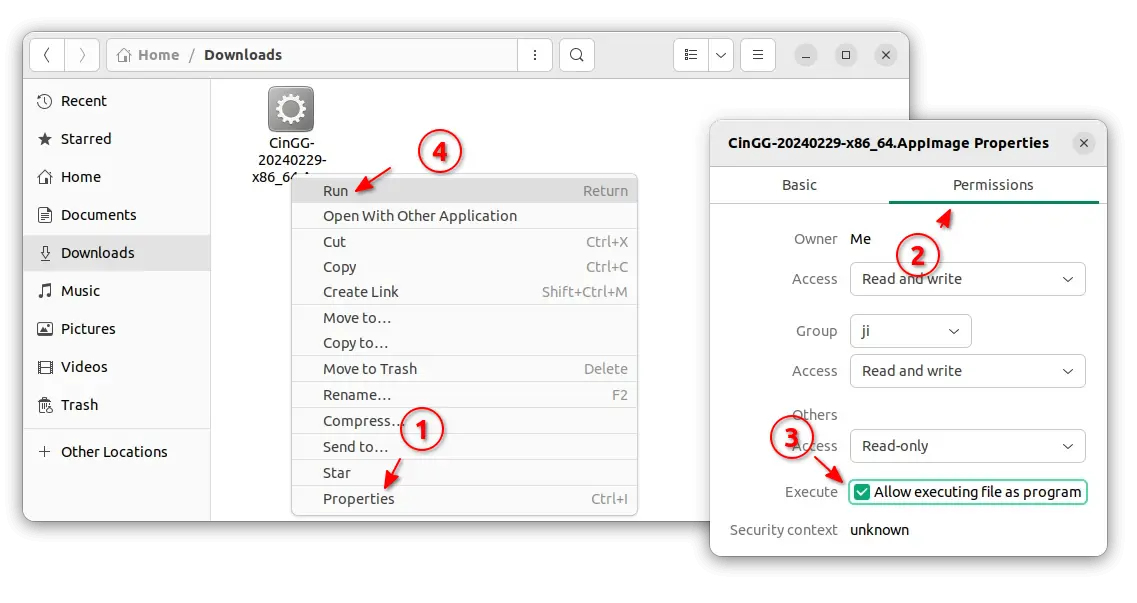
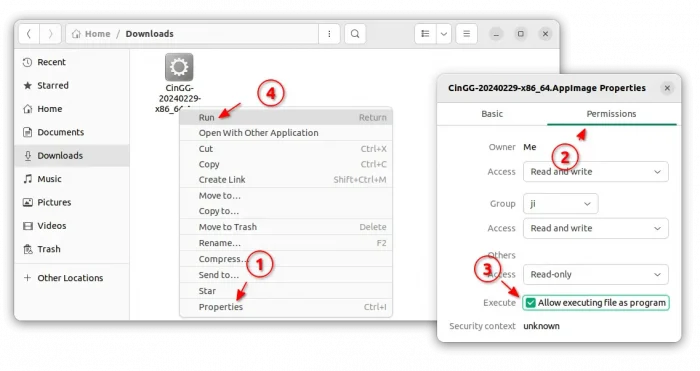
3. After downloaded the package, right-click on it in file manager, then click go to its “Properties” dialog.

Next, navigate to Permissions tab and click enable “Allow executing file as program”. Finally, click Run the AppImage file to launch the video editor:

4. Create an App icon for Cinelerra.

If you want to launch the video editor from start menu or Gnome ‘Show Apps’ screen just like other normal apps. Then, click launch text editor first.

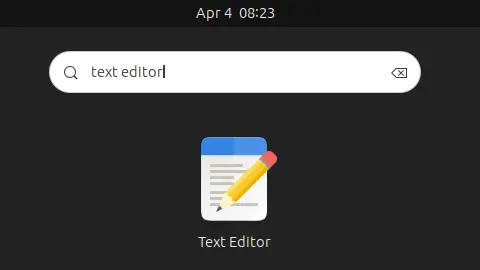
When text editor opens, create a new empty file (if it does not open a new one), then write following lines into it:

[Desktop Entry]
Name=Cinelerra GG
Comment=MultiMedia Editor
Categories=AudioVideo;AudioVideoEditing;
Encoding=UTF-8
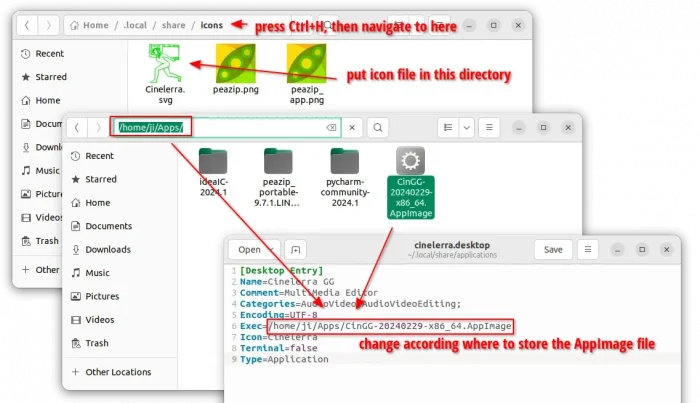
Exec=/home/ji/Apps/CinGG-20240229-x86_64.AppImage
Icon=Cinelerra
Terminal=false
Type=Application

IMPORTANT: In the lines above, you need to replace the value for “Exec”! In my case, I moved the AppImage file into my custom “Apps” folder in user home. So, it’s “/home/username/Apps/file-name.AppImage”. You have to change it to yours!

And for icon, you need to download one from web. Either .png or .svg file. Re-name to Cinelerra.png (or Cinelerra.svg depends on image type), and put it to “.local/share/icons” directory.

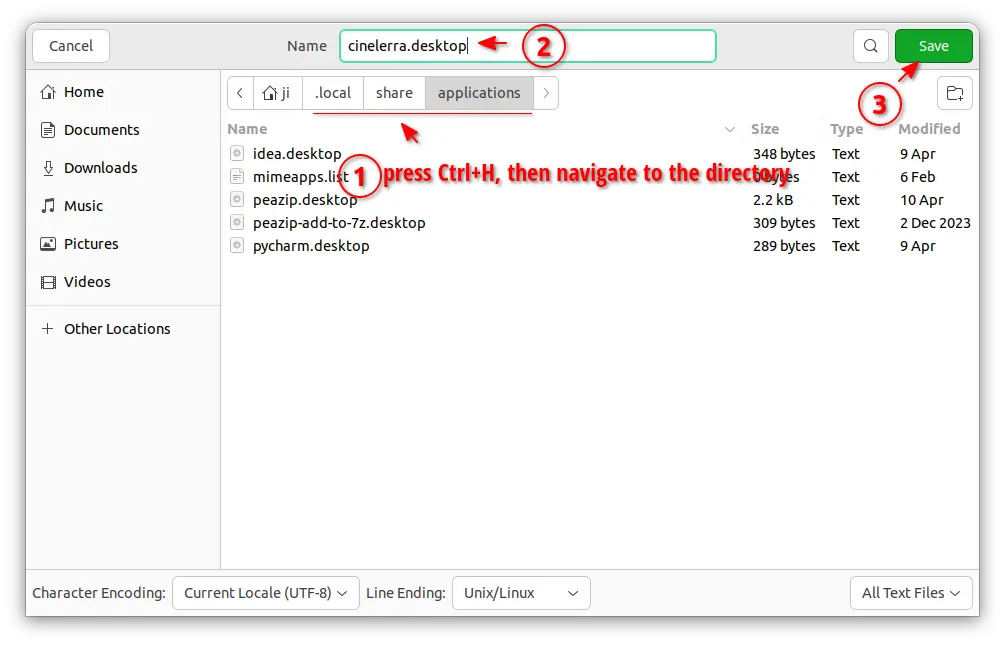
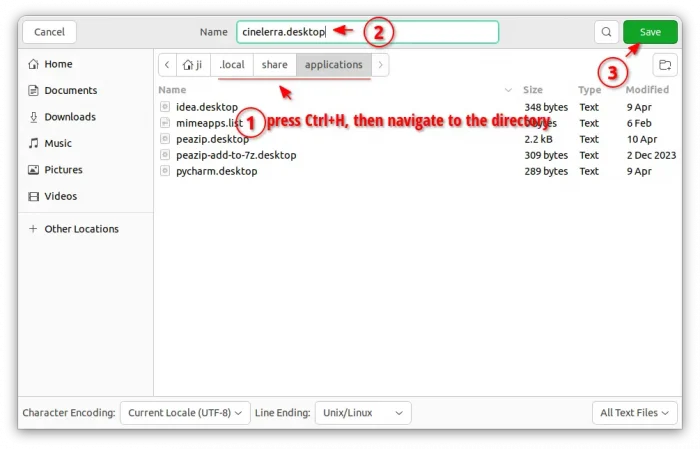
When done editing the text file, click “save” (or save as), then select save the file to .local/share/applications directory, whatever name as you want with “.desktop” extension.

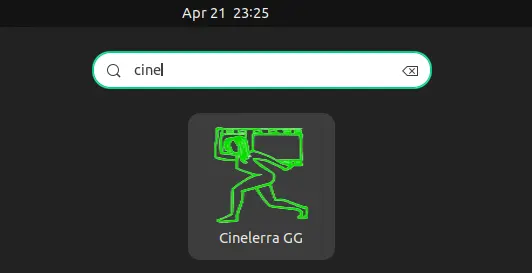
If everything’s done properly, you’re able to search for and launch the video editor from menu a few moments later.

Uninstall Cinelerra GG

To uninstall the video editor, just delete the .AppImage file from your file manager. Then, also remove the .desktop file from ‘.local/share/applications’ directory, as well as the icon file from ‘.local/share/icons’.

How to Install WordPress on Ubuntu Server

Last updated: April 22, 2024

Wordpress
Already installed LAMP or LEMP (Nginx with PHP, Mysql) on your Ubuntu Server? This time I’m going to show you how to install WordPress CMS.

WordPress is a popular blogging tool and a content management system (CMS) based on PHP and MySQL. It’s free and open-source.

To install WordPress, first login your Ubuntu Server as root, then follow the steps below:

1.) Create Mysql Database and User for WordPress.

    • First log into Mysql as root user:
      mysql -u root -p

Type in the root password to get past.

  • Create a database. Change database-name in code to whatever you want.
    CREATE DATABASE database-name;
  • Create an user. Change database-user in code to whatever you want.
    CREATE USER database-user@localhost;
  • Give a password to the user just created. Change password-here in code.
    SET PASSWORD FOR database-user@localhost= PASSWORD("password-here");
  • Grant all privileges to the new user.
    GRANT ALL PRIVILEGES ON database-name.* TO database-user@localhost IDENTIFIED BY 'password-here';
  • f.) Finally, refresh Mysql:
    FLUSH PRIVILEGES;
  • g.) Exit Mysql sell
    exit

2.) Download WordPress and setup the configuration.

  • Download the latest wordpress:
    wget http://wordpress.org/latest.tar.gz

    Then extract:

    tar -xzvf latest.tar.gz
  • Copy the sample configuration file to make a backup.
    cd wordpress && cp wp-config-sample.php wp-config.php
  • Edit the configuration file:
    vi wp-config.php

    Press I to start editing, Esc to stop editing. Press :, then type wq to save and exit, type q! to exit without save.

    Then change the section of database-name, database-user, password-here.

    // ** MySQL settings – You can get this info from your web host ** //
    /** The name of the database for WordPress */
    define(‘DB_NAME’, ‘database-name’);

    /** MySQL database username */
    define(‘DB_USER’, ‘database-user’);

    /** MySQL database password */
    define(‘DB_PASSWORD’, ‘password-here’);

3.) Setup the permissions.

    • Give ownership of the directory to the apache or nginx user by running following commands one by one:
sudo rsync -avP ~/wordpress/ /var/www/
cd /var/www/
sudo chown www-data:www-data * -R 
sudo usermod -a -G www-data username

4.) Finally in your browser go to IP or domain/wp-admin/install.php and start installing.

Enjoy!

Want to build a website? Then you need to setup a web server! Here I’ll show you how to install and setup LAMP pack on Ubuntu 12.04 LTS Server.

LAMP is a combination of Linux (OS), Apache HTTP Server, PHP (open-source scripting language), and MySQL (database software).

In this tutorial I use the hostname www.example.com with the IP address 192.168.0.100 as example.

1.) Login or Remote access your server as root, or run command to get root privileges.

sudo su

2.) Install Mysql:

apt-get install mysql-server mysql-client

You’ll be asked to set a password for root user of Mysql.

3.) Install Apache2:

apt-get install apache2

After installed, test if it works by going to http://192.168.0.100 in your web browser. Remember change the IP to yours.

apache-wellcome-page

The default default document root is /var/www/, and the configuration file is /etc/apache2/apache2.conf.

4.) Install PHP5:

apt-get install php libapache2-mod-php

Restart Apache2 service to get it works with PHP:

systemctl restart apache2

5.) To test if PHP works, create info.php in the root directory “/var/www/”:

nano /var/www/info.php

Then insert following lines:

<?php
phpinfo();
?>

Then press Ctrl+S to save file and Ctrl+X to exit. Then in browser go to http://192.168.0.100:info.php (replace ip to yours)

Phpinfo

6.) To get Mysql support in PHP, install following packages:

apt-get install php-mysql php-curl php-gd php-intl php-pear php-imagick php-imap php-memcache php-ps php-pspell php-snmp php-sqlite3 php-tidy php-xmlrpc php-xsl

Then restart Apache2 service:

systemctl restart apache2

Go to or reload http://192.168.0.100/info.php in your browser:

Mysql-support-in-php5

7.) (Optional) Install phpMyAdmin, a web interface to manage Mysql Databases:

apt-get install phpmyadmin

After installed, go to http://192.168.0.100/phpmyadmin/, login with root and password you set in step 2.