Archives For September 30, 2013

This tutorial shows you how to customize your Elementary OS top panel, including background color and transparency, auto hide panel, and show or hide Applications launcher.

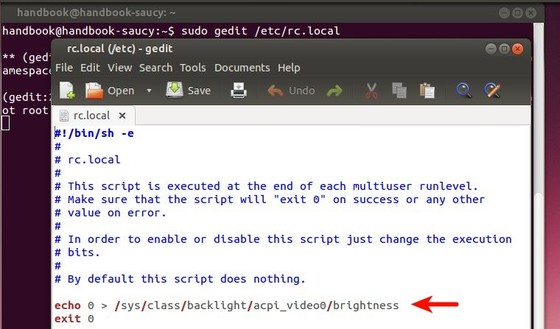
To get started, press Ctrl+Alt+T on your keyboard to open terminal. When it opens, run command to edit the /usr/share/themes/elementary/gtk-3.0/app.css:

sudo scratch-text-editor /usr/share/themes/elementary/gtk-3.0/apps.css

eos panel config file

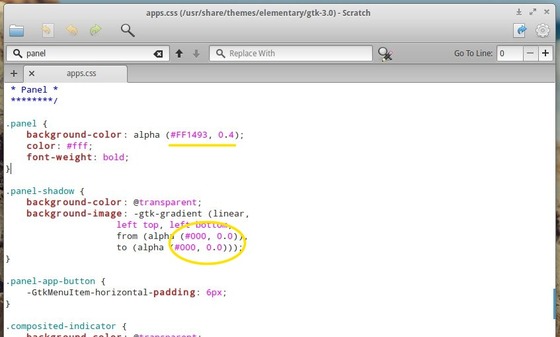
There you can change the value of panel background color and transparency as well as other colors, include Noise, Terminal, Notify, and more.

To apply changes, run:

pkill wingpanel

To get slim wingpanel, run command below in terminal:

sudo apt-get install wingpanel-slim elementary-tweaks

Then go to System Settings -> Tweaks -> Wingpanel Slim, there you can enable slim wingpanel, auto-hide panel, show / hide launcher.

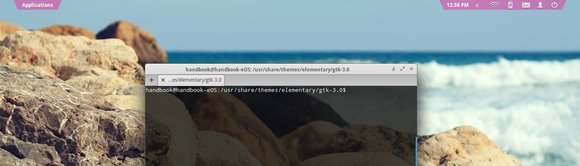
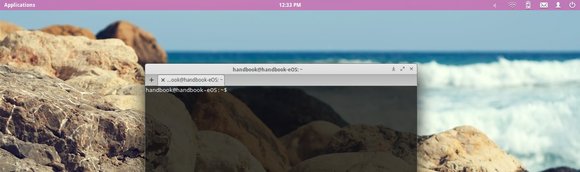
Finally, my panel looks like:

As your may know, every time Ubuntu boots up you get the maximum level of screen brightness on laptop. Here’s a way to save your brightness by adding a startup script which will automatically adjust screen brightness when Ubuntu boots up.

Tutorial Objectives:

  • Save your screen brightness in Ubuntu 13.10
  • Enjoy!

To get started, press Ctrl+Alt+T on your keyboard to open terminal. When it opens, run commands below:

cat /sys/class/backlight/acpi_video0/max_brightness

It outputs the maximum level of your laptop backlight. Mine is 9. The minimum is 0.

Run command below to edit the /etc/rc.local file, which is a script executed at the end of each multiuser runlevel.

sudo gedit /etc/rc.local

Add following before the last line. Change 0 to the brightness level as you want (from 0 to the max)

echo 0 > /sys/class/backlight/acpi_video0/brightness

Want to convert .gpx files to .dxf? Well, there’s an Nautilus extension which adds an option in your file browser’s context menu to make it easy to convert from gpx file format to dxf.

It is gpx2dxf. The developer has create a PPA to make it easy to install in Ubuntu 13.10 Saucy, Ubuntu 13.04 Raring, Ubuntu 12.04 Precise, Ubuntu 12.10 Quantal, Linux Mint 13/14/15/16 and other Ubuntu derivatives.

To get started installing this extension, press Ctrl+Alt+T on your keyboard to open terminal. When it opens, run command to add the PPA:

sudo add-apt-repository ppa:atareao/nautilus-extensions

Then you can install it after checking for updates, run:

sudo apt-get update; sudo apt-get install gpx2dxf

Once installed, restart Nautilus by command nautilus -q to apply the changes.

If you don’t want to add the PPA, download the DEB or source tarball from the launchpad page.

Install Picapy, Picasa Web App in Ubuntu 13.10

Last updated: October 23, 2013

Picapy is a Desktop App to manage your Picasa Web photos without opening a browser or installing Google’s Picasa Photo editor.

It works just like a file browser. Once logged in, you’re presented with a window displaying your Picasa Web albums. There you can add, edit or delete folders to your choosing. To edit/remove more than one folder use CTRL+Click.

Install picasa via PPA:

The developer has created a PPA to make it easy to install in Ubuntu and its derivatives. So far, the PPA supports Ubuntu 13.10 Saucy Salamander, Ubuntu 13.04 Raring Ringtail, Ubuntu 12.04 Precise, Ubuntu 12.10, Linux Mint 13/15/14/16.

To get started, press Ctrl+Alt+T on your keyboard to open terminal. When it opens, run command to add the PPA:

sudo add-apt-repository ppa:atareao/atareao

Then you can install it after checking for updates, run:

sudo apt-get update; sudo apt-get install picapy

This tutorial shows how to install BitDefender Antivirus Scanner in Ubuntu 13.10 Saucy or Linux Mint 16 Petra from bitdefender repository.

Bitdefender is an antivirus software suite developed by Romania-based software company Softwin. You can use the Free Edition on Ubuntu Linux to scan remove devices and ntfs partitions.

Tutorial Objectives:

  • Install BitDefender Scanner in Ubuntu 13.10 or Linux Mint 16
  • Enjoy!

To get started, press Ctrl+Alt+T on your keyboard to open terminal. When it opens, run commands to add BitDefender repository for Linux:

sudo sh -c 'echo "deb http://download.bitdefender.com/repos/deb/ bitdefender non-free" >> /etc/apt/sources.list.d/bitdefender.list'

Then get the key:

wget -O- -q http://download.bitdefender.com/repos/deb/bd.key.asc | sudo apt-key add -

After that, you can install the Scanner after checking for updates. Or run:

sudo apt-get update; sudo apt-get install bitdefender-scanner-gui

You can also install Bitdefender-samba, Bitdefender-mail with the commands below:

sudo apt-get install bitdefender-samba bitdefender-mail

Once installed, restart your computer and you’ll see the shortcut icon in Unity Dash.

Birdie is a beautiful Twitter client designed for elementary OS. It is fast, easy to use and works great. It provides all the basic Twitter features and allows you to enjoy Twitter right on your desktop.

Birdie is built by volunteers. All the source code is licensed under the GPLv3 and freely available for anyone to use, modify or share.

Birdie has been written using native technologies, like Vala and Gtk. It provides a seamless integration with elementary OS and feels like a first-class app.

Install Birdie in Ubuntu

Birdie gets a launchpad PPA, but it is not available for Ubuntu 13.10 Saucy Salamander. You can download the Deb from the link below:

32 bits for Ubuntu

64-bits for Ubuntu

Once downloaded, press Ctrl+Alt+T on your keyboard to open terminal. When it opens, run below to install the DEB as well as fix dependencies.

sudo dpkg -i birdie_0.3*.deb; sudo apt-get -f install

SmillaEnlarger is a small graphical tool (based on Qt) to resize, especially magnify bitmaps in high quality.

The used algorithm is an invention of developer’s own. This tool is free, open source and runs on Windows, Linux and Mac OSX.

This tutorial shows you how to install SmillaEnlager via PPA in Ubuntu 13.10 Saucy Salamander, which also works in Ubuntu 13.04, Ubuntu 12.10, Ubuntu 12.04 and Linux Mint 13/14/15/16/

To get started, press Ctrl+ALt+T on your keyboard to open terminal. When it opens, run command to add the PPA:

sudo add-apt-repository -y ppa:dhor/myway

Then update package lists and install it:

sudo apt-get update; sudo apt-get install -y smillaenlarger

Want to use ‘Search on Google’ in selected text’s context menu in your Gnome Terminal? The developer of Ubuntu Tweak did a little hack on Gnome Terminal, added the Google search support for it.

So that you can quickly Google command line errors from terminal. Highlight the text, right-click on it and choose ‘Search on Google’. It opens the default web browser and go to the google search result page.

The developer has created a PPA to make it easy to install, but Ubuntu 13.10 is not supported yet. Fortunately, Ubuntu 13.10 Saucy Salamander uses Gnome Terminal 3.6.1 which is same in Ubuntu 13.04 Raring. So you can install the DEBs for Raring on Saucy.

To get started, click the links below to download the debs:

Install both data & main debs and apply the changes by restart your terminal.

Emerald is a custom window decorator which was shipped with Compiz. It decorates windows borders and title bars by installing and editing themes.

Emerald has been discontinued, but the latest v0.9.5 works great in all current Canonical supported Ubuntu releases. Webupd8 team has created a PPA for Ubuntu 13.04, Ubuntu 12.10, Ubuntu 12.04. Here’s how to install and use Emerald in Ubuntu 13.10.

Tutorial Objectives:

  • Install Emerald Window Decorator in Ubuntu 13.10
  • Enjoy!

To get started, press Ctrl+ALt+T on your keyboard to open terminal. When it opens, run command to install the required packages:

sudo apt-get install git autoconf libtool libwnck1.0-cil-dev libwnck-dev intltool libdecoration0-dev gawk compizconfig-settings-manager

Download the source tarball:

wget cgit.compiz.org/fusion/decorators/emerald/snapshot/emerald-0.9.5.tar.gz

Uncompress and go into result folder:

tar -zxvf emerald-0.9.5.tar.gz && cd emerald-0.9.5/

Run commands below one by one to compile it:

./autogen.sh
make clean
make distclean
./configure --prefix=/usr --libdir=/usr/lib${LIBDIRSUFFIX} LIBS='-ldl -lm'
make
sudo make install

To enable Emerald:

emerald --replace &

To make Emerald permanently, install CompizConfig Settings Manager from Ubuntu Software Center. Open CCSM and navigate to Effects -> Window Decoration. In command area replace the default with emerald --replace &

After all, open Emerald Window Manager from Unity Dash. Download and install themes from compiz-themes.org

How to Install Nuvola Player 2.2 in Ubuntu 13.10

Last updated: October 20, 2013

Nuvola is a cloud music integration for your Linux desktop. It supports Google Play Music, Amazon Cloud Player, 8tracks, Grooveshark, Hype Machine, Pandora, Rido.

Although the maintainer has discontinued the development of this project, it’s still available for Ubuntu 13.10 Saucy, Ubuntu 13.04, Ubuntu 12.04 and their derivatives on its PPA.

Tutorial Objectives:

  • Install Nuvola Player in Ubuntu 13.10
  • Enjoy!

To get started, press Ctrl+Alt+T on your keyboard to open terminal. When it opens, run command below to add the unstable PPA which works great on my laptop.

sudo add-apt-repository ppa:nuvola-player-builders/unstable

Then update system package lists:

sudo apt-get update

Install the cloud player as well as the flash plugin:

sudo apt-get install nuvolaplayer nuvolaplayer-flashplugin