Archives For March 31, 2021

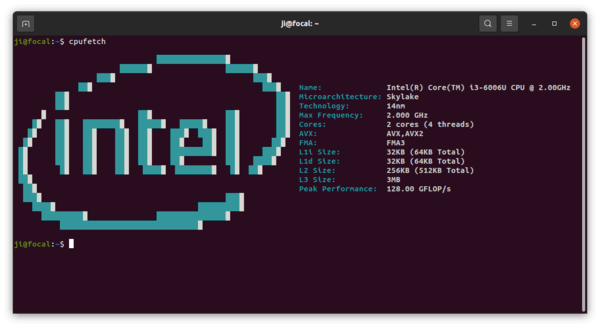
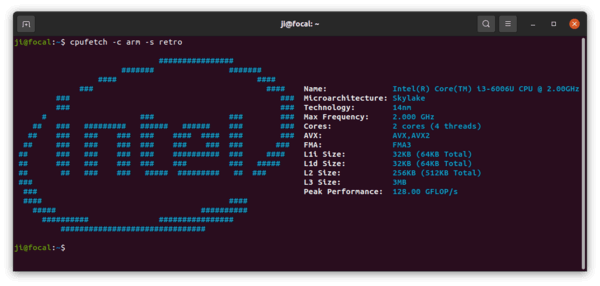
CPUFetch is a simple command line tool, a bit similar to Neofetch, but for fetching CPU architecture in Linux, Windows, macOS, and Android.

The tool outputs the manufacturer logo (e.g., Intel, AMD) along with basic CPU info, including:

  • CPU name.
  • Micro-architecture.
  • The semiconductor technology in nanometer (nm).
  • Max frequency.
  • Number of cores and threads.
  • Advanced Vector Extensions (AVX)
  • Fused-Multiply-Add (FMA)
  • L1, L2, L3 cache sizes.
  • Peak performance.

It supports custom colors and offers a few styles (themes). With it, you can easily take screenshot of the CPU information and share with your friends.

How to Install CPUFetch in Ubuntu:

CPUFetch so far do not offer an Ubuntu binary package. However, it’s easy to compile it in Linux.

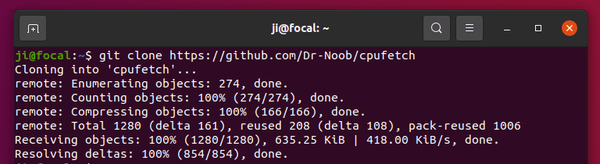
1.) Firstly open terminal from system app launcher. When it opens, run command to clone the source:

git clone https://github.com/Dr-Noob/cpufetch

Install git via sudo apt install git command if you don’t have it.

2.) Then navigate to the source folder via cd command, and compile it via make:

cd cpufetch && make

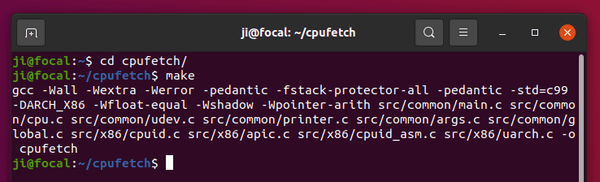
3.) You are finally be able to run the tool via ./cpufetch command in this directory!

To be able to run via cpufetch command anywhere in terminal, copy the executable file to /usr/local/bin:

sudo mv ~/cpufetch/cpufetch /usr/local/bin/

Uninstall:

To remove the source folder, run command:

rm ~/cpufetch -rf

And remove the executable file via command:

sudo rm /usr/local/bin/cpufetch

Want to try out the new Gnome 40 Desktop? You can install it in Ubuntu 21.04 Hirsute Hippo via PPA.

Gnome 40 was released more than a week ago with new features including new design for the overview screen, a horizontal workspace switcher, Dock at the bottom, new gestures, and more.

While Ubuntu 21.04 includes Gnome 3.38.x with some Gnome 40 core applications, you can get the new desktop environment via this third-party PPA.

1.) Firstly open terminal by pressing Ctrl+Alt+T on keyboard. When it opens, run command to add the PPA:

sudo add-apt-repository ppa:shemgp/gnome-40

Type your user password (no asterisk feedback) when it asks and hit Enter to continue.

2.) After adding the PPA, run command to upgrade the mutter window manager:

sudo apt install mutter

You can follow the command in the PPA description, which adds the package version in the code. It however just works with the package name only.

3.) Then install Gnome Shell 40 via command:

sudo apt install gnome-shell

4.) As the default Yaru theme is not updated for Gnome 40, you have to install and use Gnome Session instead of the Ubuntu Session. To install it, run command:

sudo apt install gnome-session

5.) And run command for the rest packages:

sudo apt upgrade

Finally reboot your machine. When you’re in login screen, DO SELECT “Gnome” or “Gnome on Xorg” before logging in. To do so, select your user and then click the gear button in the bottom-right and select Gnome in popup menu.

How to Uninstall Gnome 40:

To remove the new Gnome Desktop and revert back to the original v3.38.x, run command to purge the Ubuntu PPA:

sudo apt install ppa-purge && sudo ppa-purge ppa:shemgp/gnome-40

And if you no longer use the Gnome Session from login screen, remove it via command:

sudo apt remove gnome-session

Prefer the light mode appearance? Here’s how to change the system tray menu, date & time menu, notifications, and other top panel drop-down menus from dark to light in Ubuntu 21.04.

Different to previous Ubuntu releases, Ubuntu 21.04 now has top-panel menus in dark mode. It’s good for those prefer the dark themes. However, light mode fans need to change the Gnome Shell theme to get better experience.

Before:

After:

1. Install User Themes Extension:

To get started, you have to first install the User Themes Gnome Shell extension, which enables ability to change the Gnome Shell Theme.

Method 1: Install the extension via single command:

Press Ctrl+Alt+T on keyboard to bring up a terminal window and run the command below will install a dozen of extensions, including User Themes, in Ubuntu:

sudo apt install gnome-shell-extensions

Once installed, log out and back in.

Method 2: Install the extension from extensions.gnome.org:

For clean freak just need the single extension, firstly install chrome-gnome-shell package via command:

sudo apt install chrome-gnome-shell

Then click to go to the extension web page and turn on the toggle icon to install the extension.

Don’t see the toggle icon? Click ‘Click here to install browser extension’ to install browser extension, and then refresh the web page.

2. Change Gnome Shell Theme:

After installed User Themes extension, launch Gnome Tweaks (install it from Ubuntu Software) and go to Extensions tab.

There scroll down, find out and turn on the extension, click the gear button to get into settings. And finally select Yaru-light or gnome classic for even light top panel.

That’s it. Enjoy!


Ubuntu 21.04 final beta was officially released. Features images for the Ubuntu Desktop, Server, and Cloud products, and also the Kubuntu, Lubuntu, Ubuntu Budgie, UbuntuKylin, Ubuntu MATE, Ubuntu Studio, and Xubuntu flavors.

Ubuntu 21.04 code name “Hirsute Hippo”. As a non-LTS release, it has only 9-month support.

The new Ubuntu edition comes with Linux Kernel 5.11 and GNOME 3.38.x, along with some GNOME 40 core applications, e.g, GNOME Calculator, Gnome Clocks, Gnome Disk Utility.

And it by default logins to Wayland session. If your applications are not so far updated with Wayland support, you can easily switch back to X11 session by clicking the gear button when you’re at the login screen.

Another change is that the time & date menu, system tray menu, notifications, and other top-panel drop-down menus are now in Dark Mode. For those prefer either the standard or light mode, you have to install the User Themes Gnome Shell Extension to change the default theme to light. For details, see this tutorial.

Other changes include:

  • Use nftables as default backend for the firewall.
  • Add support for smartcard authentication
  • Desktop icons now handled by Desktop Icons NG extension with drag’n’drop support.
  • Pipewire support is now enabled.
  • Updated toolchain, applications, and more.

For more details, read the full release note.

And you can download the ISO image from:

Deepin, a beautiful Linux distribution based on Debian stable, released version 20.2 a day ago.

Deepin 20.2 features the LTS Kernel 5.10 and stable Kernel 5.11. In Grub boot menu, you can select to boot either Kernel as you want.

The new release now integrates the Debian 10.8 stable package repository. Thanks to code optimization, you will get less memory occupation for core apps, faster response, enhanced system performance, and smoother user experiences.

Also, Deepin 20.2 introduced a Downloader app with multiple download protocols support, including HTTP(s), FTP(s), BT, magnet link, etc. And the downloads are extremely fast.

Other changes in Deepin 20.2 include:

  • Improved multi-display support.
  • NTP configuration via a graphical interface.
  • Full-text search support for the File Manager.
  • The movie player now supports Avs2 format.
  • The image viewer now supports TIF and TIFF formats.
  • The System Installer now supports for integrating NVIDIA drivers for notebooks during the installation.
  • Other core apps updates and improvements.

Download Deepin ISO:

The ISO image is available to download via Google Drive, Sourceforge, BitTorrent, and other mirrors. Click the button below to get the links: