The graphical auto shutdown app KShutdown released version 5.90 with feature to reboot from Linux into another OS automatically.
KShutdown is a free open-source app that provides a simple Qt based user interface. It allows users to automatically shutdown, restart, hibernate, sleep, log-out, or run a command on certain time, after a period of time, on user inactivity or other event.
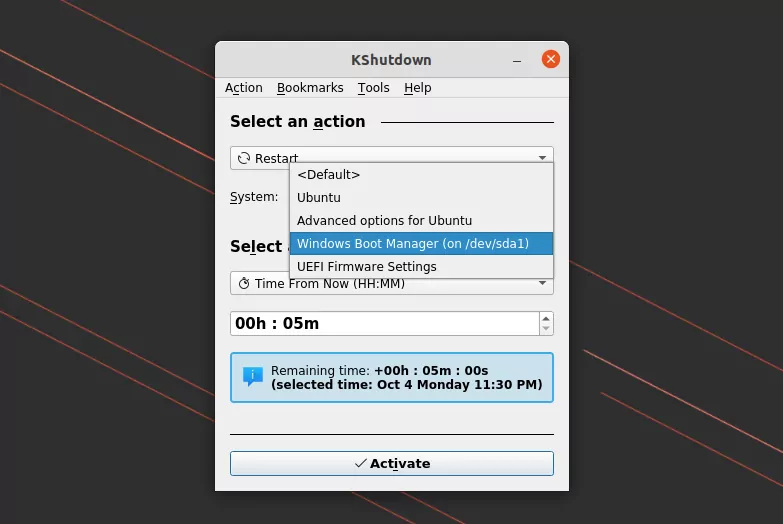
The app is getting more and more powerful. The latest 5.90, beta for next 6.0 release, introduced experimental multi-booting support. User can now automatically reboot from Linux into another OS, such as Windows, from Grub menu entries.
KShutdown reboot into another OS
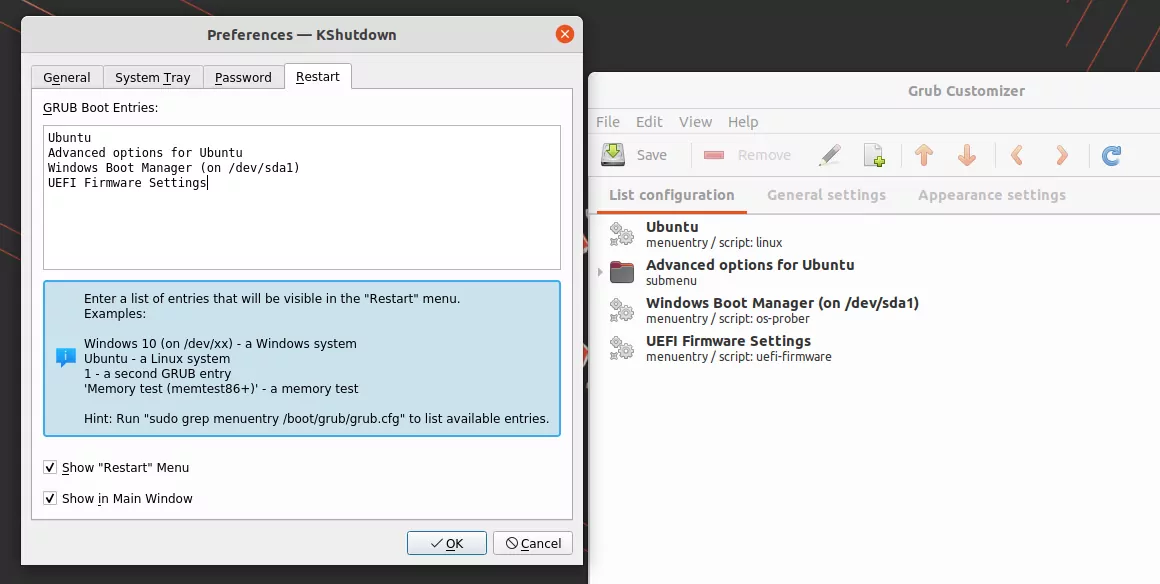
The new feature needs administrator user privilege to get access ‘/boot/grub/grubenv’. The app however does not apply it properly so far, and user need to start it manually via sudo kshutdown from command line.
And it does not read the Grub menu automatically, though it can be set manually in ‘Tools -> Configure KShutdown -> Restart’. Use the app ‘Grub Customizer’ to get the menu entries.
Manually write Grub Menu entries (from grub-customizer)
While typing in my Ubuntu laptop, I was often making mistakes by tapping on touch-pad accidentally. The text cursor (aka caret) jumped to another place, and/or app window lost focus. It made me crazy since the built-in ‘disable touchpad while typing‘ option does not function in my HP laptop.
Option 1: system built-in option
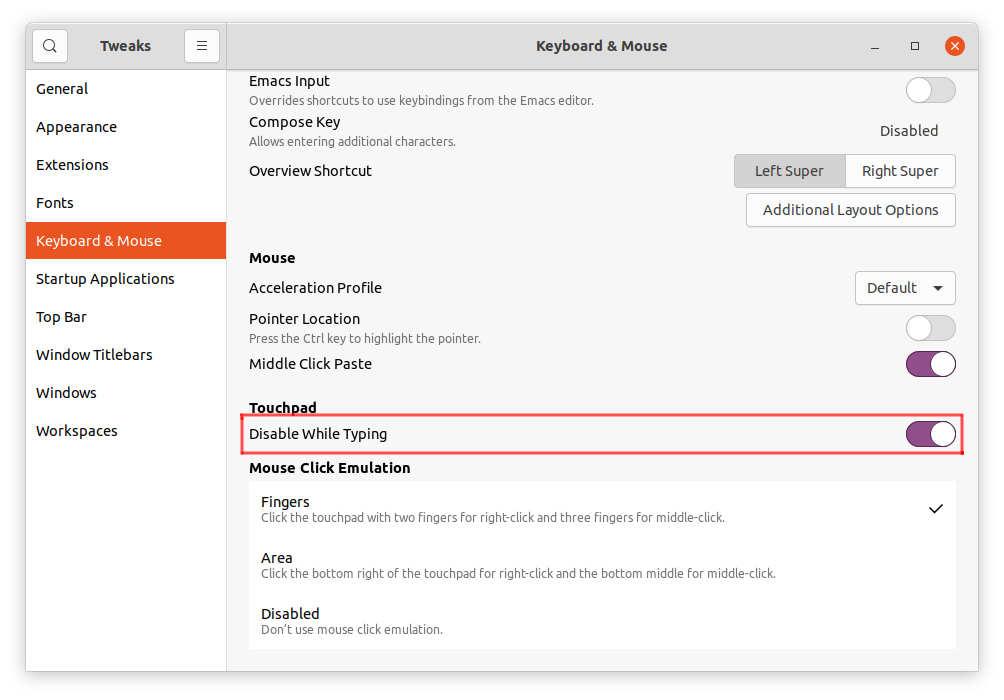
GNOME has the option to disable touchpad while typing, which is enabled out-of-the-box in current Ubuntu releases. Users may access the settings either via ‘/org/gnome/desktop/peripherals/touchpad/‘ in Dconf Editor or using Gnome Tweaks tool.
Both configuration tool available to install in Ubuntu Software.
Disable touchpad while typing via Gnome Tweaks Tool
For Synaptics touchpad running on Xorg, like me, this option may not work. And, here are the few other choices I’m going to show you in this tutorial.
Option 2: Disable touchpad while typing via Touchpad-Indicator
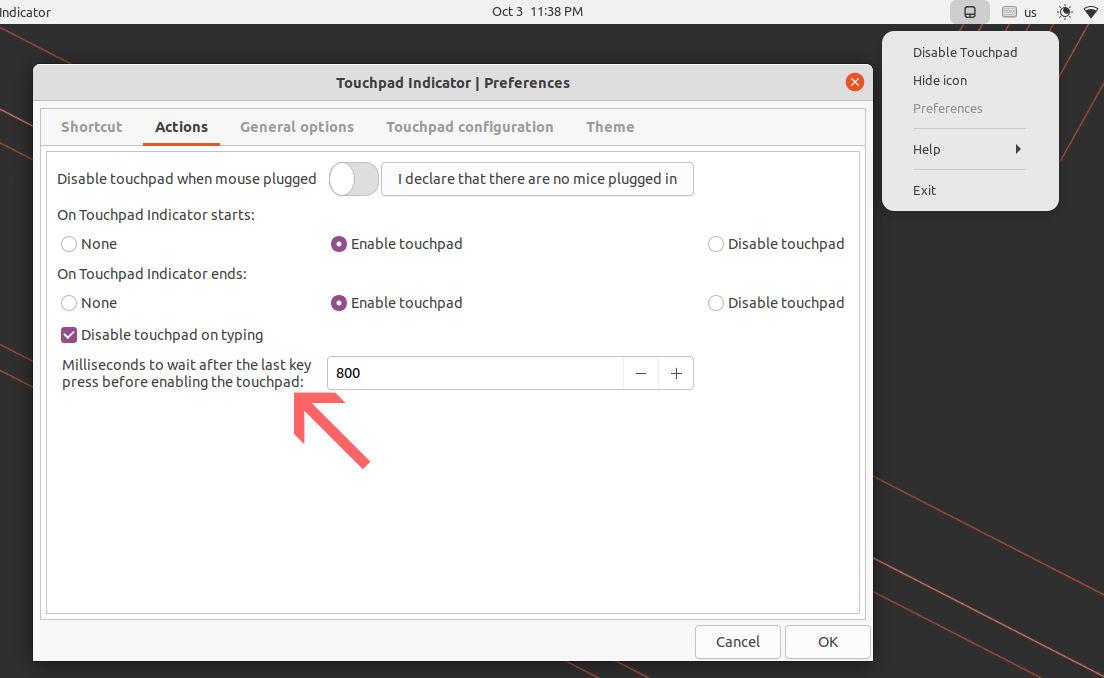
A ten years old app, Touchpad-Indicator, has ability to toggle this function for all Ubuntu users.
It’s a free and open-source project developed and maintained by atareao team from Spain. It has option to disable touchpad while typing and set milliseconds to wait after the last key press before enabling touchpad.
It also allows to disable touchpad while mouse is plugged, toggle scrolling options and remap one-, two- and three-finger tap actions.
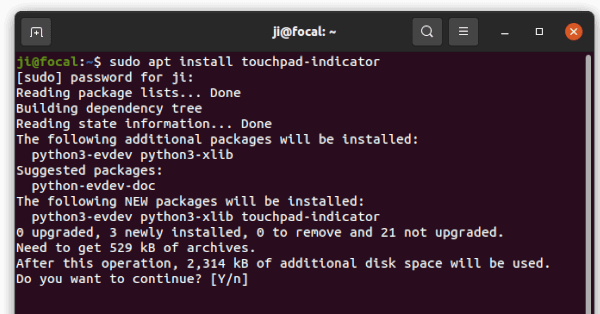
How to Install Touchpad Indicator in Ubuntu:
The software developer maintains an official PPA contains the software packages for all current Ubuntu releases (Ubuntu 18.04, 20.04, 21.04, 21.10) and old releases such as Ubuntu 12.04, Ubuntu 14.04, and Ubuntu 16.04.
1.) Firstly, open terminal from start menu or by pressing Ctrl+Alt+T on keyboard. When it opens, run command to add the PPA:
sudo add-apt-repository ppa:atareao/atareao
2.) Next, refresh package cache and install the app:
Option 3: Single command to disable touchpad while typing (for synaptics)
Touchpad indicator is great, however it’s a little bit heavy for the single function only. Without installing any third-party app, a single command can also do the trick!
The synaptics touchpad driver for Xorg server offers a command line tool “syndaemon” that monitors keyboard activity and disables the touchpad when the keyboard is being used.
Users can simply open terminal and run the command below to test it out:
syndaemon -i 0.8 -K -t -d
The command will run the service silently in background. And the parameters are:
-i 0.8 tells to wait 0.8 second after last key press before re-enabling the touchpad.
-K makes it ignore Modifier+Key combos, such as Ctrl, Alt, and/or Shift + key combinations.
-t tells to disable tapping / scrolling only. Mouse movement is still possible while typing.
-d runs the command as daemon, in background.
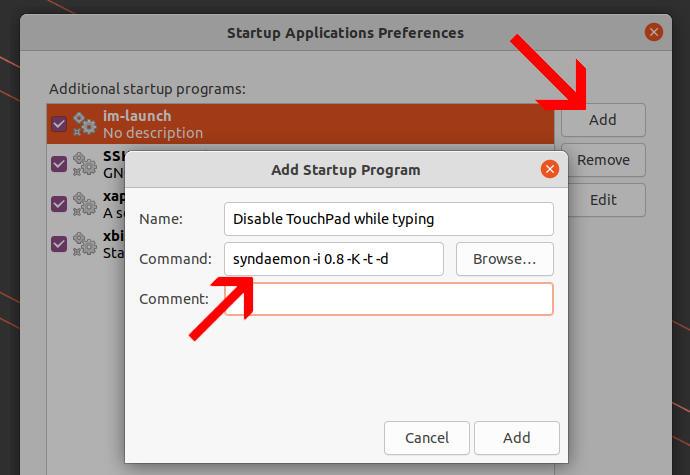
Syndaemon works until reboot. If you like this method, you may make it running automatically at start up via following steps:
1.) Firstly, search for and open ‘Startup Applications’ utility from overview screen.
2.) When it opens, click ‘Add’ button and type:
Name: Disable TouchPad while typing
Command: syndaemon -i 0.8 -K -t -d
Comment: optional
And finally click on ‘Add’ button will make it auto-start at login.
NOTE: It has downside in my case in Ubuntu 20.04 LTS. When trying to stop syndaemon either via “System Monitor” or using sudo kill -i Process-ID command, it causes touchpad tap to click not working until reboot!
Option 4: For Ubuntu with Xorg session (Libinput driver)
The function works out-of-the-box in my Ubuntu 22.04 with the default Wayland session. User may use Gnome Tweaks to toggle the option, see screenshots in Option 1.
If you’ve switch back to “Ubuntu on Xorg” session, then this method may help for those using libinput driver.
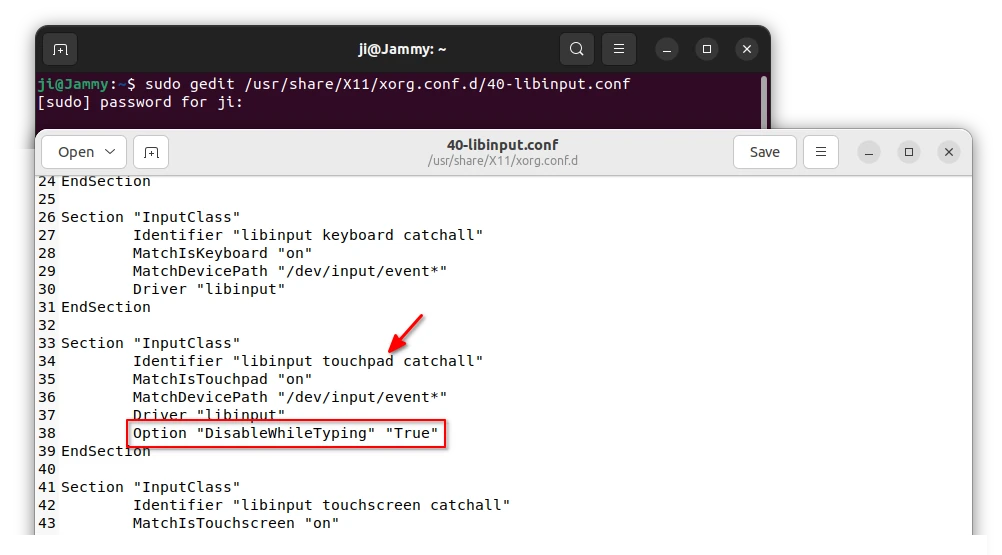
1. First, press Ctrl+Alt+T on keyboard to open terminal. When it opens, run the command to edit the config file:
If you’re trying this in Ubuntu 22.10, replace gedit with gnome-text-editor or nano.
2. When the file opens in text editor, find out the section that contains “Identifier “libinput touchpad catchall”“. Add rule Option “DisableWhileTyping” “True”, so it will look like:
After almost two years of development, the HexChat IRC client finally released new 2.6.0 version with a number of new IRCv3 features and strikethrough formatting support.
HexChat is a free open source Internet Relay Chat client that forked from XChat. It offers both command line and customizable graphical interface, allows to securely join multiple networks and talk to users privately.
The app supports features such as DCC, SASL, proxies, spellcheck, alerts, logging, custom themes, Python/Perl scripts, and even transfer files.
Add support for IRCv3 SETNAME, invite-notify, account-tag, standard replies, and UTF8ONLY
Add support for strikethrough formatting
Update network list (including Libra.Chat as the default)
Update to OpenSSL 1.1.1 on Windows
Fix text clipping issues by respecting font line height
Fix URLs not being escaped when opened
Fix misc IRC message parsing issues
Remove libnotify and libproxy dependencies on Linux.
Print ChanServ notices in the front tab by default
Add CBC mode support for fishlim plugin.
Rewrite plugin in python with CFFI This lowers memory usage and fixed conflicts with many C Python modules including pygobject.
How to install HexChat 2.16.0 in Ubuntu:
The Windows exe as well as source tarball are available to download at its official website.
For Ubuntu and other Linux, the client so far only available via universal Flatpak package which runs in sandbox. And below is how to install HexChat 2.16.0 flatpak in Ubuntu 18.04, Ubuntu 20.04, Ubuntu 21.04, Ubuntu 21.10 and their based systems.
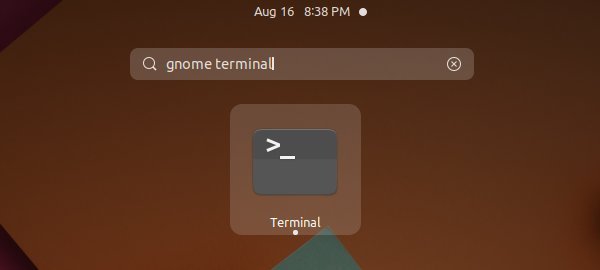
1.) Firstly, open terminal by either searching from activities overview screen or press Ctrl+Alt+T key combination on keyboard.
2.) Next install the Flatpak daemon if you don’t have it, by running command in terminal:
sudo apt install flatpak
NOTE for Ubuntu 18.04, you have to add THIS PPA to be able to install the package.
3.) Add the flathub repository that hosts the flatpak packages by running command:
4.) Finally install the HexChat IRC client via command:
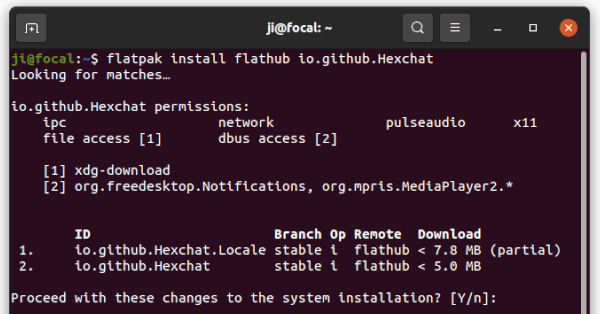
flatpak install flathub io.github.Hexchat
NOTE the Flatpak package co-exists with native deb and snap, so you may have more than one app icons in overview search box. If so, you may run the command below in terminal to launch HexChat Flatpak:
flatpak run io.github.Hexchat
How to Remove HexChat:
To remove the HexChat flatpak package, open terminal and run command:
For those doing copy & paste actions frequently in Ubuntu Linux, GPaste remembers the clipboard history and allows to find them easily via few click.
The clipboard is the place to store the text, image, file path and all the stuff that you last copied (or cut). The content in clipboard will be overwritten once you do another copy & paste action. So, when you trying to find out what you’ve copied earlier, a clipboard manager will be helpful.
Install and Use GPaste:
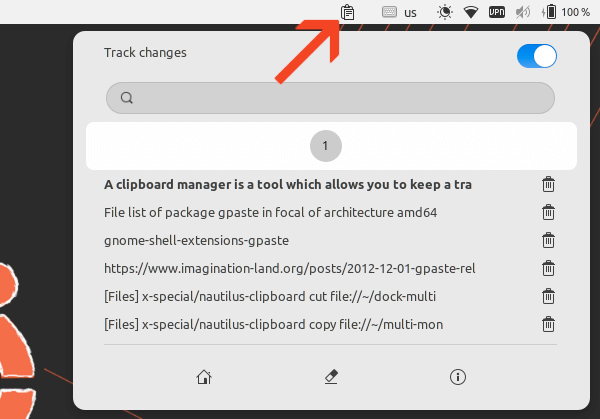
GPaste is a free open-source clipboard manager that keep a trace of what you’re copying and pasting. It offers an indicator applet in system tray, allows you to search from history, single click to copy to clipboard, so to paste to anywhere as you want. And, a global switch is present to toggle tracking clipboard changes.
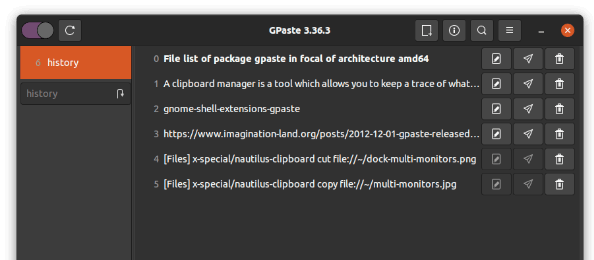
By clicking on the home icon in the drop-down menu, it brings up the main app window. There you may do all the functions, including create, edit, and/or delete content from the clipboard history. And, the hamburger icon on header bar allows to change the app settings and keyboard shortcuts.
Install GPaste in Ubuntu Linux:
For Ubuntu with default GNOME desktop, open terminal either by searching from overview screen or by pressing Ctrl+Alt+T on keyboard.
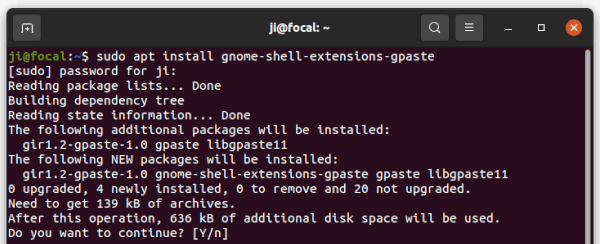
When terminal opens, run command to install the gpaste and extension packages in Ubuntu 18.04 & Ubuntu 20.04:
sudo apt install gnome-shell-extensions-gpaste
NOTE for Ubuntu 21.04 and Ubuntu 21.10, the package name has changed (removed ‘s’ in ‘extensions’). So command will be:
sudo apt install gnome-shell-extension-gpaste
Other Linux, such as Fedora may install the clipboard manager via sudo dnf install gnome-shell-extension-gpaste command.
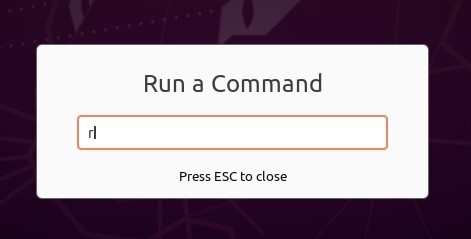
Restart Gnome Shell:
The indicator applet is provided by Gnome Extension, users have to restart GNOME Shell to allow working. To do so, press Alt+F2 key combination on keyboard, type r in pop-up ‘Run a Command’ dialog, and hit Enter.
For Wayland session, you need to log out and back in to restart Gnome Shell.
Enable GPaste Indicator:
Search for and open gpaste from the overview screen will launch the main app window. For the indicator applet, enable it via Gnome Extensions app.
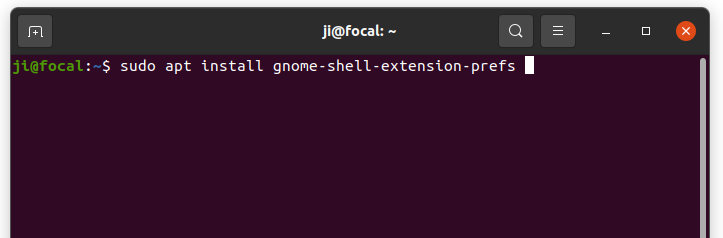
Firstly, open terminal (press Ctrl+Alt+T on keyboard) and install Gnome Extensions app if you don’t have it:
sudo apt install gnome-shell-extension-prefs
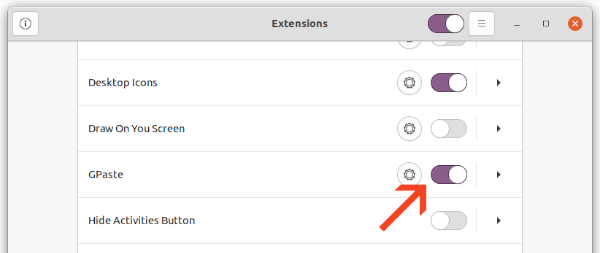
Next, launch ‘Gnome Extensions’ app, scroll down and turn on the slider icon to enable GPaste indicator:
And click on the gear button to change it settings as you like.