
![]()
This tutorial shows how to disable the touchpad in Ubuntu with GNOME, XFCE, MATE, and any other desktop environments.
Most desktops today have an option to “disable touch while typing”. But if you always have your computer with a mouse connected and rarely use the touchpad, then it can be a good choice to disable the touchpad to avoid mis-operation.
And, here’s how to do the job in Ubuntu either by using desktop setting options, or globally by using Linux command or config file.
Option 1: Disable Touchpad using System Settings
The modern desktops, such as GNOME, XFCE, MATE, Cinnamon, KDE Plasma, have graphical options to disable touchpad on per-user basis.
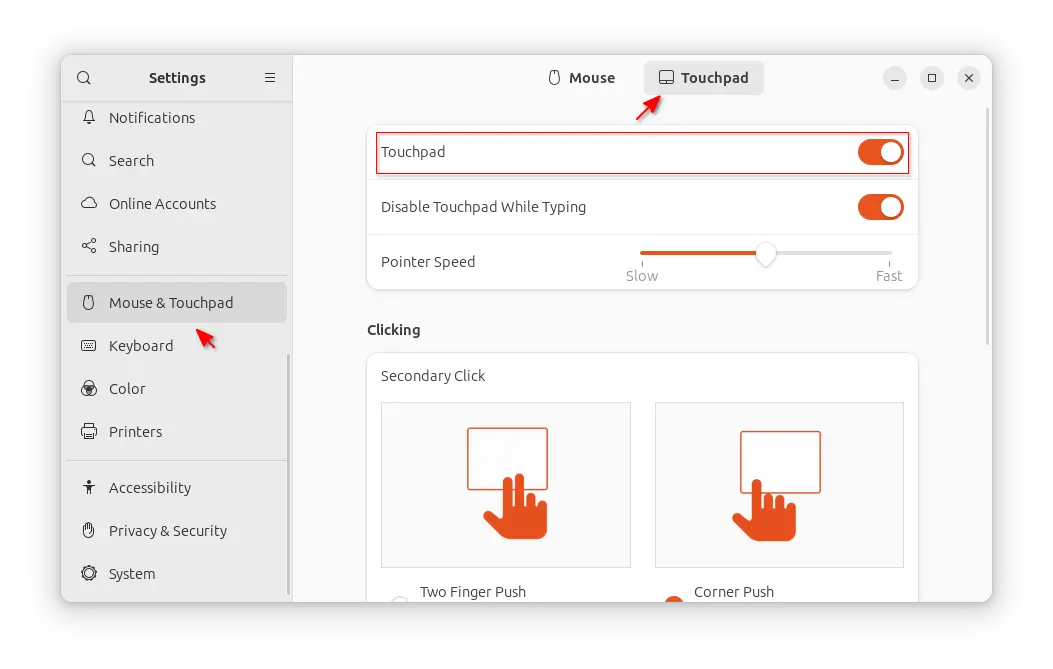
For GNOME, the default desktop in Ubuntu, simply open Settings, then navigate to Mouse & Keyboard in left. Finally, switch to “Touchpad” tab in top-right, and turn off the toggle switch for “Touchpad” will disable the feature for current user.
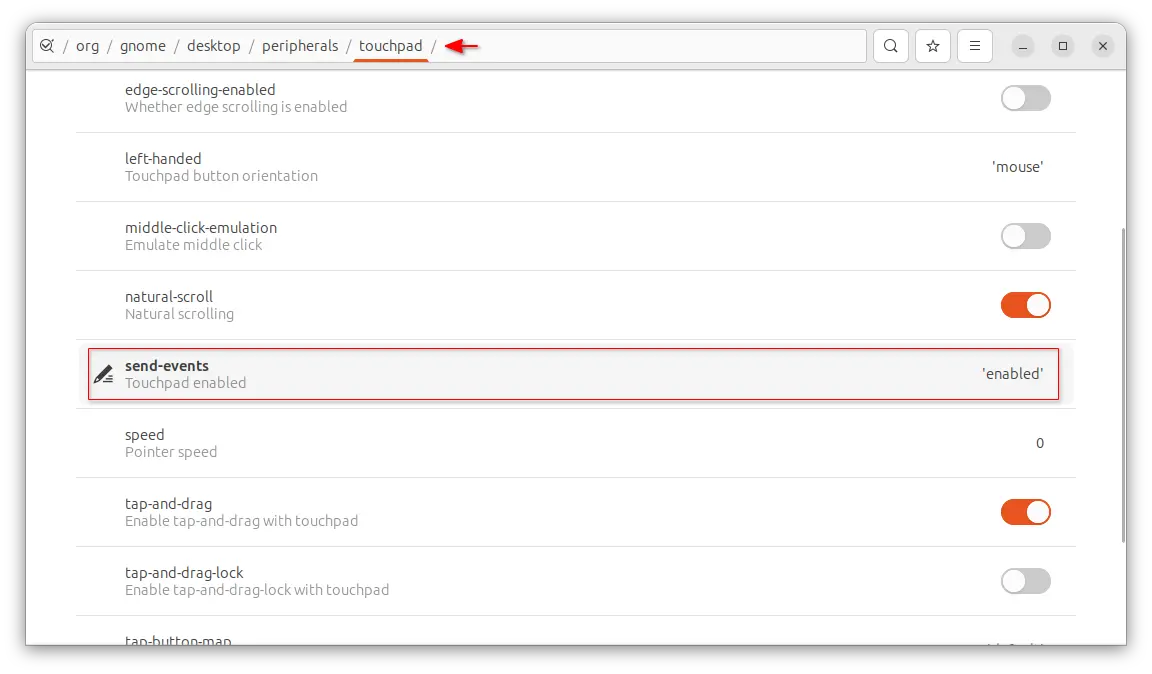
NOTE: Ubuntu 22.04 and earlier with old GNOME do NOT have this toggle option. In the case, either launch Dconf Editor (available in Ubuntu Software) and navigate to “/org/gnome/desktop/peripherals/touchpad/”, then set send-events key to disabled.
Or, run the command below in terminal instead:
gsettings set org.gnome.desktop.peripherals.touchpad send-events 'disabled'
To switch back on, use command below. And, you may bind the commands with keyboard shortcuts to easily switch on/off the touchpad.
gsettings reset org.gnome.desktop.peripherals.touchpad send-events
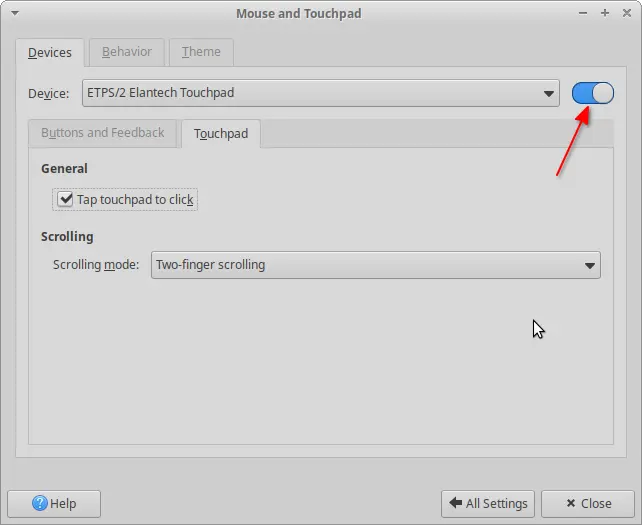
For XFCE, the default desktop for XUbuntu, simply search for and launch “Mouse and Touchpad” from start menu. Under “Devices”, choose your touchpad device from the drop-box box, finally turn off the toggle switch after it.
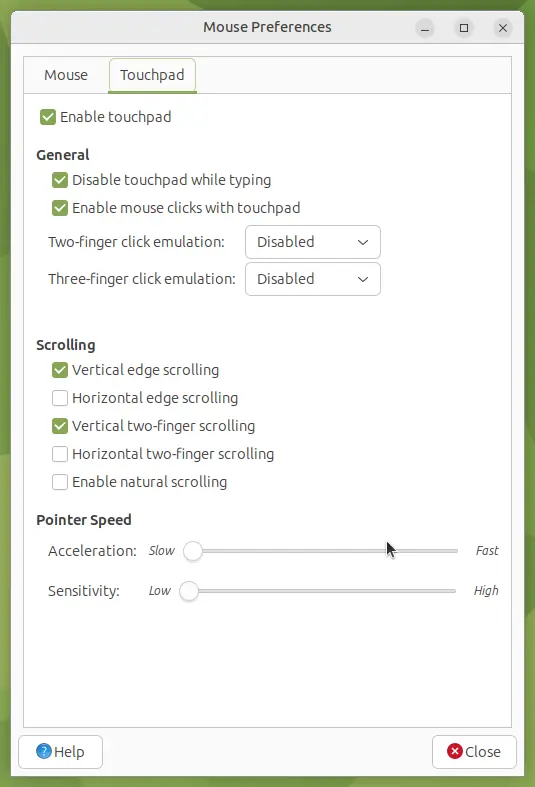
MATE desktop users can search and launch the “Mouse” utility. When it opens, switch to “Touchpad” tab, and un-tick the “Enable touchpad” check-box to disable it.
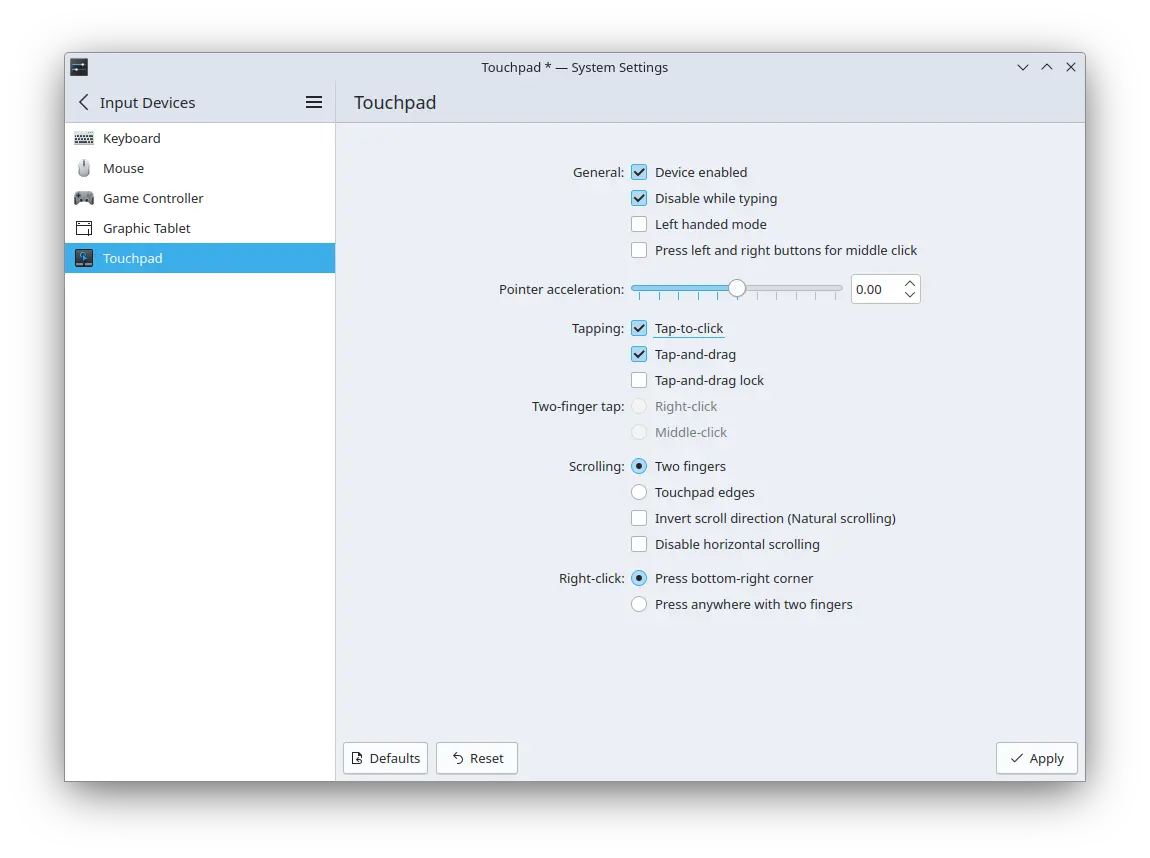
And KDE Plasma users may search and launch “Touchpad” from start menu. Then, un-tick “Device enabled” to disable it.
Other desktops (e.g, Cinnamon) may have similar option to disable touchpad. If you don’t find it or there’s no such option, use the methods below instead.
Option 2: Single Command to Disable Touchpad (Xorg only)
If your desktop does not provide such toggle option to disable/enable touchpad, then you may run the commands below instead.
NOTE: This method works only for the classic Xorg (X11), run echo $XDG_SESSION_TYPE command in terminal to tell your session type.
First, open up a terminal window (Ctrl+Alt+T) and run command to list your input devices:
xinput lists
Then, copy your touchpad device name from the output. Finally, run the command below to disable it:
xinput disable "ETPS/2 Elantech Touchpad"
In command, replace “ETPS/2 Elantech Touchpad” according to your touchpad device name.
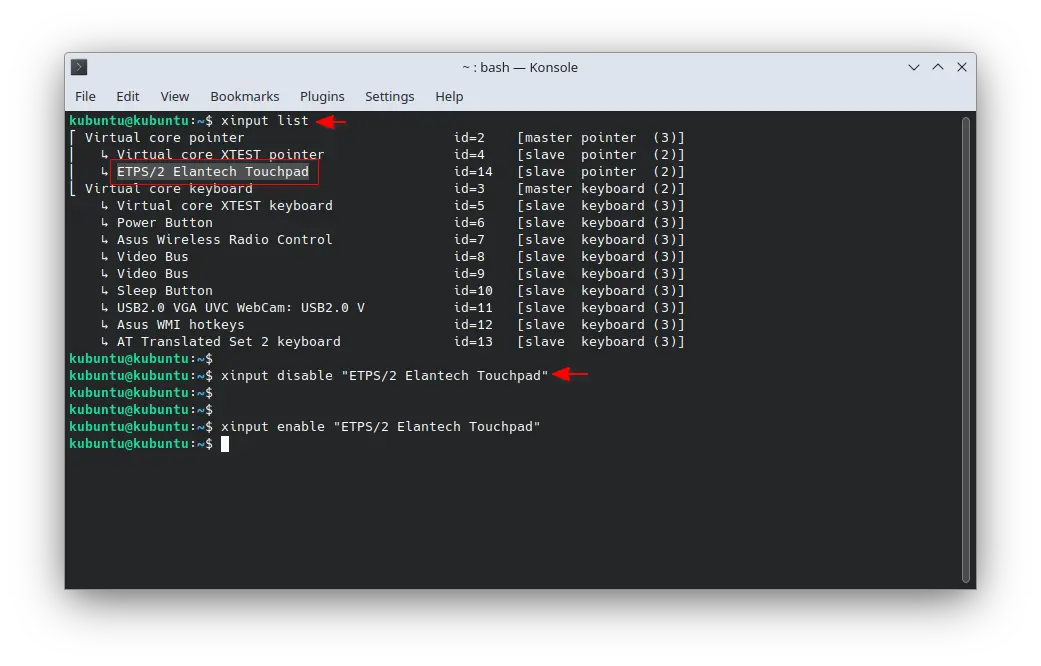
This will disable the touchpad, until log out, or when you run the command to re-enable it:
xinput enable "ETPS/2 Elantech Touchpad"
Option 3: Use udev rule to disable touchpad globally / permanently
If you want to disable it for all users automatically on startup, then you can create an udev rule to tell your system to ignore the touchpad when detecting the physical device.
NOTE: This step works for both Xorg and Wayland sessions.
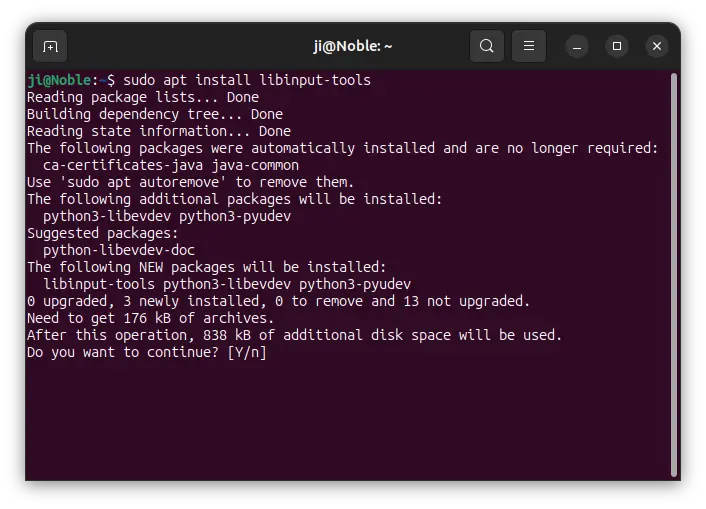
1. To do so, first run command in terminal (Ctrl+Alt+T) to install libinput tools:
sudo apt install libinput-tools
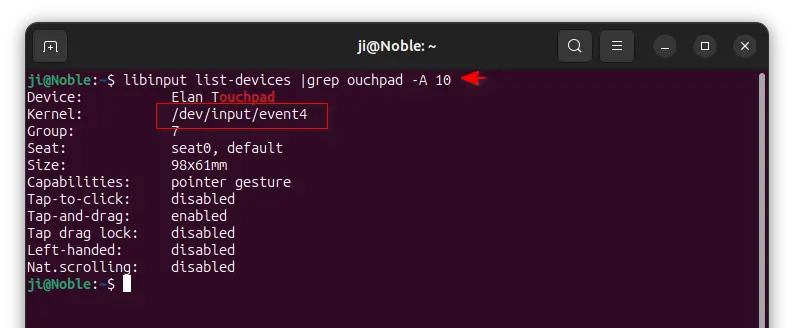
2. Then use libinput command to list all the input devices:
libinput list-devices |grep ouchpad -A 10
Here |grep ouchpad -A 10 will filter the output with keyboard “ouchpad”, along with 10 lines of trailing context. You can skip it for all input devices.
In the case, you need find out something like /dev/input/event4 that matches your touchpad device.
3. Next, use the command below to tell more about your touchpad device:
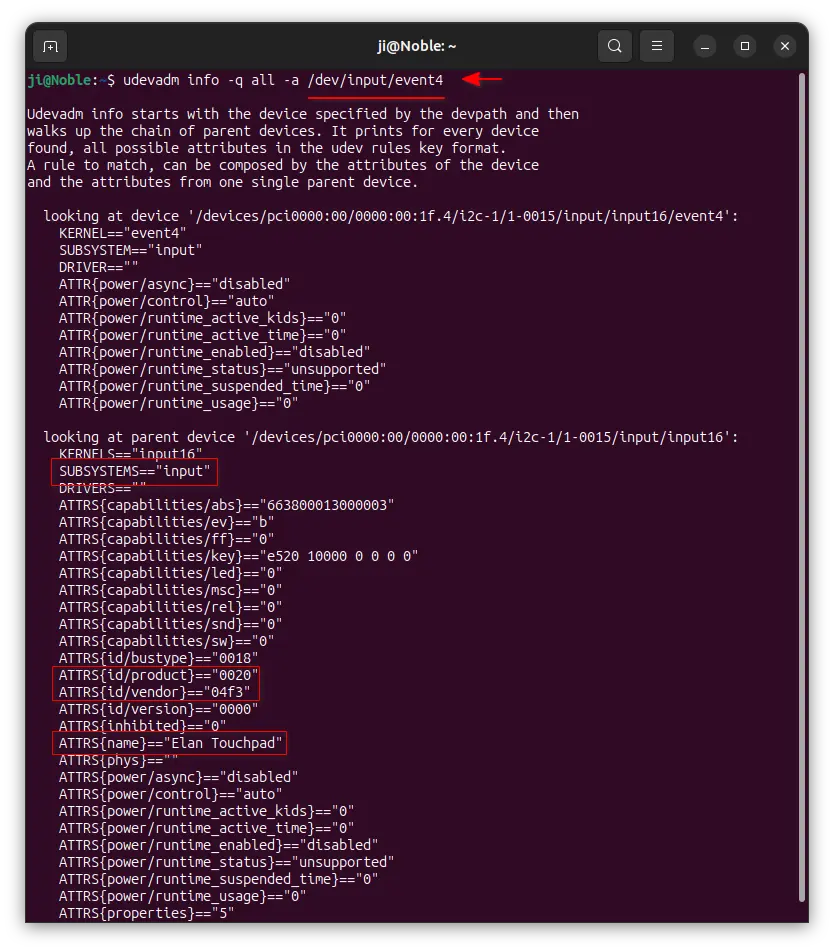
udevadm info -q all -a /dev/input/event4
Replace /dev/input/event4 according to last command output. And, press Space key to see more output in terminal, until you find out your touchpad device via its name.
Here you need to find out the IDs (e.g., product ID and vendor ID) of the touchpad, for use in next step to identify the device.
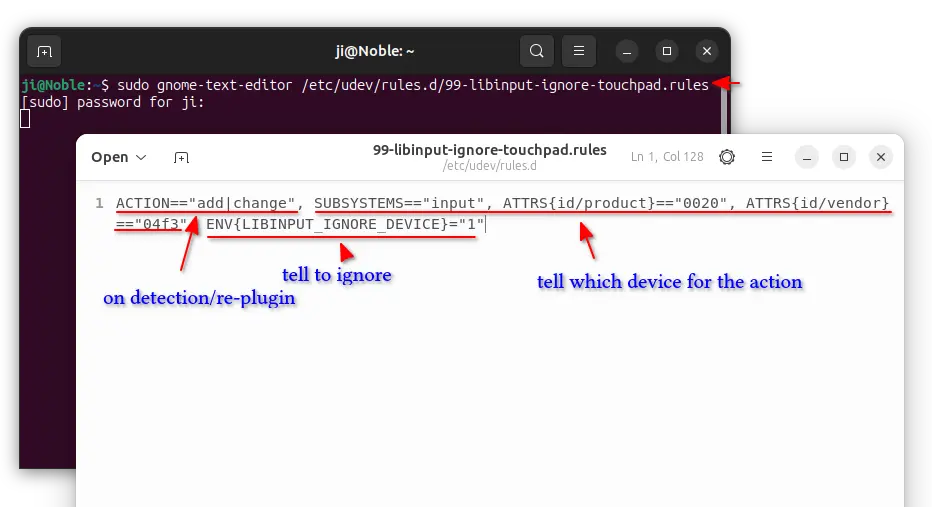
4. Finally, run command to create (and edit) a udev rule under /etc/udev/rules.d directory:
sudo gnome-text-editor /etc/udev/rules.d/99-libinput-ignore-touchpad.rules
According to your desktop, replace gnome-text-editor with mousepad for XFCE, pluma for MATE, or nano command line text editor that works in most desktops.
When file opens, paste the line below, and edit the product & vendor ID according to last step.
ACTION=="add|change", SUBSYSTEMS=="input", ATTRS{id/product}=="0020", ATTRS{id/vendor}=="04f3", ENV{LIBINPUT_IGNORE_DEVICE}="1"
Here:
ACTION=="add|change"tells to apply the rule, when adding or re-plugging the device.SUBSYSTEMS=="input", ATTRS{id/product}=="0020", ATTRS{id/vendor}=="04f3"are used to identify the touchpad device.- And
ENV{LIBINPUT_IGNORE_DEVICE}="1"to tells to ignore it.
After saving the file (for nano, press Ctrl+S to save then Ctrl+X to exit), the udev rule will apply in next boot.
In case you want to apply the udev rules without reboot, then run the commands below to force reload it:
sudo udevadm control --reload-rules && sudo udevadm trigger


