![]()
Using KeePassXC to store your passwords? By releasing v2.7.0 (Beta at the moment), the popular password manager introduced many exciting new features!
KDBX 4.1. The new release finally implements the KDBX 4.1 which was introduced 10 months ago via KeePass 2.48. The new version of the KDBX file format features
- assign tags to groups;
- optional password quality estimation;
- remember previous parent group;
- custom icons with names and last modification/deletion times;
- custom data items with last modification times.
Replace all crypto libraries with Botan. Due to feature list and maintainer support, the release now replaces Argon2 library with Botan on all platforms. And, the minimum requirement is Botan 2.11.0.
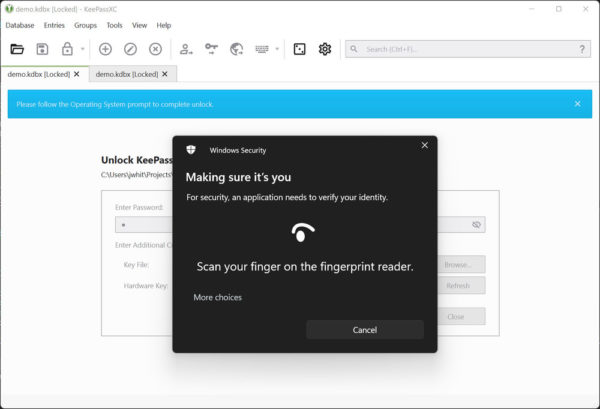
Quick unlock database via Windows Hello / Apple Watch. If you’re using the software in Windows 10+, then you’re able to unlock KeePassXC database easily via a PIN, facial recognition, or fingerprint. And, macOS Catalina (10.15)+ may use TouchID or Apple Watch to get access.
Security improvements. Also in Windows and macOS, the new release now make KeePassXC (main & child windows) invisible for screen recording and screen shooting. It prevents malware from looking at your screen by recording your desktop or taking screenshots.
Other changes in KeePassXC 2.7.0 (Beta) include:
- Direct write save option, which my solve problems for cloud storage and GVFS
- Allow to specify custom backup location & filename.
- Add group clone action.
- Add tag functionality.
- Implement support for hardware keys via wireless NFC
- Add support for OpenSSH 8.2 FIDO/U2F keys
- Add Microsoft Edge support for Linux
- Bulk-delete and purge unused custom icons
- Support adding custom passphrase wordlists
- Improve attachment handling and security
- Add option to double-click copying some entry columns.
Download / Install KeePassXC:
As the release is in beta stage, it’s not available in the official download page so far.
However, you may download the packages for Linux, Windows, and macOS from ‘Assets‘ section via the release page:
For Linux user, grab the ‘.AppImage‘ package. Add executable permission by right-clicking and going to ‘Properties -> Permissions’. And finally run it to launch the password manager.