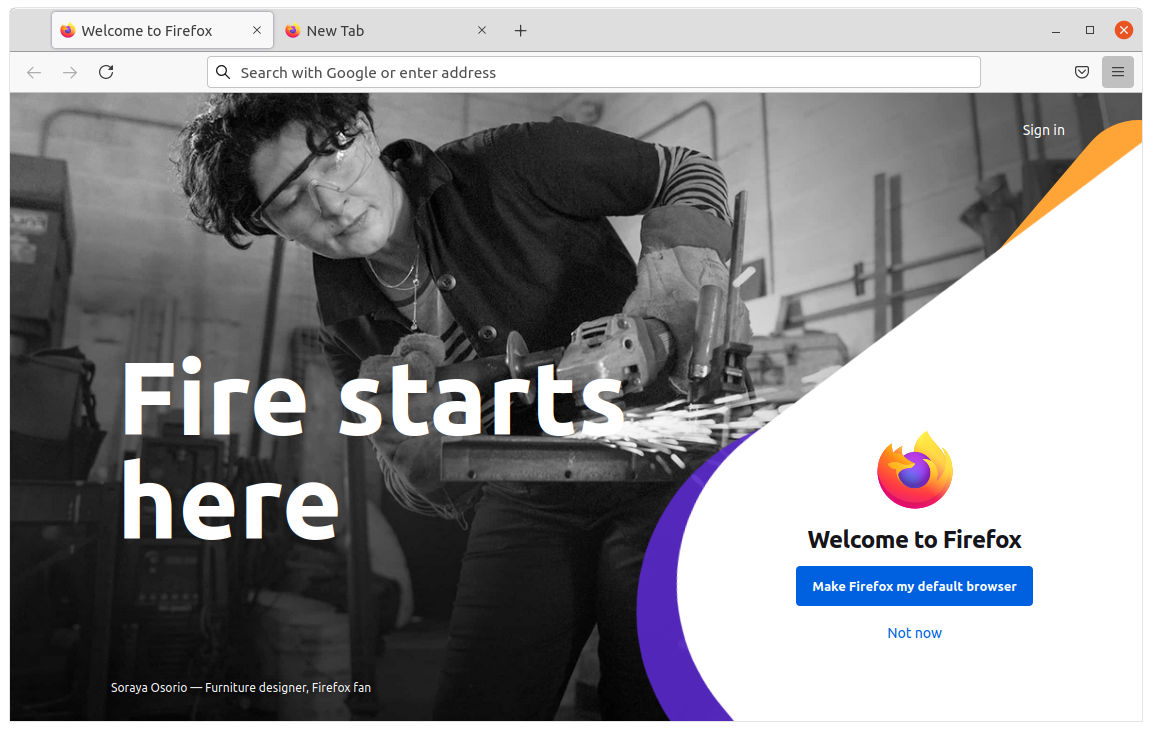
Mozilla Firefox 89.0 was officially released today with the focus on redesigned and modernized user interface.
Firefox 89 has a simplified browser chrome and toolbar. It uses floating tab design with rounded corners for active tab. Less toolbar buttons present, and bookmarks, history and downloads are merged into single menu button.
The main menu content has been reorganized and prioritized. Menu items no longer have icons at beginning.
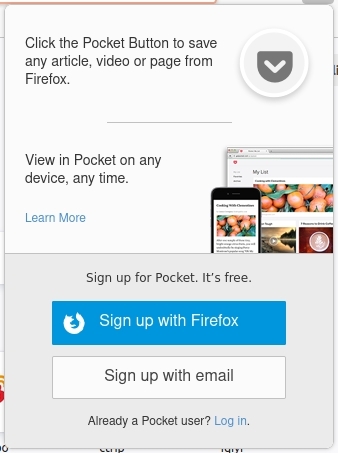
The new release also introduced new ‘Pocket’ icon in left side of the menu button. It allows to save any archive, video or page from Firefox. And it provides buttons to sign in/up pocket, so to view your saved content on any device any time.
Other changes in Firefox 89.0 include:
Native context menus on Mac OS with dark mode support.
Reduced number of alerts and messages, so you can browse with fewer distractions.
Update private browsing mode with even more privacy.
Smart Zoom support via double-tap with two fingers, or single finger on your Magic Mouse.
Various security and other fixes.
Event Timing API Support.
How to Get Firefox 89:
As usual, Ubuntu will publish the Firefox 89 packages through the security & updates repositories in next few days.
You can just wait until it being available to update in Software Updater:
Alternatively, see the release note and download the portable package from Firefox website:
The font size of startup boot menu is too small or too large? It’s easy to fix by setting an appropriate screen resolution for the Grub boot-menu in Ubuntu.
1.) Tell which video modes your graphics card support.
Before starting to configure the Grub bootloader, you firstly need to know which video modes are supported.
a.) The hwinfo command has an option to display the information. It however show me nothing. You can try it by opening terminal (Ctrl+Alt+T) and run command:
sudo apt install hwinfo && hwinfo --framebuffer
b.) If howinfo does not work, use videoinfo instead which however runs in Grub command console.
Firstly restart your machine. When you’re at Grub boot-menu, press c to get into command console.
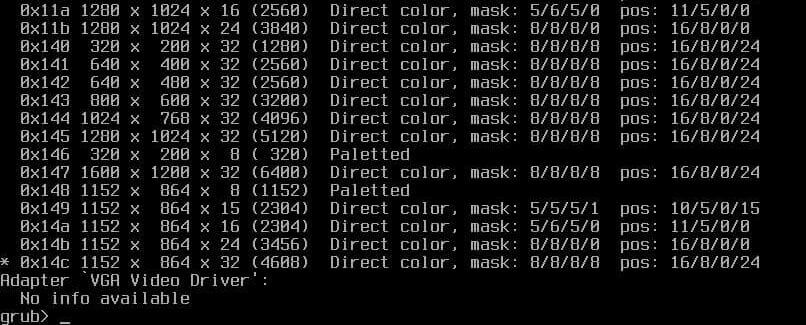
Next run command videoinfo to list supported video modes.
Take a picture of the output, or write down your desired resolution, e.g., 1024x768x32 and 1280x1024x32.
Finally run exit to get back boot menu.
2.) Set a custom screen resolution for Grub boot menu:
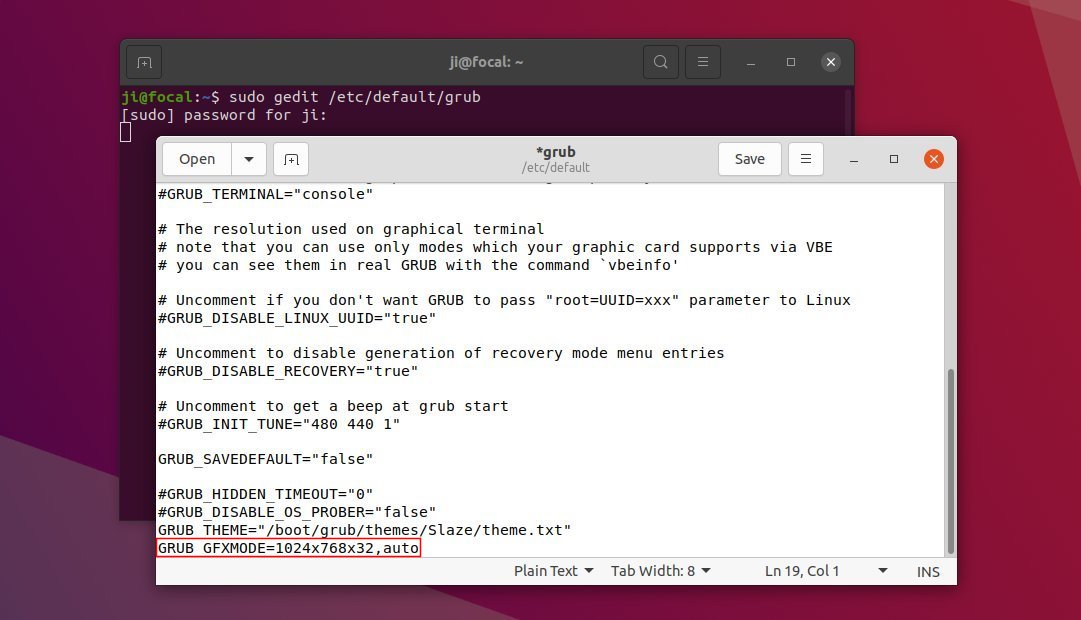
Now boot into Ubuntu, open terminal from system app launcher, and run command to edit the Grub configuration file:
sudo gedit /etc/default/grub
Next set a screen resolution by changing value of “GRUB_GFXMODE”. For instance, set 1024x768x32 (32 means 32-bit color) via:
GRUB_GFXMODE=1024x768x32,auto
Multiple resolutions can be specified, the default is auto.
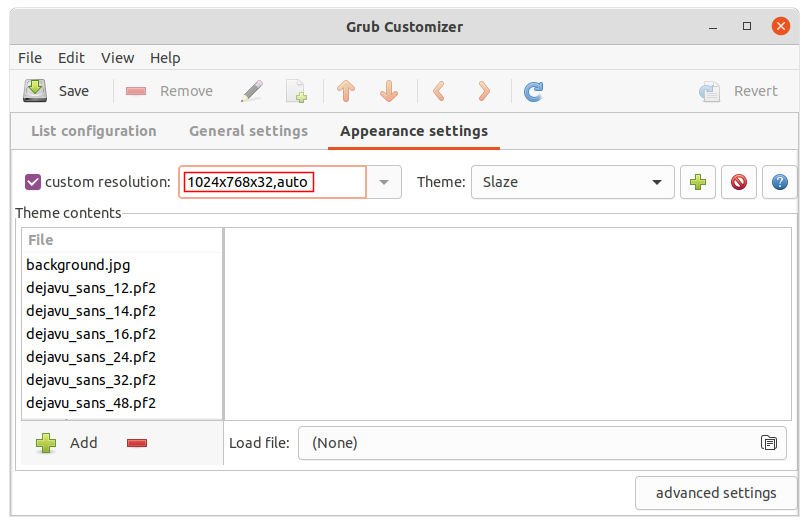
Without running command, you can also set it via Grub Customizer under its ‘Appearance settings’ page.
3.) Update grub to apply change:
If changed the solution via Grub Customizer, simply click on “Save” button. Or, open terminal and run command to update grub:
This tutorial shows how to mount the VirtualBox virtual disk image in Ubuntu, so you can access the Guest OS file system with read and write permission, if it does not boot.
After misconfigured my VirtualBox Guest OS, it does not longer work. I know how to correct the issue to make it boot again, but firstly accessing to the file system is required!
Since the VBox user manual does not work, here’s what I did in Ubuntu 20.04 host with VirtualBox 6.1.x:
1.) Firstly open terminal from system application launcher. When it opens, run command:
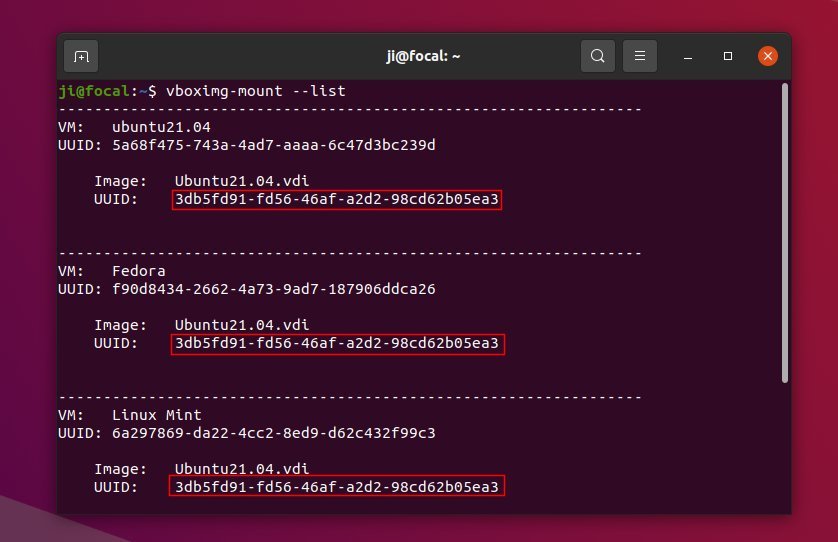
vboximg-mount --list
vboximg-mount is a utility to make VBox disk images available to the host. With --list, it list all Disk Images as well as the UUID.
In the case, I have all Guest OSes on single Disk Image (.vdi). And the uuid is: “3db5fd91-fd56-46af-a2d2-98cd62b05ea3”
2.) Next perform a FUSE mount of the virtual disk image:
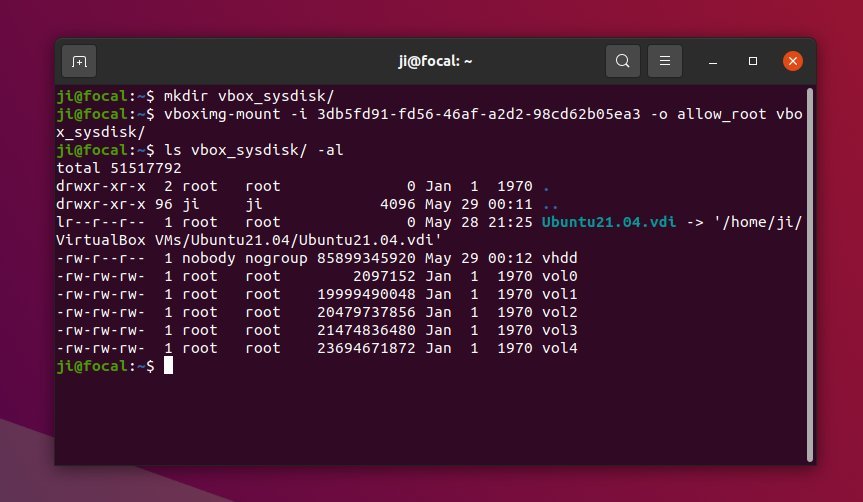
First create a folder as mount point, vbox_sysdisk for instance:
mkdir vbox_sysdisk
Then mount it via command (remember to change the UUID to yours):
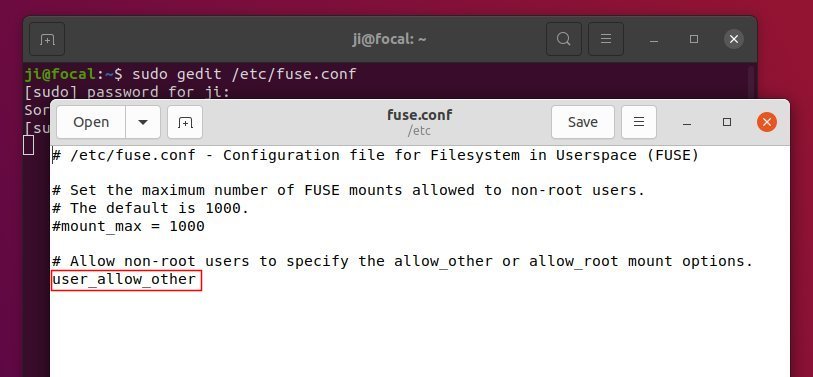
NOTE: You may need to edit the “/etc/fuse.conf” to make the -o allow_root flag work. To do so, run command sudo gedit /etc/fuse.conf and enable (remove # at its beginning) “user_allow_other” line.
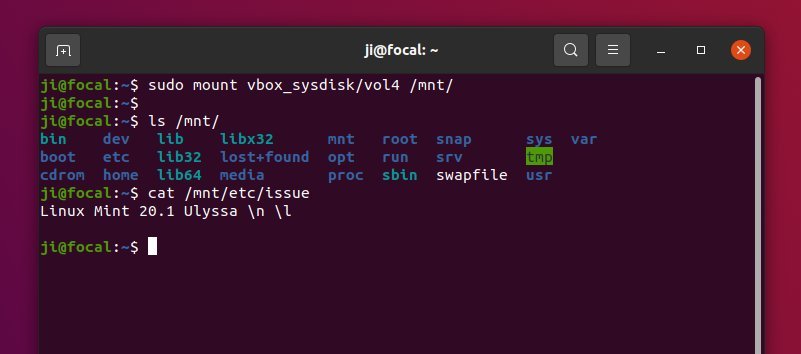
3.) As the previous picture shows, I have 5 disk partitions: vol0, vol1, …, vol4. Now mount either partition (vol4 for instance) to /mnt via command:
sudo mount vbox_sysdis/vol4 /mnt
Finally go to /mnt directory and there you are.
Unmount:
To un-mount the guest os file system, run command:
sudo umount /mnt
To un-mount the VBox disk image, run command:
umount ~/vbox_sysdisk
And you may finally remove that folder either from file manager or by running command in terminal:
Totally new to Linux, and want to give a try? Here are some of the Linux Distributions friendly to beginners.
Linux is a family of open-source operating systems based on Linux Kernel. As there are so many distributions available, I’ll list the top 8 that are easy to use for beginners.
NOTE: Ranking and opinions expressed here are solely my own! As an Ubuntu user for more than 15 years, I’m not new to Linux but may be new to those in the list. So this could be a Linux review via a beginner!
8. Solus
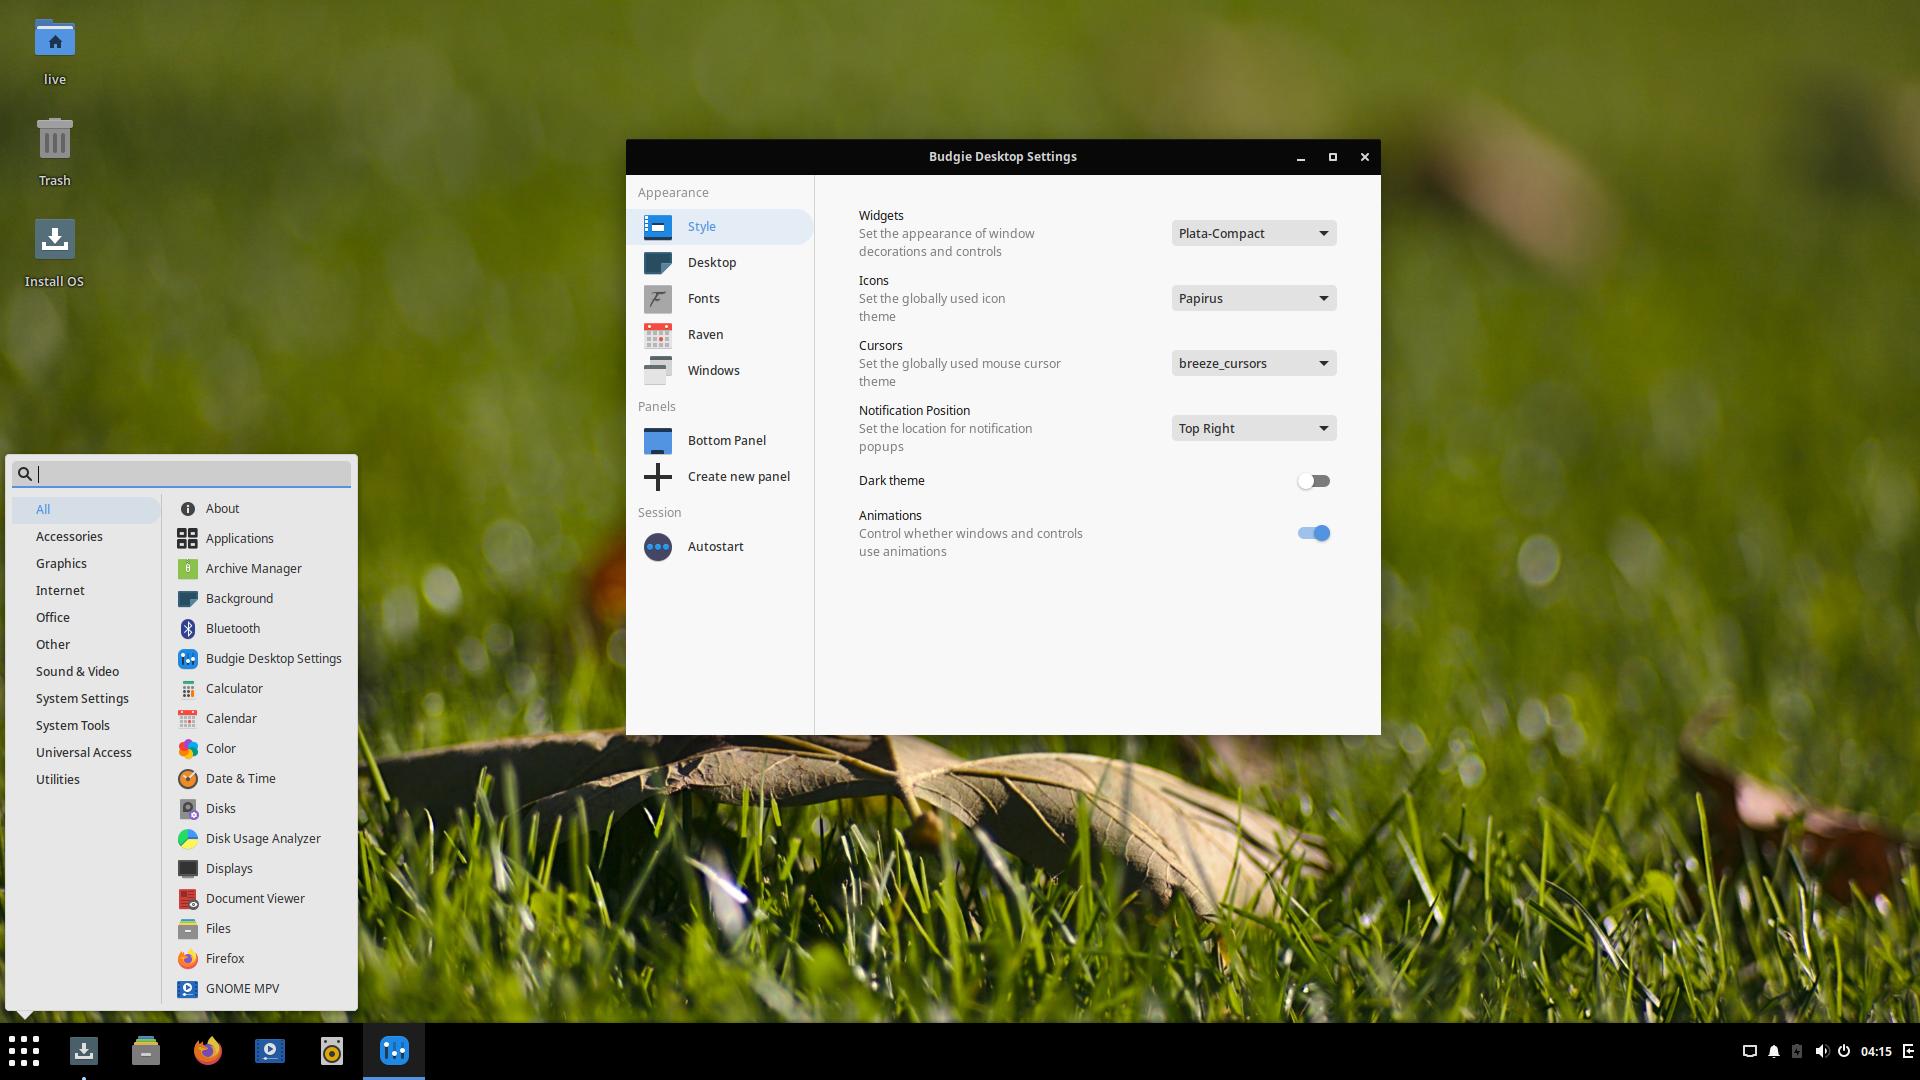
Solus, formerly known as Evolve OS, is an independently developed OS for 64-bit processor. The system provides 4 desktop editions: Budgie, GNOME, MATE (abandoned), XFCE, and KDE Plasma.
Its own Budgie Desktop provides the classic Windows look-like desktop appearance, along with settings utility to change themes, fonts, and manage panel items. And it also has a Gnome style ‘System Settings’ to configure many other settings.
Solus ships with a variety of software out of the box. Besides its own package repository, it also support Snap and Flatpak with more choices.
7. Pop!_OS
Pop!_OS is a free open-source Linux Distribution based on Ubuntu. It’s powered by American Linux computer manufacturer System76, for computers built by System76, but also free to download and install on other machines.
Pop!_OS features customized GNOME Desktop Environment named COSMIC. It comes with a few built-in themes for better desktop and window management. Without Snap, the system focuses on native Deb and Flatpak packages support out-of-the-box.
As well, it has out-of-the-box support for AMD and NVIDIA GPUs, provides default disk encryption, and the most recent release also have packages that allow for easy setup for TensorFlow machine learning and NVIDIA CUDA.
6. Zorin OS
Zorin OS is another Ubuntu based system designed especially for those new to Linux.
The system has 4 editions in the download page. While “Ultimate” need to play for downloading, the core, lite, and education editions are free.
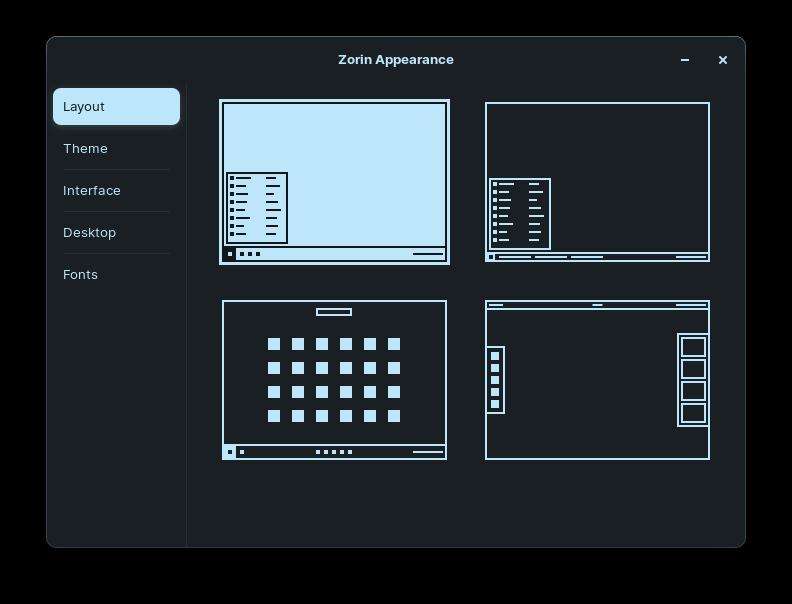
It features a customized GNOME desktop, aims to be the alternative to Windows and macOS. Zorin OS is clean and polished. And it has an appearance dialog to change the desktop layout with single click.
Thanks to Wine and PlayOnLinux, many Windows applications can be easily installed on Zorin OS via simply a few clicks.
5. Deepin Linux
Deepin is a Debian based Linux distribution that focuses much of its attention on intuitive design.
Deepin is the most beautiful Linux system as far as I can see. It features Deepin Desktop Environments with its core applications.
Deepin Linux is developed by a company from China. It ships with its own WPS Office with full MS Office file support, as well as CodeWeavers’ CrossOver, the paid, commercialized version of Wine.
Installing Windows apps, e.g., WeChat, QQ, is quite easy in Deepin. It’s the best Linux OS for users from China.
4. Fedora
Fedora is a Linux distribution developed by the community-supported Fedora Project and owned by Red Hat, a subsidiary of IBM.
Same to Ubuntu, Fedora announces new releases every year in April and October. However, each release has only 9-month support. And Linus Torvalds, creator of Linux, uses Fedora as his main Linux Distro.
Due to the close relationship between Gnome and Fedora, Fedora Workstation (the desktop edition) is always the first to benefit from the latest Gnome Shell releases.
Fedora Workstation is bleeding edge. It’s always the first to get the new technologies, drivers and package updates. And the desktop appearance is easy to configure via System Settings, Gnome Tweaks, Dconf Editor, as well as Gnome Shell Extensions. However, installing proprietary drivers is not easy for beginners.
3. Manjaro
Manjaro is a Linux Distro based on Arch Linux. It focuses on user-friendliness and accessibility.
Different to other Linux, Arch Linux and Manjaro uses a “rolling release” system. Which means you don’t have to re-install or upgrade the whole system again and again.
It features three desktop editions with XFCE, KDE, and GNOME. The system looks modern and works out-of-the-box with a variety of pre-installed software.
The XFCE and KDE editions has the classic Windows like style layout. And Gnome defaults to top panel with left dock. It however has a settings dialog to the UI layout.
The package manager ‘pamac’ is great, it enables ability to get the latest software packages from either main repository, AUR (Arch User Repository), flathub, or snap store all in one. As well, it has built-in utilities to install the latest Kernels, and proprietary NVIDIA drivers.
2. Ubuntu:
Ubuntu is the top popular Linux Distribution ranked by Google Trends. Not only for the Desktop, but also popular as Linux Server and for clouding computing.
Like Fedora, Ubuntu announces new releases every 6 months. Versions released in April of even-year (e.g., 16.04, 18.04, 20.04) are LTS with 5-year support. All others has only 9-month support.
Ubuntu is based on Debian, and uses GNOME as the default Desktop Environment. The Desktop is not perfect out of the box, the Software Center sucks, media codec is not pre-installed, clicking app icon on dock does not minimize the opened window, and more and more.
However, there are tons of tutorials and answers on the web shows you how to tweak Ubuntu. And you can ask on https://askubuntu.com/.
Ubuntu contains a wide range of software packages. Though the packages in default repositories are always old, many software developers (e.g., LibreOffice, Inkscape) and third-party maintainers maintain PPAs (Personal Package Archive) with most recent packages for Ubuntu users. And Flatpak and Snap is also available for choice.
Ubuntu is not the best for those totally new to Linux, but it has the largest community base actively participates and provides support to its users.
1. Linux Mint
Linux Mint is the most friendly Linux system for beginners in my own opinion.
It is based on Ubuntu LTS, and feature three desktop editions: Cinnamon, MATE, and Xfce. Linux Mint includes a variety of pre-installed software and it’s ready to use out-of-the-box.
All the settings for desktop users are easy to access via all-in-one ‘System Settings‘ tool, including desktop appearances, account, privacy, display, power management, printers, driver, firewall, and more.
Along with Ubuntu package base, Linux Mint also has its own package repository. Apps are easy to install either via Synaptic or System package manager. Kernels are easy to install via its update manager. PPAs and apt repositories are easy to manage via its ‘Software Sources’ utility. Thanks to Ubuntu, the latest NVIDIA drivers are also easy to apply.
As a fast growing Linux Distribution, Linux Mint is a stable, safe, reliable, and extremely easy to use.
At Last
Since there are so many Linux Distributions, I can’t try all of them one by one. Feel free to leave comment if you found a better one.
Inkscape, free open-source vector graphics editor, release new major version 1.1 a few days ago. Here’s how to install it in Ubuntu 20.04, Ubuntu 21.04, Linux Mint 20.x.
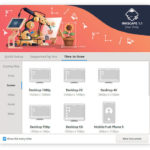
Inkscape 1.1 features a new welcome screen with ability to choose canvas colors, keyboard shortcut style, and toggle dark mode.
By different tabs, it also shows you how to contribute, and options to open recent files, set size of documents.
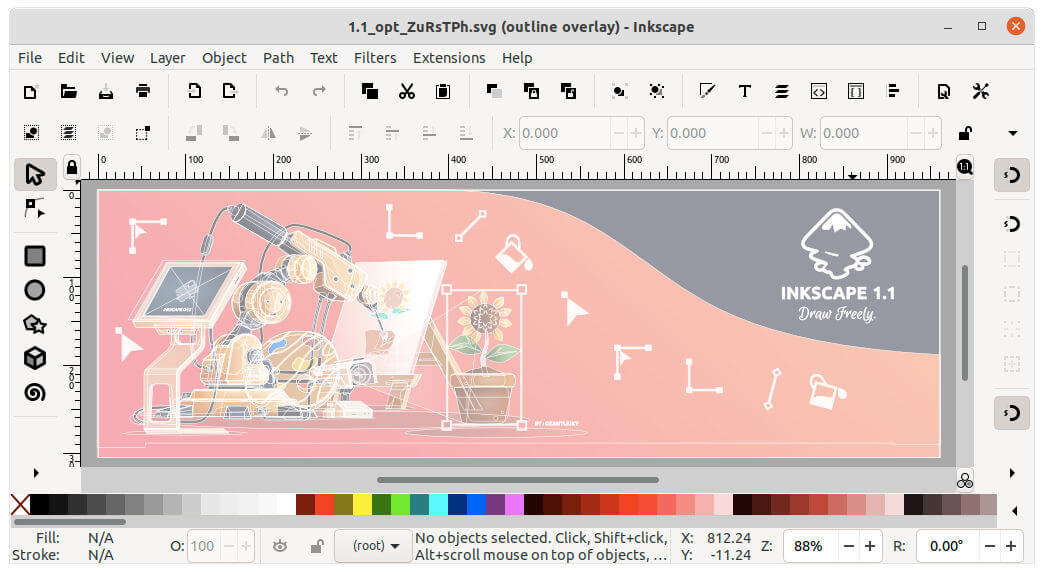
The release also introduced a new display mode, outline overlay, made by Jabier Arraiza.
It displays a muted view (opacity) of your drawing behind the object outlines that are click-sensitive, so you can make sure everything is in order.
New “Command Palette”, open it by pressing ? on keyboard.
Revamped Dialog Docking System
Copy, cut and paste a selection of nodes with the Node tool
New ‘Export PNG Image’ dialog to export JPG, WebP and TIFF, optimized PNG.
New ‘Extension Manager’ in beta.
How to Install Inkscape 1.1 in Ubuntu:
The easiest way to install the editor is using the official Snap package.
Also, non-install Appimage is available in official download page. Download it, make executable via file’s “Properties -> Permissions” dialog, finally click run to launch the program.
For those prefer the classic apt method, Inkscape team has official Ubuntu PPAs.
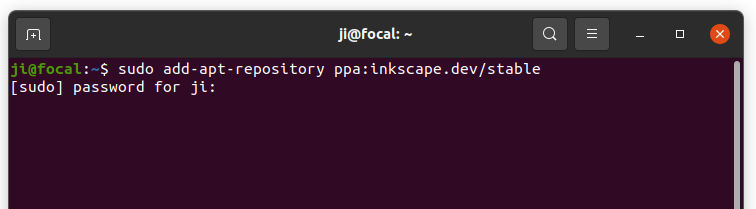
1. Open terminal either by pressing Ctrl+Alt+T on keyboard or by searching for ‘terminal’ from system application menu. When it opens, run command to add the PPA:
sudo add-apt-repository ppa:inkscape.dev/stable
Type user password (no asterisk feedback) when it prompts and hit Enter.
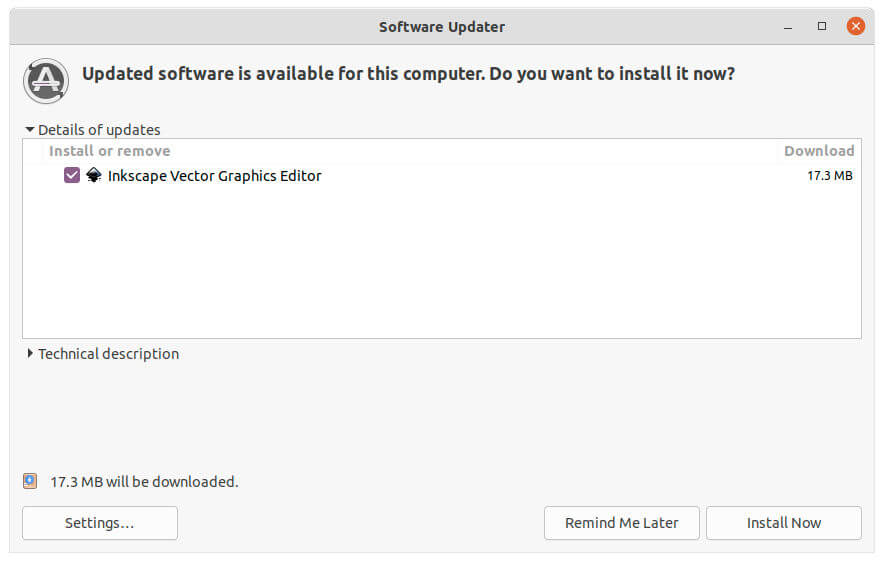
2. Then run command to install or upgrade the vector graphics editor:
sudo apt install inkscape
or upgrade it via Software Updater
Uninstall:
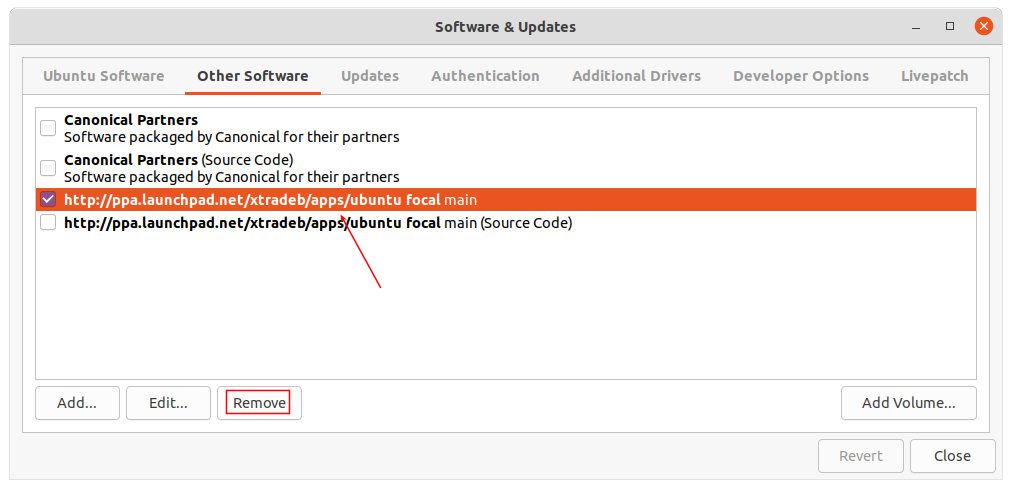
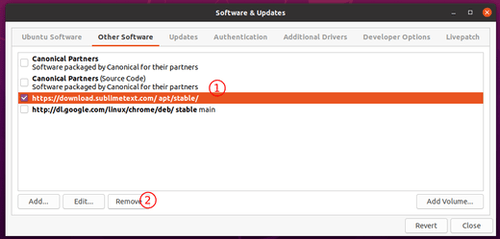
To remove the PPA repository, open Software & Updates and navigate to Other Software tab. Then remove the relevant repository line:
To remove Inkscape, either use Synaptic package manager or run command in terminal:
Since Ubuntu replaced Chromium in its universe repository with Snap package, users are looking for deb package or apt method to install the browser.
The Linux Mint team has been maintaining the chromium deb package for a while. You can install the package in Ubuntu and keep updated. It’s stable and trustworthy, however the installing process is not as easy as an Ubuntu PPA does.
Another Ubuntu PPA now contains the latest packages (90.0.4430.212 at the moment) for Ubuntu 20.04 and Ubuntu 20.10. The PPA also contains most recent versions of other useful apps, e.g., avidemux, filezilla, youtube-dl, and more. And it’s also trusty.
Chromium package in the PPA is backported from Debian Unstable repository. So it’s marked as ‘Developer build’. If you don’t want to add Linux Mint repository, the PPA can be a good alternative.
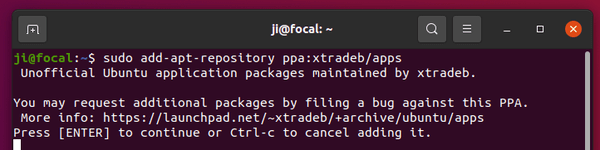
1.) Add the Ubuntu PPA:
Firstly open terminal from system app launcher. When it opens, run command to add the PPA:
sudo add-apt-repository ppa:xtradeb/apps
2.) Install Chromium:
Same to Linux Mint, the package name has changed from chromium-browser to chromium. Simply run apt command in terminal to install it:
sudo apt install chromium
Add --install-suggests flag in the command if you want to enable minimal shell and WebDriver support.
Remove the PPA:
To remove the Ubuntu PPA, either open Software & Updates -> Other Software and remove the relevant line:
By releasing version 0.96, the feature-rich screenshot application is finally ported to GTK3, making first step to get back to Ubuntu universe repository.
Shutter 0.96 does no longer depends on goocanvas, Gnome wnck, GTK2 version of image viewer widget, unique and appindicator module. Instead, it now requires GTK3 version of image viewer widget, GooCanvas2, and libwnck-3.
The release also remove the option “Captures only a section of the window”. because it didn’t work with the way how modern Qt and Gtk were drawing their windows anyway.
There are also possible issues including:
Multiple screens might or might not be broken
HiDPI screens might do screenshot of a nested menu in a wrong place
Get Shutter 0.96:
At the moment of writing no binary package is available to install, but only source tarball which is available in the link below:
For Ubuntu and Linux Mint users who like this screenshot tool, keep an eye on linuxupring PPA and xtradeb PPA, both maintains most recent Shutter packages.
Want to run a command or a script daily, weekly, monthly, or on other given schedule? It’s easy to do this in Ubuntu via cron job.
Cron is a time-based job scheduler to run command or script periodically at fixed times, dates, or intervals. It’s typically used for system maintenance or administration, though it can be useful for general purpose, e.g., downloading file from internet at regular intervals.
1. Edit crontab files:
Users can set up a cron job easily by configuring crontab file by crontab command. It’s pre-installed in Ubuntu based systems. And each user has its own crontab config file.
b.) Schedule task for current user:
To run command or script by current user, simply open terminal from system app launcher and run command:
crontab -e
For the first time, it will prompt to select an editor to edit the config file. Choose one you prefer or press Enter to use the default nano text editor.
b.) If need root or sudo privilege:
For command or script need sudo or root user privilege, you may run following command instead:
sudo crontab -e
It will create (if not exit) or open the configuration file for root user.
c.) Specify a user to run the schedule task:
You can add -u <user_name> flag to specify the user, ji for instance.
sudo crontab -u ji -e
User can be root, so it will do the same to sudo crontab -e:
sudo crontab -u root -e
2. Set time interval, command or script to run periodically:
After running a command in step 1, it opens the configuration file in the terminal window (or command console).
Now scroll down and add a new line:
* * * * * <command or script>
The first 5 asterisks “*” specify the time and date, change them accordingly.
Examples:
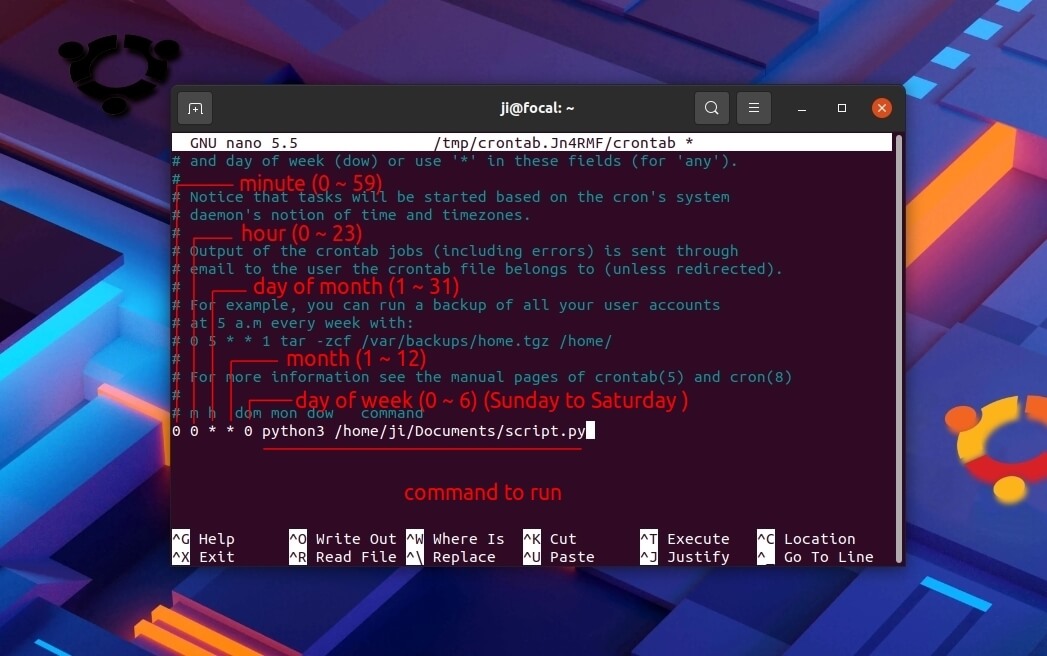
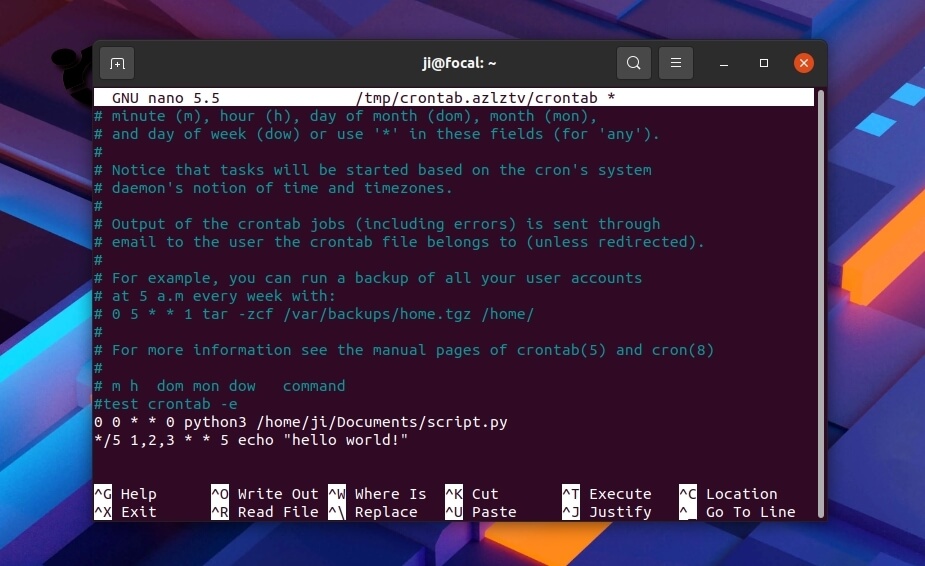
a.) For example, to run a python3 script under my Documents folder at midnight (00:00) every Sunday, use:
0 0 * * 0 python3 /home/ji/Documents/script.py
Here:
the first 0 specifies the minute, use * for every minute.
the second 0 specifies the hour, use * for every hour.
the third flag * specifies the day of month, every day if week day not specified.
the forth flag * says every month.
the fifth flag (third 0) specifies the week day. From 0 to 6 mean Sunday to Saturday.
b.) Run echo "hello world!" command everyday at 16:30, add this line:
30 16 * * * echo "hello world!"
c.) You can use */n to run for every n-th interval of time. And use multiple specific time intervals with commas.
For instance, run the command every Friday at first, second, an third hour every 5th minute (01:00, 01:05, 01:10, …, 02:00, 02:05, 02:10, …, 03:55).
*/5 1,2,3 * * 5 echo "hello world!"
Finally, save the configuration file. If edited via nano, press Ctrl+X on keyboard, type y, and hit Enter to save it.
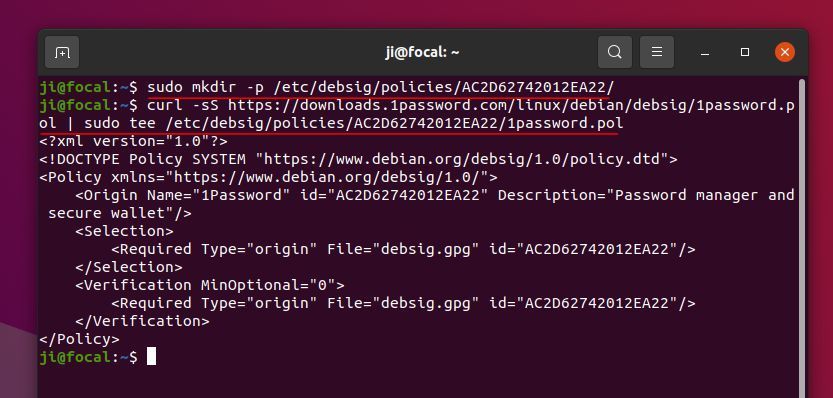
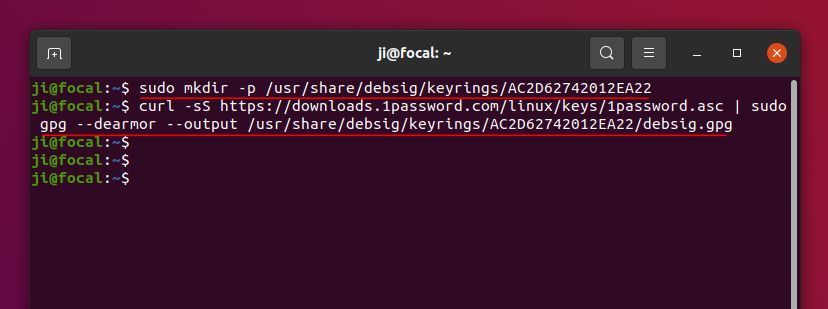
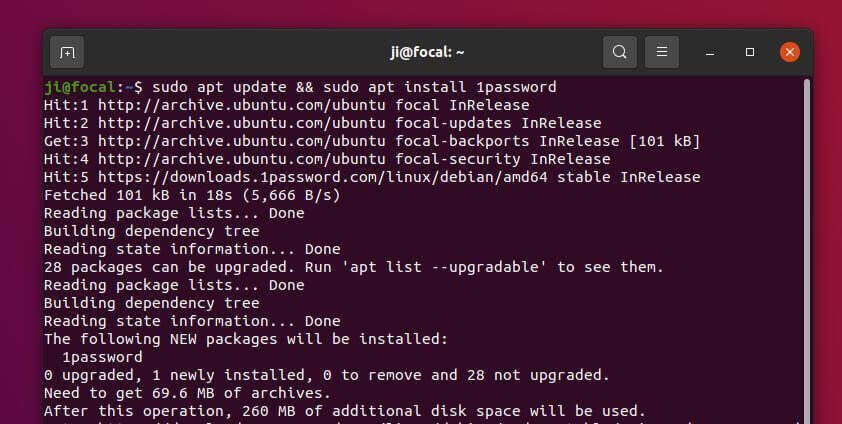
The 1Password password manager now adds officially Linux support. Here’s how to install it in Ubuntu 20.04 via its apt repository.
1Password is a password manager developed by AgileBits Inc. It provides a place for users to store various passwords, software licenses, and other sensitive information in a virtual vault that is locked with a PBKDF2-guarded master password. By default, this encrypted vault is stored on the company’s servers for a monthly fee.
Download & install DEB package:
1Password for Linux was available for test last year. Now it’s finally goes stable. The .deb binary is available to download at the link below: