Avidemux video editor released version 2.7.4 today with tons of bug-fixes. Here’s how to install it in Ubuntu 18.04, Ubuntu 19.04.
Aivdemux 2.7.4 release highlights:
- Detect and warn when cut points in H.264 video streams may result in playback issues despite being on keyframes
- Update to the 4.1.4 release
- Enable HW accelerated decoding of 8-bit HEVC for recent versions of Intel graphics driver on Windows
- Support audio tracks in fragmented MP4 files
- Support E-AC3 audio tracks in MP4 files
- Fix ASF demuxer still broken by chance with MSVC++ only, the fix relevant for all platforms
- Support more varieties of BMP images
- Optimize output of the Mp4 muxer for streaming on Windows too
- Add option to the Mp4 muxer to output fragmented MP4 files
- Support WMAPRO audio codec for decoding
- Support AAC with signal band replication (SBR) in external audio tracks
- Numerous other fixes. See HERE for details.
How to Install Avidemux 2.7.4 in Ubuntu:
There are a few ways installing the latest the video editor in all curren Ubuntu releases.
- Appimage, single executable (enable it in file properties dialog) to launch the editor.
- Flatpak, community maintained package that runs in sandbox.
- Native Ubuntu (.deb) packages via an unofficial PPA.
For Ubuntu 16.04, Ubuntu 18.04, and Ubuntu 19.04, here’s how to install Avidemux 2.7.4 via the unofficial PPA.
1. Open terminal either from app launcher or via Ctrl+Alt+T keyboard shortcut. When it opens, run command to add the PPA:
sudo add-apt-repository ppa:ubuntuhandbook1/avidemux
Type user password (no asterisk feedback due to security reason) when it prompts and hit Enter.


2. Then run following 2 commands to refresh package cache and install the video editor:
sudo apt update

sudo apt install avidemux2.7-qt5 avidemux2.7-qt5-data avidemux2.7-plugins-qt5 avidemux2.7-jobs-qt5
NOTE: if you get software launching error similar to:
avidemux2.7_qt5: symbol lookup error: avidemux2.7_qt5: undefined symbol: _Z20extractH264FrameTypePhjPjPiP11ADM_SPSInfoS0_
try updating your system via command sudo apt update && sudo apt upgrade.
Uninstall:
To remove the native Ubuntu .deb package of Avidemux 2.7, run command in terminal:
sudo apt remove --autoremove avidemux2.7-*
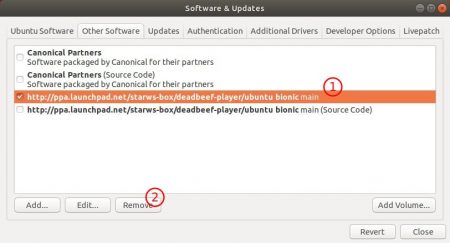
And remove the PPA via Software & Updates utility under ‘Other Software’ tab.