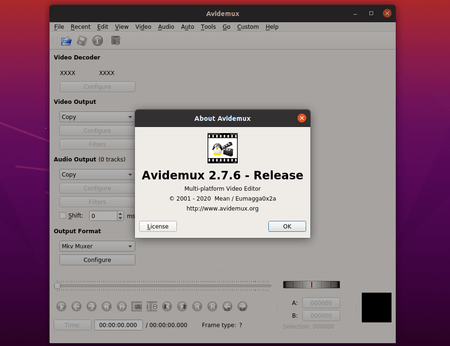
Avidemux video editor 2.7.6 was released a day ago with new video encoder / decoder, and many improvements. Here’s how to install it in Ubuntu 20.04, Ubuntu 18.04, Ubuntu 16.04.
Avidemux 2.7.6 release highlights according to the changelog file:
- Detect and warn when cut points in HEVC video streams may result in grave playback issues despite being on keyframes
- Add libaom-based AV1 decoder
- Add libvpx-based VP9 encoder
- Update to FFmpeg 4.2.3
- Add hardware accelerated deinterlacer and resizer based on VA-API
- Increase maximum supported resolution to 4096×4096
- Add support for Vorbis audio, LPCM audio to the Mp4 muxer
- Add HE-AAC and HE-AACv2 profiles to the FDK AAC encoder plugin
- Numerous other improvements and fixes.

How to Install Avidemux 2.7.6 in Ubuntu:
Appimage:
The official non-install single executable .appimage package is available for downloading:
After downloaded the appimage, go to file Properties -> Permissions and make it executable, finally right-click and run the file to launch Avidemux video editor.
Flatpak:
The software is also as containerized Flatpak package.
You can run following commands one by one to setup flatpak, add flathub repository, and install Avidemux flatpak package:
sudo apt install flatpak

flatpak remote-add --if-not-exists flathub https://flathub.org/repo/flathub.flatpakrepo

flatpak install flathub org.avidemux.Avidemux
Ubuntu PPA:
I’ve uploaded the .deb packages into the unofficial PPA, available for Ubuntu 16.04, Ubuntu 18.04, Ubuntu 19.10, Ubuntu 20.04, and derivatives.
1.) Open terminal and run command to add the PPA:
sudo add-apt-repository ppa:ubuntuhandbook1/avidemux
Type user password (no asterisk feedback) and hit Enter to continue.


2.) Then refresh system package cache and install the editor:
sudo apt update

sudo apt install libavidemux2.7-6 libavidemux2.7-qt5-6 avidemux2.7-qt5 avidemux2.7-plugins-qt5 avidemux2.7-jobs-qt5
NOTE: Due to build failure, I changed names of some shared libraries. If you have problem launching the editor, try sudo apt upgrade to update your system packages.
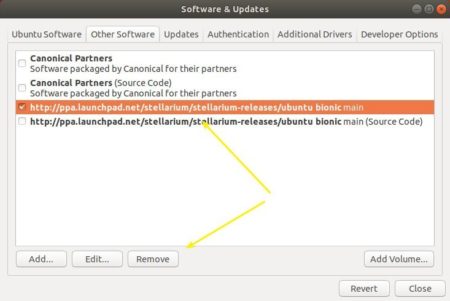
Uninstall:
To uninstall the PPA, run command:
sudo add-apt-repository --remove ppa:ubuntuhandbook1/avidemux
To uninstall the video editing software, run:
sudo apt remove libavidemux2.7-6 avidemux2.7-qt5 avidemux2.7-plugins-qt5 avidemux2.7-jobs-qt5
And to uninstall the Flatpak package, use command:
flatpak uninstall org.avidemux.Avidemux