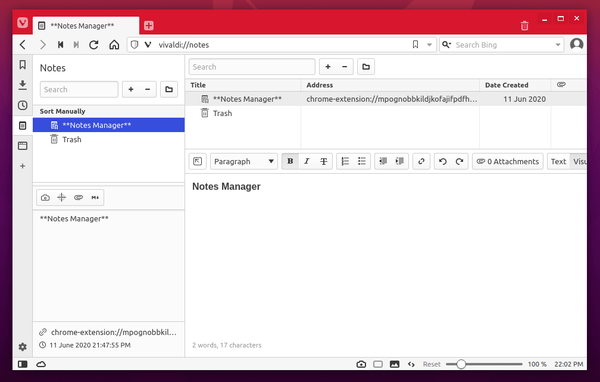
After two beta releases, KeePassXC password manager 2.4.0 finally goes stable. Here’s how to install it in Ubuntu 16.04, Ubuntu 18.04, and higher.
KeePassXC 2.4.0 enables coordinate system scaling for high-DPI displays, adds new database wizard, implements advanced search, and
Automatic update checker
KeeShare database synchronization
Improve favicon fetching; transition to Duck-Duck-Go
Remove KeePassHttp support
Linux: Prevent Klipper from storing secrets in clipboard
Linux: Enable use of browser plugin in Snap build
TOTP QR Code Generator
Allow toolbar to be hidden and repositioned
Increase max allowed database timeout to 12 hours
Password generator uses existing password length by default
Browser Integration Enhancements
How to Install KeePassXC 2.4.0 in Ubuntu via Snap:
The official snap package (runs in sandbox and auto-updates itself) has been updated.
The snap can be easily installed in Ubuntu 18.04 and higher via Ubuntu Software:
For Ubuntu 16.04, run command to install snapd daemon first:
sudo apt-get install snapd
Then install the snap package via command:
sudo snap install keepassxc
How to Install KeePassXC 2.4.0 in Ubuntu via PPA:
For those who don’t prefer snap packages, the official KeePassXC PPA contains the most recent .deb packages for Ubuntu 14.04, Ubuntu 16.04, Ubuntu 18.04, Ubuntu 18.10.
The 2.4.0 release package will be made into PPA in 2 or 3 days. Check the previous link before getting started.
1. Open terminal either via Ctrl+Alt+T keyboard shortcut or by searching for ‘terminal’ from app launcher. When it opens, run command to add the PPA:
sudo add-apt-repository ppa:phoerious/keepassxc
Type user password (no asterisk feedback due to security reason) when it prompts and hit Enter to continue.
2. Then upgrade KeePassXC via Software Updater:
or run commands one by one in terminal to install the latest package:
sudo apt update
sudo apt install keepassxc
Uninstall:
To remove the PPA, open Software & Updates and navigate to Other Software tab.
To remove KeePassXC .deb package, run command in terminal:
Kid3 audio tag editor released version 3.7.1 today. Here’s how to install it in Ubuntu 16.04, Ubuntu 18.04, Ubuntu 18.10, and higher.
Kid3 3.7.1 primarily brings bug fixes and usability improvements. Most new features target the Android version, which now supports a dark theme, a better file selection dialog and more configuration options.
Support max-, min-, unq- aggregation when renaming directories.
Android: Support dark and light themes.
Android: Support opening files with Kid3 from other apps.
Android: Settings for formats, character replacements and import profiles.
Improved support format codes in file name for cover.
Fixed support setting of ID3v2 version for DSF files.
Avoid jumping around frames while deleting.
Removal of multiple tags where not all tags are removed.
Setting of a simple string as value for IPLS frame with TagLib.
Adapted to Discogs server update.
How to Install Kid3 3.7.1 in Ubuntu:
The official Kid3 PPA contains the latest software packages for Ubuntu 16.04, Ubuntu 18.04, Ubuntu 18.10, and higher.
Open terminal either via Ctrl+Alt+T keyboard shortcut or by searching for ‘terminal’ from software launcher. When it opens, do following steps one by one.
1. Copy and paste following command in terminal and hit run to add the PPA:
sudo add-apt-repository ppa:ufleisch/kid3
Type your password (no asterisk feedback due to security reason) when it prompts and hit Enter to continue.
2. Then you can upgrade Kid3 from a previous version via Software Updater:
or run commands one by one in terminal to install or upgrade to the latest tag editor:
sudo apt update
sudo apt install kid3-qt
For KUbuntu, you may replace kid3-qt with kid3 in the last command for KDE integration.
Uninstall
To remove the PPA repository, either open Software & Updates -> Other Software tab, or run command:
Audacity audio editor 2.3.1 was finally released and restored Linux support which was missing in 2.3.0.
Audacity 2.3.1 brings over 20 bug-fixes and following new features / improvements:
Microfades are now an opt-in feature. They were always on in 2.3.0.
The advanced vertical zooming option is now available in the View->Zoom menu.
Regular interval labels now support range labels.
How to Install Audacity 2.3.1 in Ubuntu:
There’s an unofficial PPA contains the 2.3.1 packages for Ubuntu 16.04, Ubuntu 18.04, Ubuntu 18.10, Ubuntu 19.04, and their derivatives, e.g., Linux Mint 18.x and 19.x.
1. Open terminal either via Ctrl+Alt+T keyboard shortcut or by searching for ‘terminal’ from app launcher. When it opens, run command:
NVIDIA driver 418.43 for Linux was released 2 weeks ago with G-SYNC Compatible (a.k.a. FreeSync / Adaptive-Sync) support. Now you can install it in Ubuntu 18.04 and higher via the “Graphics Drivers” team PPA.
NVIDIA driver 418.43 is the first stable release in the 418 series, and it features:
Linus Torvalds announced the released of Kernel 5.0 yesterday afternoon. He wrote on lkml.org:
Ok, so the last week of the 5.0 release wasn’t entirely quiet, but it’s a lot smaller than rc8 was, and on the whole I’m happy that I delayed a week and did an rc8.
It turns out that the actual patch that I talked about in the rc8 release wasn’t the worrisome bug I had thought: yes, we had an uninitialized variable, but the reason we hadn’t immediately noticed it due to a warning was that the way gcc works, the compiler had basically initialized it for us to the right value. So the same thing that caused not the lack of warning, also effectively meant that the fix was a no-op in practice.
But hey, we had other bug fixes come in that actually did matter, and the uninitialized variable _could_ have been a problem with another compiler.
Regardless – all is well that ends well. We have more than a handful of real fixes in the last week, but not enough to make me go “Hmm, things are really unstable”. In fact, at least two thirds of the patches are marked as being fixes for previous releases, so it’s not like 5.0 itself looks bad.
…
Changes in Linux Kernel 5.0 include:
AMD Radeon FreeSync support
Logitech High Resolution Scrolling support
Raspberry Pi Touchscreen support out of the box.
New console font for HiDPI and retina screens.
Initial support for NVIDIA Turing GPUs
And numerous other changes
How to Install Linux Kernel 5.0 in Ubuntu:
The mainline kernel packages for Linux 5.0 are available for download at the link below:
Depends on your OS type, download and install the packages in turns:
Select generic for common system, and lowlatency for a low latency system (e.g. for recording audio), amd64 for 64bit system, i386 for 32bit system, or armhf, arm64, etc for other OS types.
Alternatively you can download and install the kernel binaries via terminal commands (Ctrl+Alt+T):
Restart your machine and select boot with the previous kernel in boot menu ‘Grub2 -> Advanced Option for Ubuntu’. Then run command to remove Linux Kernel 5.0:
OBS Studio, free live streaming and screen recording software, released version 23.0 recently with many new features. Here’s how to install it in Ubuntu 16.04, Ubuntu 18.04, Ubuntu 18.10.
3. Now you can install OBS-Studio via Synaptic package manager, upgrade the software from an existing release via Software Updater, or simply run commands one by one: