Archives For November 30, 1999

Want to display digital clock, system memory and CPU load in your Desktop? There’s new circular widget for Ubuntu 22.10, Fedora 37, and other Linux with GNOME 43.

There are quite a few tools to display system load widget in desktop. Here I’m going to introduce the one that has a Conky look alike circular widget for GNOME desktop.

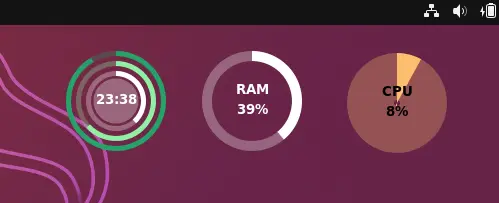
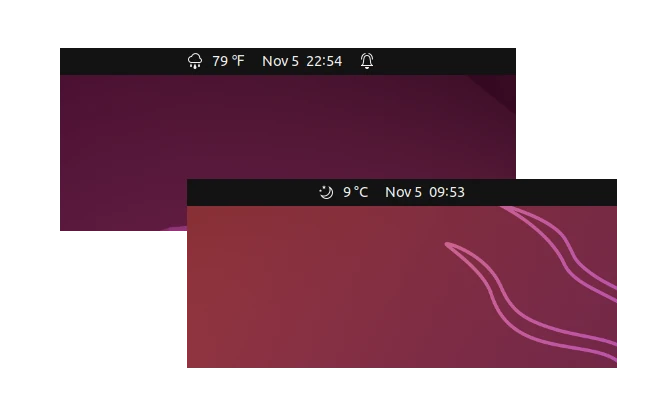
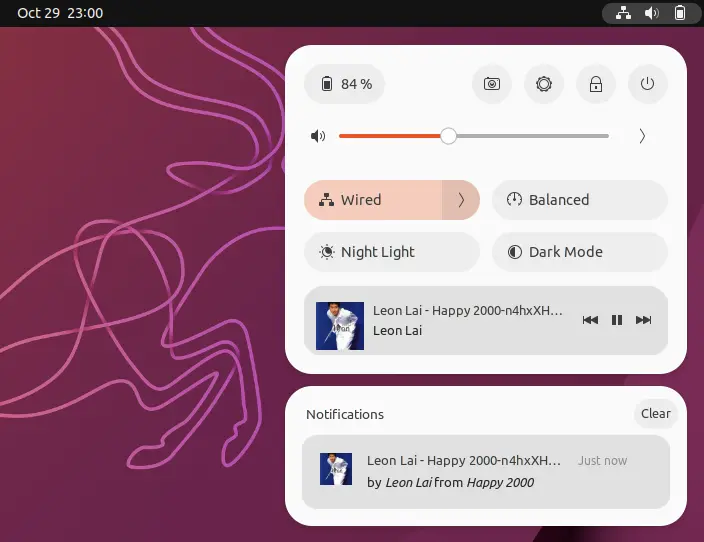
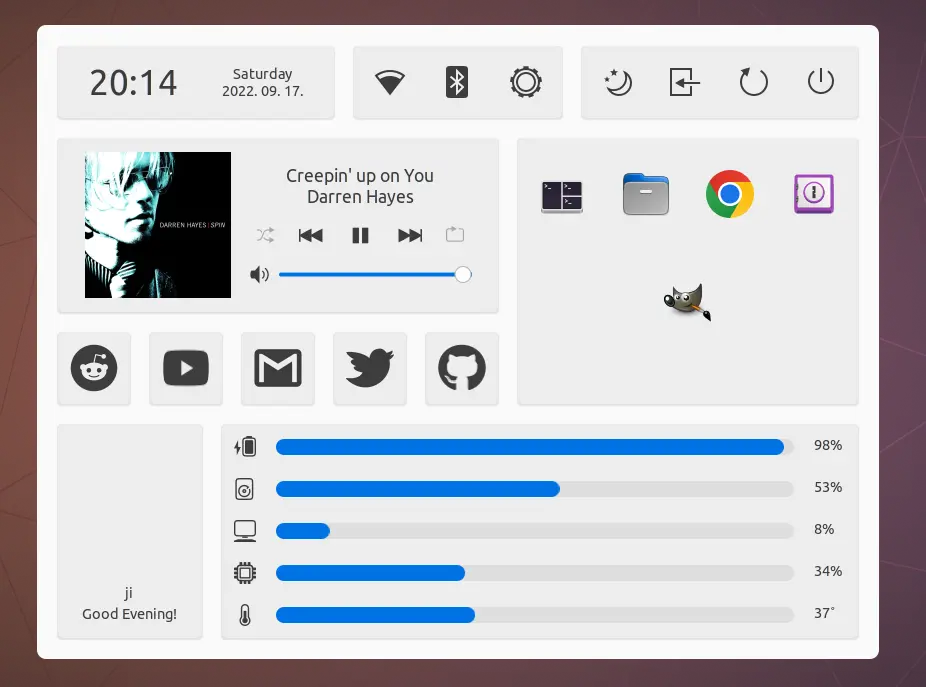
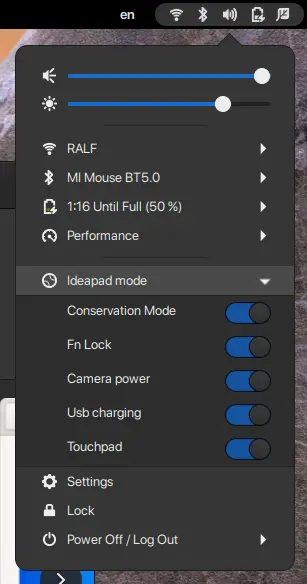
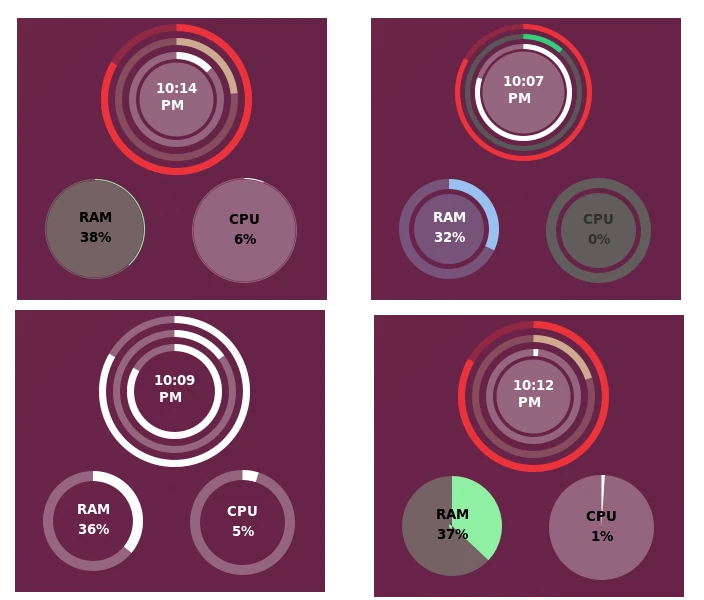
It displays local time, RAM usage and CPU load in 3 separated circular widget. Meaning you can drag moving any one of them to anywhere in your screen. And, it allows to resize the circle, change its color, line width, as well as text color and background, etc to get different look and feel.

Cool, isn’t it? Let me show you how to install it.

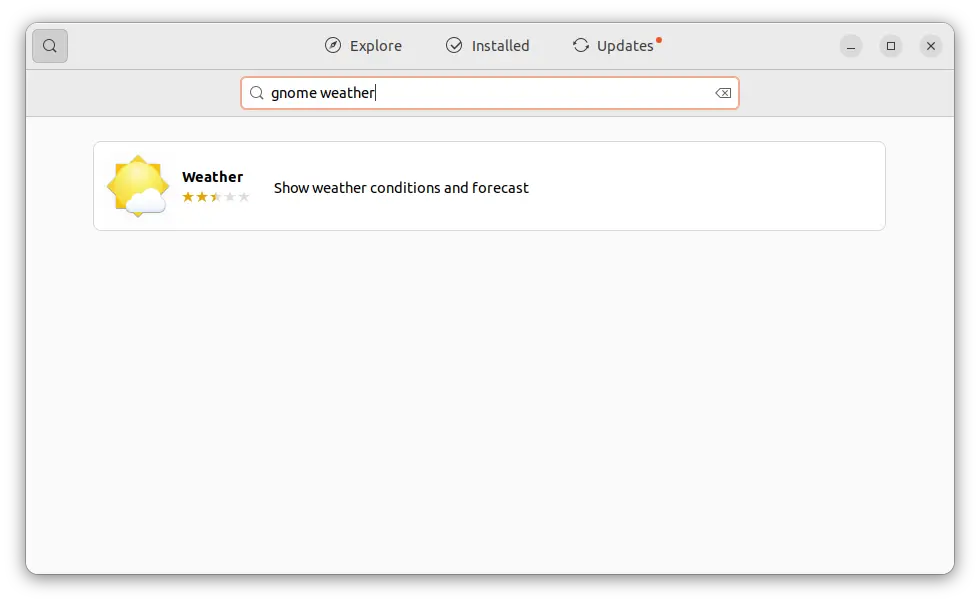
Step 1: Install Extension Manager

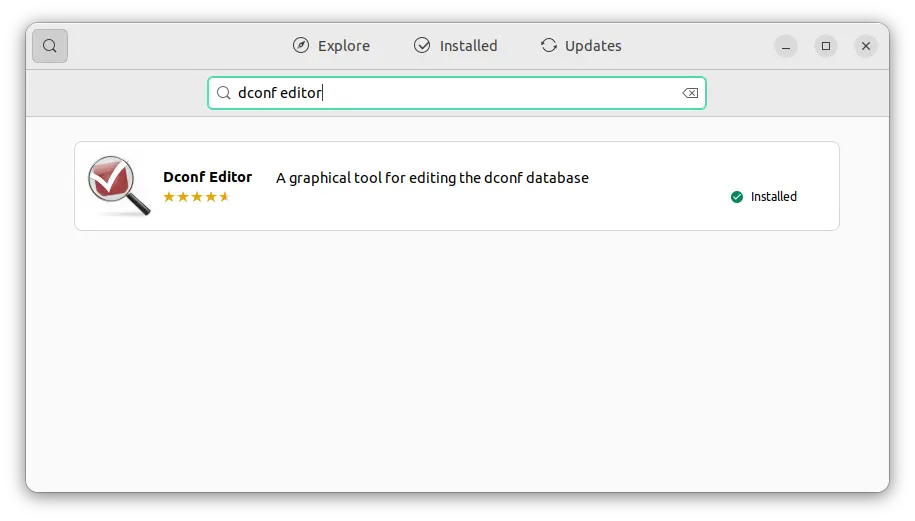
First, search for and install the “Extension Manager” app from Ubuntu Software, for installing Gnome extensions.

Install Extension Manager in Ubuntu 22.04+

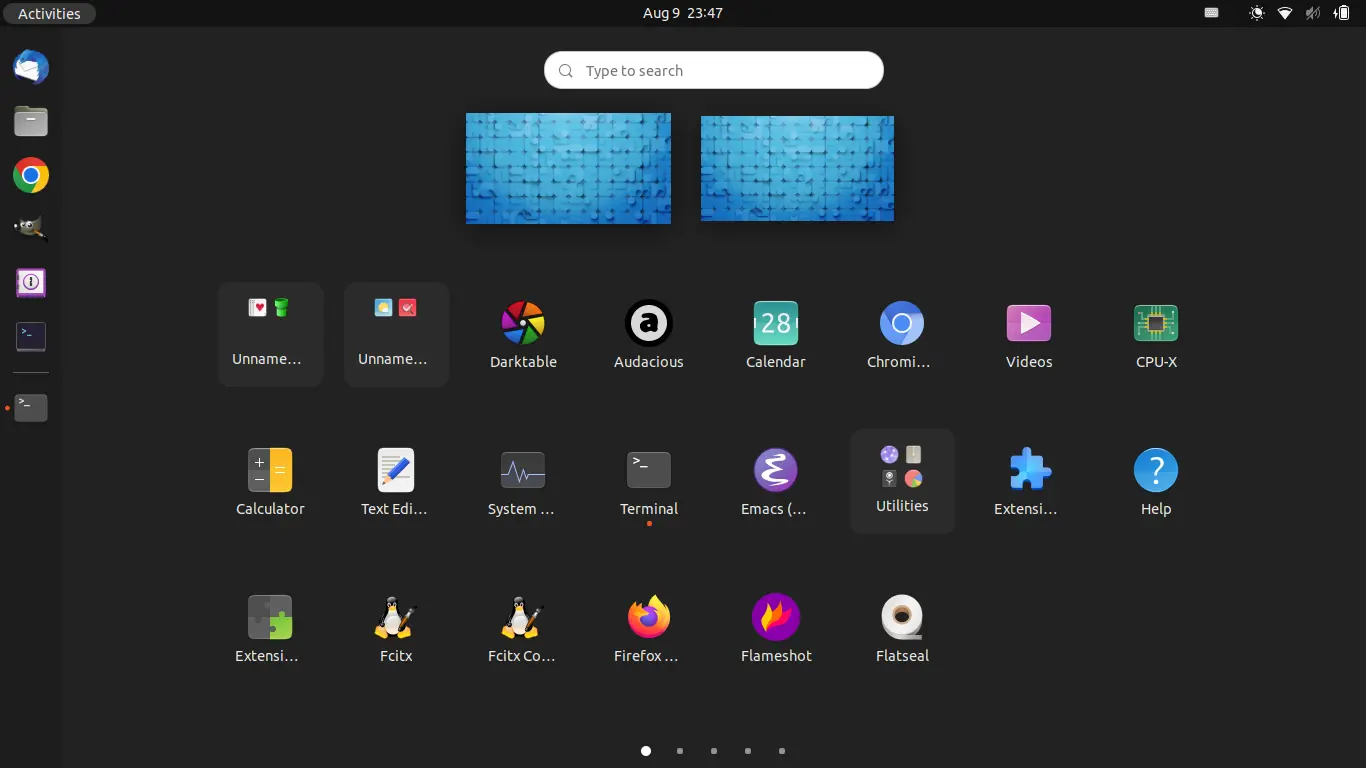
Once installed, search for and launch the tool from ‘Activities’ overview screen.

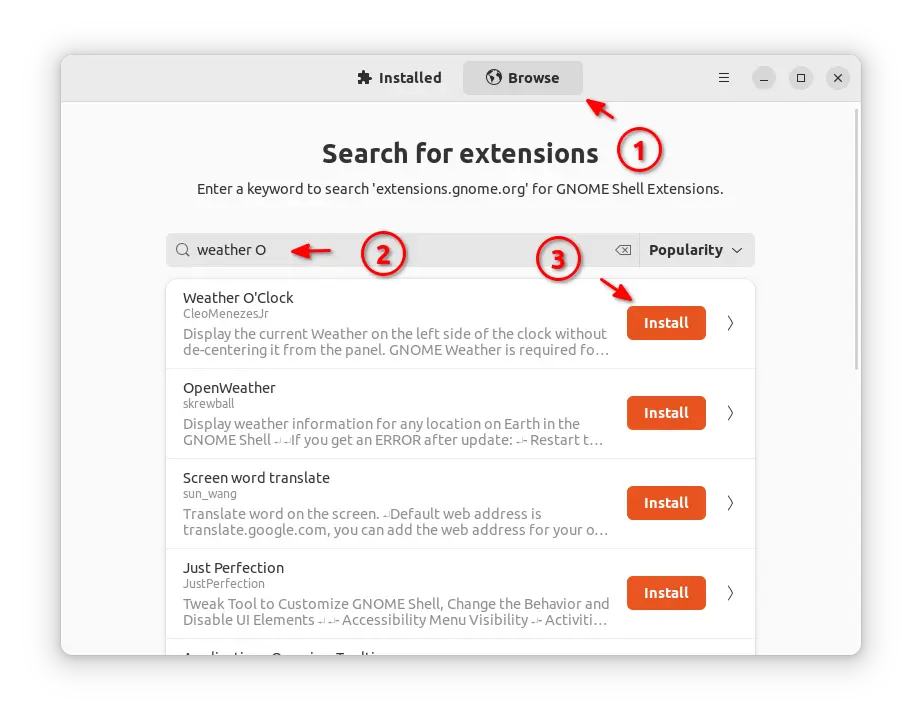
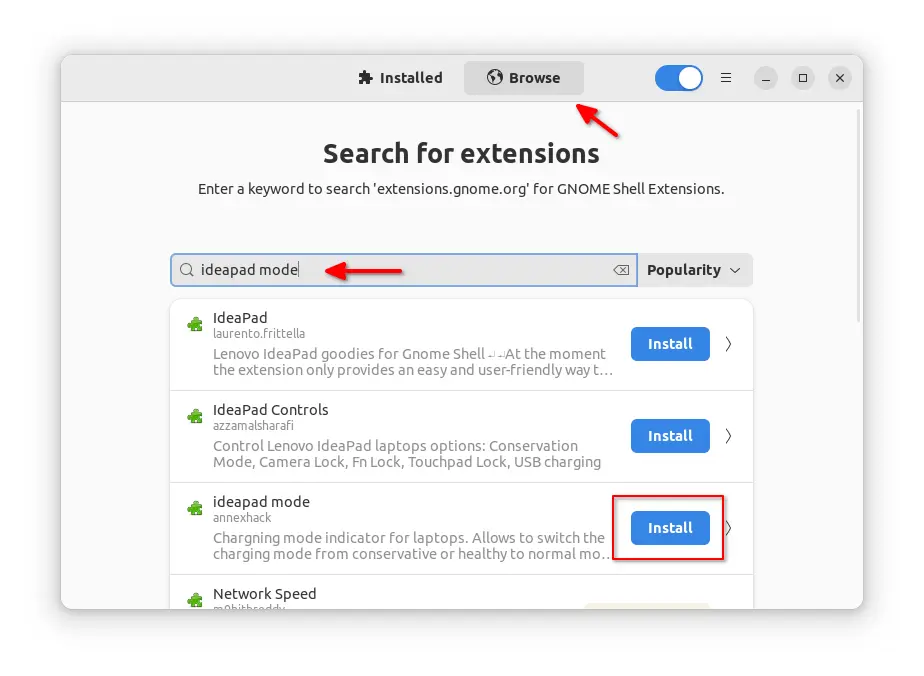
Step 2: Install the Circular Widgets via Extension Manager

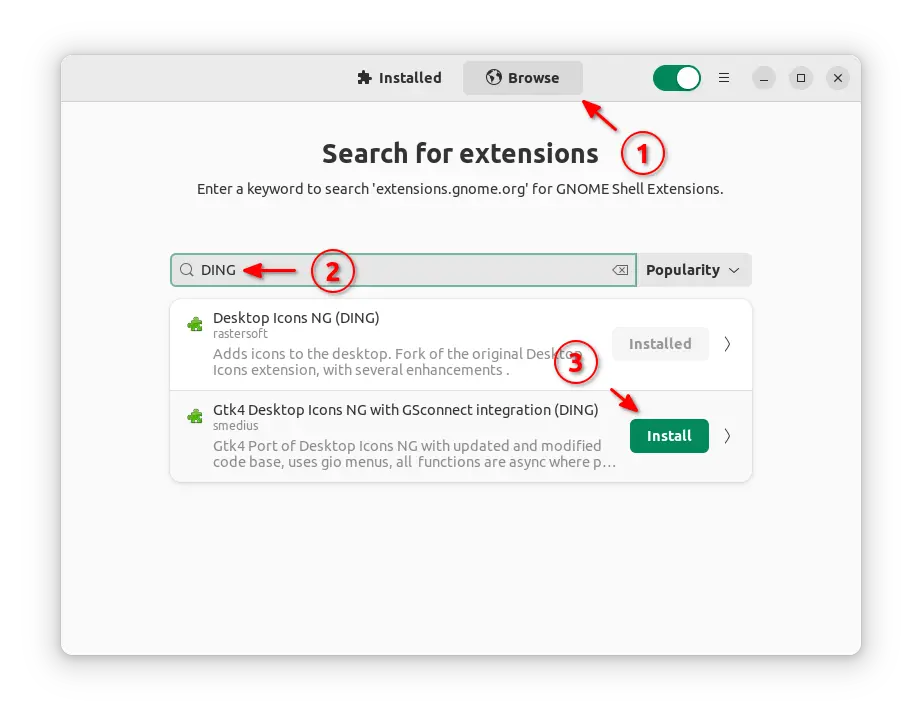
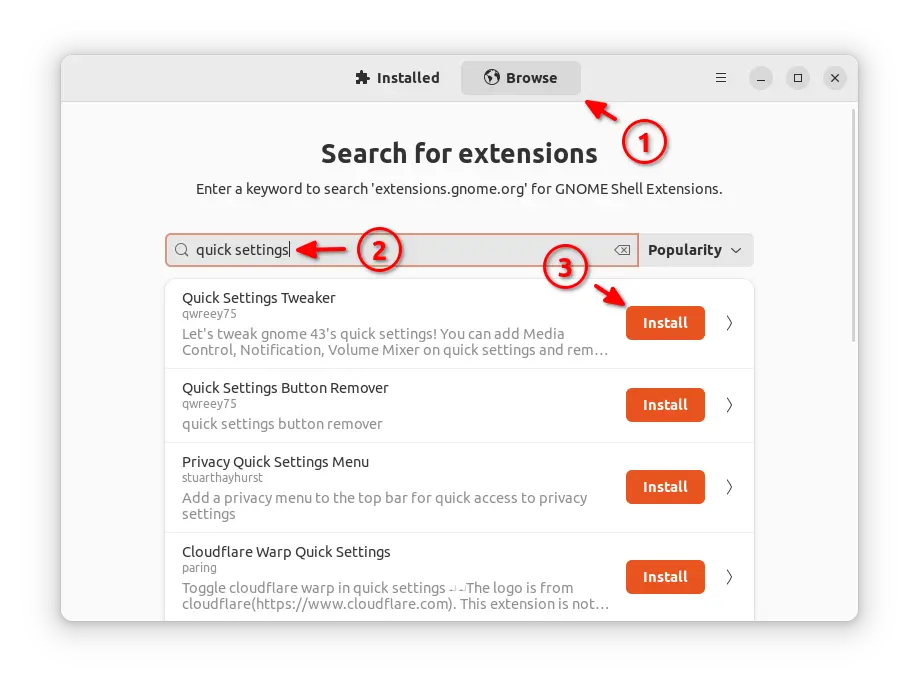
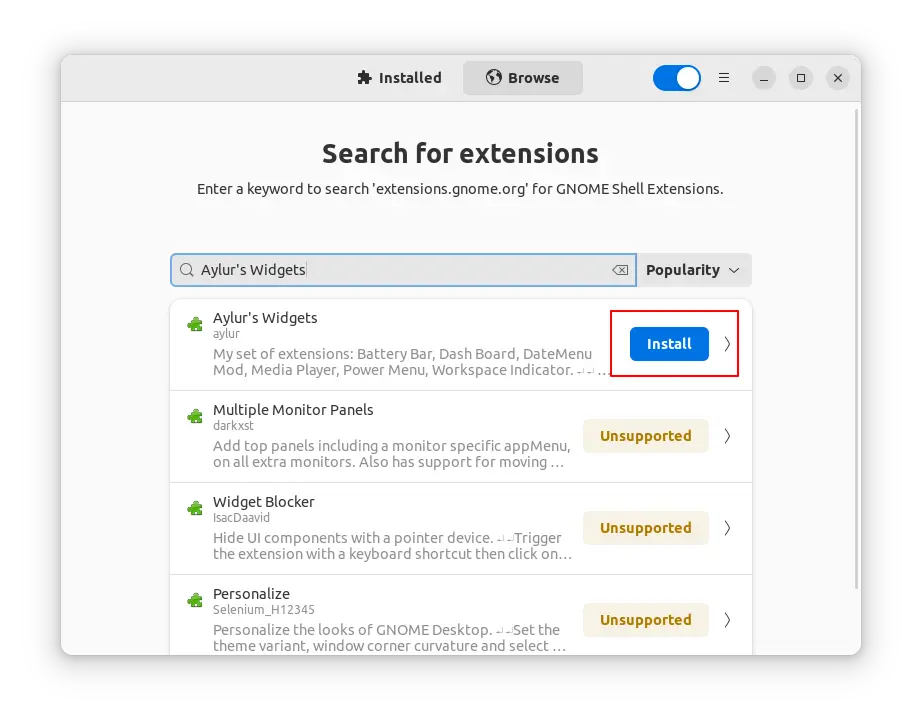
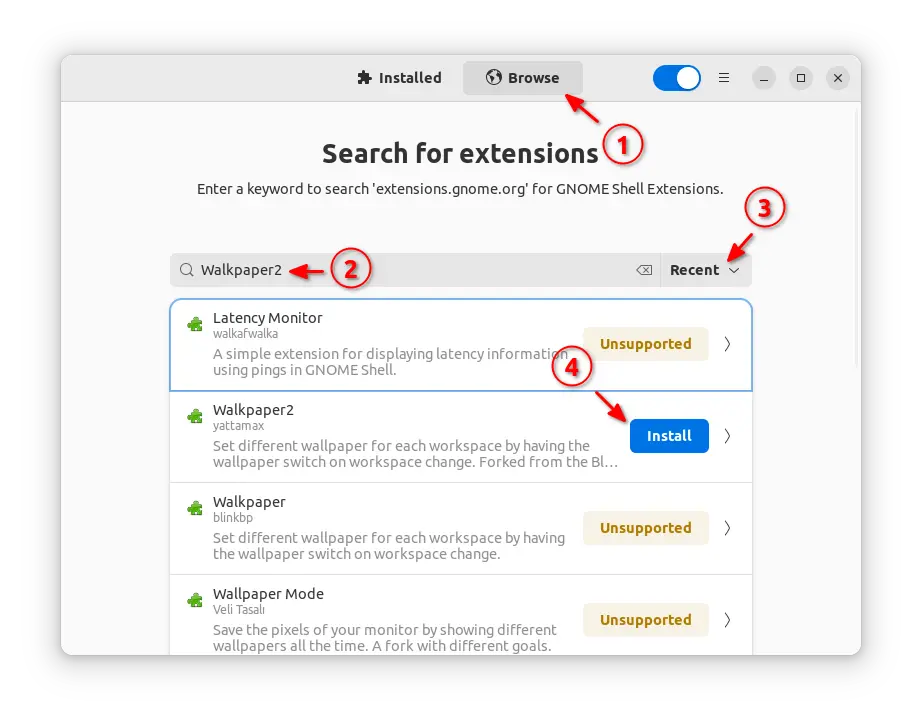
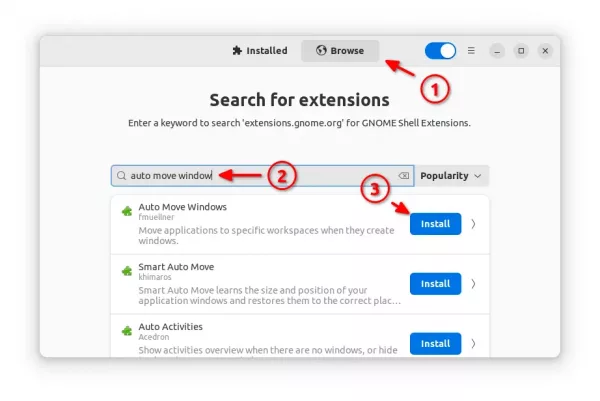
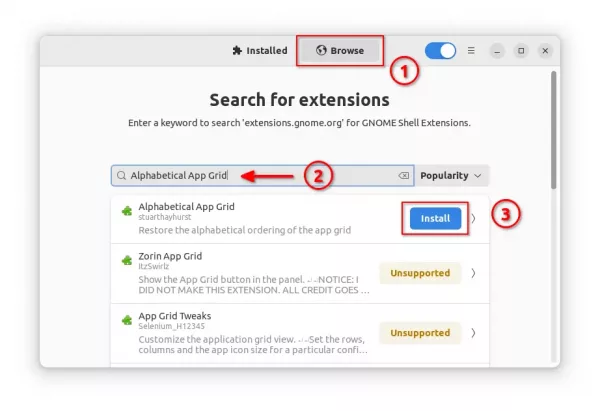
When Extension Manager opens, navigate to ‘Browse’ tab, then search for and install the Circular Widgets extension.

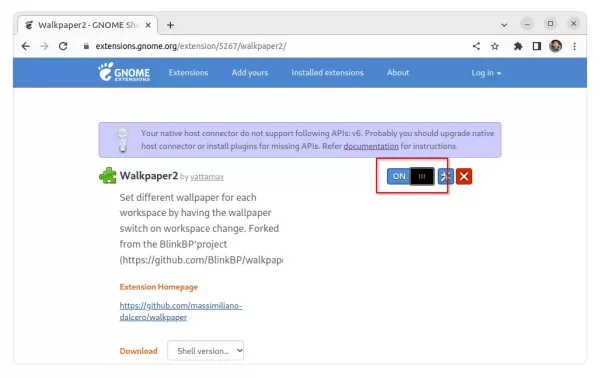
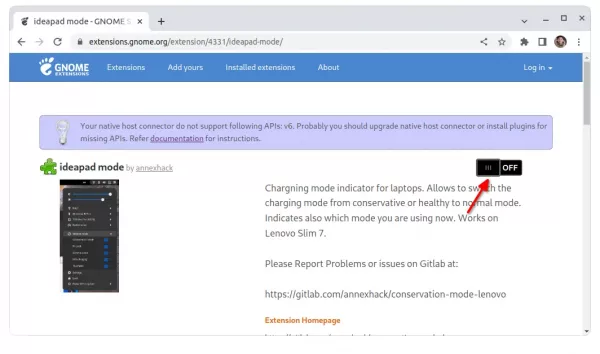
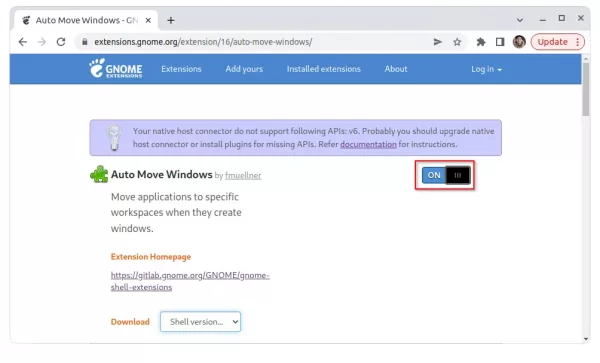
For Fedora 37 user, simply go to this web page and use ON/OFF switch to install it.

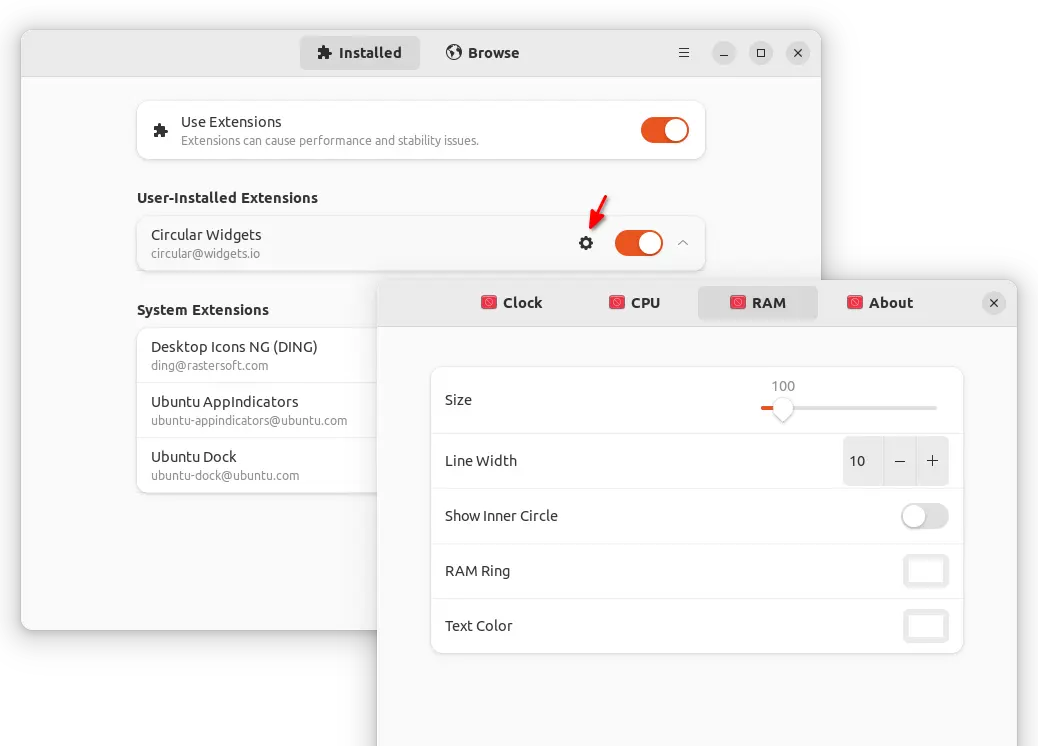
Step 3: Configure the widget

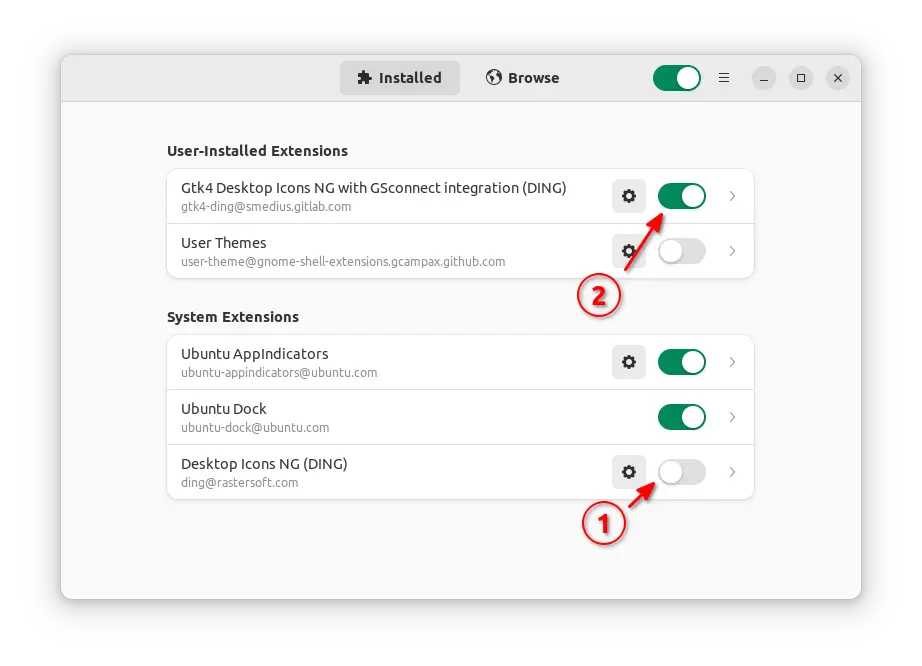
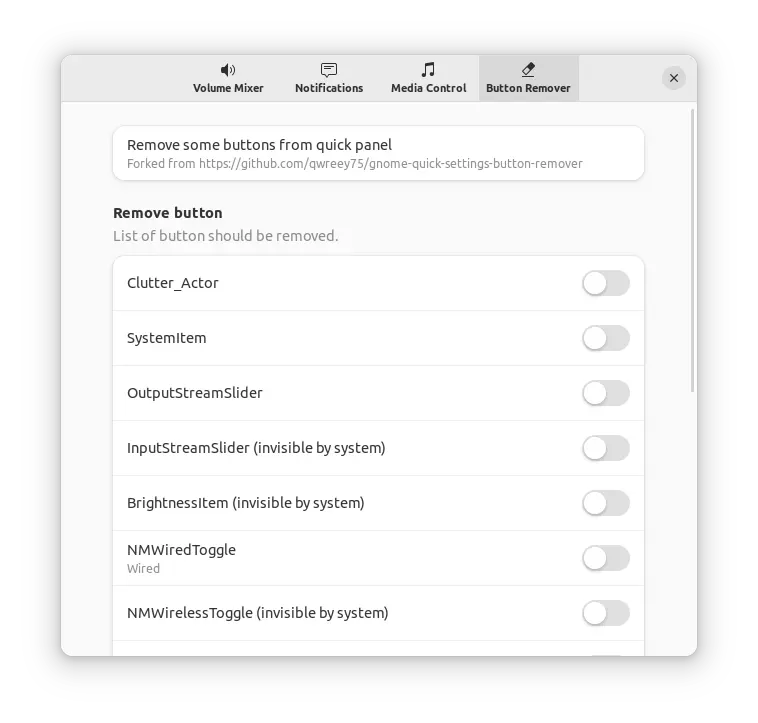
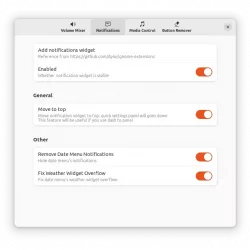
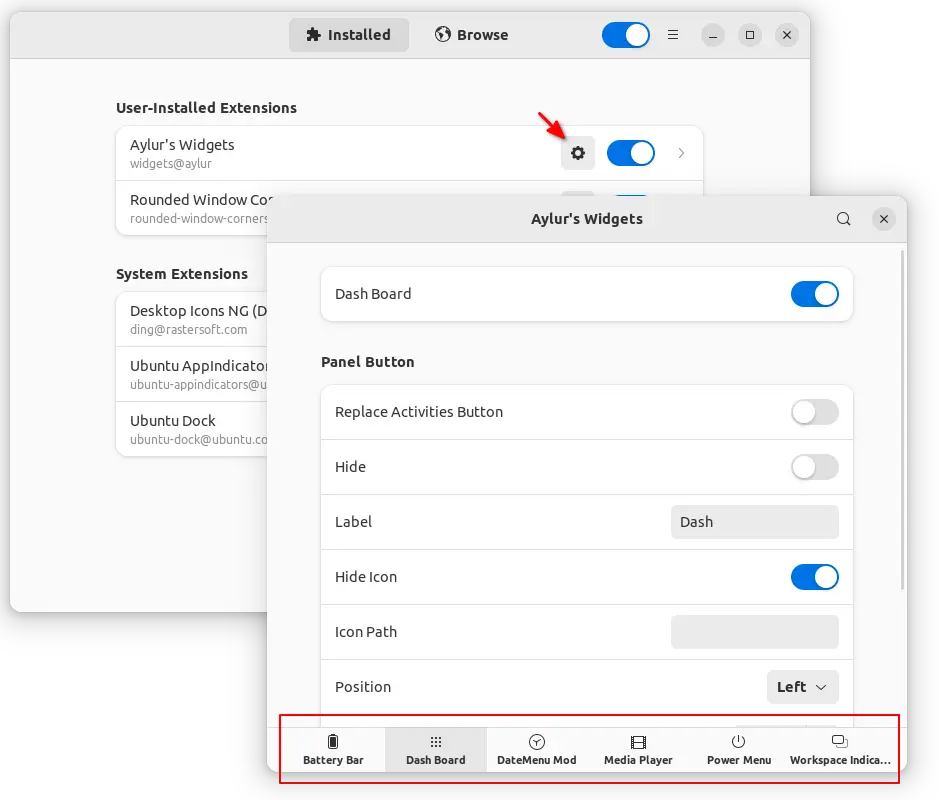
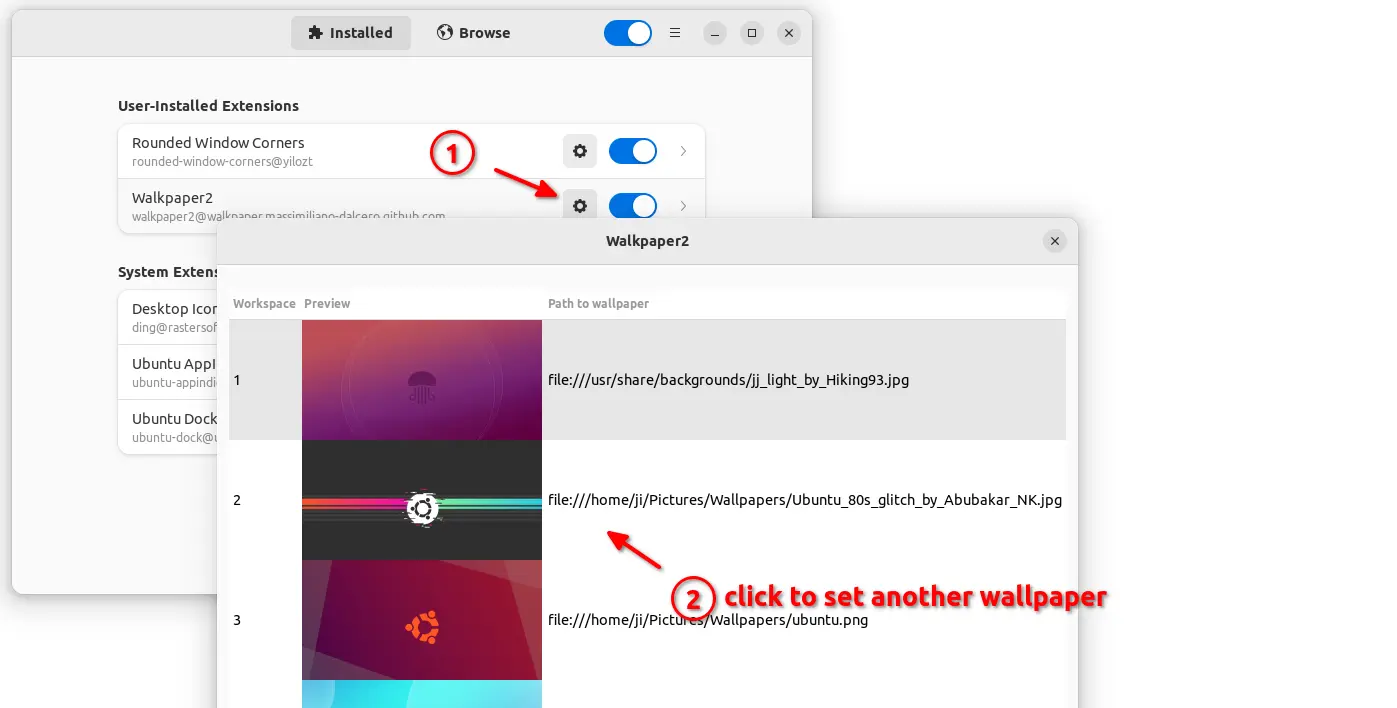
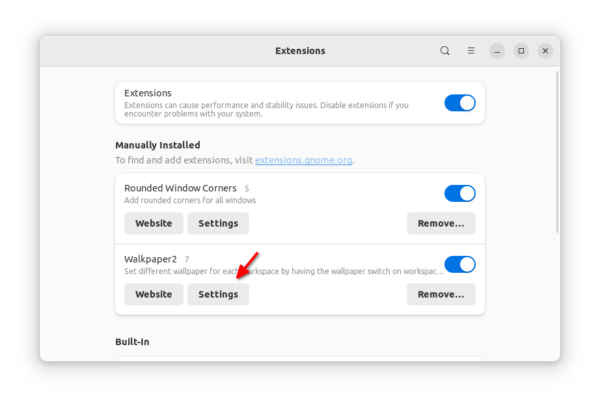
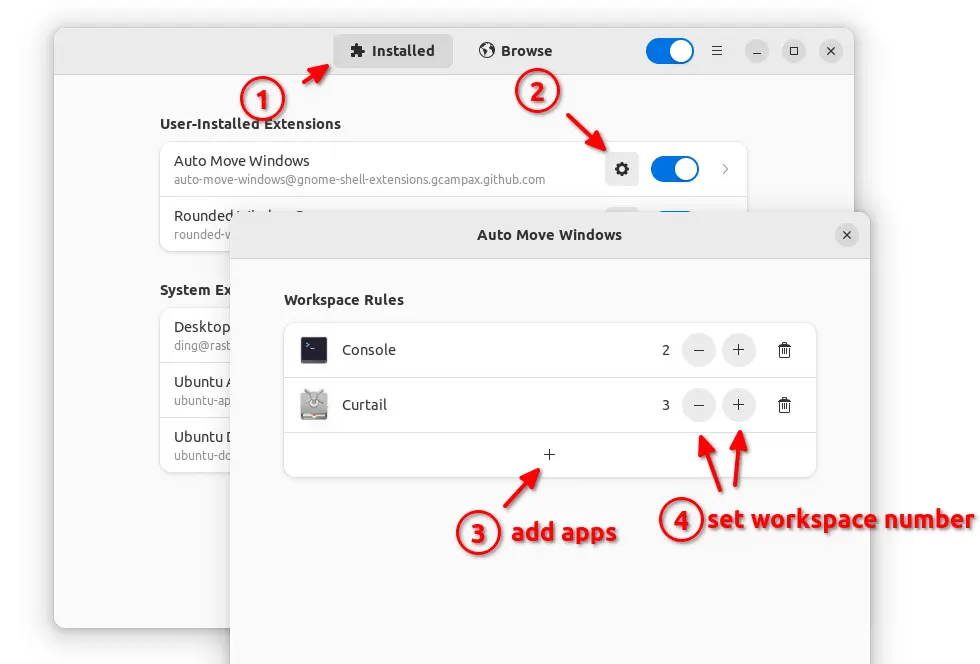
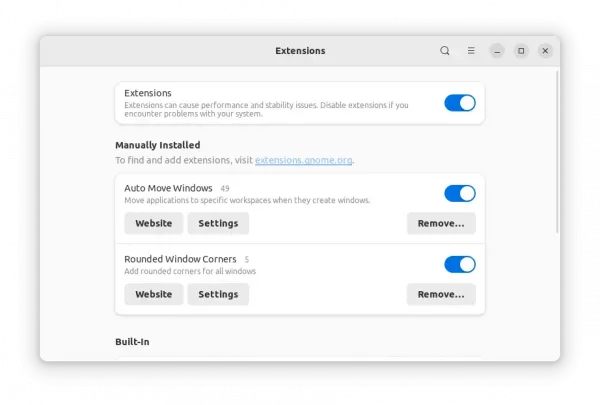
After installed the extension, go back to ‘Installed‘ tab in Extension Manager, or install and open ‘Gnome Extensions’ app from GNOME Software for Fedora. There you can open the configuration dialog for each circle widget.

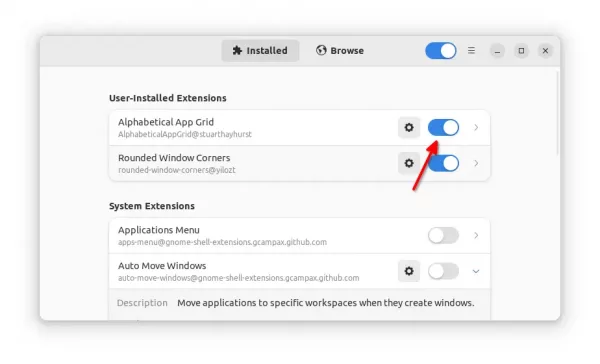
NOTE: For Ubuntu & other Linux using “Desktop Icons NG (DING)” extension, you have to disable it temporarily until being able to drag moving the system load widget.

As you may know, icons on Ubuntu desktop is handled by an extension called “Desktop Icons NG”. While GNOME has been moving to GTK4, the extension so far still uses GTK3 toolkit to implement all the functions.

A GTK4 port of this extension now is in development, with all previous functions, bug-fixes, as well new features.

The new version works as another extension as it’s not been merged upstream. It comes with GSconnect integration, and features drag and drop app icons from Ubuntu Dock (Dash-to-Dock) to the desktop.

  • Drag and drop from left dock panel to desktop will REMOVE app icon from favorites.
  • Hold Ctrl + drag and drop will REMOVE from favorites, and ADD onto desktop.
  • Hold Shift + drag and drop will ADD icon to desktop without removing it from favorites.

Also, it adds more functions to drag and drop files from file manager (Nautilus) to the desktop. By default, drag and drop between desktop and Nautilus will MOVE the files from one to another directory. With the new extension, you can also:

  • Press and hold Ctrl + drag’n’drop to COPY files.
  • Press and hold Alt + drag and drop to select between ‘MOVE’, ‘COPY’, ‘LINK’ actions.

As well, it has a GNOME 43 style file context menu when you right-clicking on desktop. When looks more native in Ubuntu 22.04, except for the arrow …

Install GTK4 port of Desktop Icons NG:

1. Ubuntu 22.04+ users can first search for and install ‘Extension Manager’ app from Ubuntu Software.

Install Extension Manager in Ubuntu 22.04+

2. Then press Super (‘Windows’ logo) key on keyboard to open overview, search and open the tool.

3. Finally, search ‘DING’ and install the new extension under ‘Browse’ tab.

4. To use the extension, user has to disable the system built-in ‘Desktop Icons NG’ extension, and enable the new GTK4 version.

To restore, just re-enable ‘Desktop Icons NG’, disable or remove the GTK4 version via Extension Manager.

There are quite a few weather applications for Linux desktop. GNOME, the default desktop environment for Ubuntu, Fedora, and some other Linux, also has a core weather application.

With the core weather app, user can either open the app window to get current weather condition, hourly and daily forecast, or open the clock menu to see the weather forecast for next hours.

Gnome Weather and Clock menu integration

To make life easier, there’s an extension which also add current weather condition and temperature in center of top panel. So, user can get a glimpse of it and date time by looking up.

Install the Weather O’Clock extension

The extension so far supports GNOME 42 & 43, meaning you can install it on Ubuntu 22.04, Ubunru 22.10, Fedora 36/37, Arch and Manjaro Linux.

For Ubuntu and Arch, first search for and install ‘Extension Manager’ from Ubuntu Software (or Software app).

Install Extension Manager in Ubuntu 22.04+

Then, search for and launch the tool from ‘Activities’ overview screen.

Finally, search for and install the Weather O’Clock extension under Browse tab.

And other Linux can get the extension at this web page.

Install & Setup Gnome Weather

The extension needs Gnome Weather for the information.

In case you don’t have it in your system, either search for and install via Ubuntu Software / Gnome Software.

Install Gnome Weather via Ubuntu Software app

or open terminal and run the command below to install it:

sudo apt install gnome-weather

Then, open the app and set your city or country. The extension should work immediately after that.

For Ubuntu 22.10 and other Linux with GNOME 43, it’s now easy to add Media Control, Notifications, or Volume Mixer to the top-right corner system status menu (aka Quick Settings), or remove useless buttons.

It’s ‘Quick Settings Tweaker‘, an extension for the new GNOME desktop. With it, your system menu can be configured to look like:

New items can be enabled or disabled separately and moved to top or bottom. And, it removes the corresponding items from date & time menu, so it will look like:

No media control & notifications in date time menu

As well, it allows to remove any button from the system menu that you don’t use via ON/OFF toggles. Differently, turn on a toggle will remove the corresponding button, while turn it off to leave it unchanged.

Remove useless buttons from top-right sy
stem menu

Step 1: Install ‘Quick Settings Tweaker’

For Ubuntu 22.10, firstly search for and install ‘Extension Manager’ tool from Ubuntu Software.

Install Extension Manager in Ubuntu 22.04+

Then, search for and open the tool from ‘Activities’ overview screen.

Finally, use Extension Manager to search and install the extension under ‘Browse’ tab.

For other Linux with GNOME 43, go to extension website and install via on/off toggle.

Step 2: Configure Your Gnome System Menu

After installation, either switch back ‘Installed’ tab in Extension Manager, or install and use ‘Gnome Extensions’ app to open the configuration dialog.

And here are the screenshots of the ‘Quick Settings Tweaker’ configuration pages:

For Ubuntu 22.04, Ubuntu 22.10, Fedora 36/37 & other Linux with GNOME 42/43, there’s a new extension to enable more useful gadgets into top panel.

It’s “Aylur’s Widgets” extension that adds Dash, Workspace dots, Media playback control, Battery bar, Power menu in top-bar. All of them have ON/OFF switches, position option (left, center, right) as well as other settings.

Dash is a trigger to quickly access frequently used system settings, including Wi-Fi, Bluetooth, Settings, Shutdown Menu, Favorite Apps, Playback Control, Social Media websites, and have a glance at time & date, battery status, CPU usage, core temperature.

The button has configurable text and icon, and allows to replace the “Activities” button. With it enabled, user may also press Super + D on keyboard to trigger the menu. In case you use the shortcut key to show/hide desktop, you may assign another shortcut via Dconf Editor.

It also displays round dots on panel indicates all available desktop workspaces, and allows to quickly switch between them by clicking a single click. As well, there are music playback control, customizable date time format, battery bar and power button for choice.

How to Install Aylur’s Widget Extension

NOTE: the extension so far supports GNOME 42/43, which means you need Ubuntu 22.04|22.10, Fedora 36/37, Manjaro or Arch Linux with GNOME.

For Ubuntu, first search for and install “Extension Manager” from Ubuntu Software.

Install Extension Manager in Ubuntu 22.04

Then, search for and open the tool from ‘Activities’ Overview:

When it opens, navigate to ‘Browse’ tab, search for and install the ‘Aylur’s Widget’ extension:

After installation, go back ‘Installed’ tab, and click on gear button to configure the extension:

For other Linux, go to the extension page below and use the ON/OFF switch to install it:

And configure it using “Gnome Extensions” app which is available to install via GNOME Software or your system software manager.

This simple tutorial shows how to set custom names for your desktop workspaces, and replace “Activities” in the top-left with the current workspace name you specified.

Today’s desktop operating systems mostly have multiple desktops to group app windows in different screen. These virtual desktops in GNOME (default desktop environment in Ubuntu/Fedora Workstation) are called workspaces. And, each workspace can have its own name.

Step 1: Set custom names for your workspaces

1. First, search for and install “Dconf Editor” if you don’t have it from Ubuntu Software (or GNOME Software).

2. Next, search for and open the Dconf Editor tool from ‘Activities’ overview screen.

When it opens, navigate to “org/gnome/desktop/vm/preferences“. Scroll down and click on “workspace-names” to get into the setting page.

Finally, turn off the default value, and type your desired named in ‘custom value’ box.

NOTE: GNOME by default has 2 workspaces. It adds/removes workspaces automatically to keep only one extra empty workspace. To set fixed number of workspaces, open “Settings” and navigate to “Multi-tasking > Workspaces”

For those familiar with Linux commands, this can be done simply by running the command below in terminal:

gsettings set org.gnome.desktop.wm.preferences workspace-names "['name1', 'name2', 'name3', 'name4']"

Step 2: Replace “Activities” with current workspace name

By replacing “Activities”, you can take a glance at top-left to make sure which workspace you’re working on. Though the name changes, it’s still working like before. By clicking on it will open the overview screen.

1.) First, search for and install “Extension Manager” from Ubuntu Software.

Install Extension Manager in Ubuntu 22.04

2.) Then, search for and launch the tool you just installed from overview screen:

3.) Finally, navigate to “Browse” tab, search for and install the “Activities Workspace Name” extension.

For Fedora 36 user, just go to the extension web page and use the ON/OFF switch to install it:

NOTE: If you set workspace names after installed the extension, restart GNOME Shell it required to make it work. To do so, press Alt+F2, type ‘r’ and hit Enter on Xorg session, or log out and back in on default Wayland.

Want to set different wallpaper for each desktop workspace? You can now do this in Ubuntu and Fedora via a GNOME extension.

This is one of my favorite features when Ubuntu was using Unity as default desktop. After switched back to GNOME, I didn’t find an alternative method to re-implement this feature until I met this extension.

However, this method does not display different wallpapers in overview. Wallpaper applies only when you switched to that desktop (workspace). So, it may be called change wallpaper automatically when switching desktop.

Install the Extension & Set wallpapers in Ubuntu 22.04:

For Ubuntu 22.04, first search for and install “Extension Manager” from Ubuntu Software.

Install Extension Manager in Ubuntu 22.04

Next, press Super (Windows logo) key to open overview, search for and open the tool you just installed.

When it opens, navigate to “Browse” tab, search for and install “Walkpaper2” extension.

Finally, switch back to “Installed” tab, click the gear icon for the extension. In pop-up window, just click on the previous image to open dialog to set new wallpaper.

NOTE: GNOME by default has 2 desktops, and adds more dynamically. To set fixed number of desktop workspaces, go to “Settings -> Multitasking -> Workspaces”.

Set different wallpaper in other GNOME based Linux

For Fedora Workstation 36, Arch and Manjaro with GNOME, simply go the to link below and turn on the ON/OFF switch to install the extension:

In case you don’t see the ON/OFF switch, follow the link in that page to install web browser extension and refresh it.

To get the settings dialog, install and use “Gnome Extensions” app, either from Gnome Software or via pamac package manager.

There’s another extension with old GNOME support, however lack of versions support for Ubuntu 18.04 and Ubuntu 20.04.

Running Ubuntu 22.04 or Fedora 36 on a Lenovo IdeaPad laptop? It’s super easy to turn on/off the conservation mode.

Conservation Mode is a feature of Lenovo IdeaPad to prolong life of the battery. It’s targeted for those who plug-in ac power. With the mode enabled, the battery will only charge to 55-60%.

For the GNOME 3.36+ (defaults in Ubuntu 20.04+, Fedora 35/36 and optional in Arch and Manjaro), there’s an extension to add the toggle options into system tray menu.

As well, it also provides options to turn on/off camera, Fn Lock, Touchpad, and USB Charging.

How to Install the tool:

The tool is available as a Gnome extension called “IdeaPad Mode”.

For Ubuntu 22.04, first search for and install “Extension Manager” from Ubuntu Software.

Install Extension Manager in Ubuntu 22.04

Next, search for and launch “Extension Manager” either from ‘Activities’ overview or ‘Show Applications’ screen.

When the app opens, navigate to ‘Browse’ tab and finally search for and install the extension:

As you can see, there are few other similar extensions to do the job, click install either one that you prefer.

For Ubuntu 20.04, Debian 11, Fedora and other Linux with Gnome, simply use the on/off switch in the page below to install it:

NOTE: Ubuntu 20.04 needs to first install the agent package by running the command below in terminal (Ctrl+Alt+T):

sudo apt install chrome-gnome-shell

Also, install the browser extension if prompted and refresh the web page for the on/off switch.

When you try to open an application in Ubuntu, Fedora or other Linux with GNOME, it’s possible to specify in which desktop workspace the app window should start!

Most operating systems today have multiple desktops to organize unrelated ongoing projects. In Ubuntu Linux, we usually called them “workspaces”. For most common used applications, user may even let them start automatically in specified workspace to improve workflow efficiency.

For Ubuntu 22.04:

1. Firstly, search for and install “Extension Manager” from Ubuntu Software.

Install Extension Manager in Ubuntu 22.04

2. Once installed, press on Super (Windows logo key) on keyboard to open ‘Activities’ overview. Then search for and launch the tool:

3. When it opens, navigate to “Browse” tab, type ‘Auto Move Windows‘ in search box and hit Enter. Finally, click the install the extension.

4. Once installed, navigate back to ‘Installed’ tab in Extension Manager and click on the gear button for that extension you just installed.

In pop-up dialog, use ‘+’ icon to add apps and set the workspace numbers for each app.

NOTE 1: The search function in app selection dialog seems broken, you have to browse through all apps manually.

NOTE 2: GNOME desktop by default has only 2 workspaces, and adds more automatically when the last is in use.

To set workspace number to ‘3’, ‘4’, or bigger, open “Settings (GNOME Control Center) -> Multitasking”, enable “Fix number of workspaces” and set a number for it.

For old Ubuntu, Fedora, Arch Linux, etc

Other GNOME based Linux can also install the “Auto Move Windows” extension directly by using the on/off switch in web browser.

(Ubuntu Only) First, press Ctrl+Alt+T on keyboard to open terminal. When it opens, run command to install the agent:

sudo apt install chrome-gnome-shell

Next, open the link button below and turn on the slider icon to install the extension:

Install browser extension if you don’t see the on/off switch in that page, and click refresh.

Finally, install “Gnome Extensions” app in either Ubuntu Software / Gnome Software, and use it to open the configuration dialog.

Install & Use “Gnome Extensions” app to configure it

Tip: Ubuntu 20.04 user may use “Gnome Tweaks” (available in Ubuntu Software) to configure the number for workspaces.

Messed up the app list in ‘Show Applications’ menu in Ubuntu 22.04? It’s easy to restore the original alphabetical ordering.

In Gnome, user can either click the 3×3 9-dots icon on dock or press Super (Windows logo key) + A on keyboard to open the ‘Start Menu’.

The GNOME Desktop ‘Start Menu’

App icons in that menu (definitely screen) support drag and drop re-arranging position. However, there’s no option to restore the app order.

To deal with the issue, user can either use the hidden configuration key or install an extension to do the trick in Ubuntu 22.04.

Option 1: Single command to restore app grid order

Press Ctrl+Alt+T on keyboard to open terminal. When it opens, run command:

gsettings set org.gnome.shell app-picker-layout "[]"

The command set the layout to empty and let it re-generate automatically. However, you need to log-out and back in to apply change.

If you happen to use the classic Xorg session, simply press Alt+F2, type r in pop-up dialog and hit Enter to restart Gnome shell to apply change.

Option 2: Use Alphabetical App Grid Extension:

It’s ‘Alphabetical App Grid‘ which so far supports for GNOME version from 38 to 42. Which means you can install and use the tool to restore app grid in Ubuntu 22.04, Debian 11, Fedora 35/36, Arch Linux and Manjaro etc.

1. For Ubuntu 22.04, firstly search for and install “Extension Manager” from Ubuntu Software.

Install Extension Manager in Ubuntu 22.04

2. Then, search for and open the tool from start menu or ‘Activities’ overview.

3. When the app opens, navigate to ‘Browse’ tab. Finally, search for and install “Alphabetical App Grid” extension.

After installation, it restore the alphabetical ordering automatically. In case you want to drag & drop re-arranging the app icons again, turn the extension off under “Installed” tab. And, re-enable it at any time you want to restore.

In addition, both methods do not restore (remove) the folders that combine multiple app icons in sub-menus. You need to manually drag them out, then use either method above to re-order them.