
This is a picture guide for beginners to set static IP address on Ubuntu 13.04 Raring Ringtail, both wireless and wired connection.
Ubuntu by default uses DHCP (Dynamic Host Configuration Protocol) to obtain IP address when your computer is connected to a network. You may required to change to static IP address in some network environments. This tutorial will show you how to do this step by step.
Tutorial Objectives:
- Setup Static IP Address in Ubuntu 13.04 (both wireless & wired)
- Enjoy!
To get started, move your cursor to top-right corner network icon on panel. Click to expand the menu and choose Edit Connections…
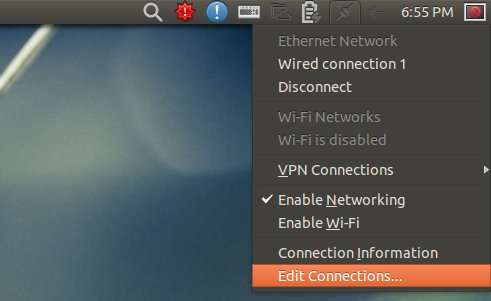
In next window, choose your wired connection or wifi network then click Edit button.

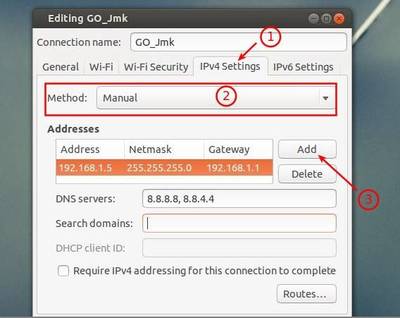
Then navigate to IPv4 Settings tab. Switch Method to “Manual” from the drop-down box. Click Add button and type in IP address, netmask and gateway. Finally click “Save” when everything’s done.


But i cant press the save button when i am choosing manual method. It is disabled for the option “manual”. How can i resolve the issue?
me too… can’t save…did you find resolution?
Click Add button and set ip address.After you can get anable save button
I too have the same problem. Nazar do you fixed that problem can you guide me to fix this problem.
I faced the same problem because when I added the addresses I created an empty line below the correct one. All I had to do was to DELETE this empty line and the Save button was enabled.
I hope this helps.
Orestis
I met with the same problem at beginning, but solved it by:
Go to “Network connection” in “settings”, Select “wired connection” in my case, TURN ON connection on the right side of the page (Ubuntu 14), then edit settings. Now I am able to click “Save” button.
I had the same issue, but figured out if you close then reopen the configuration page, immediately select Manual, then add the IP address, tab to the mask, add the mask, but after adding the mask, press Enter. Don’t tab out of the mask or mouse click away from it. Just Enter after typing the last number of the mask.