Archives For November 30, 2012


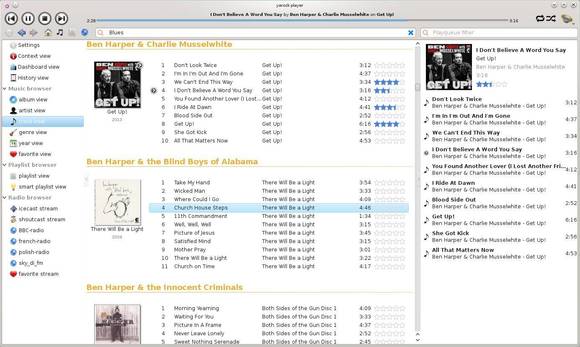
Yarock, a Qt music player features music collection cover art browsing now is at 0.9.65 with new features and bug fixes.

Yarock 0.9.65 changelog:

  • add file system browser view
  • add tunein stream image download support
  • add option to remove or not duplicate tracks in playqueue
  • improve discography part in context view
  • add loading status when building database
  • fix last fm now playing method
  • fix crash on browser favorite view
  • fix crash on menu bar clicking
  • fix mpris2 support
  • fix smart playlist edition (losing configuration)
  • fix little freeze when entering view by genre
  • fix browser item right click in case of single item selection
  • fix file dialog issue
  • fix regression on tracks move inside playqueue
  • improve settings view
  • lot of code rewrite/refactoring
  • change to facilitate fedora packaging (thanks to fedora community help)
  • add option to use system lib for src3party
  • change default installation path

Install Yarock Music Player:

For Ubuntu, Linux Mint and their derivatives, press Ctrl+Alt+T on keyboard to open terminal. When it opens, run commands below one by one:

sudo add-apt-repository -y ppa:samrog131/ppa

sudo apt-get update

sudo apt-get install yarock

Source code and Gentoo, ArchLinux package are available in Yarock project page

yarock music browser


Synapse is an indicator applet that brings Mac OS X and iOS’s spotlight style search feature. With it, you can search from files, applications and Google/Google Maps.

Synapse indicator looks great in Pear OS 8 (Ubuntu based, iOS 7 inspired). Here’s what it looks like in Ubuntu Unity:

To install the app, press Ctrl+Alt+T on keyboard to open terminal. When it opens, follow the steps below one by one:

1. Add the indicator ppa:

sudo add-apt-repository ppa:elementary-os/unstable-upstream

2. For Ubuntu 12.04, Ubuntu 12.10 and Ubuntu 13.04, add the dependencies ppa:

sudo add-apt-repository ppa:birdie-team/stable

For Ubuntu 13.10, Ubuntu 14.04, download and install the DEBs below:

libgranite-common.deb

libgranite (64 bit) | libgranite (32 bit)

3. Update and install:

sudo apt-get update; sudo apt-get install indicator-synapse

Once installed, you’ll see the applet on next login.

RDesktop is an open source RDP client for Windows NT/2000 Terminal Server and Windows Servers. While the default version in universe repository is old, this tutorial shows how to install the latest rdesktop 1.8.1 via PPA in Ubuntu 13.10, Ubuntu 13.04, Ubuntu 12.04 and their derivatives.

RDesktop 1.8.1 and 1.8.0 changelog:

  • Fix a typo in configure.ac
  • Fix a bug which made rdesktop steal CPU cycles.
  • Fix issue with reconnect, make use of deactivate variable
  • Added 4 new disconnect reasons with exit codes
  • Fix issues of window handling in SeamlessRDP parts of rdesktop
  • Fix a backward compability with OpenSSL
  • Fix a bug when code needs a x window available but there are none.
  • Fix a sigsegv zeroing memory
  • Fix a 64bit portability issue
  • Support for protocol negotiation eg. SSL/TLSv1 and CredSSP
  • Support for CredSSP + Kerberos authentication (NLA)
  • Support for smart card single-sign-on
  • Support passing smart card pin as password as argument
  • Added IPC for controlling a master rdesktop process
  • Support for connection sharing when using SeamlessRDP
  • Improved handling of network connection failures
  • Autoreconnect using the connection cookie at network failure
  • Fix a few smart card issues
  • Fix bug with mouse scroll handling
  • Fix for left/right braces in Italian keymap
  • Fix crash and memory leak in local drive redirection
  • Fixes issues with license files loading/saving

Install rdesktop via PPA:

Press Ctrl+Alt+T on keyboard to open terminal. When it opens, run commands below one by one:

sudo add-apt-repository ppa:pmjdebruijn/rdesktop-release

sudo apt-get update

sudo apt-get install rdesktop

Once installed, run rdesktop in terminal to get a list of options.

Most cases, you’ll use one of the following two commands:

rdesktop -u john -fP 143.210.123.456
rdesktop -u john -g 100% -PKD 143.210.123.456

Both commands login as john and display remote desktop in full screen.

To create a launcher, see this post

Want the latest Adobe Flash Player in Ubuntu Chromium browser? After v11.2, the Flash Player plugin for Linux will only be available via the “Pepper” API as part of the Google Chrome. Adobe will continue to provide security updates to non-Pepper distributions of Flash Player 11.2 on Linux for five years from its release.

There’s a PPA contains installer packages which will download the latest Google Chrome package, extract the Pepper Flash files, and install them for Chromium (Google Chrome itself is not installed).

UPDATE: Since Ubuntu 14.04, you can directly install Pepper Flash installer from Ubuntu Software Center, or by click the link below:

To add the PPA, press Ctrl+Alt+T on keyboard to open terminal and then run command below:

sudo add-apt-repository -y ppa:skunk/pepper-flash

Install Pepper flash installer:

sudo apt-get update; sudo apt-get install pepflashplugin-installer

After that, you can enable Pepper Flash Plugin for Chromium browser by running below command in terminal:

sudo update-pepperflashplugin-nonfree --install

Restart Chromium and check out by typing in chrome://plugins, in my case the flash version is 11.9

This tutorial shows how to install Chromium browser 31 via PPA in Ubuntu 13.10 Saucy, Ubuntu 13.04 Raring, Ubuntu 12.04 Precise, Linux Mint and their derivatives.

Chromium is an open-source web browser project from which Google Chrome draws its source code. The latest has reached version 31, it is available in Ubuntu Mozilla Security Team PPA for Ubuntu 12.04 and higher.

Chromium 31 changelog:

  • Include dmesg events mentioning chromium in apport reports.
  • Abandon nss transitional package as Dependency, and add real package with epoch version number.
  • Fix multiple memory corruption issues.
  • Use after free related to speech input elements.
  • Use after free related to media elements.
  • Out of bounds read in SVG.
  • Use after free related to “id” attribute strings.
  • Use after free in DOM ranges.
  • Address bar spoofing related to interstitial warnings.
  • Out of bounds read in HTTP parsing.
  • Issue with certificates not being checked during TLS renegotiation.
  • Various fixes from internal audits, fuzzing and other initiatives.
  • Read of uninitialized memory in libjpeg and libjpeg-turbo.
  • Read of uninitialized memory in libjpeg-turbo.
  • Use after free in libjingle.
  • debian/chromium-chromedriver.install: Drop unsupported, broken old chromedriver v1 and add chromedriver2.
    Update webapps patches.
  • Disable chromedriver testing until the new server-test client dependencies are figured out.
  • Drop base_unittests and automated_ui_tests build and automatic test and from installation exclusion.
  • Include wildcat package ‘pepflashplugin-nonfree’ in apport reportting.
  • To get started installing Chromium, press Ctrl+Alt+T on keyboard to open terminal. When it opens, run commands below one by one:

    sudo apt-get update
    
    sudo apt-get install chromium-browser

    Linux Kernel 3.10 LTS (Long Term Support) has reached version 3.10.22. All users of this kernel series are urged to upgrade as soon as possible. Here’s how to do it in Ubuntu, Linux Mint and their derivatives.

    Linux Kernel 3.10.22 comes with wireless, sound and powerpc improvements, radeon, nouveau, i915 driver updates, as well as other changes. See the changelog for details.

    Install / Upgrade Kernel 3.10.22:

    The DEB packages have been made into Ubuntu Kernel page. Follow the steps below to download and install them.

    1. Press Ctrl+Alt+T on keyboard to open terminal. When it opens, run commands below to download the DEBs:

    For 32 bit system:

    wget http://kernel.ubuntu.com/~kernel-ppa/mainline/v3.10.22-saucy/linux-headers-3.10.22-031022-generic_3.10.22-031022.201312041435_i386.deb
    
    wget http://kernel.ubuntu.com/~kernel-ppa/mainline/v3.10.22-saucy/linux-headers-3.10.22-031022_3.10.22-031022.201312041435_all.deb
    
    wget http://kernel.ubuntu.com/~kernel-ppa/mainline/v3.10.22-saucy/linux-image-3.10.22-031022-generic_3.10.22-031022.201312041435_i386.deb

    For 64 bit system:

    wget http://kernel.ubuntu.com/~kernel-ppa/mainline/v3.10.22-saucy/linux-headers-3.10.22-031022-generic_3.10.22-031022.201312041435_amd64.deb
    
    wget http://kernel.ubuntu.com/~kernel-ppa/mainline/v3.10.22-saucy/linux-headers-3.10.22-031022_3.10.22-031022.201312041435_all.deb
    
    wget http://kernel.ubuntu.com/~kernel-ppa/mainline/v3.10.22-saucy/linux-image-3.10.22-031022-generic_3.10.22-031022.201312041435_amd64.deb

    2. Install the kernel:

    sudo dpkg -i linux-headers-3.10.22-*.deb linux-image-3.10.22-*.deb

    Once done, restart your computer.

    If for some reason the kernel does not work properly on your system. Restart and boot into Grub -> Advanced -> previous kernel, then remove Linux Kernel 3.10.22 via:

    sudo apt-get purge linux-headers-3.10.22-* linux-image-3.10.22-*

    The latest Linux Kernel 3.12.3 has been released a few hours ago. If you’re using Kernel 3.12 series, this tutorial shows how to install or upgrade in Ubuntu 13.10, Ubuntu 13.04, Ubuntu 12.04, Linux Mint and their derivatives.

    Linux kernel 3.12.3 is yet another big release that introduces numerous updated drivers, many architecture improvements (AMR, PowerPC, s390, parisc, ARM64, avr32), some fixes for the CIFS and EXT4 filesystems, as well as sound improvements.

    See the changelog for details.

    Install / Upgrade Kernel 3.12.3:

    The DEB packages for Ubuntu and Debian users have been made into Ubuntu Kernel mainline page.

    Press Ctrl+Alt+T on keyboard to open terminal. When it opens, run commands below one by one:

    1. For 32 bit system, download the DEBs via:

    wget http://kernel.ubuntu.com/~kernel-ppa/mainline/v3.12.3-trusty/linux-headers-3.12.3-031203-generic_3.12.3-031203.201312041453_i386.deb
    
    wget http://kernel.ubuntu.com/~kernel-ppa/mainline/v3.12.3-trusty/linux-headers-3.12.3-031203_3.12.3-031203.201312041453_all.deb
    
    wget http://kernel.ubuntu.com/~kernel-ppa/mainline/v3.12.3-trusty/linux-image-3.12.3-031203-generic_3.12.3-031203.201312041453_i386.deb

    For 64 bit system, run:

    wget http://kernel.ubuntu.com/~kernel-ppa/mainline/v3.12.3-trusty/linux-headers-3.12.3-031203-generic_3.12.3-031203.201312041453_amd64.deb
    
    wget http://kernel.ubuntu.com/~kernel-ppa/mainline/v3.12.3-trusty/linux-headers-3.12.3-031203_3.12.3-031203.201312041453_all.deb
    
    wget http://kernel.ubuntu.com/~kernel-ppa/mainline/v3.12.3-trusty/linux-image-3.12.3-031203-generic_3.12.3-031203.201312041453_amd64.deb

    2. Install the DEBs:

    sudo dpkg -i linux-headers-3.12.3-*.deb linux-image-3.12.3-*.deb

    Restart your computer and done.

    If your graphics card does not work properly with this kernel, you may re-configure or even re-install the video driver.

    To revert back to previous kernel, reboot and go into Grub -> Advanced -> choose previous kernel. Then remove this kernel via:

    sudo apt-get purge linux-headers-3.12.3-* linux-image-3.12.3-*


    Want to monitor Ubuntu Server remotely with a graphical interface? Well, there are quite a few ways. Here I’ll you a lightweight tool called Monitorix.

    Monitorix is an open source tool which allows to monitor server information through your web browser. It displays graphs with:

    • System load average and usage
    • Global kernel usage
    • Kernel usage per processor
    • Filesystem usage and I/O activity
    • eth0 network traffic and usage
    • System services demand
    • Network port traffic
    • Users using the system
    • Devices interrupt activity

    Monitorix has a built-in HTTP server, it also works with Apache, Nginx, lighttpd, etc.

    monitorix login screen

    monitorix main window

    Install Monitorix:

    On Ubuntu/Debian server, first install the dependencies:

    sudo apt-get update
    
    sudo apt-get install rrdtool perl libwww-perl libmailtools-perl libmime-lite-perl librrds-perl libdbi-perl libxml-simple-perl libhttp-server-simple-perl libconfig-general-perl

    Download the DEB package (For the latest go to this page):

    wget http://www.monitorix.org/monitorix_3.4.0-izzy1_all.deb

    Install Monitorix:

    sudo dpkg -i monitorix_3.4.0-izzy1_all.deb; sudo apt-get -f install

    Start the service:

    sudo service monitorix start

    Finally, access remotely or locally by typing http://serverip:8080/monitorix in your web browser.

    The config file is /etc/monitorix.conf. There you can change the port, deny or allow remote host, and something else.


    Virtual Machine Manager is a desktop interface for managing virtual machines through libvirt. It primarily targets KVM VMs, but also manages Xen and LXC (linux containers). It presents a summary view of running domains, their live performance & resource utilization statistics. Wizards enable the creation of new domains, and configuration & adjustment of a domain’s resource allocation & virtual hardware. An embedded VNC and SPICE client viewer presents a full graphical console to the guest domain.

    Virtual Machine manager is available in Ubuntu universe repository, but it’s a little old. The latest version can be easily installed on Ubuntu 13.10 Saucy, Ubuntu 13.04 Raring, Ubuntu 12.10 Quantal, Ubuntu 12.04 Precise and Linux Mint via its PPA.

    Press Ctrl+Alt+T on keyboard to open terminal. When it opens, run commands below one by one:

    sudo add-apt-repository ppa:virt-manager/stable
    
    sudo apt-get update
    
    sudo apt-get install virt-manager

    After that, start virtual machine manager from menu or Unity Dash.

    MKVToolNix 6.6.0 was released recently with drag & drop support in the chapter editor. Here’s how to install mkvmerge from official repository in Ubuntu 14.04, Ubuntu 13.10, Ubuntu 13.04, Ubuntu 12.04, Linux Mint 13/14/15/16.

    MKVToolNix is a set of tools to create, alter and inspect Matroska files under Linux, other Unices and Windows. They do for Matroska what the OGMtools do for the OGM format and then some. mkvmerge and mkvmerge GUI are part of the mkvtoolnix package, they can read a lot of different multimedia files and put their contents into Matroska files.

    To get started, press Ctrl+Alt+T on keyboard to open terminal. When it opens, follow the steps below:

    1. Run command to edit source file:

    sudo gedit /etc/apt/sources.list

    Add following two lines int the end. You may change saucy (for Ubuntu 13.10, Linux Mint 16) to raring (13.04, mint 15), quantal (12.10, mint 14), or precise (12.04, mint 13)

    deb http://www.bunkus.org/ubuntu/saucy/ ./
    deb-src http://www.bunkus.org/ubuntu/saucy/ ./

    2. Download and install the key:

    wget -O - http://www.bunkus.org/gpg-pub-moritzbunkus.txt | sudo apt-key add -

    3. Install the GUI after checking for updates:

    sudo apt-get update; sudo apt-get install mkvtoolnix mkvtoolnix-gui

    This will always install the latest MKVToolNix on your system. For Ubuntu 14.04 Trusy, version 6.6.0 has been made into universe repository. Just search for and install it from Ubuntu Software Center.