


Your preferred screen resolution is not available in the Display settings? Well, here I’m going to show you how to add a custom screen resolution in your Ubuntu desktop.
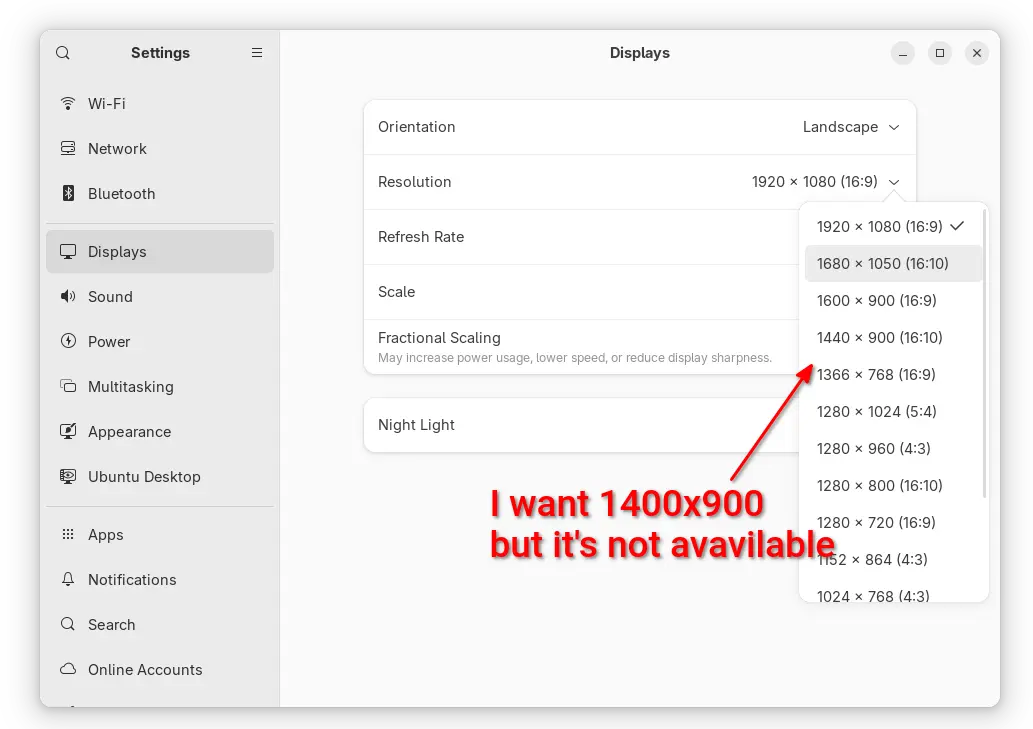
On my Ubuntu Desktop, the default 1920X1080 (16:9) resolution is kinda high for me. Though there are options to scale for menu, title bars, and text, I prefer 1400X900 (3:2) which however is not available to choose from display setting panel.
To do the job, I found 2 solutions that work in all current Ubuntu releases:
- add Kernel parameter at startup, which works in both Wayland and Xorg sessions.
- use xrandr, but it works for X11/Xorg session only.
And they are tested and work in my case in Ubuntu 18.04, 20.04, 22.04, 24.04, and 25.04.
Method 1: Add custom screen resolution as Kernel parameter
1. Find out display device name.
Before getting started, you need to find out the device name of your displays.
For X11/Xorg session, simply press Ctrl+Alt+T to open terminal. Then, run the command below:
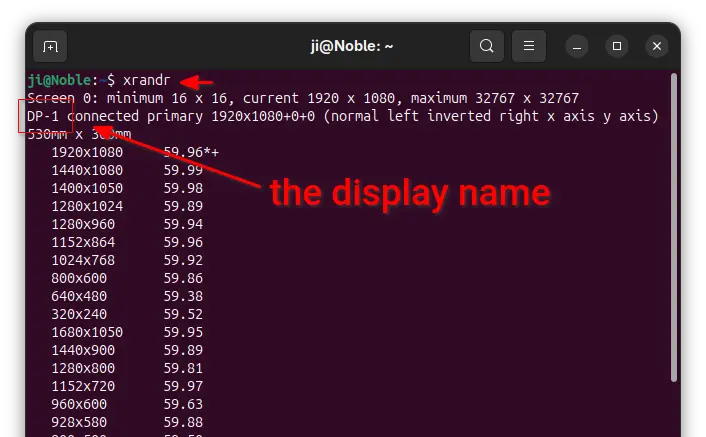
xrandr
It will output all connected displays as well as available screen resolutions. Here you need to find out and remember the display names. In my case as the screenshot shows, it’s DP-1.
For Wayland, which is the default session since Ubuntu 22.04, open terminal and run the command below instead:
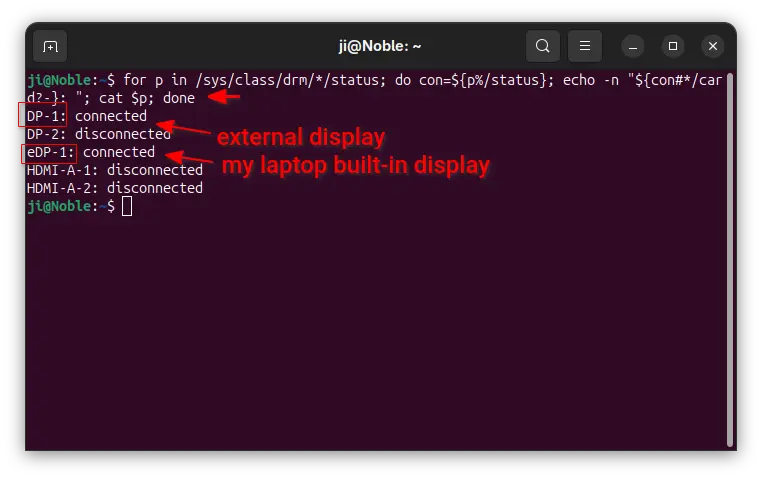
for p in /sys/class/drm/*/status; do con=${p%/status}; echo -n "${con#*/card?-}: "; cat $p; done
This command will look for all devices under /sys/class/drm directory, print the names and their status (connected or not). In my case, I have 2 displays connected. They are eDP-1 laptop built-in display, and DP-1 external display.
2. Add Kernel Parameter.
For Ubuntu booted with its built-in Grub boot-loader, user can edit the /etc/default/grub file to add kernel parameters.
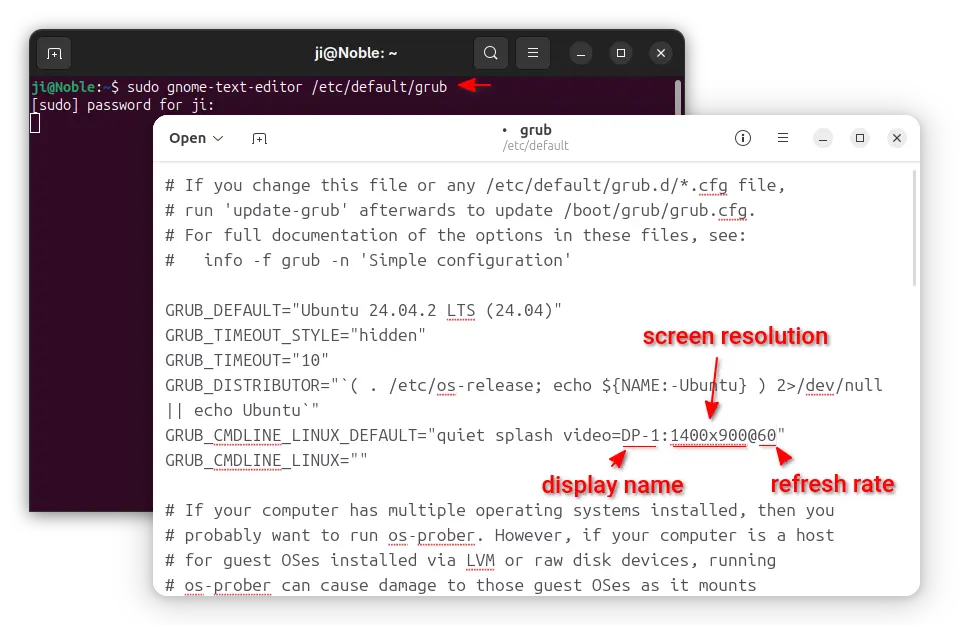
First, press Ctrl+Alt+T on keyboard to open terminal, and run command to edit that file:
sudo gnome-text-editor /etc/default/grub
For non-GNOME desktop, replace gnome-text-editor with your desktop text editor, or use nano cli tool that works in most Linux
When file opens, add video=DP-1:1400×900@60 value for GRUB_CMDLINE_LINUX_DEFAULT. And, here:
- DP-1 is the device name of target display.
- 1400×900 is the desired screen resolution.
- 60 is the refresh rate.
NOTE: You can’t set a resolution higher than the one your physical display can handle.
And, for multiple display, add either:
video=1400x900@60(skip device name) that works for all connected displays,- or
video=eDP-1:1360x700@60 video=DP-1:1600x900@60to set video size separately.
3. Update Grub to apply change
After edited the file, save it (for nano press Ctrl+S to save, then Ctrl+X to exit), and run the command below to apply change:
sudo update-grub
Finally, restart computer and go “Display” setting page for the new screen resolution.
Tips: For users who have Grub Customizer installed, then just launch the tool and navigate to General Settings page to add kernel parameters.

Method 2: Use xrandr command
For the classic X11/Xorg session, that’s default in current MATE, XFCE, etc desktop environments, there’s a built-in xrandr command line tool to set screen size.
1. First open terminal by pressing Ctrl+Alt+T key combination on keyboard. When it opens, run command:
xrandr
As mentioned above, this command output all connected displays as well as their screen resolutions. You need to find out and remember the target display name
2. Run command to calculate VESA CVT mode lines by given resolution:
cvt 1400 900 60
Here replace 1400 900 with your desired screen resolution. The refresh rate 60 is optional, though you may replace it with yours.
3. Copy the Modeline in the last command output, and run command to add new mode:
sudo xrandr --newmode "1400x900_60.00" 103.50 1400 1480 1624 1848 900 903 913 934 -hsync +vsync
NOTE here you need to replace the section in red after --newmode with the output in last command.
4. Finally add the new created mode for your display device:
sudo xrandr --addmode DP-1 "1600x900_60.00"
Replace DP-1 (see step1) and "1400x900_60.00" (Step 2 or 3) in the command.

After that, you can open Settings and navigate to Display pane, finally choose the new “1400×900” screen resolution and apply.
5. The steps above work only for current login.
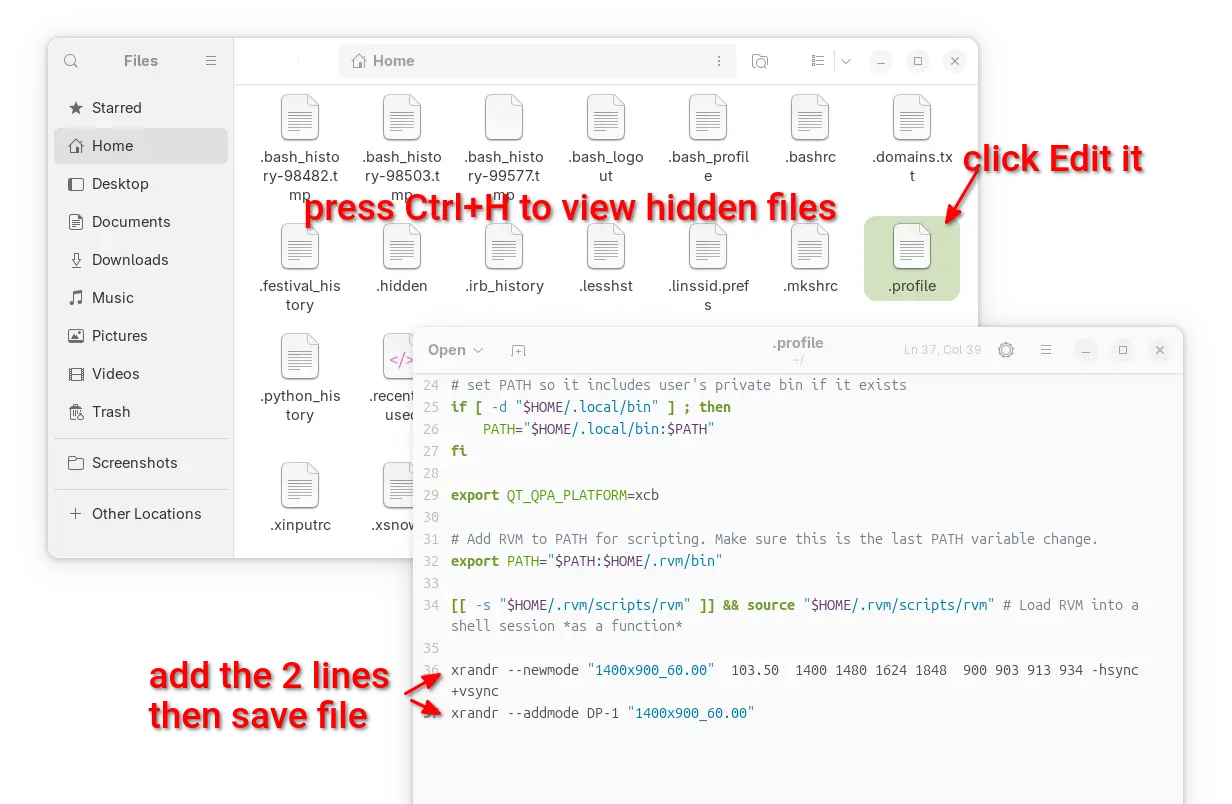
To make it permanent, open HOME folder and press Ctrl+H to show hidden files. Next, find out and click edit .profile file.
When the file opens, add the commands in step 3 & 4 (skip sudo) and save.


A very cool tip! I now can use a notebook with physical 1280 x 800 resolution with 1638 x 1024 :-) Thank you!
I’m getting the following error message. Any chance on helping me make it right?
$ sudo xrandr –addmode eDP1 “1600x900_60.00”
X Error of failed request: BadMatch (invalid parameter attributes)
Major opcode of failed request: 140 (RANDR)
Minor opcode of failed request: 18 (RRAddOutputMode)
Serial number of failed request: 45
Current serial number in output stream: 46
Many thank!
I got that error but if you continue on with the steps it still works fine.
I am getting the same error. I don’t know what to do next.
Same Here. Does Not Work.
$ xrandr
And then replace eDP1 with either VGA-1 or DVI-1, whatever reads connected next to it
your display may be eDP-1 not eDP1.
Find the exact text from xrandr (step 1).
After changing your screen resolution, it’s xy alignment may overlap or gap your other screens.
Move them around, based on left,top origin 0,0
xrandr --output eDP-1 --pos 1600x0Not working for me
Can we do this for 2560X1080 for display on LG Ultrawide monitor
The steps work fine, but it doesn’t display correctly- I get fuzzy lines as if alignment is off.
Perfect!!!
Good article
perfect for me using 1680×1050 because this option was not available in display choices; TKS
Nice to see this technique laid out neatly – you don’t need to place the “cvt” command in your profile file though.
That is only used to give you the format for placing in the –newmode xrandr command.
It won’t do any harm there, but it won’t actually do anything :)
I get an error when doing this command:
sudo xrandr –newmode “1920x1080_60.00” 173.00 1920 2048 2248 2576 1080 1083 1088 1120 -hsync +vsync
X Error of failed request: BadName (named color or font does not exist)
Major opcode of failed request: 140 (RANDR)
Minor opcode of failed request: 16 (RRCreateMode)
Serial number of failed request: 41
Current serial number in output stream: 41
Not sure what’s the problem. But as @Andrew said, it still work if you continue on the steps.
Thanks a lot Ji !!!
in ~/.profile file enough add 2 last commands. (cvt is only show mode, not configuration)
Thank you – not only is your English perfect, your guidance on screen resolution is also clear and precise. I’ve been trying to sort this problem out for weeks. Excellent…
Fantastic tutorial, it worked “out of the box”. Thanks a lot! :)
Does not work at all. Xrander not found. Whye the HELL do you have to do these things in some little DOS box in Linux? Can’t they catch up with other operating systems where you do not have to use this little MS DOS box, and set things in a GUI?
And it should be forgiving of your spelling and or typing. I typed Xrander and it gave an error! Unbelievable. It should work spelled either way.
Then, the thing does not say anything about edp-1 so that does not work. I don’t know what else would??? I got this…..
xrandr
Screen 0: minimum 320 x 200, current 1024 x 768, maximum 16384 x 16384
HDMI-0 disconnected (normal left inverted right x axis y axis)
DVI-0 disconnected (normal left inverted right x axis y axis)
VGA-0 connected 1024×768+0+0 (normal left inverted right x axis y axis) 0mm x 0mm
1024×768 60.00*
800×600 60.32 56.25
848×480 60.00
640×480 59.94
fixitman2@fixitman2-Linux:~$ 1600 x 1200 / 75 Hz
1600: command not found
fixitman2@fixitman2-Linux:~$ cvt 1600 900
# 1600×900 59.95 Hz (CVT 1.44M9) hsync: 55.99 kHz; pclk: 118.25 MHz
Modeline “1600x900_60.00” 118.25 1600 1696 1856 2112 900 903 908 934 -hsync +vsync…..
THEN you notice, “command not found 1600! WHAT THE HELL??? Why would you have to put in ANOTHER command? OK so then the cvt thing. ….
xrander –newmode “1600x900_60.00” 118.25 1600 1696 1856 2112 900 903 908 934 -hsync +vsync
No command ‘xrander’ found, did you mean:
Command ‘xrandr’ from package ‘x11-xserver-utils’ (main)
xrander: command not found
fixitman2@fixitman2-Linux:~$ sudo xrandr –newmode “1600x900_60.00” 118.25 1600 1696 1856 2112 900 903 908 934 -hsync +vsync
and AGAIN command not found. I HATE MS DOS!!!!…
thern to top it all off I finally get this. ….
xrandr –newmode “1600x900_60.00” 118.25 1600 1696 1856 2112 900 903 908 934 -hsync +vsync
X Error of failed request: BadName (named color or font does not exist)
Major opcode of failed request: 140 (RANDR)
Minor opcode of failed request: 16 (RRCreateMode)
Serial number of failed request: 33
Current serial number in output stream: 33
fixitman2@fixitman2-Linux:~$ sudo xrandr –addmode eDP-1 “1600x900_60.00”
xrandr: cannot find output “eDP-1″….
AND it simply does not work. Can’t someone write a damn display thingy that you can click on the numbers you want, picking displays from a list (mine is a Dell UltraScan P1110 – CRT monitor – 21″… which last I checked Window XP had listed, and I used.) Nothing showing up, you cannot select anything from the dropdown. AND I REFUSE to get a new monitor, this one is much better than those flat screen crap ones they now sell with the stupid widescreen, which I never saw the need for! Also it’s native resolution is 1800X1440, which I can’t seem to find in the dropdown. It only wants to let me set some widescreen thing , 1024X768 OR the old fashioned 800X600 which Windows 95 used. I think Linux is about 20 years behind the times on this one.
the comand is ‘xrandr’ not xrander
OK after typing stuff in for like 2 hours, trying over and over and all kind of errors and stuff, it finally worked. Why does it have to be so hard? THEN I went to do the final steps with gedit and it is not installed! I guessed I could do the same with mousepad (since I’m on Xubuntu_) and I hope I got that right. mode is now 1280×1024 and for some reason it won’t run at 75 htz like the monitor manual says, it gets all wonky, so 60 htz it is. Oh and thank God for the old monitors buttons that set size and top to bottom height, etc. That was way too hard to figure out how to do with some obscure DOS code in a little box, I prefer physical buttons!!!
Now to find where the color profiles are stored! OH WAIT I can set colors right on the monitor with BUTTONS unlike these new flat screen things where you can’t adjust anything at all without being some sort of genius programmer. Hell, can’t even find the “on” button on most of them, it’s on the back or side or something, I like it RIGHT on the FRONT labeled “ON” where you can see it!!!
VGA-0 instead of the edp-1 was one mistake apparently.
I solved my “X Error of failed request: BadMatch (invalid parameter attributes)”
It seems that you can’t use xrandr with the nVidia proprietary driver. Getting back to the driver included in Ubuntu fixed the error for me.
Moreover, my screen did not show proper resolution, and seems that you can not always depend on cvt and gtf. I got the working numbers by finding your device EDID and reading it by parse-edid.
How can I do this… Increase my resolution by , ” (6) 1080p monitors”.?
thank you, I always do that with my HP1740 screen but if you use wayland as your display server it will never work
Genius! Thank you.
Don’t even try. Not gonna change anything. You are gonna get nothing but error messages.
This step-by-step much appreciated and worked for me.
In the step xrandr –newmode … I received some errors, but per comments here I just ignored them and continued on with the steps.
Thanks a lot. Was able to get this set in my vmware
Hey everyone. I’m trying to change the resolution within 17.10 on a dell studio 1558 laptop to its native 1440×900. When trying to create the –newmode I get a: “No protocol specified Can’t open display 0:”
Any ideas?
Thank you soo much!
Could you explain why that resolution wasn’t there initially? For me just one 16:9 resolution was there, ie 1920×1080.. all others were in 4:3..
It works if you don’t use the password in order to authorize and login only. Else you get something about tty or pass error
I am new to Ubuntu,
Thanks for the steps, this was very helpful and easy to follow, and now my scrren works much better
Worked for me!
I spend 2 days trying to solve this problem.
Monitor Samsung SA300 (S22A300B)
Video adapter nvidia gtx 760.
Ubunto with driver from X.Org X server – Nouveau (…)
Using VGA cable with DVI converter . So where you used eDP-1, I used DVI-I-1.
Thank you!
It worked perfectly applying 2560x1440x44Hz in my display.
And when I restart, it keeps this resolution.
Thank you!
Worked like a charm for my LG 22M45HQ-B which refused to be set in native resolution of 1920 x 1080. Great job, clear instructions. Thank you!
Best article I found on setting resolution manually. Folks, you need to follow each step and the red highlights on the picture are there for a reason.
Hello,
what version of xrandr are you using? I only seem to get error messages:
cvt 816 1080
Modeline “816x1080_60.00” 73.00 816 872 952 1088 1080 1083 1093 1120 -hsync +vsync
so far so good, now:
xrandr –addmode Modeline “816x1080_60.00” 73.00 816 872 952 1088 1080 1083 1093 1120 -hsync +vsync
xrandr: unrecognized option ‘73.00’
so its expecting a different format?… or…
excuse me, I mixed up addmode and newmode :s
Little problem, it says:
No protocol specified
Can’t open display :0
Can somebody help me? I have to work in Inkscape and my screen resolution is 1366×900, I need it bigger. Thanks guys :)
Same Problem here:
#xrandr
Screen 0: minimum 320 x 200, current 1920 x 1080, maximum 8192 x 8192
XWAYLAND1 connected 1920×1080+0+0 (normal left inverted right x axis y axis) 620mm x 340mm
1920×1080 59.96*+
#sudo xrandr –newmode “2560x1440_60.00” 312.25 2560 2752 3024 3488 1440 1443 1448 1493 -hsync +vsync
[sudo] Passwort für ***:
No protocol specified
Can’t open display :0
#sudo xrandr –addmode XWAYLAND1 “2560x1440_60.00”
No protocol specified
Can’t open display :0
This is a Wayland issue since it’s default in Ubuntu 17.10. Try the update in Step 3.
Amazing! thanks alot…
Use this instead
DO STEPS 1-3 from this sites tutorial then do this
xrandr –newmode “1920×1080” 173.00 1920 2048 2248 2576 1080 1083 1088 1120 -hsync +vsync
xrandr –addmode Virtual1 1920×1080
xrandr –output Virtual1 –mode 1920×1080