NVIDIA graphics driver for Linux released version 465.27 a day ago with new Laptop GPUs support and a few bug-fixes.
In NVIDIA 465.27, following new GPUs are supported:
T600 Laptop GPU
T1200 Laptop GPU
RTX A5000 Laptop GPU
RTX A4000 Laptop GPU
RTX A3000 Laptop GPU
RTX A2000 Laptop GPU
There are also some fixes in the release including:
Fixed a bug that could prevent a system from resuming from suspend when DisplayPort activity occurred while the system was suspended.
Fixed a regression that prevented eglQueryDevicesEXT from correctly enumerating GPUs on systems with multiple GPUs where access to the GPU device files was restricted for some GPUs.
Fixed a regression that could cause system hangs when changing display resolution on SLI Mosaic configurations.
Fixed a bug that could result in blank displays when driving multiple displays at the same resolution using active DisplayPort dongles.
How to Install NVIDIA 465.27 in Ubuntu:
Ubuntu now builds the latest NVIDIA drivers and pushes them via its own security & updates repositories.
Just wait! It’ll be available in next few days. At that time, launch Additional Drivers utility and you’ll see the driver available to install.
If you can’t wait, go to NVIDIA website and download the .run installer package (not recommended for beginners):
Want to create a bootable live-USB for installing Ubuntu on your machine? Well, here’s how to do it in Windows, Linux, or Mac OS.
I used to use UNetbootin to create bootable Live USB. However, the USB drive does not boot after writing with recent Ubuntu ISO images. So here I’m going to introduce you few other USB writing tools.
Though I prefer the style of Ventoy, it however does not install in my USB stick for unknown reason. If you need bootable USB with other data transfer usage unaffected, try it!
Requirements:
Firstly you need an USB stick with at least 4 GB storage. And backup your data before getting started.
Also a PC, Laptop / Notebook, or even Raspberry Pi running Linux, Windows, or Mac OS.
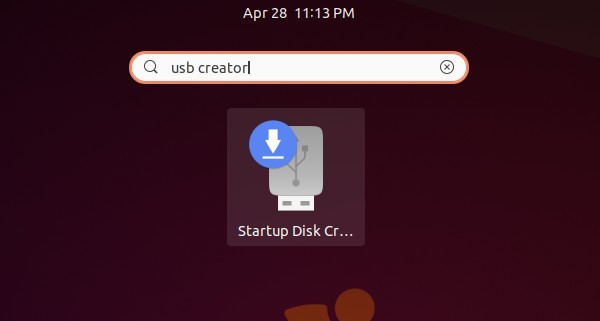
If you’re now working on Ubuntu, that’s great, simply search for and launch Startup Disk Creator. Other Ubuntu based systems can get it by installing the usb-creator-gtk package.
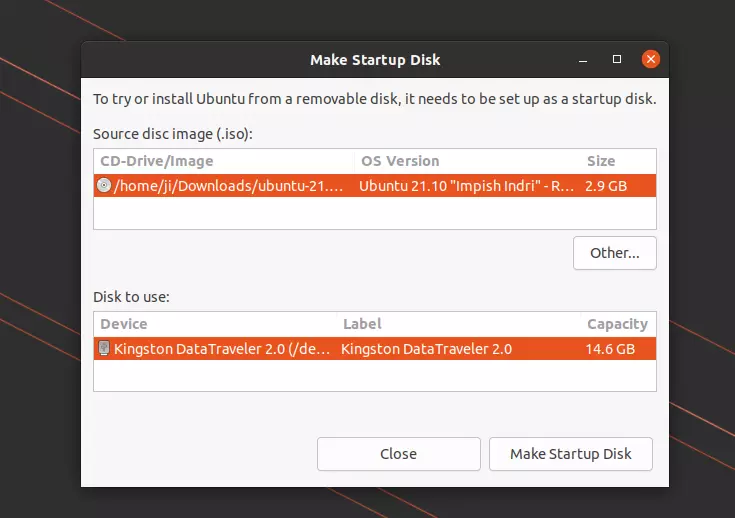
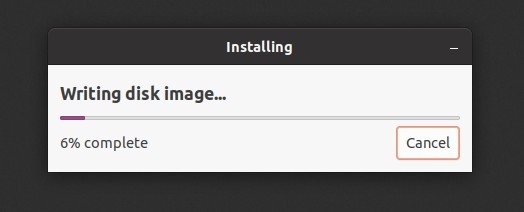
When the tool opens, click on “Other …” and select the Ubuntu ISO image. Plug-in USB stick and it will auto-detect it.
Finally click on “Make Startup Disk“, click OK to confirm and type your user password to get start.
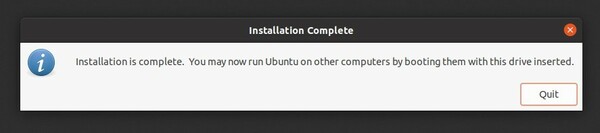
When done, it should prompt you installation complete. That’s it.
Create Bootable USB from Other Linux, Windows, Mac OS.
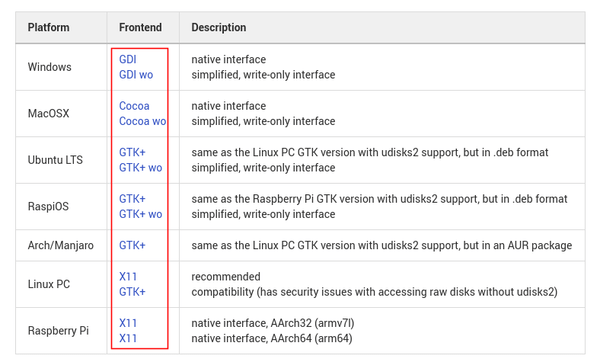
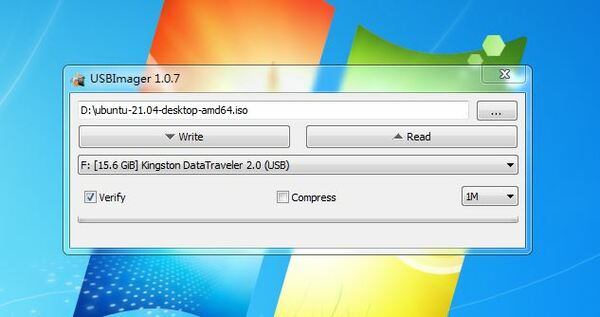
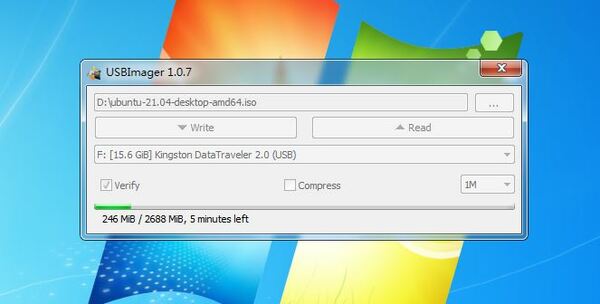
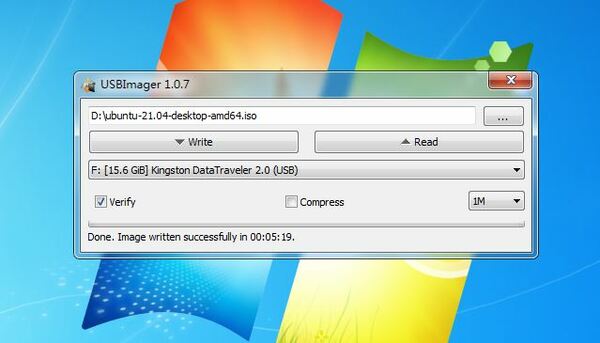
For all other systems I’d recommend USBimager if no system built-in tool available, though there are many other USB creating tools in the web.
USBimager is a free and open-source tool with really simple interface. It small in package size with less than 200 KB. And it works on old systems, minimum system required Windows XP, Mac OS 10.13. Also it’s available for Raspberry Pi.
1.) Firstly select download the USBImager package from your system:
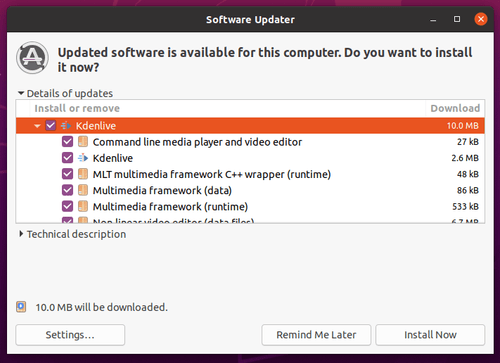
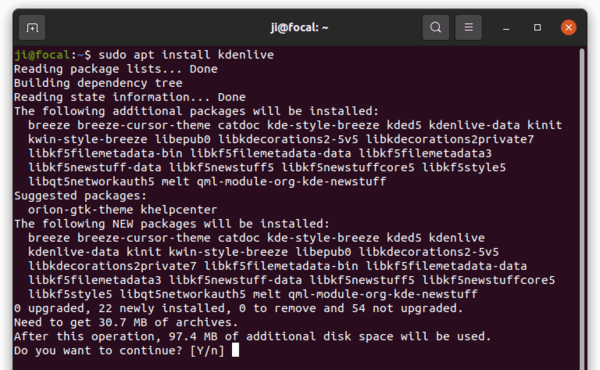
KDE’s Kdenlive video editor 21.04 was released today with lots of usability improvements and some great new features.
Kdenlive 21.04 introduced new Speech-to-Text feature which automatically transcode audio to text, and it supports for 17 languages and dialects using the official models.
The release also features new Media Browser, which can be enabled from View menu. With it, you can easily browse through file system and drag’n’drop add clips to the Bin or Timeline.
And there are new effects typewriter effect with 3 animation modes, Alpha Strobe effect to text, images, or videos, Effect Zones to apply effects to specific regions of tracks or the timeline.
Restart your machine and select boot with the previous kernel in boot menu ‘Grub2 -> Advanced Option for Ubuntu’. Then run command to remove Linux Kernel 5.12:
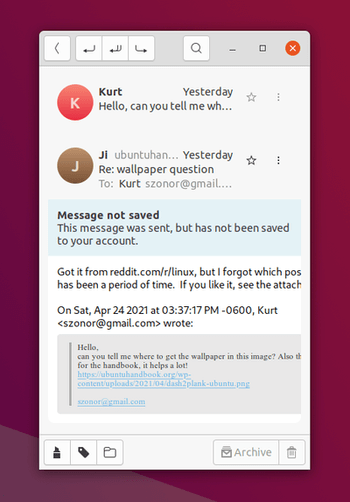
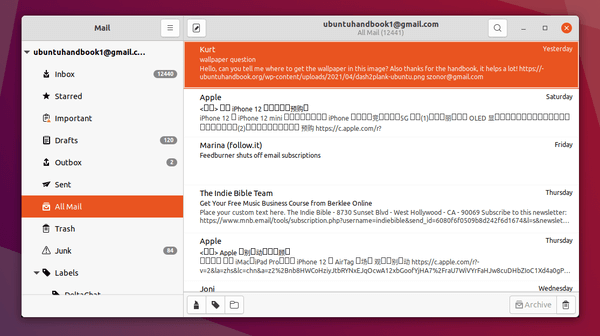
The Geary email client 40.0 was released a few days ago with UI enhancements.
Like Gnome core apps, Geary has the similar version system. After v3.38, Geary 40 was released days ago with adaptive user interface that supports for half-screen, portrait and small displays. So it finally has a Linux phone friendly UI.
Visual changes also include updated icons and improved performance for displaying large conversations.
Other changes in the release include:
Upgraded full-text search engine
Improved search for languages such as Thai and Chinese
Improved keyboard shortcuts
Improved server compatibility
Numerous user interface translation updates
Numerous bug fixes and user interface improvements
How to Install Geary 40 in Ubuntu:
The new release package so far is only available to install via flatpak package.
1.) Open terminal either from system application menu or by pressing Ctrl+Alt+T on keyboard. When it opens, run command to install the flatpak daemon if you don’t have it:
sudo apt install flatpak
2.) Add the flathub repository which hosts the flatpak package:
Got a deb file download from the web? This is a beginner’s guide shows you how to install the file in Ubuntu.
DEB is the software package format for Debian / Ubuntu based systems. Besides Ubuntu main / universe repositories and Ubuntu PPAs, some applications offer .deb files for downloading in their project pages or websites.
Option 1.) Directly install via double-click.
Like EXE file for Windows, you can simply double click on a deb file. By default, it opens Ubuntu Software with an option to install the software package.
This is the easiest way. However Ubuntu Software is buggy, it’s one of the top core apps being criticized for years.
Option 2.) Use Gdebi Package Installer.
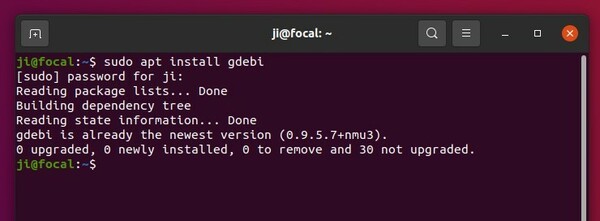
Gdebi package installer is the most recommended way to handle .deb packages. It’s default in Linux Mint. Ubuntu users can either install it from Ubuntu Software or by running command in terminal (Ctrl+Alt+T):
sudo apt install gdebi
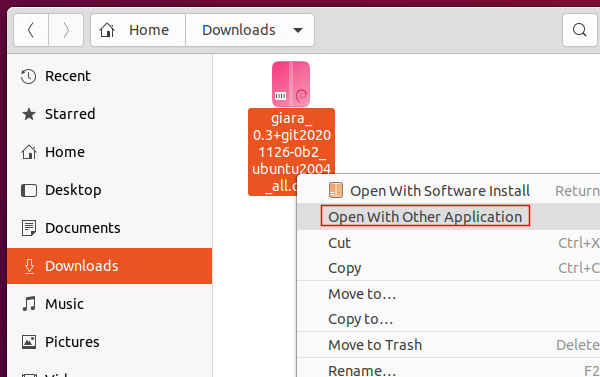
After installed it, just right-click on a deb file, select “Open With Other Application” and choose Gdebi package installer to open the file.
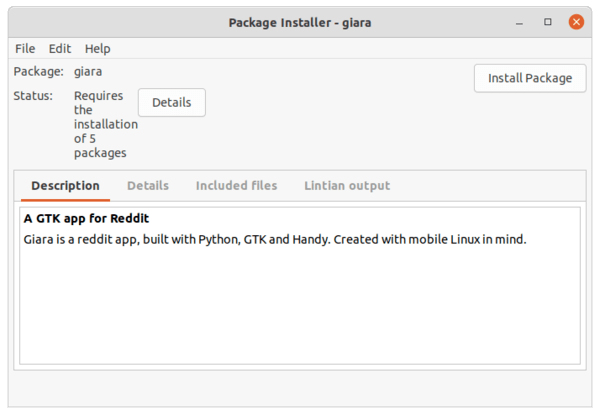
When Gdebi opens, it shows the package details including app description, dependency libraries, and installed files. To install it, click on “Install Package” button.
And a ‘Remove Package’ button will be available once you installed it.
Option 3.) Using apt command:
Apt is the most commonly used command to install, remove, and manage software packages from Ubuntu repositories, PPAs, and third-party apt repositories.
It seems to start from Ubuntu 20.04, the apt command added support for installing local deb files.
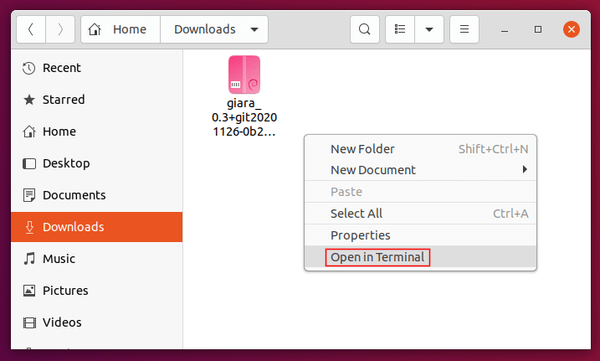
Firstly, right-click on blank area of the folder that contains the deb file. Then select ‘Open in Terminal’
When terminal opens, run command to install local deb file:
sudo apt install ./PACKAGE_NAME.deb
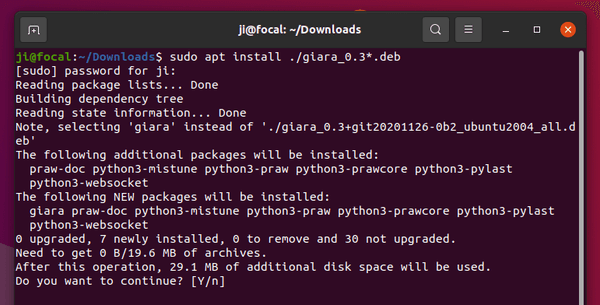
You can use wildcard character * in file name. In my case, the command can be:
sudo apt install ./giara_0.3*.deb
Option 4.) Using dpkg command:
dpkg is the command line package manager for Debian. I used to use the command to install local deb files in Ubuntu. The downside is that dpkg does not install missing dependency packages automatically.
To install a deb file via dpkg command, run:
sudo dpkg -i /path/to/file_name.deb
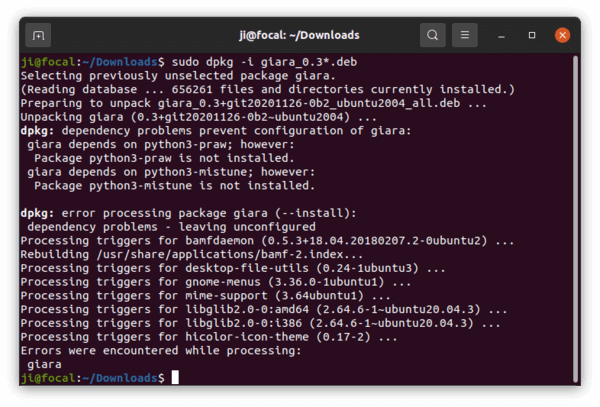
Same to the previous option, you can use “Open in Terminal” option to open folder in terminal and then run command:
sudo dpkg -i giara_0.3*.deb
Since it does not handle dependency automatically, the command often output error and leave package unconfigured. You have to run one more command to fix it:
sudo apt -f install
Conclusion:
Since Ubuntu Software is buggy and dpkg command does not handle dependency packages, Gdebi and apt command can be the best choices to install local deb file in Ubuntu via either graphical or command line.
Ubuntu 21.04 Hirsute Hippo was officially released! For Ubuntu 20.10 users, here’s how to upgrade your system to the new edition.
Same to the previous version, Ubuntu 21.04 is a short term release with 9 month support. It’s powered by Linux Kernel 5.11 with following features:
Microsoft Active Directory integration
Use wayland as default session, while Xorg is still available.
Dark Gnome Shell Theme by default.
Use Desktop Icons NG extension for drag & drop support.
Use nftables as default firewall backend.
Add support for smartcard authentication
Toolchain and core application updates.
How to Upgrade Ubuntu 20.10 to Ubuntu 21.04:
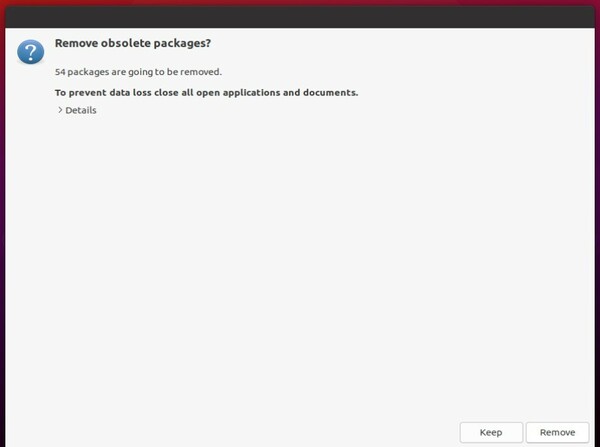
1.) First of all, make backup of all your important data.
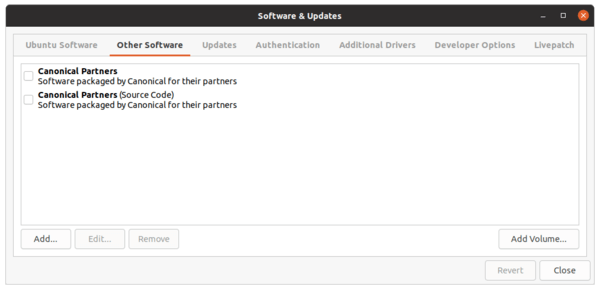
2.) Then disable or remove Ubuntu PPAs, or third-party repositories. To do so, open Software & Updates utility and go to Other Software tab.
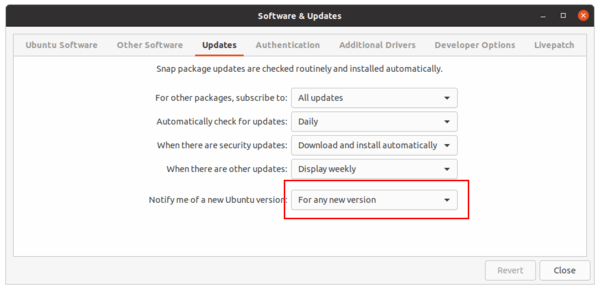
3.) Next navigate to Updates tab, make sure the value of “Notify me a new Ubuntu version” is set to “For any new version“.
4.) If proprietary drivers are in use, it’s recommended to switch to the open-source drivers under Additional Drivers tab.
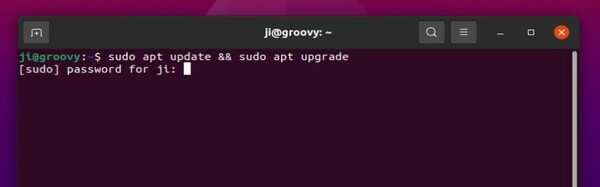
5.) Press Ctrl+Alt+T on keyboard to open terminal, and run command to install all system updates:
sudo apt update && sudo apt upgrade
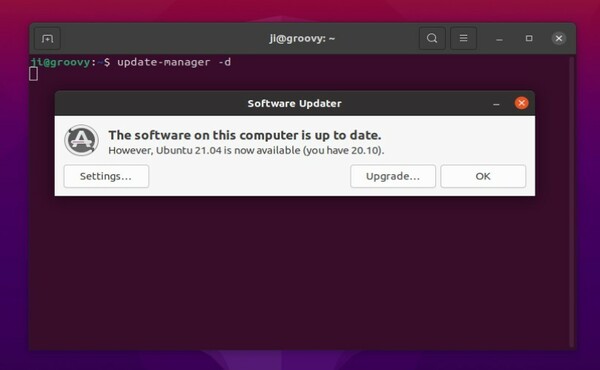
6.) Restart your machine, then open terminal and run command:
update-manager -d
The Software Updater will pop-up and prompt you that Ubuntu 21.04 is available.
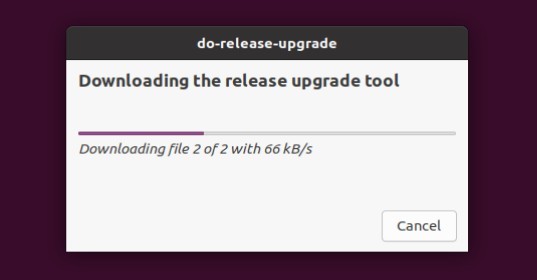
7.) Click on “Upgrade” button and confirm after reading the release note dialog.
NOTE: though the release note says Hirsute Hippo development branch. It did upgrade to Ubuntu 21.04 final edition in my test.
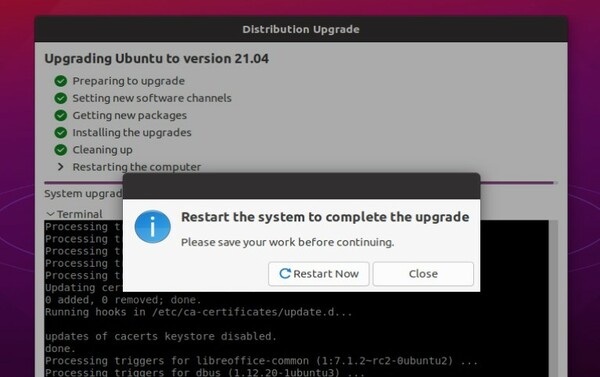
After that, it starts downloading the release upgrade tool:
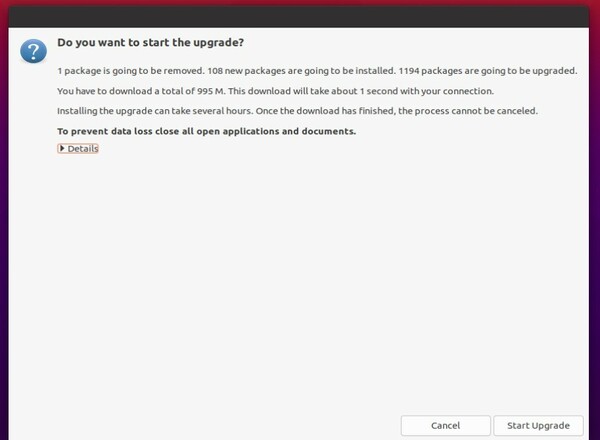
8.) Finally, you’re at the system upgrade wizard:
Before “Getting new packages“, it will again ask for confirmation. And your WON’T be able to cancel the upgrading process once you click on “Start Upgrade” button.
9.) Depends on network speed and system resources, the upgrading process can even take a few hours. However, there will be one or two confirm dialog during the process. So DON’T leave your machine too far, you have to keep an eye on it.
When everything’s done successfully, it will prompt to restart the machine to complete the process.
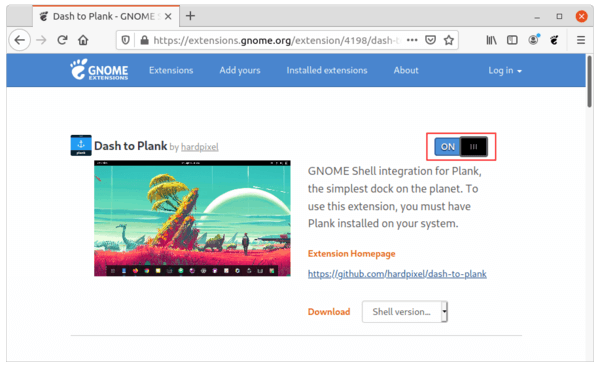
Prefer Plank dock launcher? Dash-to-Plank is the GNOME Shell extension to integrate it in Ubuntu.
Besides Dash-to-Dock and Dash-to-Panel, this is the third ‘Dash-to’ extension I’ve heard about. It’s Gnome Shell integration for Plank, the simplest dock on the planet.
Why Plank?
For me, the only reason to use Plank instead of Ubuntu Dock (Dash-to-Dock) is that there are tons of Plank themes available in the web, so I can change its look and feel at will.
Install Dash-to-Plank:
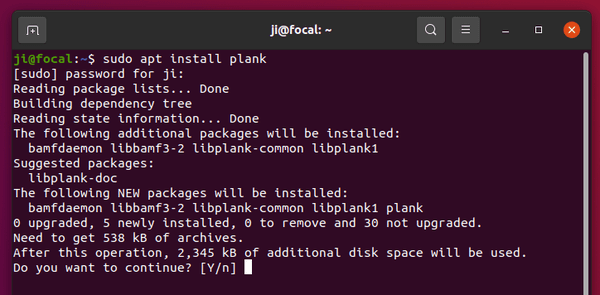
1.) Firstly, you have to install plank by running command in terminal (press Ctrl+Alt+T to open terminal):
sudo apt install plank
Though I’m not sure, before installing the extension system restart is required.
2.) Install the chrome-gnome-shell package if you’re first time to install a Gnome Shell extension.
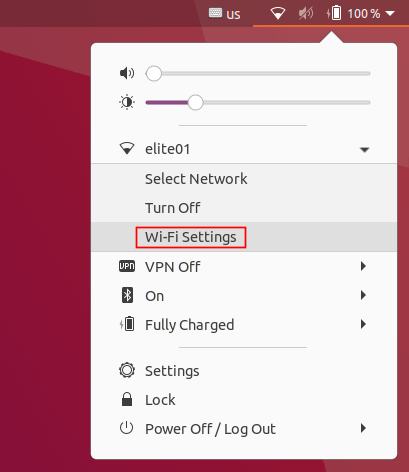
Forgot your wireless access point password? Well, there are a few ways to find it out in Ubuntu.
Option 1.) Using system’s wifi settings:
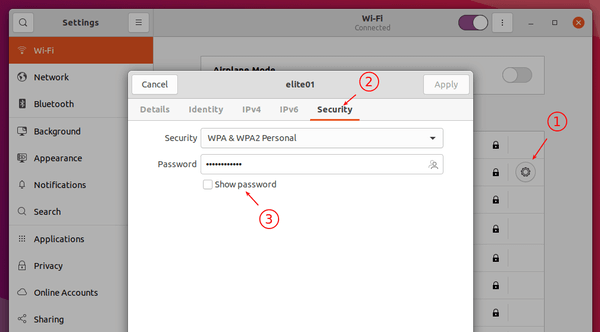
Firstly, if your Ubuntu is running with the default desktop environment. Simply go to Wi-Fi settings from system tray menu:
Then click on the gear button after the current connected access point to get into settings page. Navigate to the Security tab, and finally tick “Show password” check out to get the password.
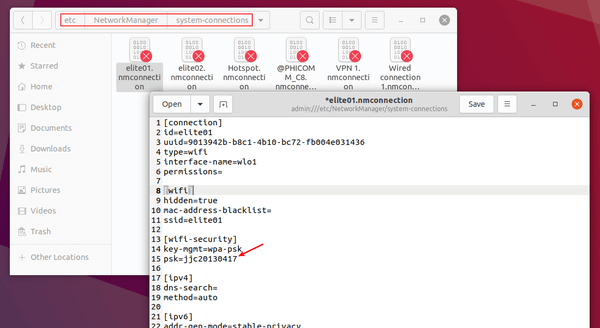
Option 2.) Get Wi-Fi password via connection profiles:
For other desktop environments or command line, navigate to /etc/NetworkManager/system-connections directory either in file manager or by running command in terminal:
cd /etc/NetworkManager/system-connections && ls
There you’ll see all saved network connections. Just open the desired one with your favorite text editor (need root permission) or by running command:
sudo cat FILENAME.connection
When file opens, you’ll see the password under wifi-security section.
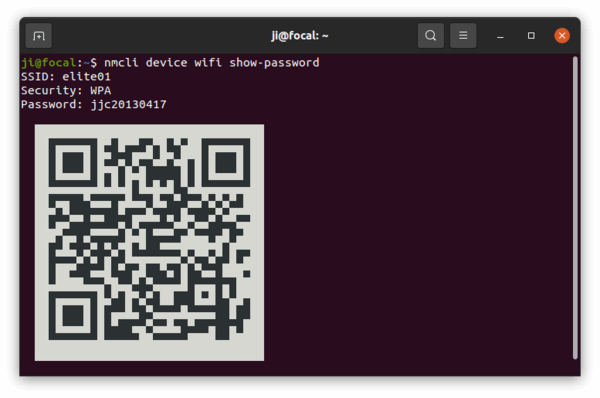
Option 3.) Single command to tell Wi-Fi password:
If you don’t hate Linux command, you can run this single command to print the current connected Wi-Fi password:
nmcli device wifi show-password
The command will work on all Linux systems. And it outputs a QR code for sharing with your friends.
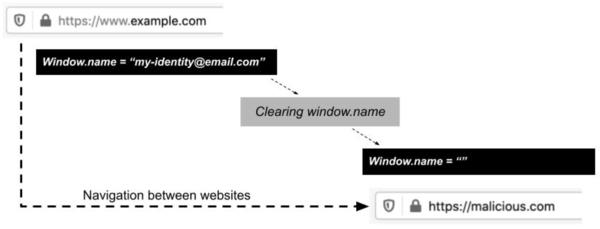
Mozilla Firefox 88.0 was released today. For Linux users now it supports for smooth pinch-zooming using a touchpad.
Besides that, Firefox 88 introduced a new protection against privacy leaks. Now it confines the window.name property to the website that created it. And it will clear the window.name property when navigating between websites to potential privacy leakage.
For those prefer the built-in ‘Take a Screenshot’ action, the feature has been removed from the ‘three dots’ page actions menu. Instead, you can get it from the context menu.