
![]()
This tutorial shows how to enable variable refresh rate (VRR) to get better gaming experience in Ubuntu 24.04 with default GNOME Desktop.
Variable Refresh Rate (VRR), aka adaptive sync, is a feature that allows your monitor to adjust the refresh rate on the fly, so it matches the frame rate of output signal from the graphics card. It’s useful for games to eliminate screen tearing, and can also lowers power consumption since the monitor does not need to always refresh at the highest rate.
GNOME introduced experimental VRR since version 46 in default Wayland. Here I’m going to how to enable this feature.
Requirements:
Before getting started, you need to check something to make sure you meet all the requirements for enabling this feature.
1. Monitor: First of all, you need to make sure your monitor supports VRR! For an external monitor, just use the physical buttons to open the menu, find out and enable that option (usually adaptive sync).
Or, you may go to VESA adaptive sync website to check a list of certified products. For AMD graphics card, go to this page for its freesync featured monitors, laptops, and TVs.
2. Graphics card:
- For Intel, you need Iris Xe integrated GPU (since Gen 11 CPU on laptops) or Intel Arc dedicated GPU for VRR support.
- NVIDIA implements this feature via G-SYNC using its proprietary driver. And, you need GTX 650 Ti Boost GPU or higher (G-SYNC), or GeForce 10 series (Pascal) and above (G-Sync Compatible). However, GT 1030 is not supported (some reported MSI GT1030 with DP supports VRR).
someone report MSI GT 1030 support VRR through the DP port
- And, all AMD GPUs starting with the 2nd iteration of Graphics Core Next support FreeSync for adaptive sync.
3. port. The display must be plugged in via DisplayPort (DP), though some support this through HDMI 2.1.
Enable VRR in GNOME
So if both your monitor and graphics card support VRR (adaptive sync). Enable that option in monitor, and install the proper graphics drivers (use Additional Drivers utility for NVIDIA proprietary, and go this page for AMDGPU).
Option 1: Single Command to Enable VRR for Mutter
Then, press Ctrl+Alt+T on keyboard to open up a terminal window, then run the single command to enable the feature for Mutter window manager:
gsettings set org.gnome.mutter experimental-features "['variable-refresh-rate']"
After that, you need to restart computer to apply the change.
Option 2: Use Dconf Editor (graphical way)
If you hate Linux command, then just launch App Center, then search and install Dconf Editor tool.
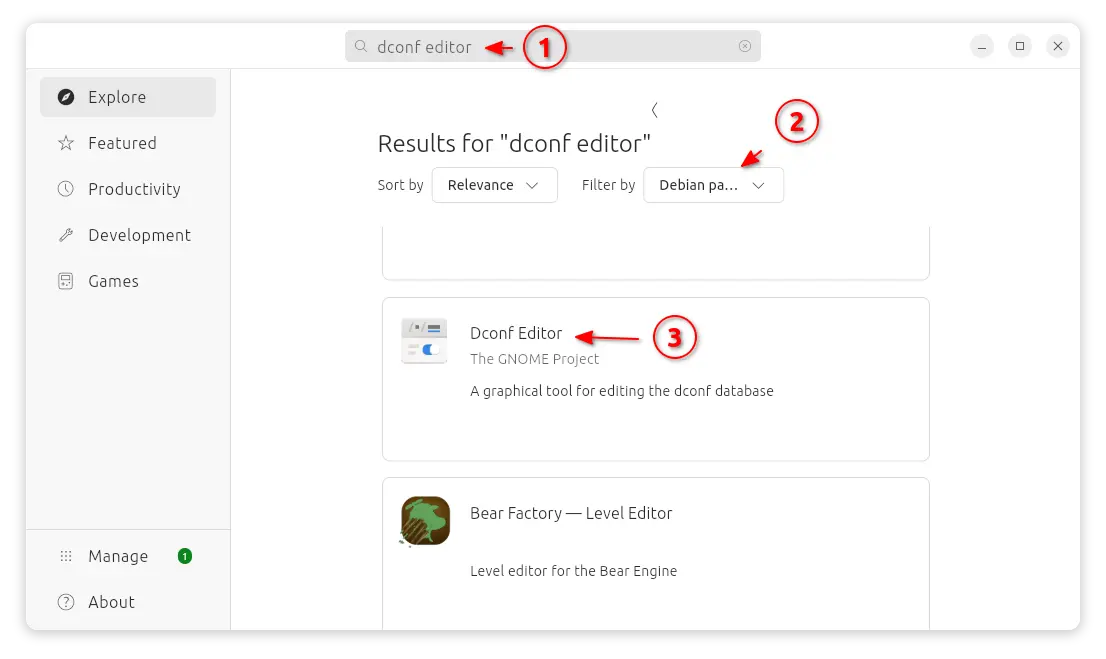
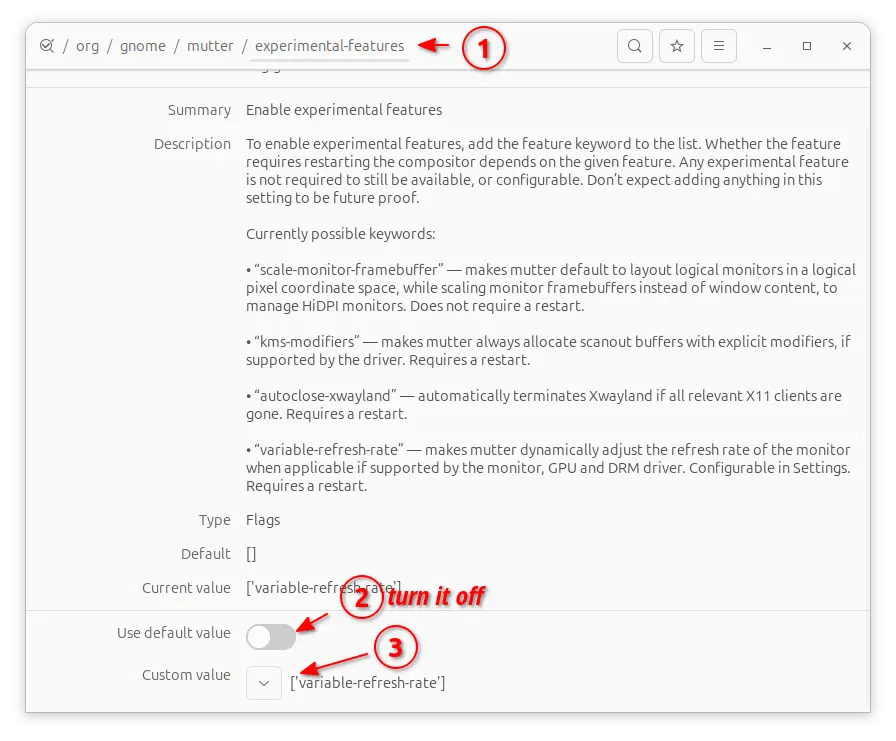
Next, launch “Dconf Editor” and navigate to org/gnome/mutter. Scroll down to find out and click go to the “experimental-features” key page. Then, do:
- Turn off “Use default value” option.
- Click the down arrow for “Custom value” and select “variable-refresh-rate”.
- Finally, click the pop-up “Apply” button to apply change.
Also restart your computer after making the change.
Turn on VRR option in Gnome Control Center
After enabled the feature for Mutter and restarted computer, open “Settings” from the top-right corner system status menu.
In the “Settings” dialog, navigate to Displays in left, then choose your display (if more than one connected), click expand “Refresh Rate” and finally enable the “Variable Refresh Rate” option and set a preferred rate.
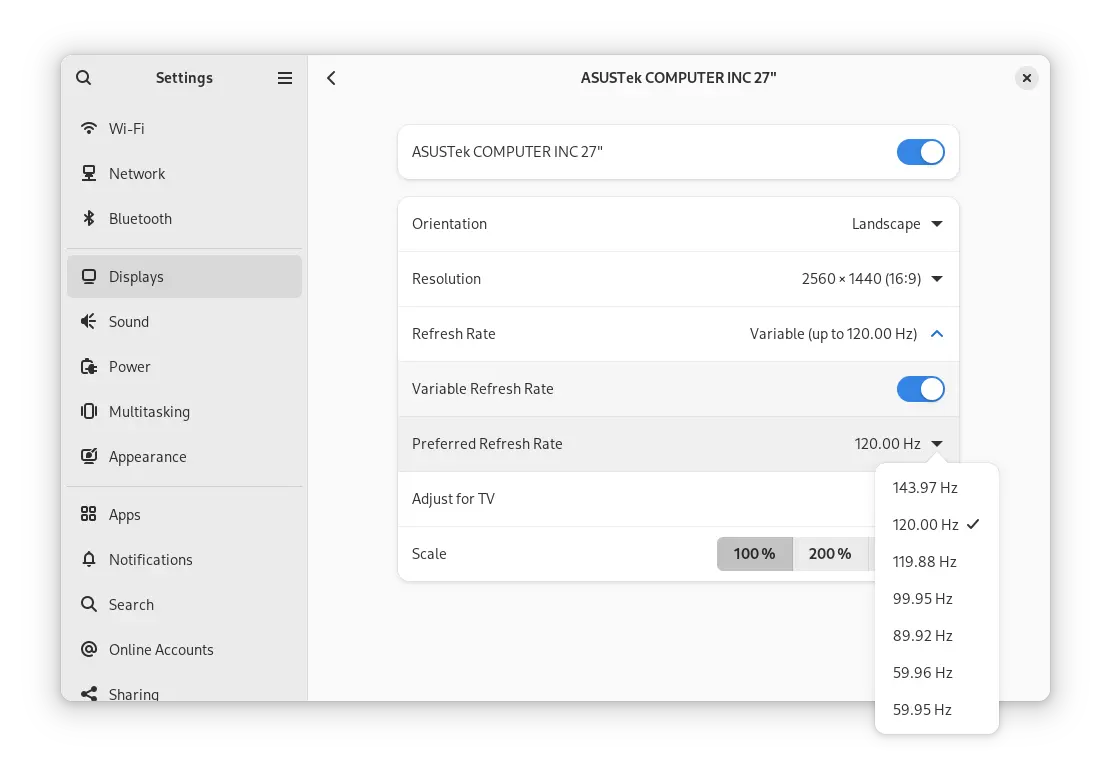
image from gitlab.gnome.org


after doing this the option does not show up for me.
I have rebooted & am on xorg.
hopefully you have figured it out in the meantime, but for others who end up reading this: you have to press/expand the “Refresh Rate”, for VRR option to appear.