
![]()
As you know, Ubuntu uses PipeWire as replacement of PulseAudio for its default sound server since Ubuntu 23.04. And, it now uses WirePlumber to manage pipewire session and policy.
With WirePlumber, you may configure more about your sound output and input. You can use Linux command to switch default audio input/output device, change volume level, and mute/un-mute sound and microphone.
As well, you may change the audio bit depth, sample rate, resample quality, and other properties for certain sound device.
NOTE: This tutorial does NOT work for Ubuntu 22.04 and earlier, since they use PulseAudio as default. And, lua script does NOT work for 24.10 & later due to policy change!
Use wpctl Command
WirePlumber has a command line tool called wpctl. It’s useful for getting your device status, properties, and change some settings on the fly, such as set default audio device and change volume.
First, open up a terminal window (Ctrl+Alt+T) and run command:
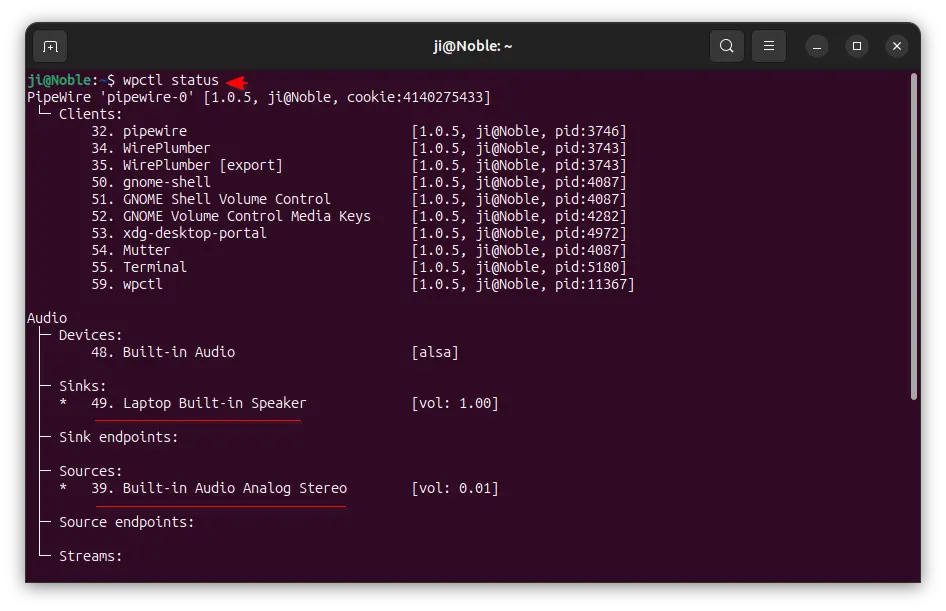
wpctl status
The command will output all the audio devices, audio sinks, and audio sources. The ones with * at the beginning are the defaults that in use. And, the numbers (e.g., 48, 49, 39 in the screenshot below) are the IDs.
To switch default audio input or output device, if you have multiple devices available, then use command:
wpctl set-default ID
Here replace the ID with the number you got from the last wpctl status command.
And, you may use the commands below to increase, decrease, or set volume. Which can be useful for scripting purpose or binding for keyboard shortcuts.
- Increase volume by 5% for default audio output, with a limit of 150%:
wpctl set-volume -l 1.5 @DEFAULT_AUDIO_SINK@ 5%+
- Decrease volume by 5% for default audio output:
wpctl set-volume @DEFAULT_AUDIO_SINK@ 5%-
- Set volume of default output to 0.5:
wpctl set-volume @DEFAULT_AUDIO_SINK@ 0.5
- Toggle mute/unmute for default audio output (or replace
togglewith0to unmute or1to mute):wpctl set-mute @DEFAULT_AUDIO_SINK@ toggle
In the commands above, you may replace @DEFAULT_AUDIO_SINK@ with @DEFAULT_AUDIO_SOURCE@ for the default audio input (e.g., microphone). Or use ID number instead for certain audio sink/source.

Use lua script to configure Sound Properties
NOTE: This step only works for WirePlumber 0.4.x (24.04 has 0.4.17). It has dropped lua script support since version 0.5 (24.10 has v0.5.6).
Step 1: Get the Name of target sound input/ouput
Because the sound devices’ ID numbers are dynamic and change often, you need to find out the device.name or node.name to let WireBlumder know which device you want to configure.
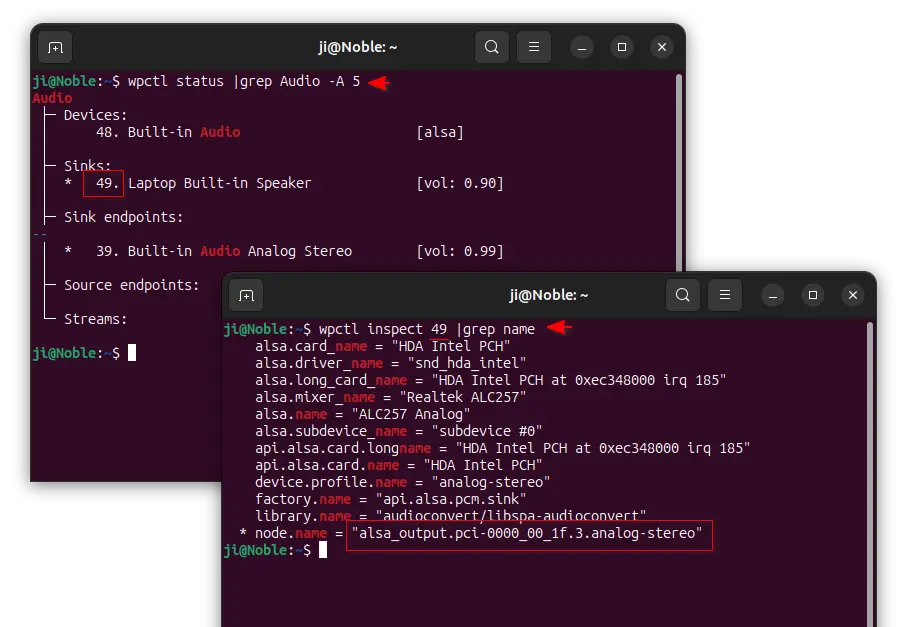
First, run command below to find out the ID of target device/sink you want to configure:
wpctl status
Then, use the command below to display more information about the target object (replace number 49 according to last command).
wpctl inspect 49
In the output, copy the value of either “device.name” or “node.name” for use in next step.
Step 2: Create & Edit lua script file
Ubuntu 24.04 so far uses lua scripts for WirePlumber configuration. The default config files are located in /usr/share/wireplumber directory. While, user can create custom config files under /etc/wireplumber or ~/.config/wireplumber directories.
1. For current user only, press Ctrl+Alt+T on keyboard to open terminal and run commands:
- First, create the local wireplumber configuration folder:
mkdir -p ~/.config/wireplumber/
- Then, create the
main.lua.dsub-folder for storing lua scripts:mkdir -p ~/.config/wireplumber/main.lua.d
- Finally, create & open a custom script file with name
51-alsa-custom.lua:gnome-text-editor ~/.config/wireplumber/main.lua.d/51-alsa-custom.lua
Here replace
gnome-text-editordepends on your desktop environment. Usemusepadfor XFCE,plumafor MATE, ornanocommand line text editor that works in most desktops.

2. When file opens, paste the content below and edit accordingly.
rule = {
  matches = {
    {
      { "node.name", "matches", "alsa_output.pci-0000_00_1f.3.analog-stereo" },
    },
  },
  apply_properties = {
      ["node.description"]       = "Laptop Built-in Speaker",
      ["audio.format"]           = "S32LE",
      ["audio.rate"]             = 48000
  },
}
table.insert(alsa_monitor.rules,rule)
IMPARTANT: Mis-configuration and typo errors in this file MAY break the sound output or input! Do it carefully!
Here you need to:
- Replace
alsa_output.pci-0000_00_1f.3.analog-stereowith yours audio device/sink node name (See Step 1). - Add more (or delete if need) and change audio settings under “apply_properties” section accordingly. Other properties include:
- [“node.disabled”] = false,
- [“priority.driver”] = 100,
- [“priority.session”] = 100,
- [“node.pause-on-idle”] = false,
- [“dither.noise”] = 0,
- [“dither.method”] = “none”, — “rectangular”, “triangular” or “shaped5”
- [“audio.channels”] = 2,
- [“session.suspend-timeout-seconds”] = 5, — 0 disables suspend
For more options, either read the
/usr/share/wireplumber/main.lua.d/50-alsa-config.luafile, or see the official documentation for device/node properties (some may be not available since WireBlumder is old in Ubuntu).

For nano command line text editor, press Ctrl+S to save file and Ctrl+X to exit.
Step 3: Apply Changes
To apply the new configuration file, simply run the command below to restart the wireblumder service:
systemctl --user restart wireplumber.service
Undo:
Any incorrect settings or typo errors you made in last step may break the sound output/input. In the case, just delete that file via the command below:
rm ~/.config/wireplumber/main.lua.d/51-alsa-custom.lua
Then restart the service (see Step 3) should restore everything to default.


Terminals are fun, but for a great GUI app to route audio in pipewire, look into qpwgraph.
https://www.rncbc.org/drupal/node/2647
Maybe some typos in here: “Because the sound devices’ ID numbers are dynamic and change often, you need to find out the device.name or node.name to let WireBlumder know which device you want to configure.”
This why I went back to Windows 11. I can’t see why Linux distros refuse to include this in the sound settings menu just like MacOS and WinOS. Hopefully Linux Distros will fix this in the feature.