DeadBeef, the lightweight music player application for Linux, Windows, and macOS, released new 1.10.2 version few days ago.
This free open-source music player released version 1.10.1 last week with new Lyrics Viewer plugin. User can enable “Design” mode and add Lyrics widget to show the lyrics for the song being played.
Audacity, the free open-source audio editor and recording application, released new 3.7.6 version few days ago. PPA updated for all current standard Ubuntu releases.
The new release of this cross-platform (Windows, Linux, and macOS) computer software added the FFmpeg 8.0 multimedia library support. Continue Reading…
Easy Effects, the free open-source audio equalizer and effects application for Pipewire, released new major 8.0.0 version few days ago.
The new app release switched its UI backend from GTK4 plus LibAdwaita to Qt6, QML and Kirigami. The Flatpak package is now based on KDE runtime platform instead of GNOME.
The popular free open-source Audacity audio editor announced new 3.7.0 release few days ago!
Unlike v3.5.0 or v3.6.0, this is NOT a feature release but maintenance updates with many bug-fixes and performance improvements. While, the developers are working on next major Audacity 4.0.
The new release improved contrast in the light theme. Which, fixed the issue that the focus border was hard to discern as it was blue against a blue-based background.
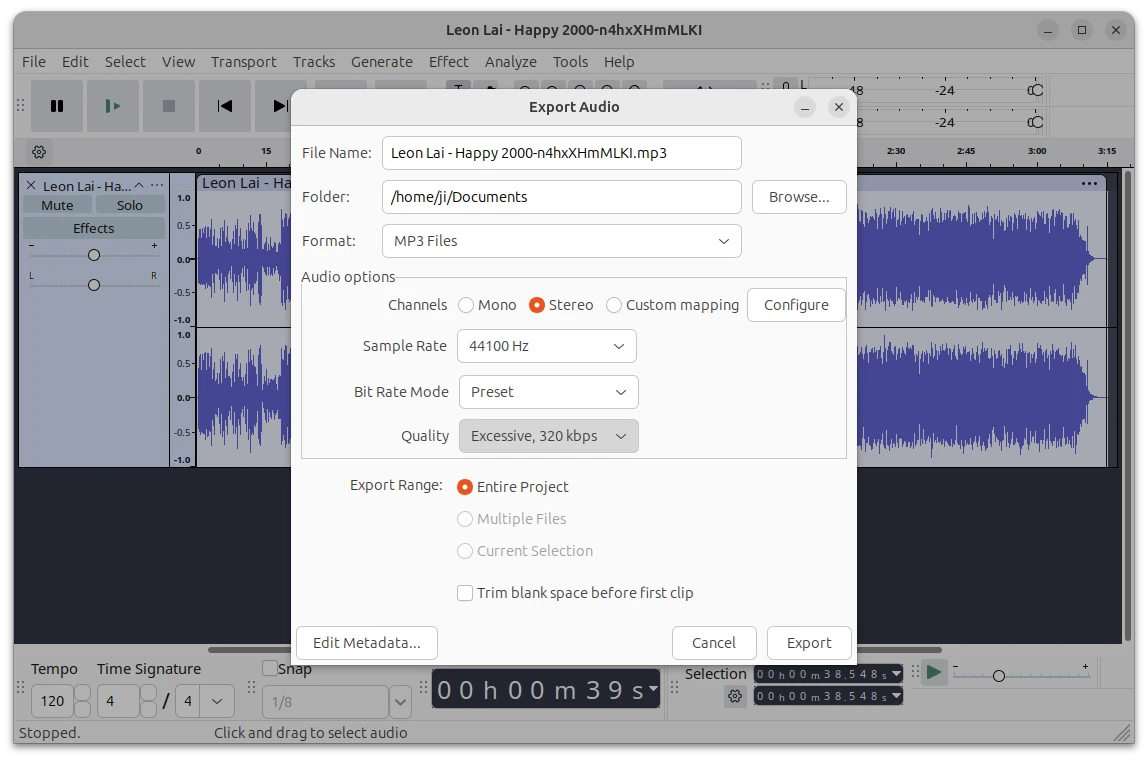
To not make disabled and neurodivergent people uncomfortable while they use Audacity, it renamed the word “Insane” in the Quality drop-down menu in the Export Audio dialog with “Excessive“.
As you know, Ubuntu uses PipeWire as replacement of PulseAudio for its default sound server since Ubuntu 23.04. And, it now uses WirePlumber to manage pipewire session and policy.
With WirePlumber, you may configure more about your sound output and input. You can use Linux command to switch default audio input/output device, change volume level, and mute/un-mute sound and microphone.
As well, you may change the audio bit depth, sample rate, resample quality, and other properties for certain sound device.
Audacity audio editor announced new major 3.6.0 release few days ago. Here are the new features and how to install guide for Ubuntu users.
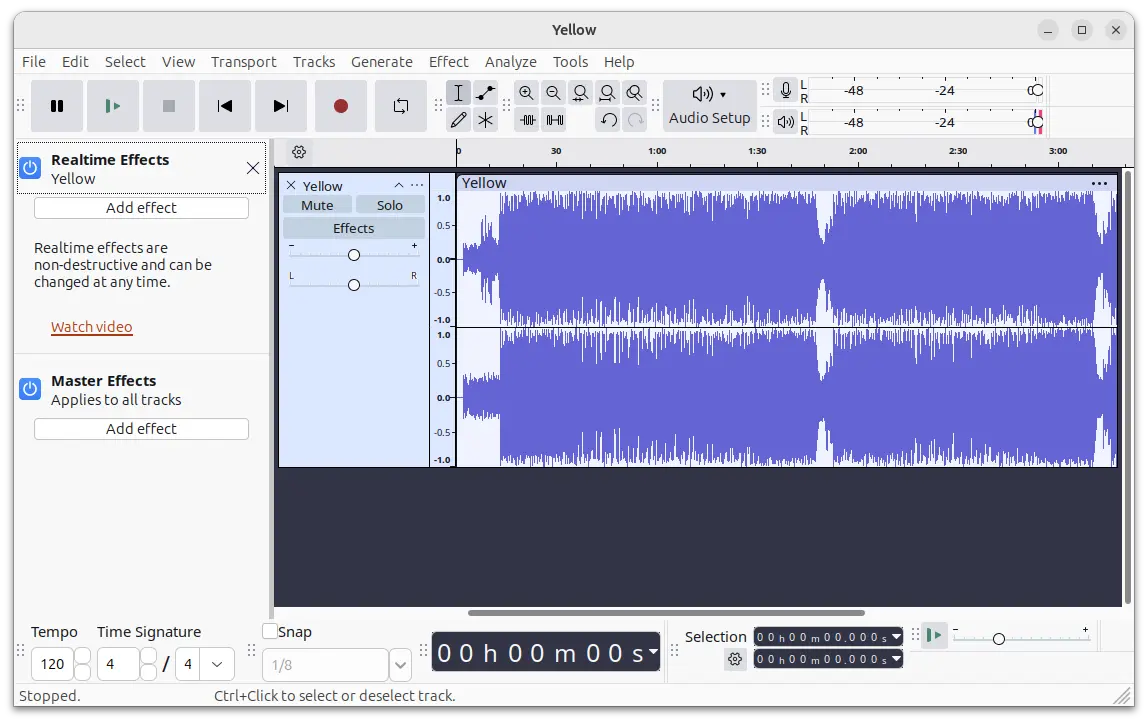
The new release features new Master Effects. By clicking “Effects” button in app window, it will now show you Realtime Effects and Master Effects options for choice. While, the new Master Effects allows to apply effects to the entire project at once.
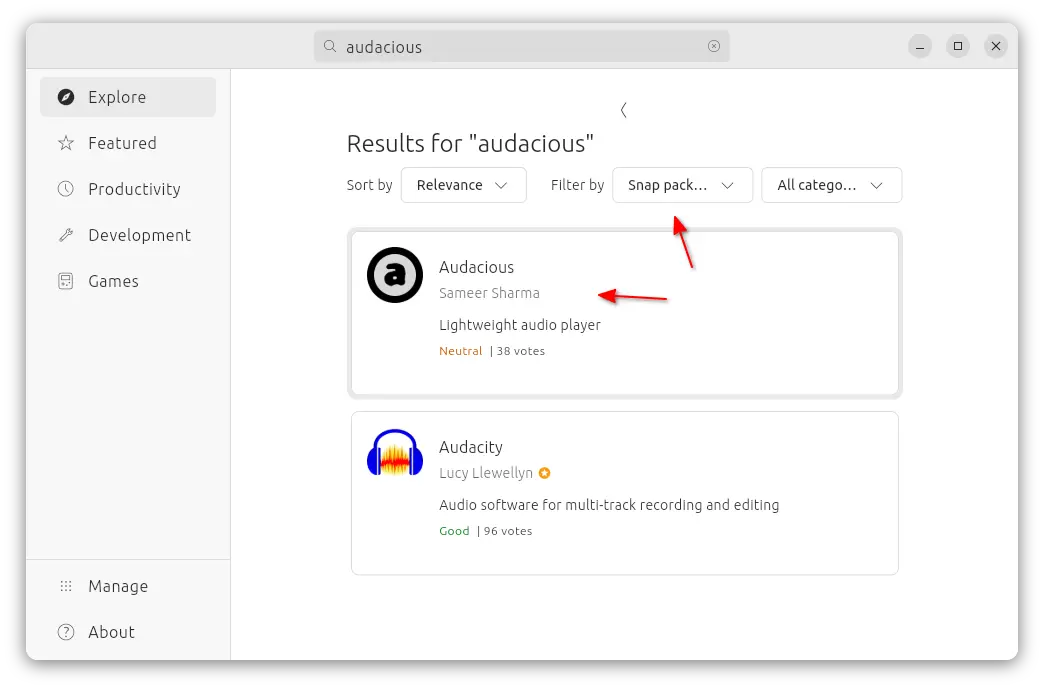
Audacious, the popular lightweight audio player, released new 4.4 version this Wednesday!
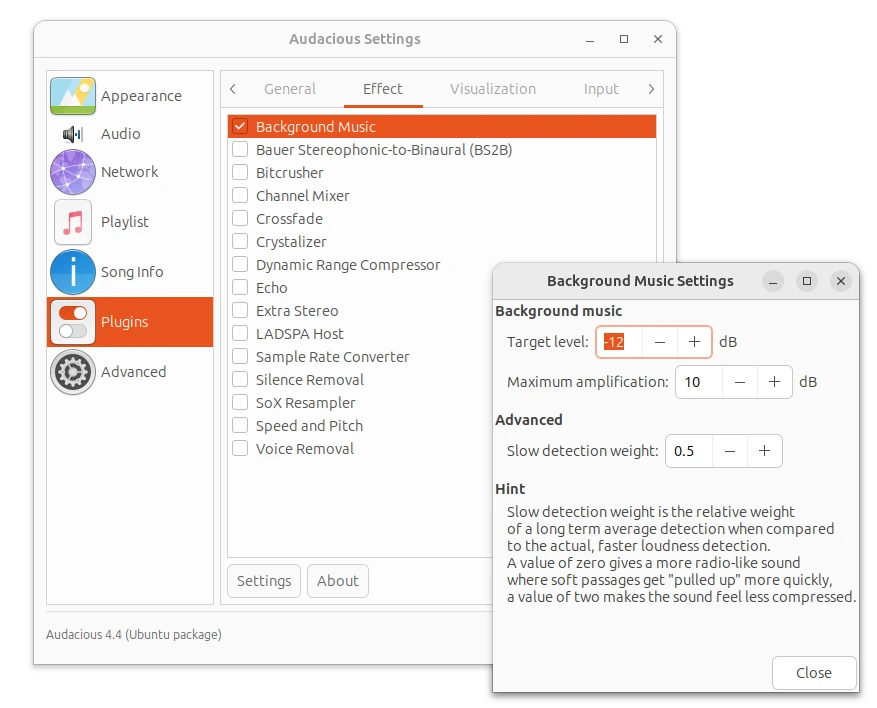
The new release of this free open-source music player restores Lyrics plugin for GTK interface, and adds new provider chartlyrics.com. Thanks to Michel Fleur, there’s now “Background Music” plugin, under “Effect” tab in the Plugin page, allows to make the sound equally loud within and between tracks.
The Scrobbler (Last.fm) plugin now also works on macOS and Windows. And, the Song Change plugin now allows to run custom command when a song is stopped.
Audacious 4.4 now defaults to GTK3 + Qt6, though Qt5 and GTK2 are still supported. It improved Wayland support for GTK interface, but the classic Winamp interface does NOT work properly on Wayland, thus users are recommended to run Audacious via XWayland (default behavior if available) therefore.
Other changes in Audacious 4.4 include:
Add Disc Number support
Read ReplayGain values in Opus files from R128 tags
For Ubuntu users, it’s available to install via Ubuntu PPA (native .deb package), Snap package, or Flatpak package (runs in sandbox environment).
Method 1: Audacious Snap package
If you’re OK running the audio player in sandbox environment, then Audacious is easy to install through Ubuntu Software (or App Center) as Snap package.
Method 2. Install Audacious via Flatpak
Most Linux can install the audio player as Flatpak package, that runs in sandbox. So far, it supports amd64 and arm64 platforms.
All current Ubuntu user can press Ctrl+Alt+T on keyboard to open terminal and run the 2 commands below one by one to get it.
After installation, search for and launch it from start menu or Gnome overview. Log out and back in if app icon not visible.
Method 3. Install Audacious from Ubuntu PPA
For Ubuntu 18.04, Ubuntu 20.04, Ubuntu 22.04, Ubuntu 23.10, and Ubuntu 24.04 users, I’ve uploaded the new release package into PPA for amd64 and arm64/armhf machines.
Changes in the PPA package:
Packages for Ubuntu 18.04 and Ubuntu 20.04 are built with Qt5 + GTK3, since Qt6 is NOT available.
Qt6 + GTK3 for Ubuntu 22.04 and higher.
The dependency library name changes that follow upstream policy in Ubuntu 24.04:
libaudcore5 -> libaudcore5t64
libaudgui5 -> libaudgui5t64
libaudqt2 -> libaudqt2t64
libaudtag3 -> libaudtag3t64
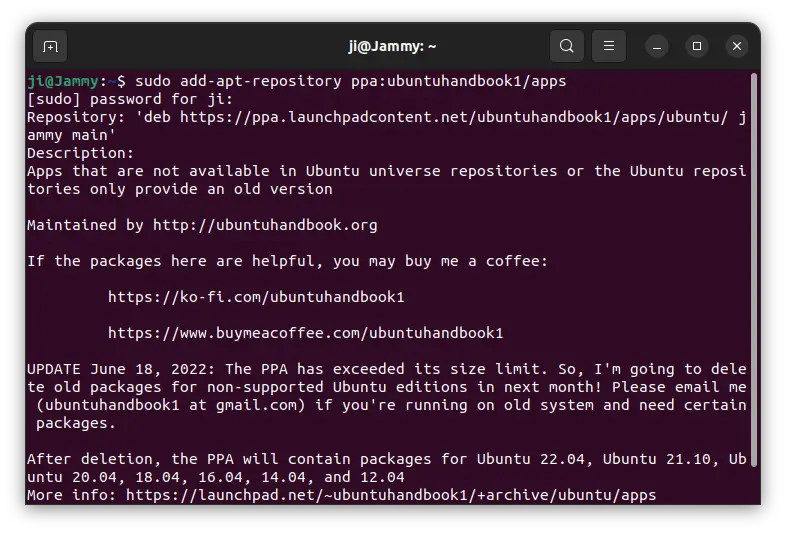
1. First, press Ctrl+Alt+T on keyboard to open terminal. When it opens, run command to add the PPA:
sudo add-apt-repository ppa:ubuntuhandbook1/apps
Type user password (no visual feedback, just type in mind) when it asks and hit Enter to continue.
2. Then, update system package cache:
sudo apt update
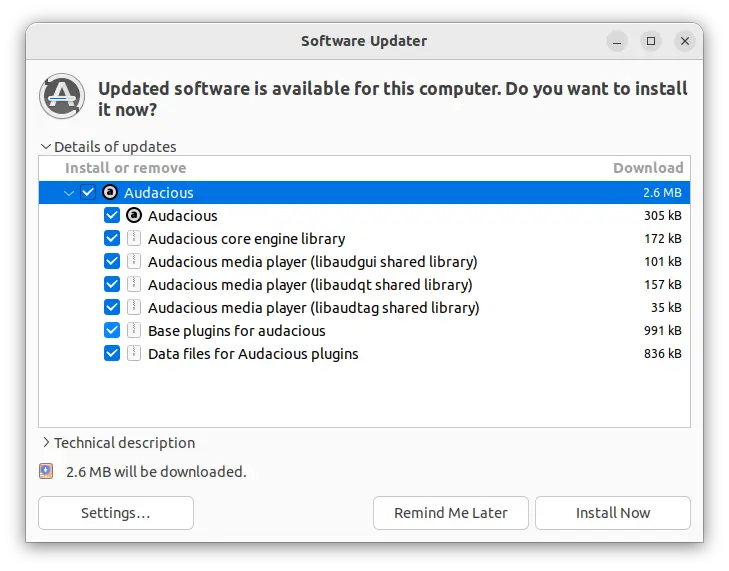
3. If you have an old version of the music player installed, you can now update the package to the latest using “Software Updater” utility.
Or, run the command below in terminal to install or upgrade the package:
sudo apt install audacious audacious-plugins
NOTE: For Ubuntu 22.04 runs into “Error opening output stream” issue, open “Settings” and set audio output plugin to “PulseAudio” output.
Uninstall Audacious
To remove the audio player installed as Flatpak, open terminal (Ctrl+Alt+T) and use command:
Also clean up runtime library via flatpak uninstall --unused.
If you want to restore the music player to the stock version available in system repository. Run command below to purge PPA as well as downgrade installed packages:
This is a step by step guide shows you how to enable the event sounds (system sound or custom sound) for login and log out actions in Ubuntu 24.04 LTS.
When booting Ubuntu 24.04 from a live USB, it plays a sound after logged into the desktop. The sound however does no longer play after installed the system on your disk. So, here I’m going to show you how to re-enable this feature.
NOTE: This tutorial is tested and works in my case in Ubuntu 24.04. It MAY also work in old Ubuntu releases and even other Linux, but for GNOME Desktop only.
This tutorial shows how to install the popular Spotify music app in Ubuntu 24.04, Ubuntu 24.10 though Snap, Deb, or Flatpak packages.
Spotify supports for Linux officially through Snap package which runs in sandbox environment, and Deb package that’s native in Debian and Ubuntu.
For choice, there’s also a community maintained Flatpak package, which also runs in sandbox environment. All of them is available for only x86_64 (Intel/AMD CPUs) platform so far.
Spotify for Linux packages:
Snap package, runs in sandbox and receives updates automatically.
Deb package, the classic package format runs natively in Debian and Ubuntu.
Flatpak package, unofficial community maintained package, runs in sandbox and works in most Linux desktop.