![]()
GIMP image editor got a new update for its 2.99 development release this Friday. Here’s the new features as well as how to install guide for Ubuntu users.
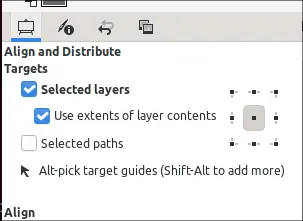
GIMP 2.99.14 is the 7th development release for the next major 3.0 release. It reworked the Align and Distribute tool to make it easy to use. Target items to align or distribute are now the selected layers and/or paths. For layers in particular, a new option “Use extents of layer contents” is available to align or distribute target layers based on their pixel contents.
The Text tool now has new “outline” and “fill” options, to insert text in different styles. For me, it’s no longer required to use ‘Grow…’ and then ‘Stroke Selection’ to do similar job.
This release also introduced a new ‘Gray‘ theme, as well as “Override icon sizes set by the theme” option to resize icons among small, medium, large and huge.

XCF file support is greatly improved with multi-threading support. Saving with default RLE and zlib is now much faster! And, this release introduced initial Apple Silicon package support for macOS users.
Other changes in GIMP 2.99.14 include:
- Transform tools activated automatically
- New “Paste as Single Layer” and “Paste as Single Layer in Place” options in the Edit > Paste as submenu.
- Moving to GApplication and GtkApplication
- Add ‘Root layers only’ option on PDF export.
- export PSD images as CMYK(A) support.
- Metadata import and export for JPEG-XL support.
- Initial support for Apple’s ICNS files.
- Add “Show reduced images” option when importing TIFF.
How to Install GIMP 2.99.14:
The image editor has an official download page for the development releases. It offers the official package for Linux as Flatpak, though there’s also an unofficial PPA for Ubuntu users.
Option 1: Install GIMP 2.99.14 as Flatpak
Ubuntu and most other Linux can install the editor as Flatpak that runs in sandbox. For Ubuntu users, they are generally 3 commands for installing it:
- Press Ctrl+Alt+T on keyboard to open terminal. Run command to install the daemon package in case you don’t have it.
sudo apt install flatpak
- Then, add the flathub beta repository by running command:flatpak remote-add –user flathub-beta https://flathub.org/beta-repo/flathub-beta.flatpakrepo
- Finally, install GIMP beta release via command:
flatpak install --user flathub-beta org.gimp.GIMP
If you already installed the previous GIMP 2.99.12, use flatpak update --user org.gimp.GIMP beta command to update it.
And, if you also have GIMP 2.10 stable release installed as Flatpak, only one of them can be visible in system app launcher. Use either command below to switch between them:
flatpak make-current --user org.gimp.GIMP beta
flatpak make-current --user org.gimp.GIMP stable
NOTE: skip --user flag if you installed the package system wide without this parameter.
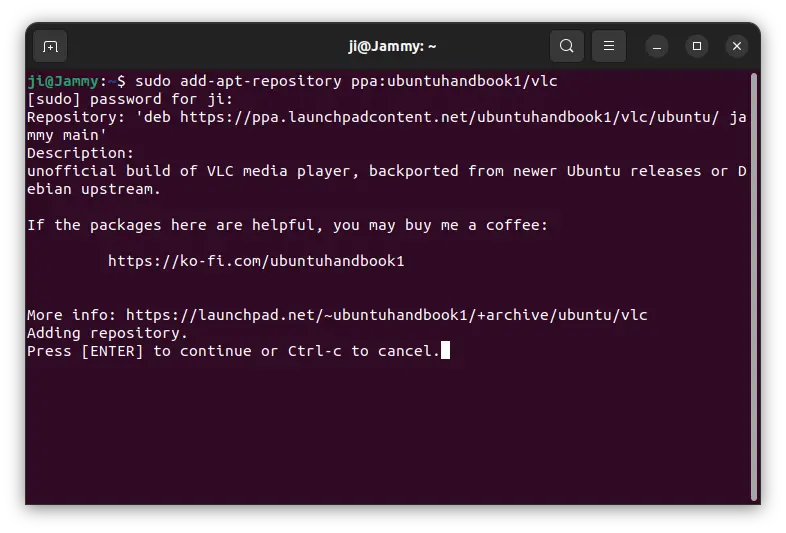
Option 2: install GIMP 2.99.14 from PPA
For those who prefer the classic .deb package format, there’s an unofficial PPA contains the package for Ubuntu 20.04, Ubuntu 22.04, and Ubuntu 22.10.
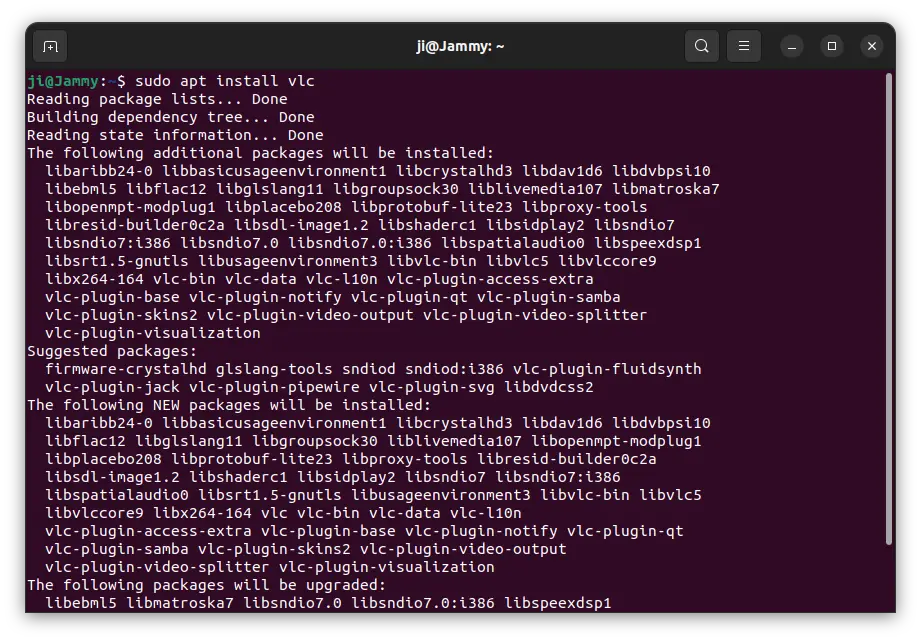
Simply, open terminal from start menu or by pressing Ctrl+Alt+T on keyboard, then run the commands below one by one to add the PPA, update, and install GIMP 2.99.x:
sudo add-apt-repository ppa:mati75/gimp30
sudo apt update
sudo apt install gimp
NOTE: If you have GIMP 2.10 stable installed as .deb package, the commands above will upgrade it to the latest development release.
To restore the stock GIMP package in system repository, run command to purge the Ubuntu PPA which also downgrade all installed packages:
sudo apt install ppa-purge & sudo ppa-purge ppa:mati75/gimp30