Looking for a MacOS Hand Mirror alternative app for Ubuntu? Here’s one for the GNOME desktop.
It’s CamPeek, an extension adds an icon on GNOME top-bar, allowing to one-click to preview your webcam. It’s lightweight and fast! And, it streams your webcam feed directly without recording or saving any data.
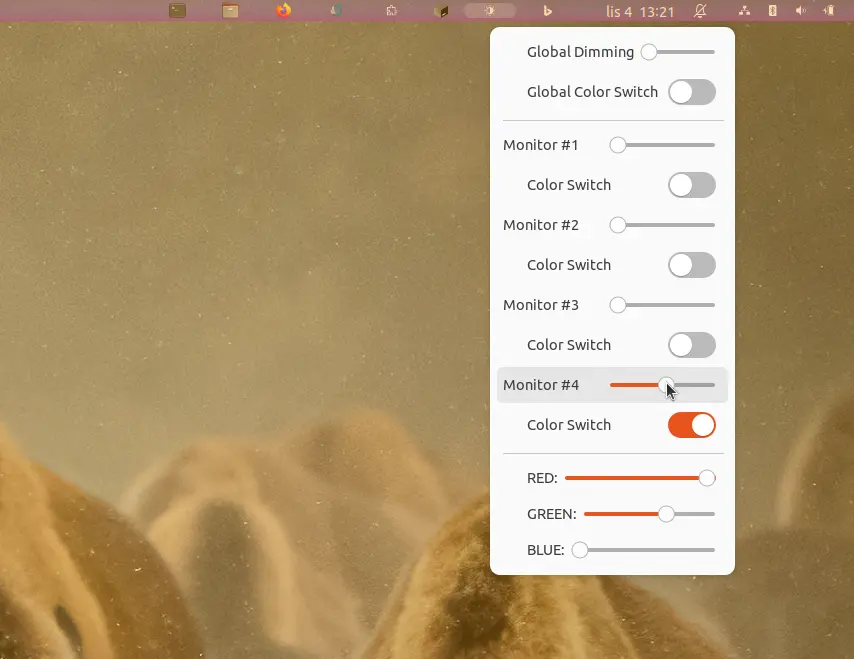
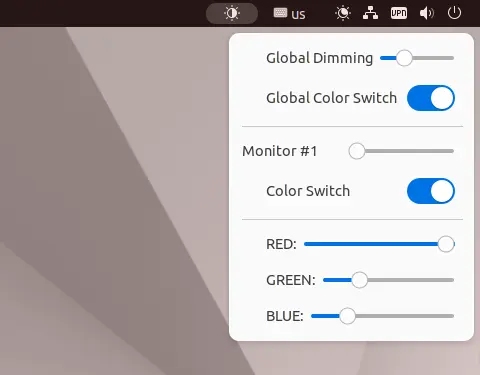
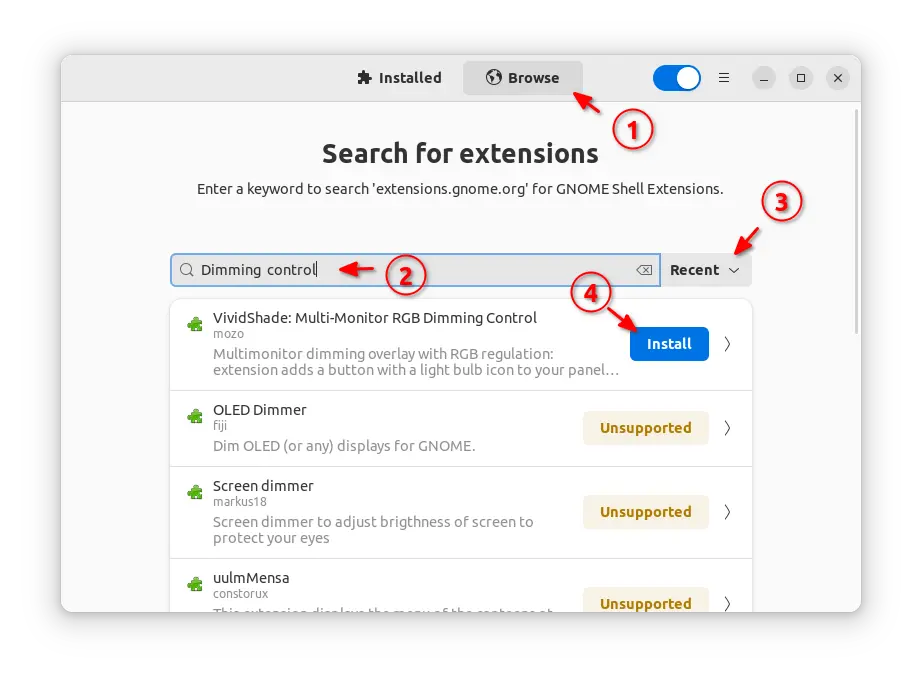
Have multiple monitors connected to your Ubuntu 22.04 machine? There’s now an indicator to dim all or individual monitor screen brightness with sliders.
You can dim external monitor brightness with either physical buttons or ddcutil utility. However, an indicator applet in system tray can be more effective, and here’s one for Ubuntu 22.04 with default GNOME 42.
It’s a Gnome Shell extension, that adds a light bulb to top-right corner in panel. By clicking on it, will show you the slider to dim all the connected monitors, as well as individual sliders to dim certain screens.
And, by moving the slider to far right will make the screen totally dark, just like being turned off.
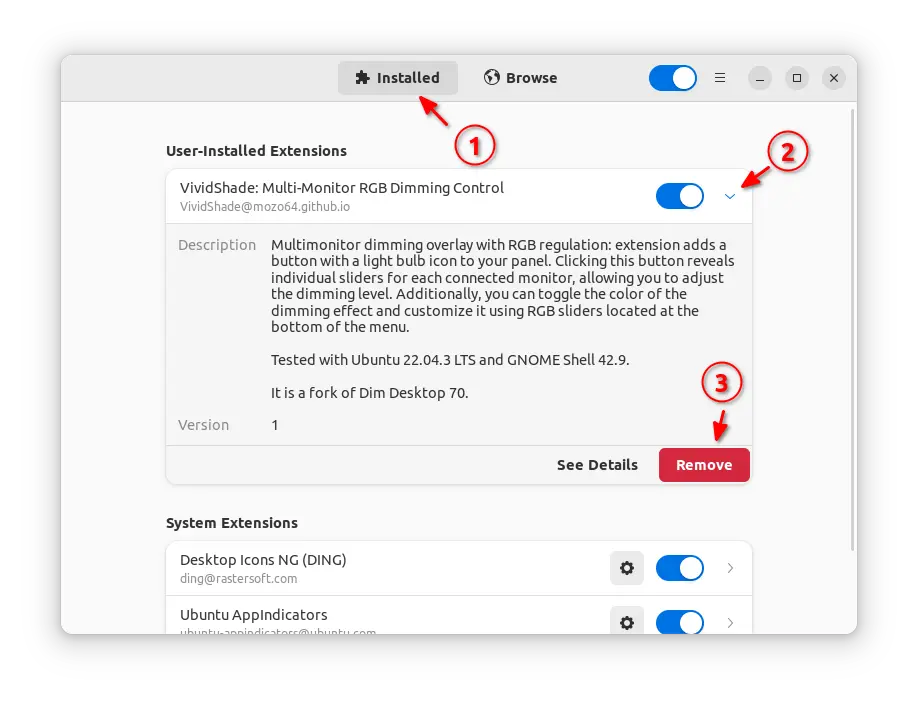
Besides dimming monitor screens, it can also change the colors with RGB sliders, which also can apply to either all or individual monitors.
As my laptop’s external HDMI port is broken, I can’t try out the multi-monitor support. But, the dimming and RGB color (need to at least move dim slider a bit to right) functions are working very well in my case in Ubuntu 22.04 Desktop PC.
My test without multi-monitors
How to Install the Dimming Control Indicator
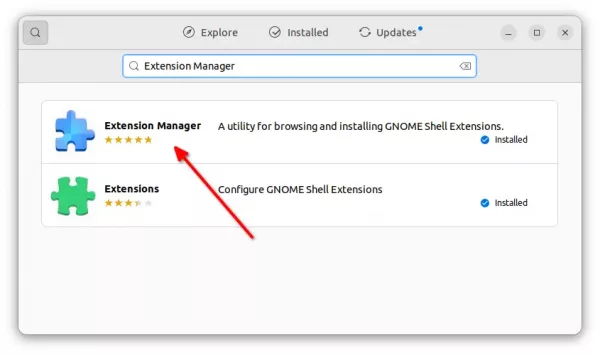
First, launch Ubuntu Software, then search for and install “Extension Manager” app.
Install Extension Manager in Ubuntu 22.04+
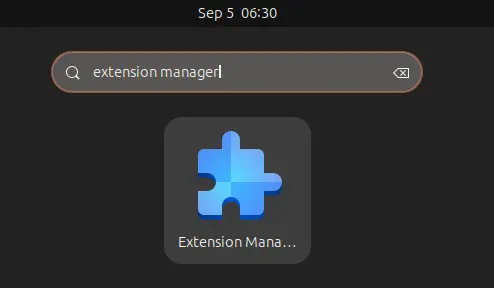
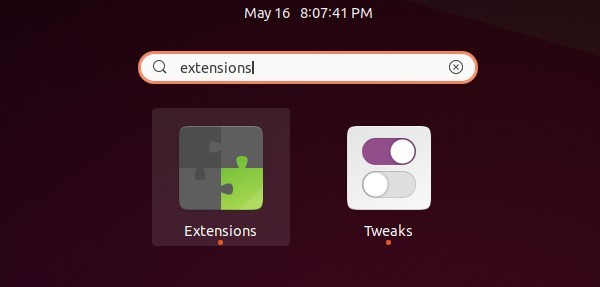
Then, click on top-left ‘Activities’ button to open overview screen, search for and launch ‘Extension Manager’.
When the tool opens, navigate to ‘Browse‘ tab, and finally search and install “VividShade: Multi-Monitor RGB Dimming Control” extension.
The indicator applet will appear on panel immediately after installation.
Uninstall:
To uninstall this extension, also launch “Extension Manager“. Click expand it under first tab, finally click on red “Remove” button.
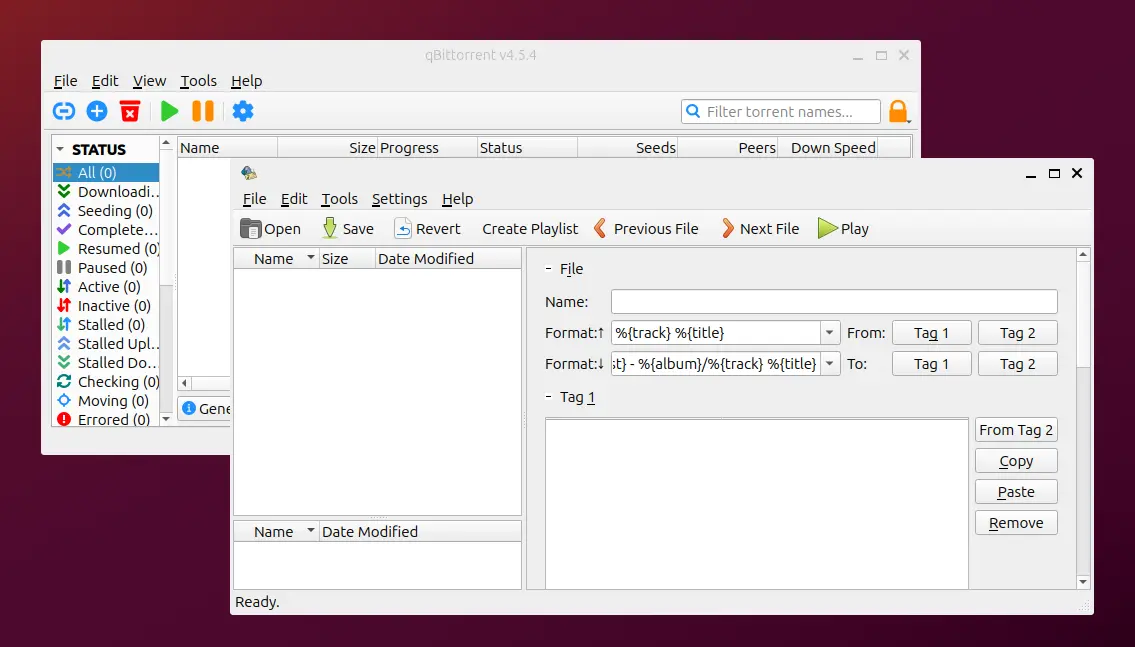
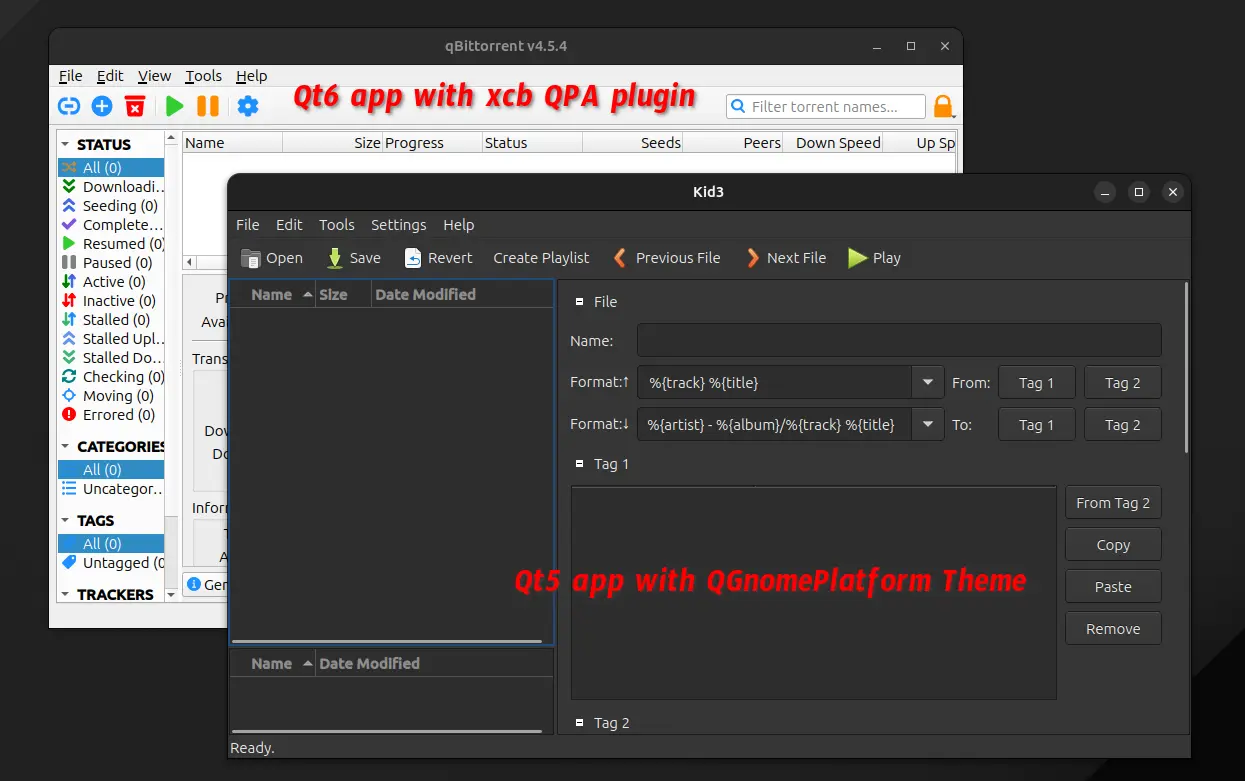
Your apps do NOT have window border and shadow in Ubuntu 24.04? Here are the quick workarounds for the applications based on Qt UI toolkit. In Linux Desktop, applications are built with different UI toolkit. While, GNOME, Cinnamon, and XFCE use GTK3/4, KDE and LxQt use Qt for their applications. Ubuntu by default uses GNOME as default desktop environment, but user may also use Qt applications, such as qbittorrent, ksnip screenshot tool, kdenlive video editor, and more. Since Ubuntu 23.10, the Qt applications are looking weird. They have very thin border without shadow, that look kinda borderless. This is an upstream issue that also happen in Debian 12 bookworm.
Qt apps in Ubuntu 23.10
If you have similar issue, then this tutorial is going to show you how to fix (workaround) it by 2 ways:
xcb QPA plugin – for Qt apps run against X11.
QGnomePlatform Theme – Qt app inclusion in GNOME, but lack Qt6 support in Ubuntu so far.
NOTE: You can do both ‘Option 1’ and ‘Option 2’ in Ubuntu. They seem not conflicting with each other.
Option 1: Set xcb QPA environment
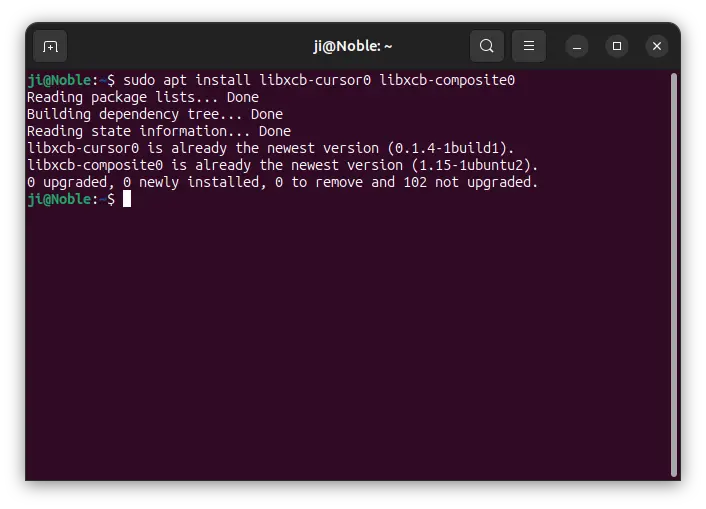
If most of your Qt apps are running against X11, then this option is a good choice. 1. First, press Ctrl+Alt+T to open up a terminal window. When it opens, run command to install the required libraries:
sudo apt install libxcb-cursor0 libxcb-composite0
Then, you can try to launch a Qt app, qBittorrent from example, from command line with xcb plugin to see if it works:
export QT_QPA_PLATFORM=xcb && qBittorrent
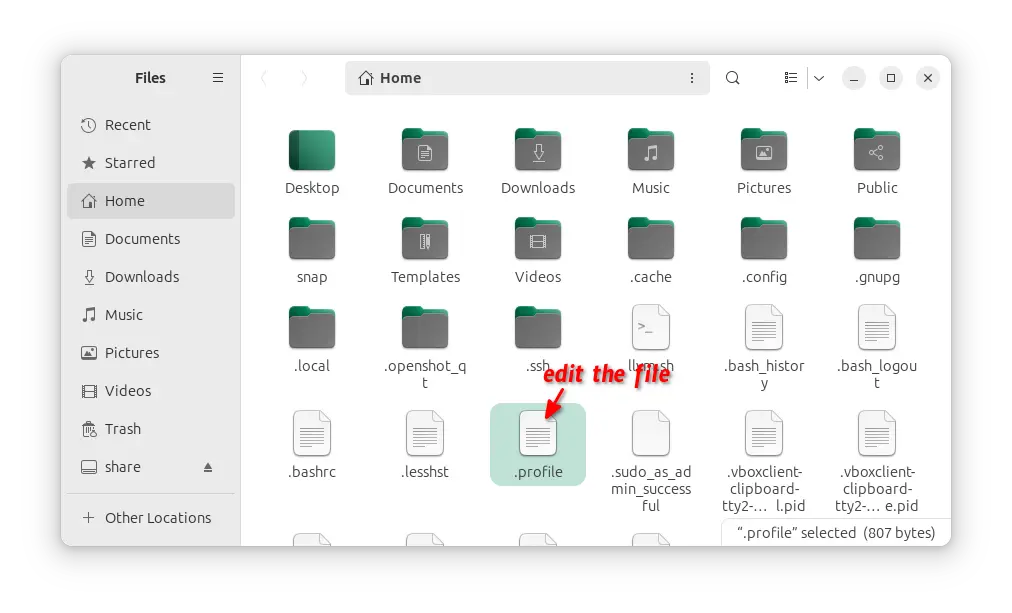
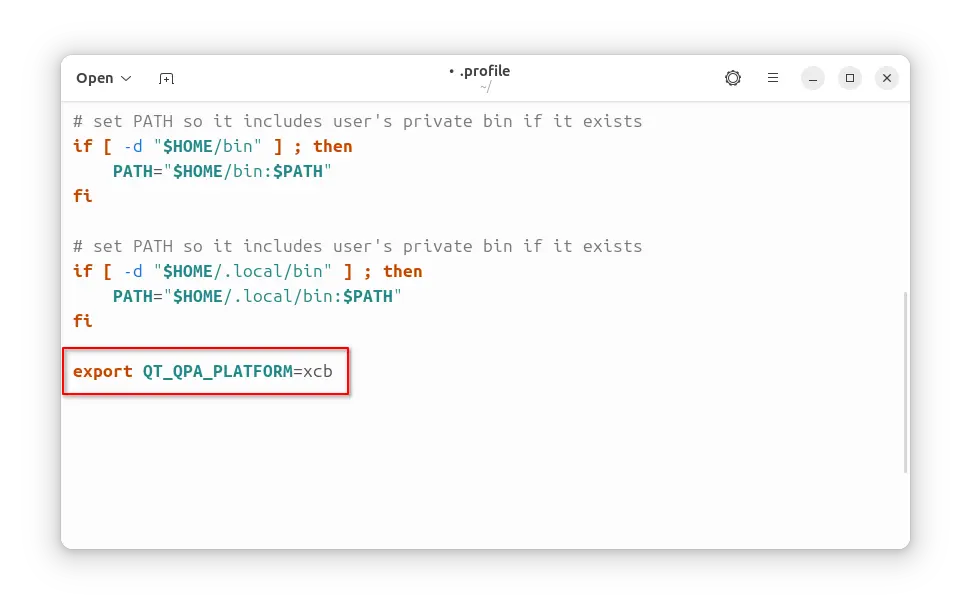
2. If it works, then open “Files“, press Ctrl+H to show hidden files/folders. Then find out the .profile file, right-click on it and select “Open With Text Editor”. 3. When the file opens, scroll down and add the new line below in the end:
export QT_QPA_PLATFORM=xcb
After saving the file, log out and back in. Then, try launching your Qt applications to see the result. Tips: without log out and back in, you may press Ctrl+Alt+T to open terminal. Then run command export QT_QPA_PLATFORM=xcb to set the environment for this terminal window. Finally, launch Qt app from this terminal.
Option 2: Use QGnomePlatform Theme
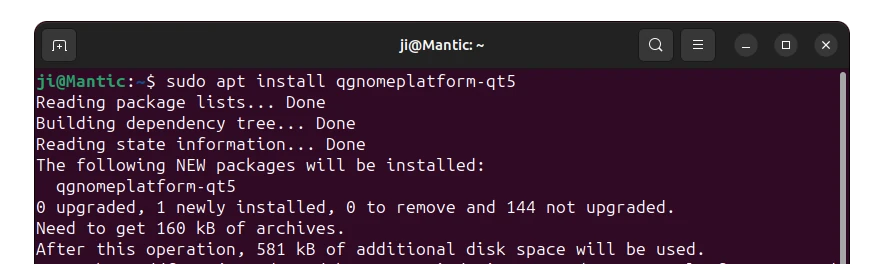
Fedora Linux has QGnomePlatform project to allow Qt applications to fit into the GNOME environment as well as possible, though it’s no longer maintained due to switch to QAdwaitaDecorations. The theme works great, and even let your Qt apps automatically switch between light and dark mode according to desktop color style. Ubuntu 24.04 and higher include the package in system repository, sadly for Qt5 apps only! 1. First, press Ctrl+Alt+T on keyboard to open terminal. When terminal opens, run command to install the theme package:
sudo apt install qgnomeplatform-qt5
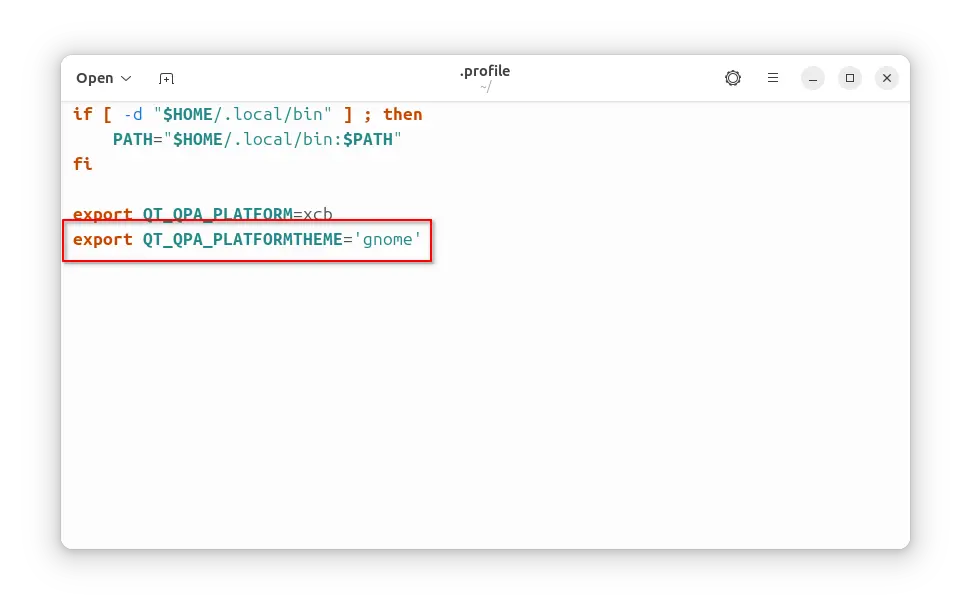
Ubuntu 25.04/25.10 user can also install the qgnomeplatform-qt6 package for Qt6 apps support!2. Next, also open “Files”, press Ctrl+H to view hidden files. Then, edit the ‘.profile‘ file and add new line in the end:
export QT_QPA_PLATFORMTHEME='gnome'
Finally, log out and back in to apply change. After doing both ‘Option 1’ and ‘Option 2’, all my Qt applications have native window borders, though the Qt6-based qBittorrent is still not fitting well in GNOME.
Qt apps in Ubuntu 23.10 after this tutorial
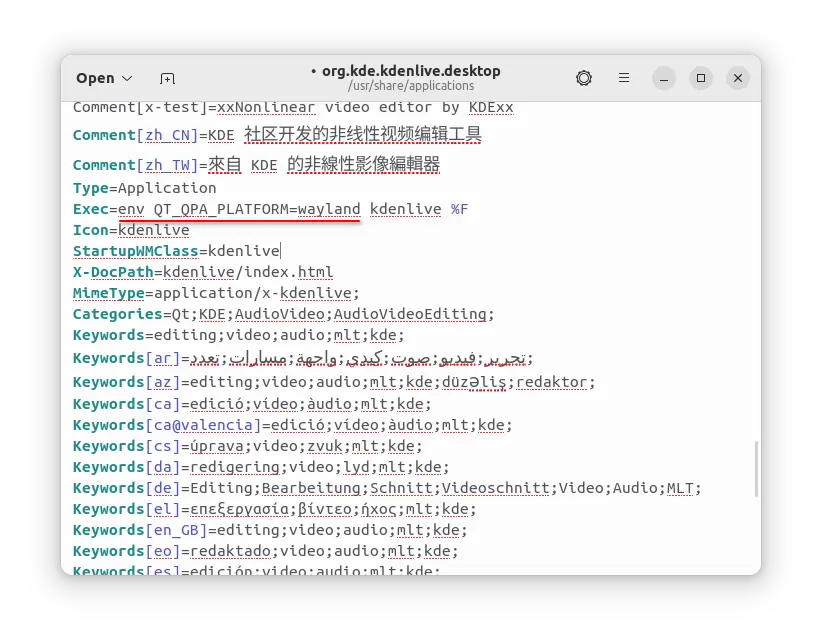
Run Qt app against Wayland
After doing ‘Option 1’, your Qt applications will run against X11. If you do need to run app against Wayland, then either launch the app from terminal. For example, launch kdenlive using wayland:
env QT_QPA_PLATFORM=wayland kdenlive
Tips: some apps may be running silently in the background. You need to close it first before running the similar command above. Or, edit the app shortcut file (usually under /usr/share/appliations), and set the environment by changing the value of ‘Exec’. For example, edit the app shortcut for Kdenlive, to make it run against wayland:
This is a beginner’s guide shows how to set custom keyboard shortcut to tile windows in Ubuntu 24.04 Noble Numbat
Ubuntu (since 23.10) introduced enhanced tiling window support with a new system extension. With it, user can easily arrange all opened windows side by side by either mouse dragging or keyboard shortcuts.
The extension supports both “edge tiling” to automatically resize and fill a window to left, right, top, or bottom screen half, and “corner tiling” to tile a window to top-left, top-right, bottom-left, and bottom-right screen quarter.
The default keyboard shortcuts use “Super + number pad key” combination. But, some laptop and PC don’t even have a number pad. In the case, you have to set custom shortcuts. And, here’s how to do the job in 2 ways.
Method 1: Use Extension Manager
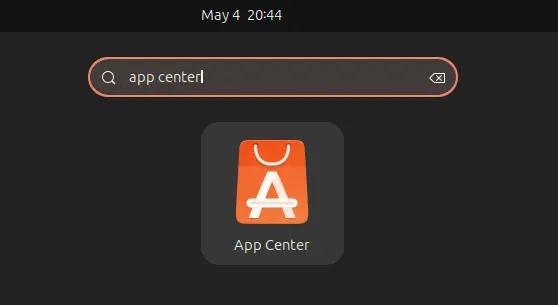
Firstly, press Super (Windows Logo) key to open overview screen. Search for and launch the new “App Center”.
When it opens, search and install “Extension Manager” app.
Install Extension Manager in Ubuntu Software/App Center
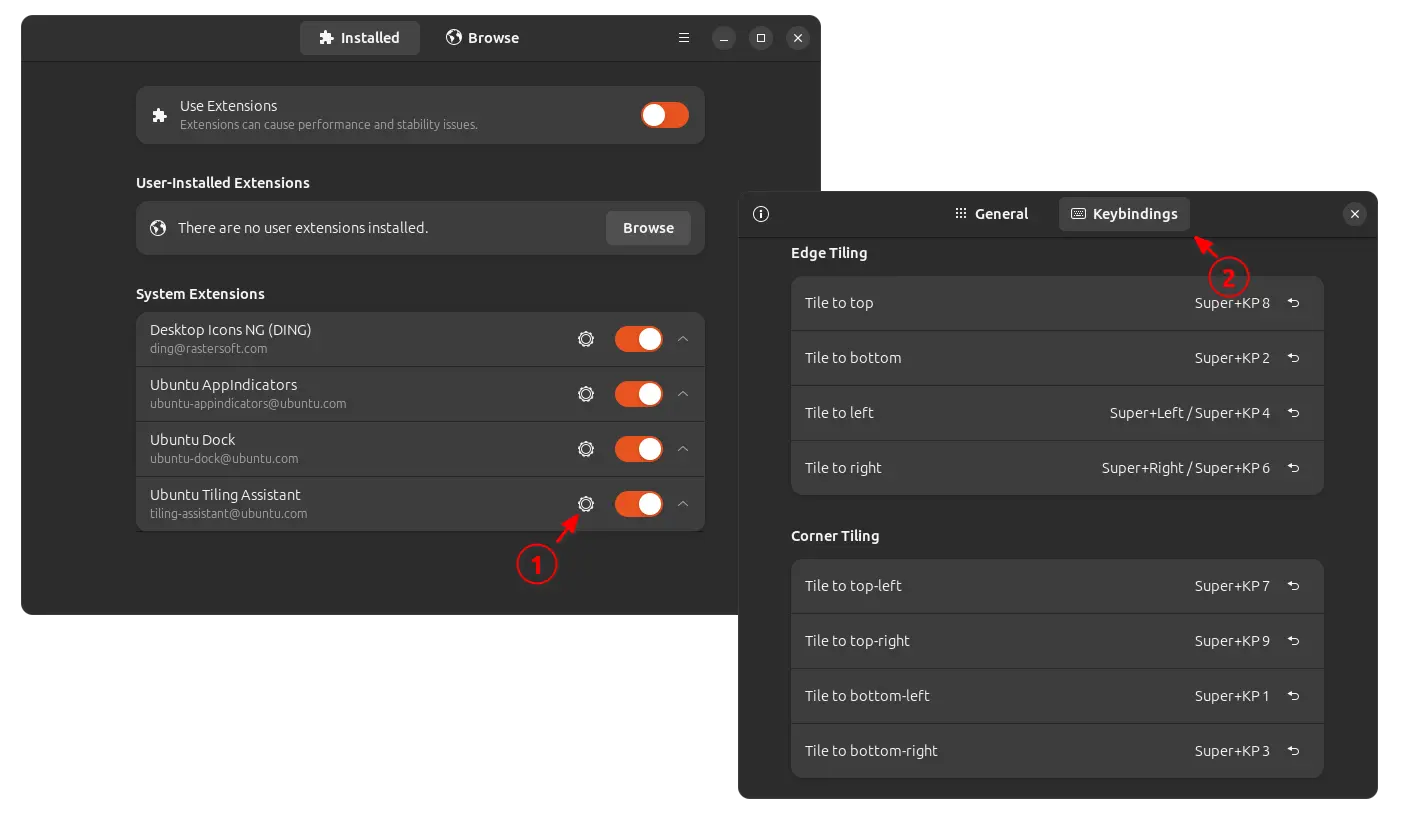
Next, launch “Extension Manager” by searching from the overview screen.
When the tool opens, scroll down and find out “Ubuntu Tiling Assistant“. Finally, click its setting icon to open the configuration dialog.
In the pop-up dialog, navigate to “Keybindings” tab, scroll down and click your desired tile action under “Edge Tiling” and “Corner Tiling” and press a key combination on keyboard to set as new shortcut.
Method 2: Use single command to set custom tiling shortcut
For those who are familiar with Linux command, the thing can be done by running gsettings command.
Firstly, search for and launch a terminal window from the overview screen.
When terminal opens, run command to set custom shortcut (Alt + q for example) for tiling to top-left quarter:
gsettings set org.gnome.shell.extensions.tiling-assistant tile-topleft-quarter "['<Alt>q']"
In command you may replace tile-topleft-quarter with one of the tile actions below:
tile-left-half
tile-right-half
tile-top-half
tile-bottom-half
tile-topright-quarter
tile-bottomleft-quarter
tile-bottomright-quarter
For the shortcut value, there must be quotation marks both inside and outside of bracket. And, the commonly used functions keys include <Control>, <Alt>, <Super> and <Shift>.
For example, set Ctrl + Alt + E to tile window to top-right corner by running command:
gsettings set org.gnome.shell.extensions.tiling-assistant tile-topright-quarter "['<Control><Alt>e']"
One tiling action can have 2 or more shortcut keys, for example, set both Alt+a and Ctrl + Left Arrow to tile a window to left half:
gsettings set org.gnome.shell.extensions.tiling-assistant tile-left-half "['<Alt>a', '<Control>Left']"
Halfway through the year, many new apps released and many abandoned. Here are 6 weather apps that are still useful in 2021.
Without searching in web browser or watching an app on mobile, there are quite a few weather apps for Linux that display weather conditions and forecast either on desktop or via system tray applet.
And here are top ones still in active development and well working in all current Ubuntu releases.
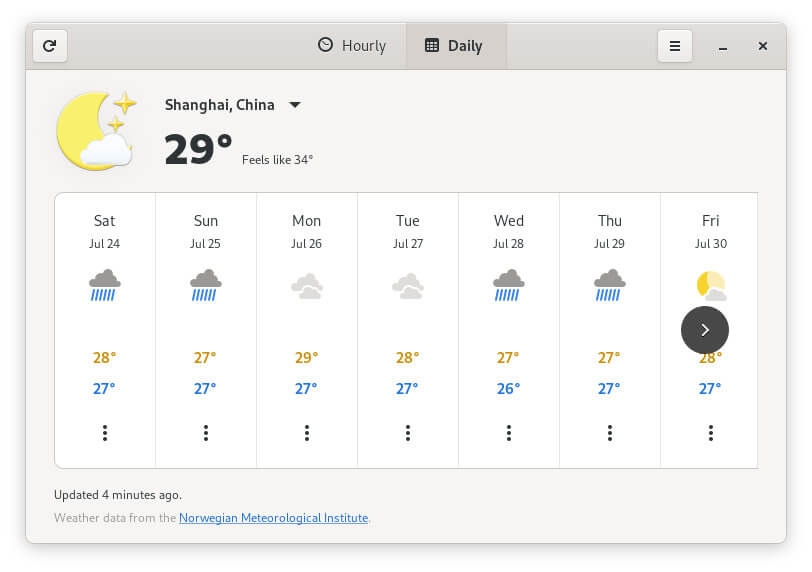
1. Gnome Weather
The Gnome Weather app is always the first one you should try, since it’s well designed and integrated with Ubuntu Gnome Desktop.
It shows weather conditions via a desktop window and integrates forecast into the Clock (date & time) menu. Sadly forecast does not work in Ubuntu 20.04 due to bug.
Version 40 displays the current temperature, feel like temperature, as well as cloudy/sunny/rainy icon for current weather. And it shows forecast both hourly and daily (2 weeks). As indicates, it collects weather data from Norwegian Meteorological Institute.
To install the app, open terminal (Ctrl+Alt+T) and run command:
sudo apt install gnome-weather
For Ubuntu 20.04, forecast is not available due to libgweather bug. To workaround it:
either install Gnome Weather flatpak package which runs in sandbox.
or install patched version of libgweather from my personal PPA and restart Gnome Shell.
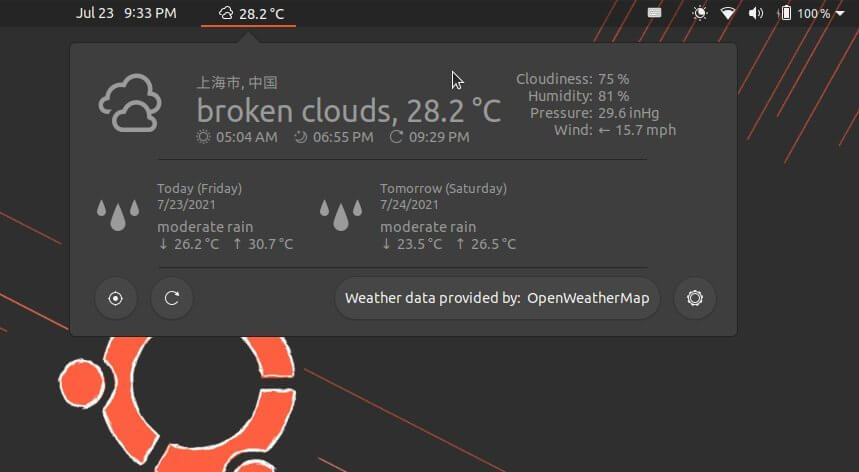
2. My Weather Indicator.
This is my favorite weather app from a Spain software developer. And it’s more than 10 years old that is still being maintained.
The app displays weather via both panel indicator and desktop widget. You can add 2 locations and choose weather services between OpenWeatherMap, Yahoo Weather, Wunderground.com, and WORLD WEATHER ONLINE.
It shows weather conditions including temperature, feels like, pressure, humidity, dew point, wind, and cloudiness. As well, it indicates the time of sunrise, sunset, and dawn/dusk.
The panel indicator offers forecast options for next hours and week days and forecast map. As well, a Moon Phase calendar is available for Waning Gibbous.
To install it, open terminal (Ctrl+Alt+T) and run commands one by one to get it from the developer’s PPA.
sudo add-apt-repository ppa:atareao/atareao
sudo apt update
sudo apt install my-weather-indicator
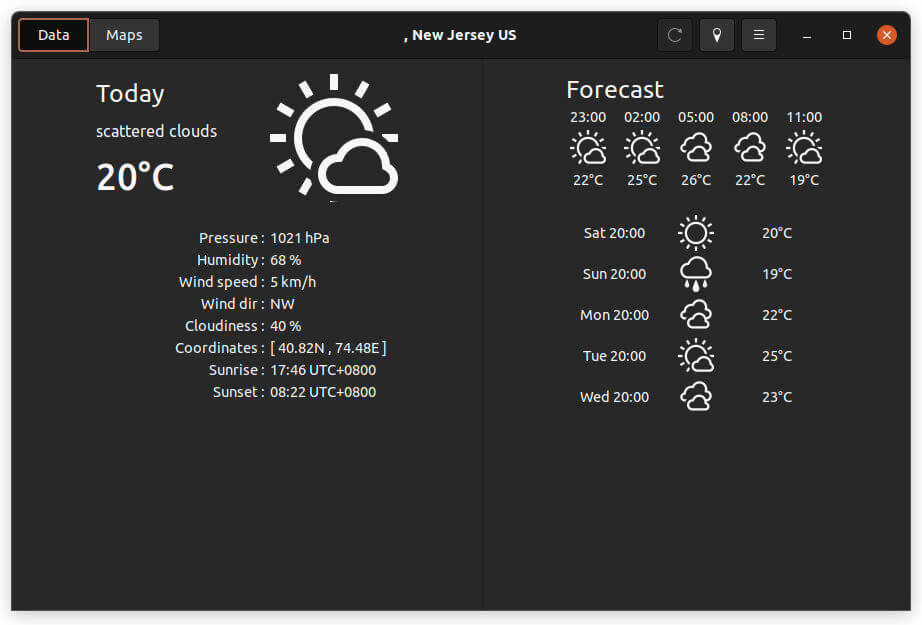
3. Meteo
Meteo is a forecast application using OpenWeatherMap API. It comes with an indicator that shows weather information including temperature, pressure, wind speed and direction, sunrise & sunset.
It also provide app window with current weather and forecast for next 18 hours and next 5 days. With it, you can also check information about temperature, pressure, wind speed, clouds, and precipitation in map mode.
The software has an Ubuntu PPA. So you can open terminal (Ctrl+Alt+T) and run following commands one by one to install it.
sudo add-apt-repository ppa:bitseater/ppa
sudo apt update
sudo apt install com.gitlab.bitseater.meteo
4. KWeather
This is a KDE weather app designed for plasma mobile. It however works good on Linux desktop even without KDE.
It shows the basic weather conditions as well as 10 days forecast in an adaptive app window. Which makes it different is the Dynamic mode that displays raining, shining, or snowing animation.
KWeather is available as flatpak package in flathub.org. To install it, first follow the setup guide and run bottom command in the link page.
5. OpenWeather Extension
This is an extension for Gnome that will work on Ubuntu, Fedora, and other Linux with Gnome Desktop.
It collects weather conditions from either OpenWeatherMap or darksky.net. And display basic info on top bar. By drop-down menu, you can see more details including:
sunrise / sunset time.
cloudiness, humidity, pressure, wind speed.
forecast (2 ~ 10 days).
The indicator position, icons, units, Geolocation provider etc are configurable via extension settings.
To install OpenWeather extension, firstly make sure chrome-gnome-shell is installed via command:
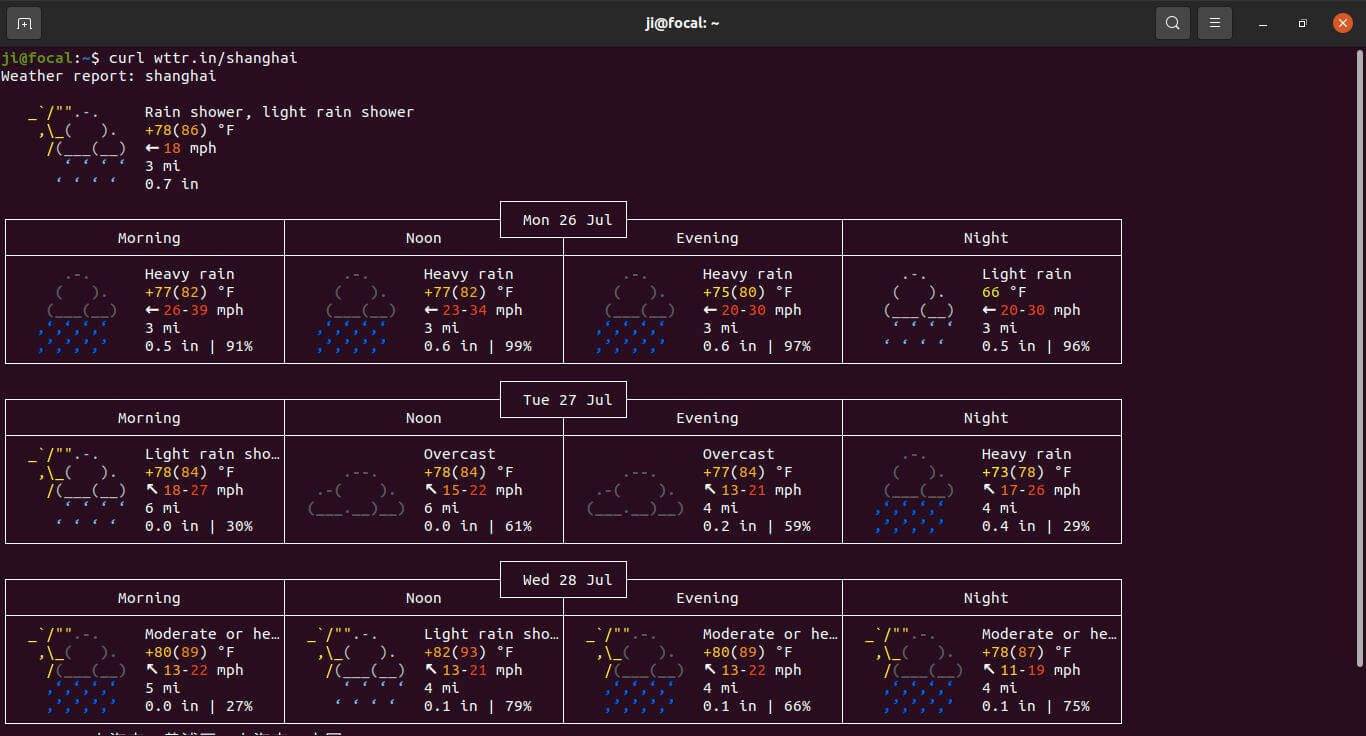
For those looking for a weather app works in command line, wttr.in is a great choice.
Just make sure curl is installed via command:
sudo apt install curl
You can then run command to get weather condition as well as forecast for current location via command:
curl wttr.in
And you may specify a location, shanghai for instance, via command:
curl wttr.in/shanghai
It’s recommended to maximize your terminal window to make the forecast table display properly.
Besides the basic info, such as, temperature, pressure, humidity, it also supports for moon phase, different units, generate PNG, and more. To get more options, run command:
curl wttr.in/:help
Final Words
There are also a few other good weather apps that I know, but they are either not maintained or not well working in my machine. If you get any other good apps, feel free to leave comment below.
Gnome 40 automatically logs into ‘Activities’ overview screen instead of a blank desktop. Don’t like this feature? Just disable it!
Gnome 40 finally lands in Ubuntu 21.10, brings the new design of its ‘Activities’ overview screen. The workspaces are now horizontal and locate across the center of screen. Along with small boxes under the search box, all running app windows will be there. And it introduces new touchpad gestures to switch between workspaces.
Instead of a blank desktop, Gnome 40 shows you the redesigned Activities by default. It’s great for you to get start directly by searching items, or accessing favorite apps on the left dock.
But I don’t like the feature and want to disable it! Well, an extension is here to do the job.
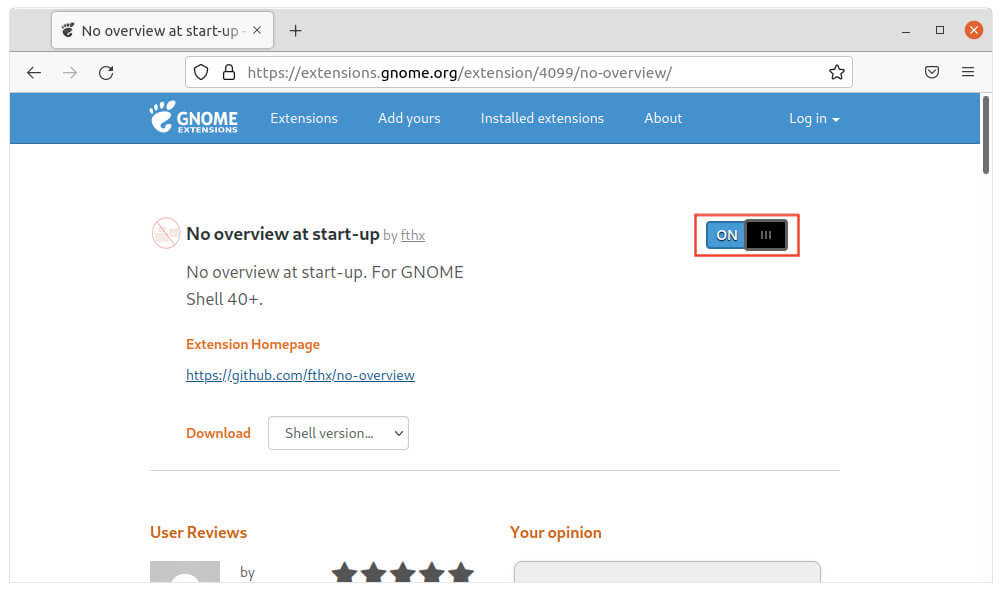
“No overview at start-up” is the simple extension to revert the change, so Ubuntu 21.10, Fedora 34 or other Linux with Gnome 40 will log into a blank desktop just like before.
Install No overview at start-up Extension:
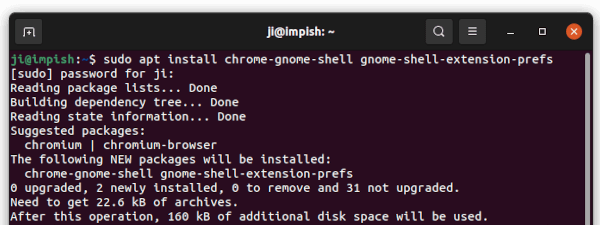
1. Firstly, press win/super key, then search for and open terminal. When terminal opens, copy and paste the command below and hit run.
The command will install the “chrome-gnome-shell” package to enable ability to install Gnome Shell Extensions from web browser. And install “gnome-shell-extension-prefs” (Gnome Extensions App) for managing extensions.
If you don’t see the slider icon, click the ‘click here to install browser extension‘ link to install browser add-on and reload the page.
The extension should function once you installed it. And you can click ‘Activities’ then search and open Gnome Extensions App to toggle on / off, or remove the extensions.
Want to automatically power off Ubuntu after given time? Here’s an Extension adds the option to top-right system menu.
Yes, you can do this either via a graphical shutdown application, or shutdown command with few parameter. However, for beginners or those hate Linux command, life will be easier with the ShutdownTimer extension.
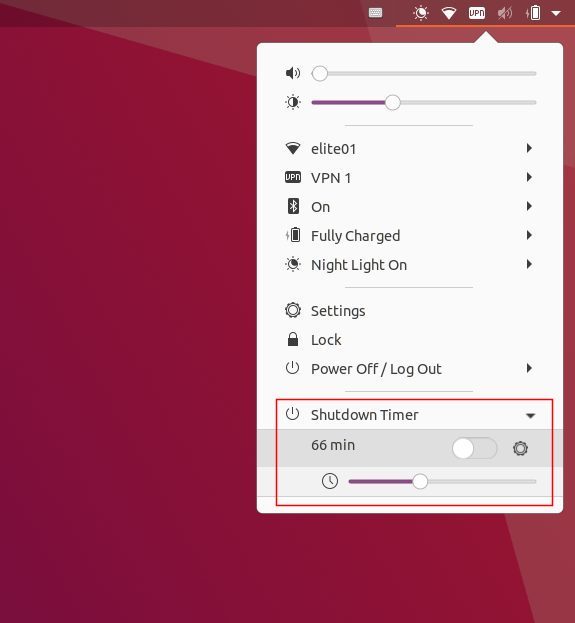
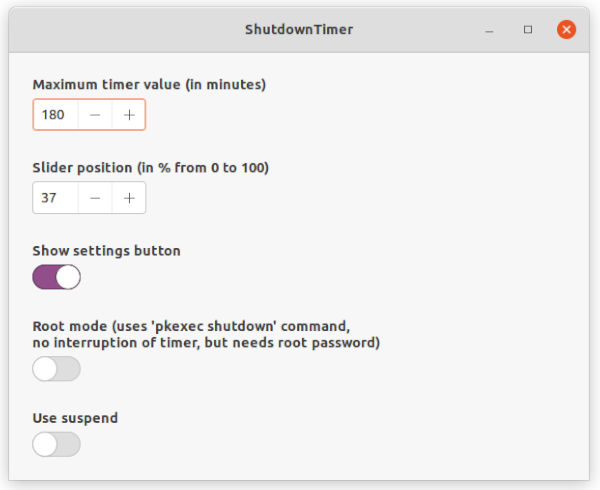
The extension adds an option under Power Off/Log Out menu. With it, you can just move the slider to change time delay, and turn on the toggle icon to automatically shutdown your computer.
A setting dialog is available by clicking on the gear icon. There you can set the minimum and maximum time value, and use Automatic Suspend instead of shutdown.
As some running apps/services might prevent user shutdown, “Root mode” is available to perform the action via super user privilege. However, you need to type user password every time you enable automatic shutdown.
How to Install the ShutdownTimer extension:
The extension supports all current Ubuntu releases running with default Gnome Desktop. As well, GNOME 40 is supported.
1.) Firstly, open terminal by pressing Ctrl+Alt+T on keyboard. When terminal opens, run command to install the required packages:
Don’t see the toggle icon? Install browser extension via ‘Click here to install browser extension’ link and refresh the web page.
Once you installed the extension, the option should appear in system menu immediately. Log out and back in or restart Gnome Shell if you don’t see the option.
This simple tutorial shows how to add a system tray menu option to switch between Dark and Light system mode in Ubuntu.
By default, the System Settings -> Appearance page offers options to choose Standard, Light, and Dark window colors. It however only apply the app theme.
For system menu, notifications, date and time menu, etc, you have to install user themes extension, and change the Gnome Shell theme individually via Gnome Tweak Tool.
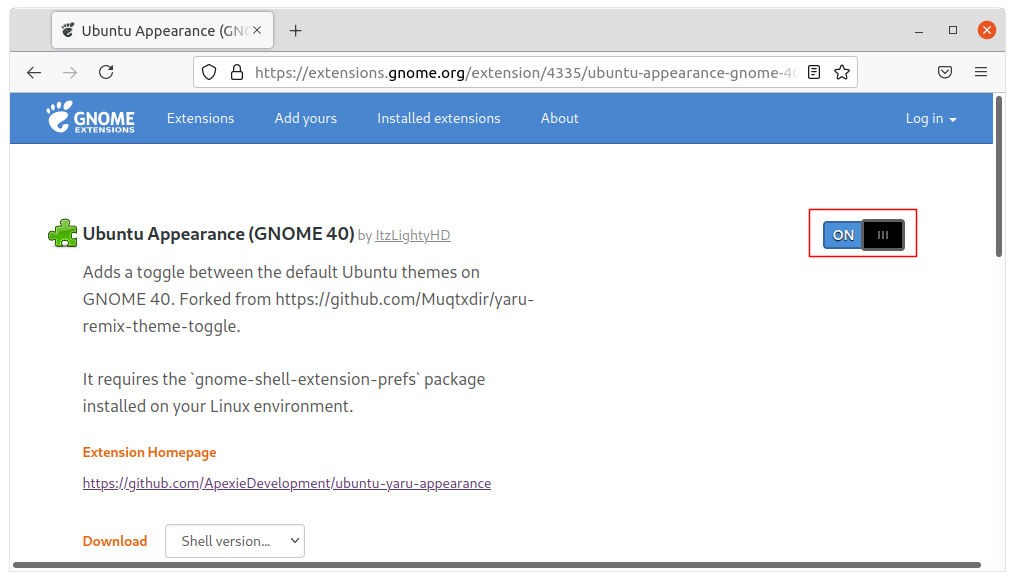
Here I’m going to introduce a new Gnome Shell Extension called ‘Ubuntu Appearance‘. With it, you can toggle fully dark and light mode easily via a few clicks.
The extension features:
Integrate Light, Dark, Standard option into system tray menu.
Toggle fully dark / light mode, not only app window colors but also system theme (e.g., system menu, calendar, notifications.).
Option name vary according to current system mode.
The user themes extension is not required.
Install Ubuntu Appearance extension:
1.) Firstly, open terminal by pressing Ctrl+Alt+T on keyboard. When terminal opens, run command to install required packages:
Don’t see the toggle icon? Click the link ‘Click here to install browser extension’ to install browser extension and refresh the web page.
Once you installed the extension, the option should appear in system menu immediately. Log out and back in or restart Gnome Shell if you don’t see the option.
Unlike laptop lid close action, it’s easy to tell Ubuntu to shutdown or hibernate automatically when reached idle timeout.
In all current Ubuntu releases, including Ubuntu 18.04, Ubuntu 20.04, Ubuntu 22.04, and Ubuntu 24.04 running with the default GNOME desktop, you can enable ‘Automatic Suspend‘ feature in Power Settings easily.
What if you want to power off, hibernate, or even log-out Ubuntu after it reached inactivity timeout? Here’s how to do this in two ways.
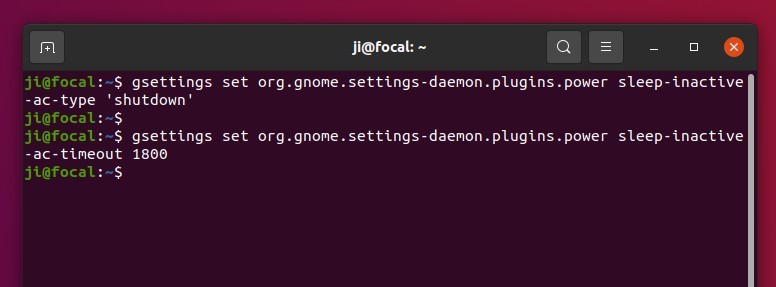
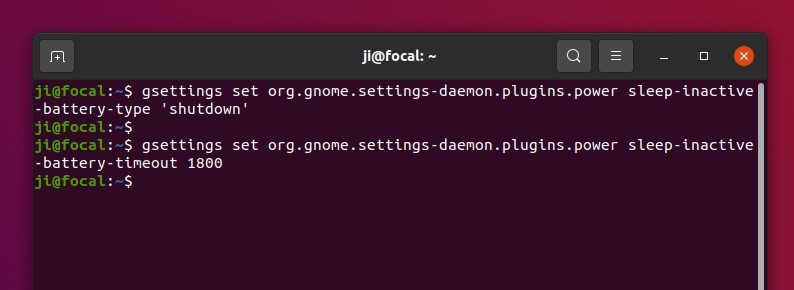
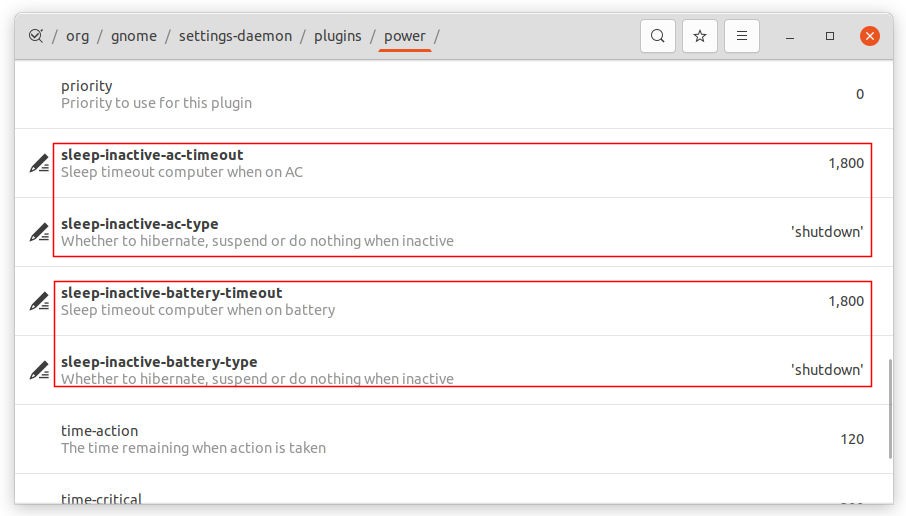
Method 1. Run 2 commands to enable Automatic Shutdown / Hibernate:
Firstly open terminal either from system application launcher or by pressing Ctrl+Alt+T on keyboard.
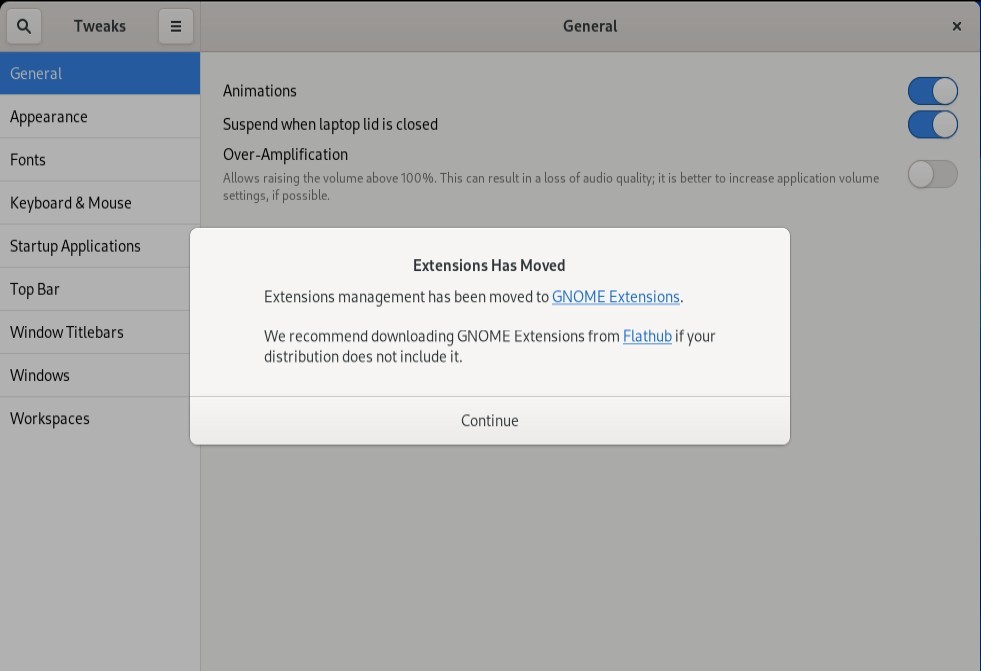
Gnome Tweaks, one of the must have apps for configuring Ubuntu, removes GNOME Shell Extensions support by releasing version 40.
Which means in next Ubuntu release which will ship with Gnome 40+, you have to use another tool to manage Gnome Shell Extensions.
If you have tried out Fedora 34, you should already see the prompt at first launch of Gnome Tweaks: “Extensions management has been moved to GNOME Extensions”.
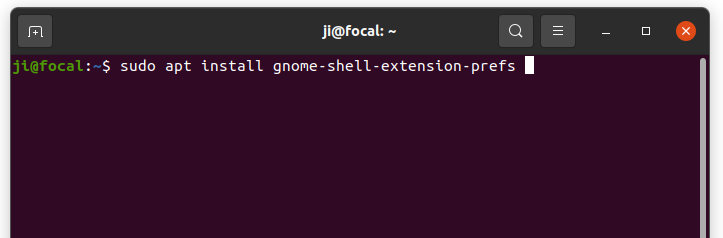
The “new” tool “GNOME Extensions” is available in Ubuntu universe repositories since Ubuntu 20.04 LTS. If you don’t have it, open terminal by pressing Ctrl+Alt+T on keyboard, and run command to install it:
sudo apt install gnome-shell-extension-prefs
Then you can open it from system app launcher.
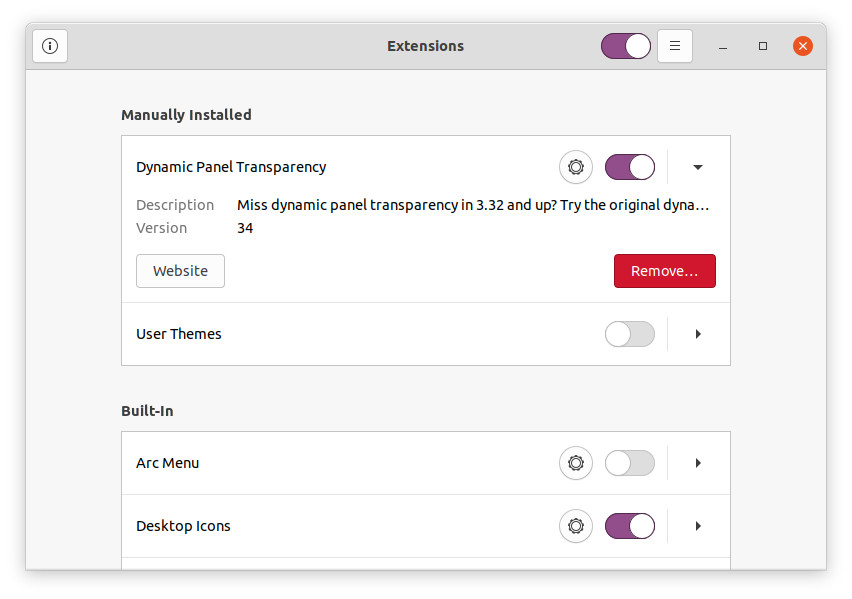
Different to the extensions tab in Gnome Tweaks, the GNOME Extensions tool displays built-in Gnome Shell extensions and user installed extensions separately.
Besides the slider icons to toggle on/off extensions and gear buttons to change extension settings, there’s a triangle icon after each extension. Clicking on the icon will expand the extension with a brief description as well as the website and remove buttons.
In addition, Fedora users can get the tool by installing gnome-extensions-app package. Other Linux with Gnome Desktop can install the flatpak package.