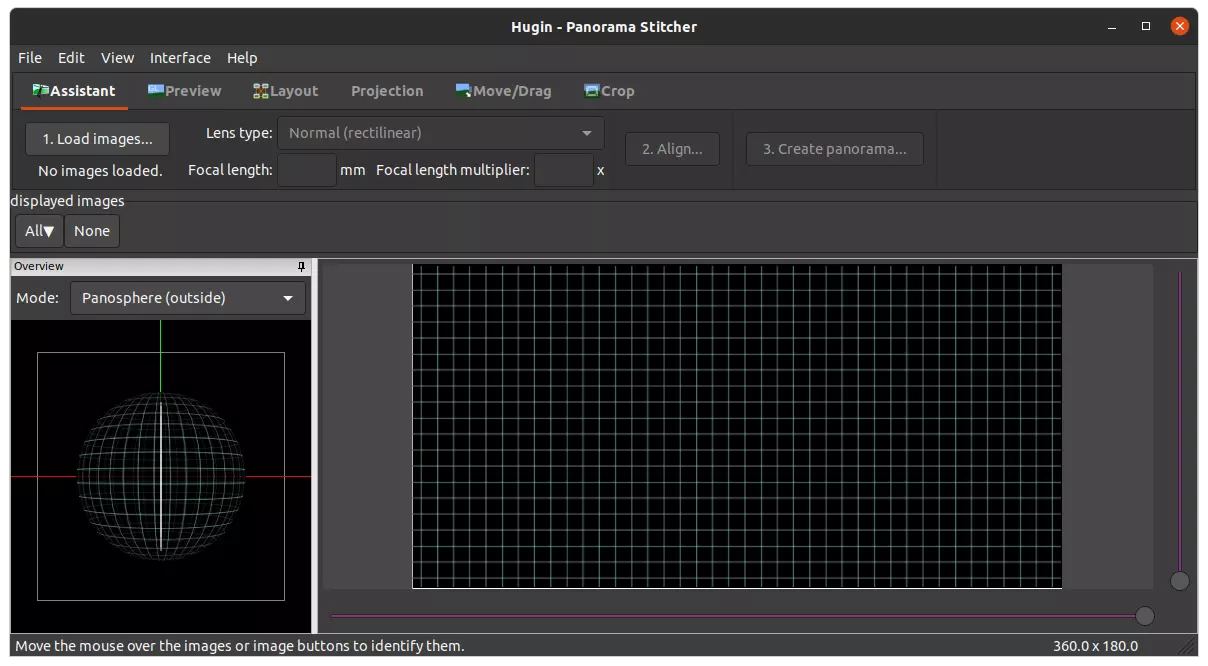
Hugin panorama stitcher finally released version 2021. Here’s how to install it via PPA in Ubuntu 18.04, Ubuntu 20.04, Ubuntu 21.04, Ubuntu 21.10, and Linux Mint 20.
Fast preview window can be panned in zoomed state with middle mouse button.
New overview mode: inside panorama sphere (similar to a interactive panorama viewer)
Updated build system for OpenEXR3.
Several bug fixes.
Install Hugin 2021 in Ubuntu:
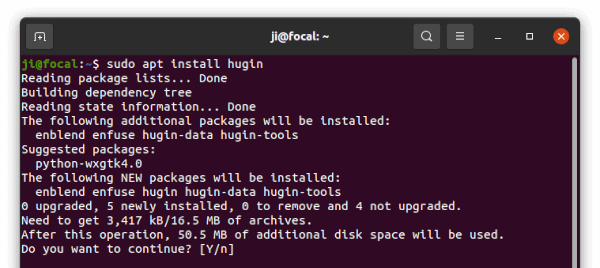
I’ve upload the package into the unofficial PPA for all current Ubuntu releases and their based systems. It seems working good though still missing ‘COPYING.txt’ file when opening about dialog.
1. Add the PPA:
Press Ctrl+Alt+T on keyboard to open a terminal window. When it opens, run the command below to add the PPA:
sudo add-apt-repository ppa:ubuntuhandbook1/apps
Type user password (no asterisk feedback) when it asks and hit Enter to continue.
2. Update package cache:
For Ubuntu 18.04 and some Ubuntu based systems, user may need to manually update the system package cache via command:
sudo apt update
3. Install / Upgrade Hugin:
After adding the PPA, either install the package via command:
sudo apt install hugin
Or upgrade the package using “Software Updater” utility.
How to Remove or Downgrade Hugin:
For any issue, user may purge the PPA repository which also downgrade the package to the stock version in Ubuntu repository:
Updated animations, rework of the Revenge in Redmond worldmap.
How to Install SuperTux via PPA in Ubuntu:
The game offers official Linux packages via universal Flatpak, non-install AppImage, and 32-bit portable tarball. They are available to download at the link below:
For those prefer the native DEB package for Ubuntu based systems. I’ve uploaded the packages into this unofficial PPA for Ubuntu 18.04, Ubuntu 20.04, Ubuntu 21.04, Ubuntu 21.10, and Linux Mint 20, etc.
Besides 64-bit package for modern PC and 32-bit for old PC (Ubuntu 18.04 only), there are also armhf/arm64 packages for devices such as Apple Silicon and Raspberry Pi.
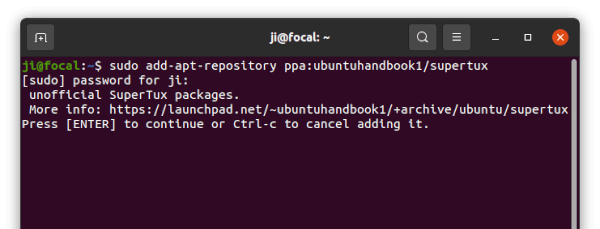
1. Add the Ubuntu PPA:
To add the PPA, firstly press Ctrl+Alt+T on keyboard to open terminal (or search from start menu). When it opens, run command:
Type user password (no asterisk feedback) when it asks and hit Enter to continue.
SuperTux also has an official daily PPA which builds the game packages almost every day. You may use the PPA instead for the bleeding edge version:
sudo add-apt-repository ppa:supertux-dev/daily
2. Update package cache:
For Ubuntu 18.04 and some Ubuntu based systems, user may need to manually update the system package cache via command:
sudo apt update
3. Install / Upgrade SuperTux:
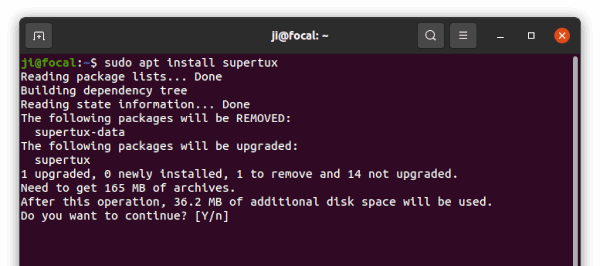
The package in PPAs is a little bit different. The stock versions in Ubuntu repository built the package into supertux and supertux-data. Apology for being lazy, the PPA packages built into single supertux.
Which means, upgrading from the stock Supertux version to v0.6.3 using “Software Updater” may not work. Instead, user need to run the command in terminal to install or upgrade the game package:
sudo apt install supertux
How to Remove or Downgrade SuperTux:
For any issue, user may purge the PPA repository which also downgrade the game package to the stock version in Ubuntu repository (change PPA name depends which one you use):
The Avidemux video editor released version 2.8.1 few days ago. Here’s what’s new and how to install in Ubuntu via PPA.
The new Avidemux 2.8.1 release improved HiDPI displays support by updating the icon set, and using OpenGL for rendering on-the-fly preview in video filter dialog.
It also introduced new filters: 3D LUT, Decimate, and Arbitrary Rotate, new video encoder: VideoToolbox HEVC for macOS users, and support for decoding 8-bit VP9 on Windows using DXVA2 and Linux using VDPAU with graphics card that features a VP9 decoder.
There are other features, such as temporarily disable active filters in Video Filter Manager and reverse video by exporting selection as JPEG images and loading in reverse order.
‘Peek Original’ button to quickly compare filtered and unfiltered inputs.
Add blend and motion interpolation options to ‘Resample FPS’ filter.
Mark cut points on navigation slider.
“Resample FPS” and “Change FPS” filters can handle up to 1000 fps.
Translucent green masking for “Crop” filter’s preview
“Resize” filter output up to 8192×8192 resolution.
Improved HiDPI scaling in previews.
x264 video encoder plugin allows to specify color properties.
Replace PulseAudioSimple with PulseAudio in Linux.
How to Install Avidemux 2.8 in Ubuntu:
The “xtradeb packaging” team is maintaining some apps and games, including Avidemux, in its PPA repositories. The maintainer comes from the old GetDEB team. And, Avidemux website refers to the PPA for Ubuntu users in the download page.
1. Remove old Avidemux package:
If you’ve installed Avidemux 2.7 packages from my unofficial PPA, remove it first!! The name now changes from avidemux2.7 to avidemux. No version number in package name anymore.
Firstly, press Ctrl+Alt+T on keyboard to open terminal. When it opens, paste the command below to remove it:
sudo apt remove --autoremove avidemux2.7-*
2. Add the new ‘official’ PPA
The xtradeb apps PPA contains Avidemux along with many other app packages for Ubuntu 20.04, Ubuntu 21.04, and Ubuntu 21.10 so far.
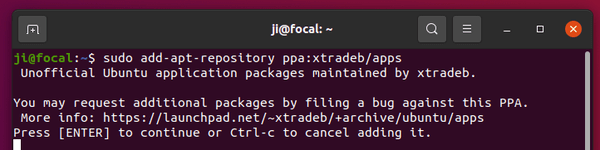
Open terminal (Ctrl+Alt+T) and run command below to add it to your system:
sudo add-apt-repository ppa:xtradeb/apps
Type user password (no asterisk feedback) when it asks and hit Enter to continue.
For those still using Ubuntu 18.04, my unofficial PPA is available for choice:
While adding Ubuntu PPA, it updates system cache automatically since Ubuntu 20.04. However, Ubuntu 18.04 and some Ubuntu based systems need to run the command to do it manually:
sudo apt update
4. Install Avidemux 2.8:
Finally, install the video editor as well as its dependencies via command:
sudo apt install avidemux-qt avidemux-jobs-qt
After installation, open the video editor by searching from ‘Activities’ overview screen and enjoy!
It removes all the packages and useless dependency libraries, though personal data left in ‘.avidemux6‘ folder (hidden folder, press Ctrl+H to display) in user home directory.
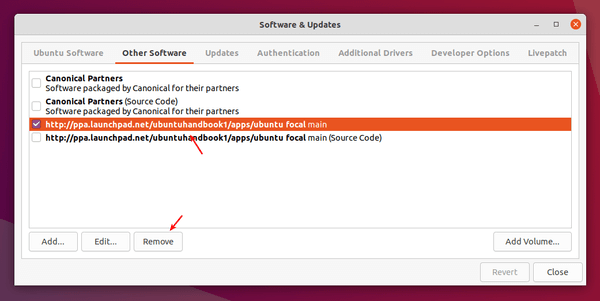
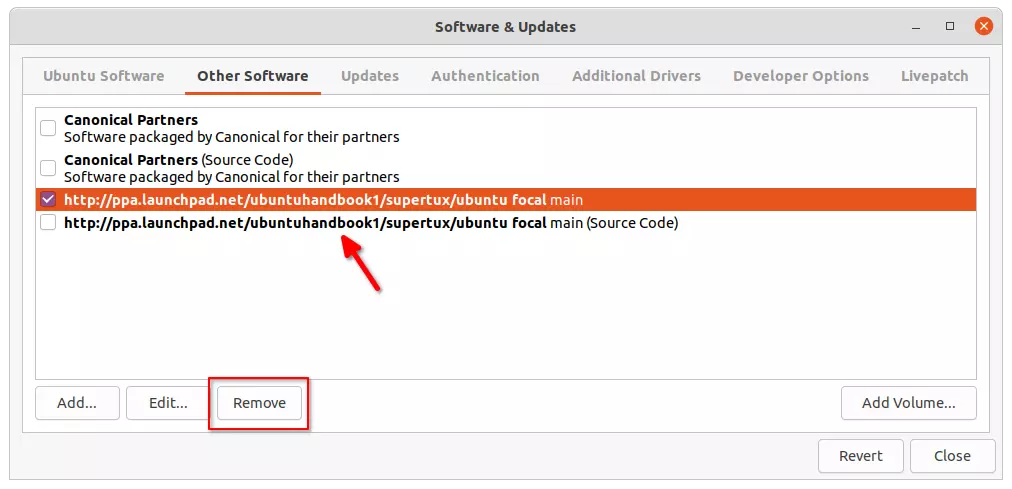
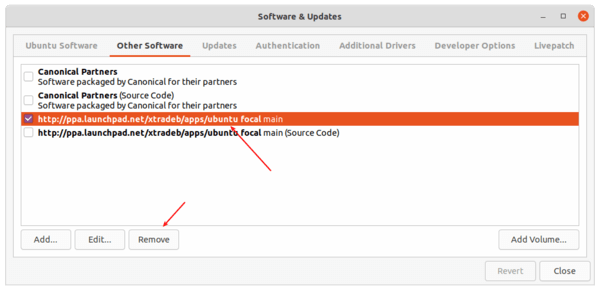
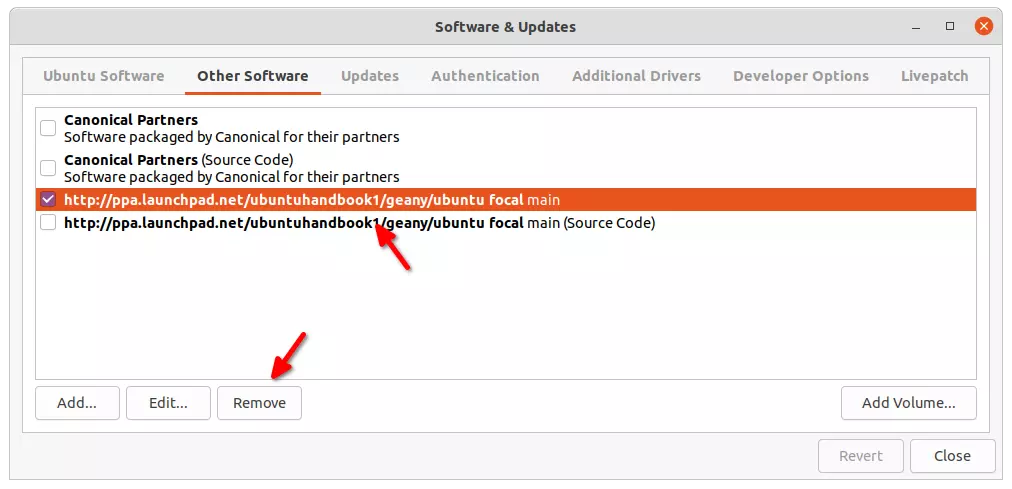
To remove the Ubuntu PPA, open ‘Software & Updates‘ and remove the relevant line under Other Software tab.
This simple tutorial shows how to easily create encrypted vaults in which you may store files safely in Ubuntu and Debian based systems.
1. Install gocrytfs and cryfs:
In this tutorial, gocrytfs or cryfs will be used as backend. Both use file-based encryption that is implemented as a mountable FUSE filesystem. The encrypted files can be stored in any folder in hard disk, a USB stick or even inside Dropbox folder. And, encrypted files can be synchronized efficiently using standard tools like Dropbox or rsync. Also, the size of the encrypted filesystem is dynamic and only limited by the available disk space.
Gocrytfs is written in Go programming language, it’s fast. CryFS is written in C++. It’s said to be apparently slow and take more disk space than Gocrytfs. You may see here for the comparison. And, install either one or both as you prefer.
Press Ctrl+Alt+T on keyboard to open terminal, and run the command below to install the software:
Install gocryptfs via command:
sudo apt install gocryptfs
Install cryfs via command:
sudo apt install cryfs
2. Install Vaults:
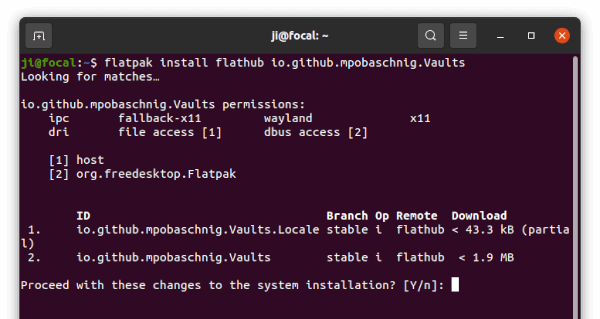
Vaults is a graphical tool provides a stupid simple user interface for creating encryption folders. Only downside could be that the app is available to install as Flatpak package. Some users do not like it.
a.) Open terminal (Ctrl+Alt+T) and run command to install flatpak daemon if you don’t have it:
Or use the command in picture after adding the Flathub repository. Vaults is a GTK4 app. It requires separated Gnome 41 platform which takes a few hundred MB disk space if you don’t have it.
3. Create and Use Encrypted Folders:
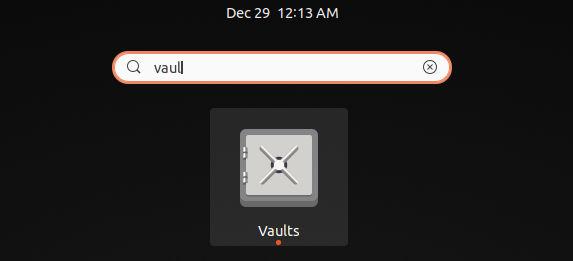
Now, search for and open ‘Vaults’ from Activities overview screen.
Launch Vaults
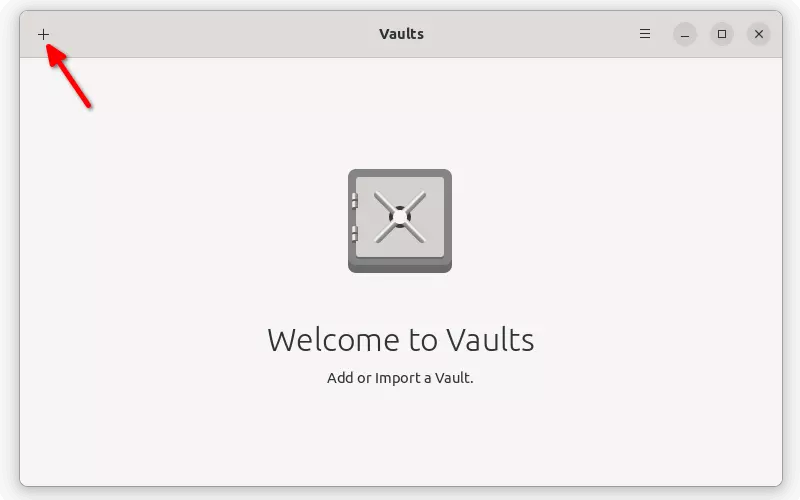
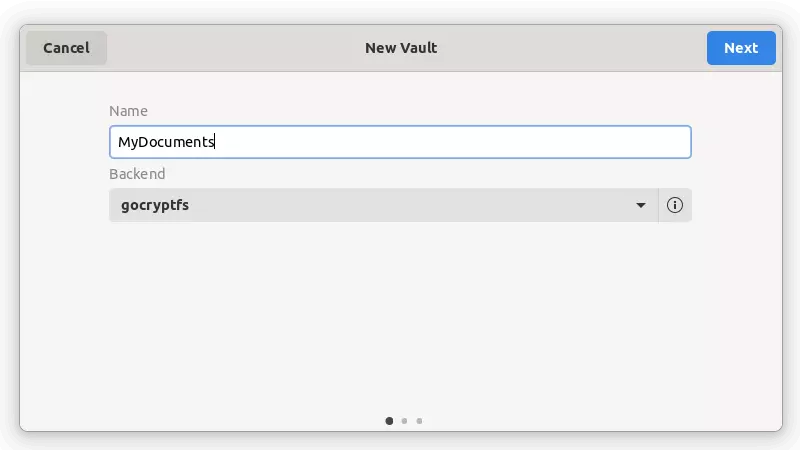
When the app opens, click on ‘+‘ icon on top left and select ‘New Vault‘.
Click ‘+’ to create new encrypted folder
Next, type a name for your new folder and select the encryption software: gocryptfs or cryfs.
Type a name for your folder
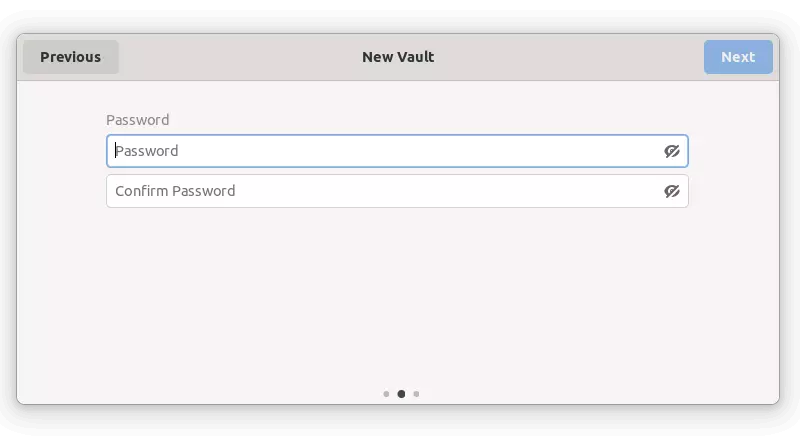
Set password in next page which will be used to mount and access the encrypted folder.
Set password for it
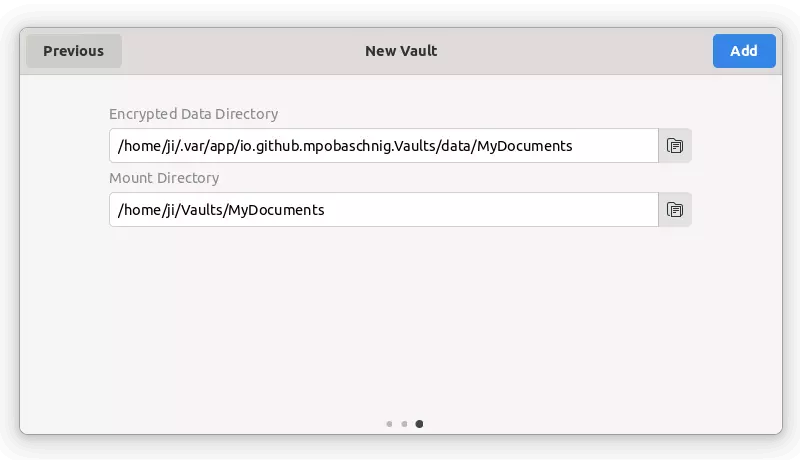
Finally, set the folder location. The default directories are OK. But, as mentioned you may store the data in USB stick or even in Dropbox folder.
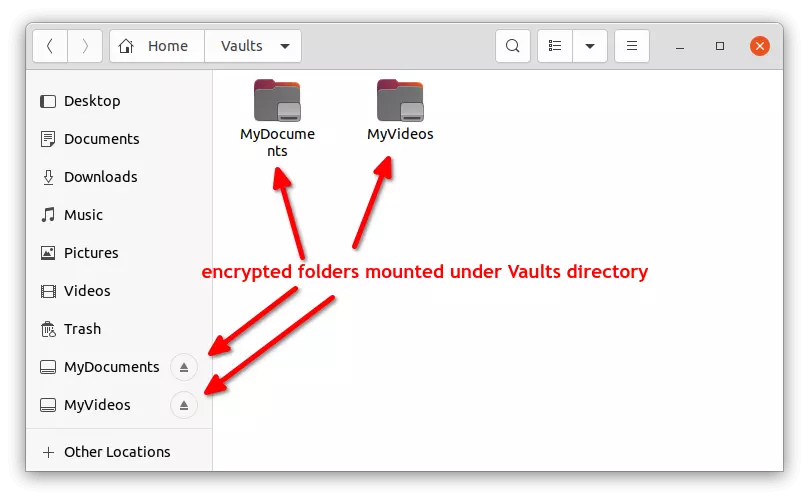
Encrypted Data Directory is the folder that stores your files. Files there are encrypted and un-readable.
To decrypt and access your files, you have to mount the Data Directory to the “Mounted Directory” folder.
Set data folder and mount folder
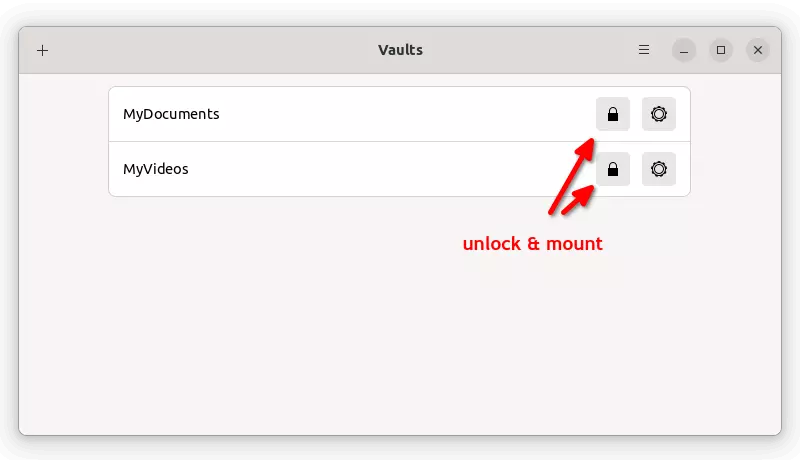
The encrypted folders you created will list in the app window. Click the little lock icon and type the password you set will mount it. (Make sure “Mounted Directory” is empty before unlocking)
Mount encrypted folders
After that, open the file manager. You’ll see the folders in left pane. Create or paste your files into that folder. These files will be encrypted and inaccessible once you unmount the folder (right-click folder in left pane and select unmount)
Put your files into mounted folder and store them safely
Uninstall:
To remove the Vaults app, open terminal (Ctrl+Alt+T) and run command:
For those hating the Flatpak and Snap packages, here’s how to compile GNU Emacs editor (v27.2 tested) from the source tarball while the Kevin Kelley’s PPA seems NOT to be updated anymore.
Before getting started, it’s recommended to remove old Emacs (if any) by running command in terminal (Ctrl+Alt+T):
sudo apt remove --autoremove emacs emacs-common
Install build dependencies:
Firstly, press Ctrl+Alt+T on keyboard to open a terminal window. When it opens, run command to install build-essential package:
sudo apt install build-essential
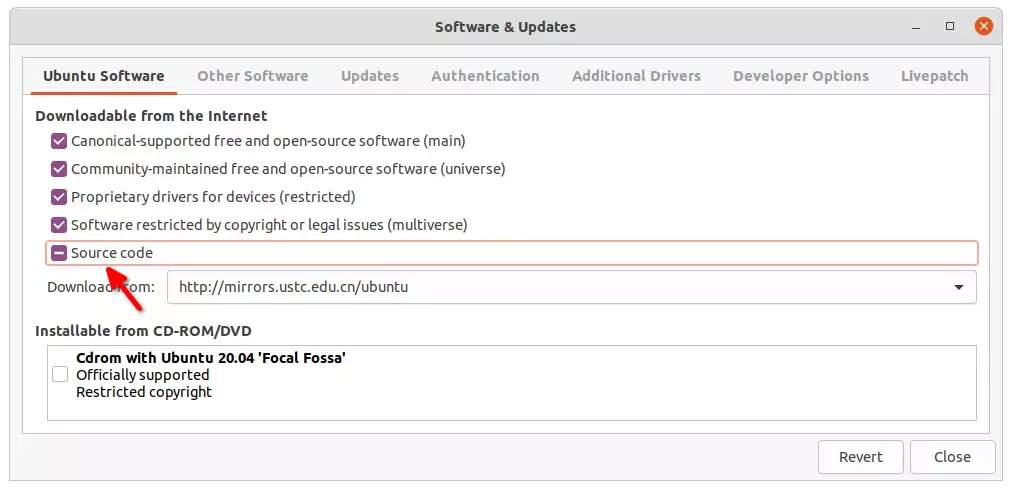
Next, search for and open ‘Software & Updates‘ from Activities overview screen. In the first tab, enable ‘Source code’ by ticking the checkbox.
Finally, refresh package cache and use apt build-dep command to install build depends:
sudo apt update && sudo apt build-dep emacs
Download Emacs source tarball:
The source tarball is available to download at the link below. So far the latest is ’emacs-27.2.tar.xz’:
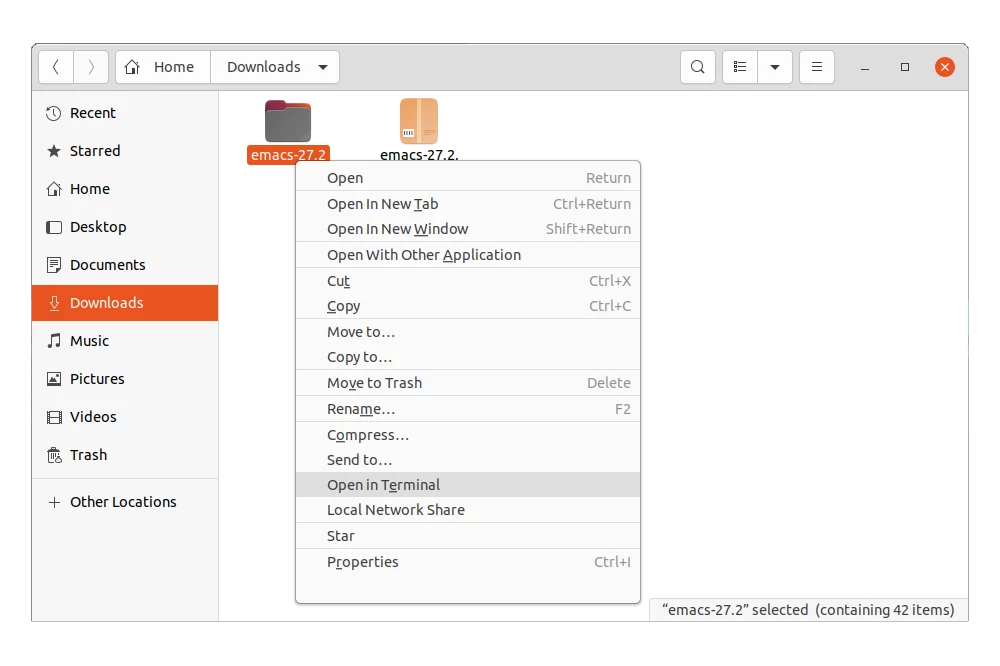
Next, extract the tarball. Right-click on source folder and select ‘Open in Terminal‘ to open a terminal with that folder as working directory.
Build & Install Emacs:
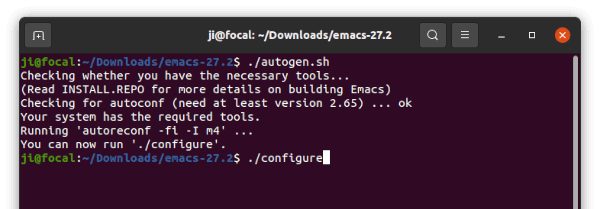
After opening source folder in terminal, run autogen.sh script to generate configure scripts:
./autogen.sh
And, configure the source via command:
./configure
If no error outputs, build Emacs via command:
make bootstrap -j4
NOTE: here I use -j4 to start 4 threads to speed up make process. Depends on how many CPU cores in your machine, you may use -j8 or -j16 or just skip it.
When everything’s done successfully, install the editor via command:
sudo make install
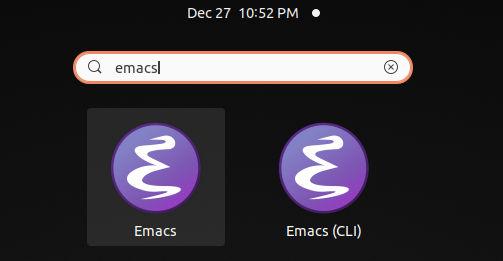
Finally, try launching the app via emacs command.
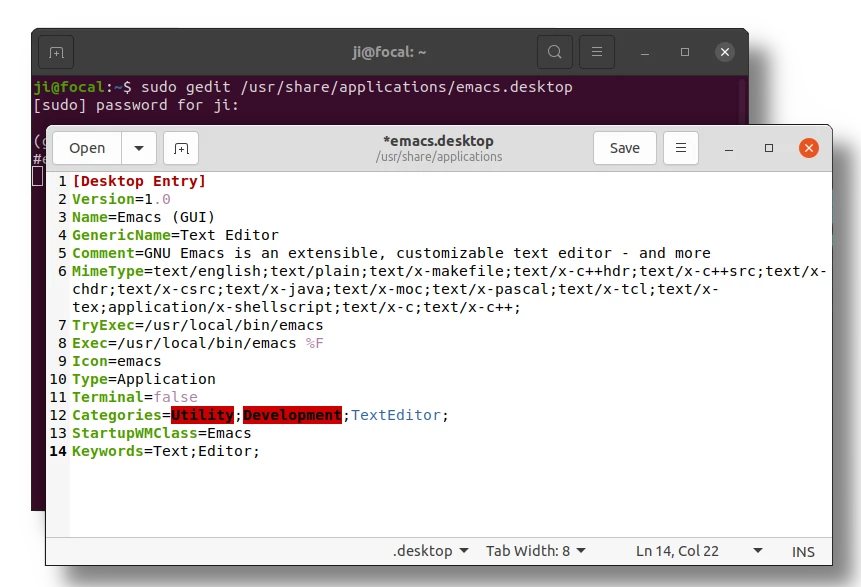
Create app shortcut icon:
By default, it installs the executable binary as ‘/usr/local/bin/emacs‘. However, it does not create app icon for launching from start menu.
To create one, run command in terminal:
sudo gedit /usr/share/applications/emacs.desktop
It will create and opens the config file in Gedit text editor. When it opens, paste the following lines and save it.
[Desktop Entry]
Version=1.0
Name=Emacs (GUI)
GenericName=Text Editor
Comment=GNU Emacs is an extensible, customizable text editor - and more
MimeType=text/english;text/plain;text/x-makefile;text/x-c++hdr;text/x-c++src;text/x-chdr;text/x-csrc;text/x-java;text/x-moc;text/x-pascal;text/x-tcl;text/x-tex;application/x-shellscript;text/x-c;text/x-c++;
TryExec=/usr/local/bin/emacs
Exec=/usr/local/bin/emacs %F
Icon=emacs
Type=Application
Terminal=false
Categories=Utility;Development;TextEditor;
StartupWMClass=Emacs
Keywords=Text;Editor;
Just like the package in Ubuntu repository, you may also create a shortcut icon for launching Emacs in command line:
Merry Christmas to all my dear readers! In this tutorial I’m going to introduce the new Ubuntu PPA for Geany IDE.
Geany is a free open-source lightweight IDE for BSD, Linux, macOS, Solaris and Windows. It supports many programming languages including C, C++, Java, PHP, HTML, LaTeX, Python, Perl, and more.
Geany does not provides official Linux packages. And, Ubuntu includes fixed versions in its repositories which are always old. For request, I created an unofficial PPA that contains the latest Geany 2.0 as well as its plugins, while the “Geany Developers” team PPA has not been updated for a year.
The PPA supports all current Ubuntu releases, including Ubuntu 20.04, Ubuntu 22.04, Ubuntu 23.10, and their based systems, e.g., Linux Mint 21, and Zorin OS 17. And, you can install it on 64-bit modern PC, and/or arm64/armhf devices (e.g., Apple Silicon and Raspberry Pi).
As not a programmer, I’m not very sure, but the IDE package seems working good in my case in Ubuntu 22.04.
What’s New in Geany 2.0:
Split “session data” into session.conf, preferences are written to and read from geany.conf.
Re-add ability to scroll over document tabs.
Use new tree view as default for the document list in the sidebar.
Dark-theme friendly colors for compiler message
Filter entry for symbol tree.
Simplify project creation from existing directories with sources.
Add option to show symbols in symbol tree without category groups.
Add option to only show line endings if they differ from file default.
Make tab label length and window title length configurable.
Make Go to Symbol commands show signature list.
Scintilla 5.3.7 and Lexilla 5.2.7
Add “Change history” feature (disabled by default)
Sync many parsers from the Universal Ctags project
Improved support for the ctags file format
Update Kotlin, Nim, PHP, Python filetype config
Apply Markdown header style to the complete header
Add AutoIt, GDScript filetype
Remove Ferite filetype
Enable local variables and improve autocompletion for C/C++ and some other languages
Use “Prof-Gnome” GTK theme and GTK dialogs on Windows.
Install Geany 2.1 in Ubuntu via PPA:
Firstly, press Ctrl+Alt+T on keyboard to open a terminal window. Or search for and open terminal from start menu if you’re not on Ubuntu. When it opens, run the commands below one by one.
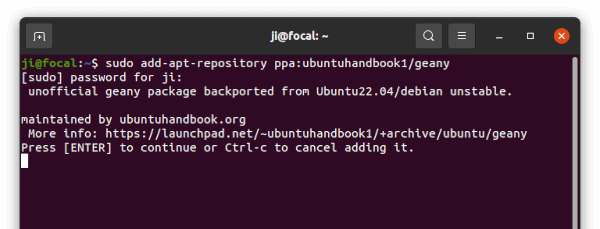
1. Add the PPA
Copy and paste (Ctrl+Shift+V) the command below into terminal and hit run will add the PPA repository:
sudo add-apt-repository ppa:ubuntuhandbook1/geany
As sudo command, you have to type user password (no visual feedback) to authenticate. After that, hit Enter to continue.
2. Update system package cache:
Since Ubuntu 20.04, it does automatically update the package cache while adding PPA. However, old Ubuntu releases (18.04) and some based systems may not. So, run command below to check updates manually:
sudo apt update
3. Install or Upgrade Geany:
If you already have an old version of the IDE package installed on your system, launch “Software Updater” (or Update Manager) to upgrade it:
Or, run command below in terminal to install/upgrade the package:
sudo apt install geany geany-plugins
Uninstall / Remove Geany:
You have two choices to get rid of the Geany packages from this Ubuntu PPA.
Option 1: Purge the Ubuntu PPA:
User may purge the Ubuntu PPA, which also downgrade all installed package (from that PPA) to the stock version in Ubuntu main repositories. To do so, run command:
Option 2: Remove the Ubuntu PPA and/or Geany package:
To remove the Ubuntu PPA without affecting all installed packages, either open “Software & Updates” and remove relevant line from “Other Software” tab.
Or, just run the command below in a terminal window:
Christmas is coming. It’s snowing lightly outside in my city! Let me show you the ways to enable falling snow animation effect on your Ubuntu or other Linux desktop!
1. XSnow
XSnow is till in active development. It enables falling snow effects in GNOME, XFCE, KDE, LXDE, OPENBOX, etc. Which means, user may run it in Ubuntu, XUbuntu, KUbuntu, Debian, and other based Linux distributions. It also works on RPM based Linux (e.g., Fedora) though the package from system’s own repositories.
Snow by default is falling on top of opened app windows and screen bottom. So, you won’t see snowflakes if there’s a window maximized.
XSnow provides an user interface to configure how many snowflakes, size, color, etc. And, it also may display Santa, Scenery, birds and more.
The app provides modern 64-bit (amd64), old 32-bit (i386), and arm64/armhf (e.g., for Raspberry Pi) deb packages for Debian and Ubuntu based systems. Just select download the latest package from the link below:
Then double-click the ‘.deb’ package to install via your system package manager. You can finally launch it from start menu (Activities overview) and enjoy.
2. Snow Extension:
For Ubuntu, Fedora Workstation, and other Linux with GNOME desktop, user may enable falling snow effect via extension.
And ‘Snow’ is one of the Gnome extensions that just do the job! It adds an indicator applet in system tray, with option to turn on / off the animation. It just works, nothing else!
To install the extension, click the button above to open the extension web page and turn on the slider icon. If you don’t see the switch, install web browser extension (via link in that page) and refresh the page.
NOTE: Firefox as Snap (defaults in Ubuntu 21.10) does not support installing Gnome extensions so far. use another browser instead. And, Ubuntu user needs to first install “chrome-gnome-shell” package by running command in terminal (Ctrl+Alt+T):
sudo apt install chrome-gnome-shell
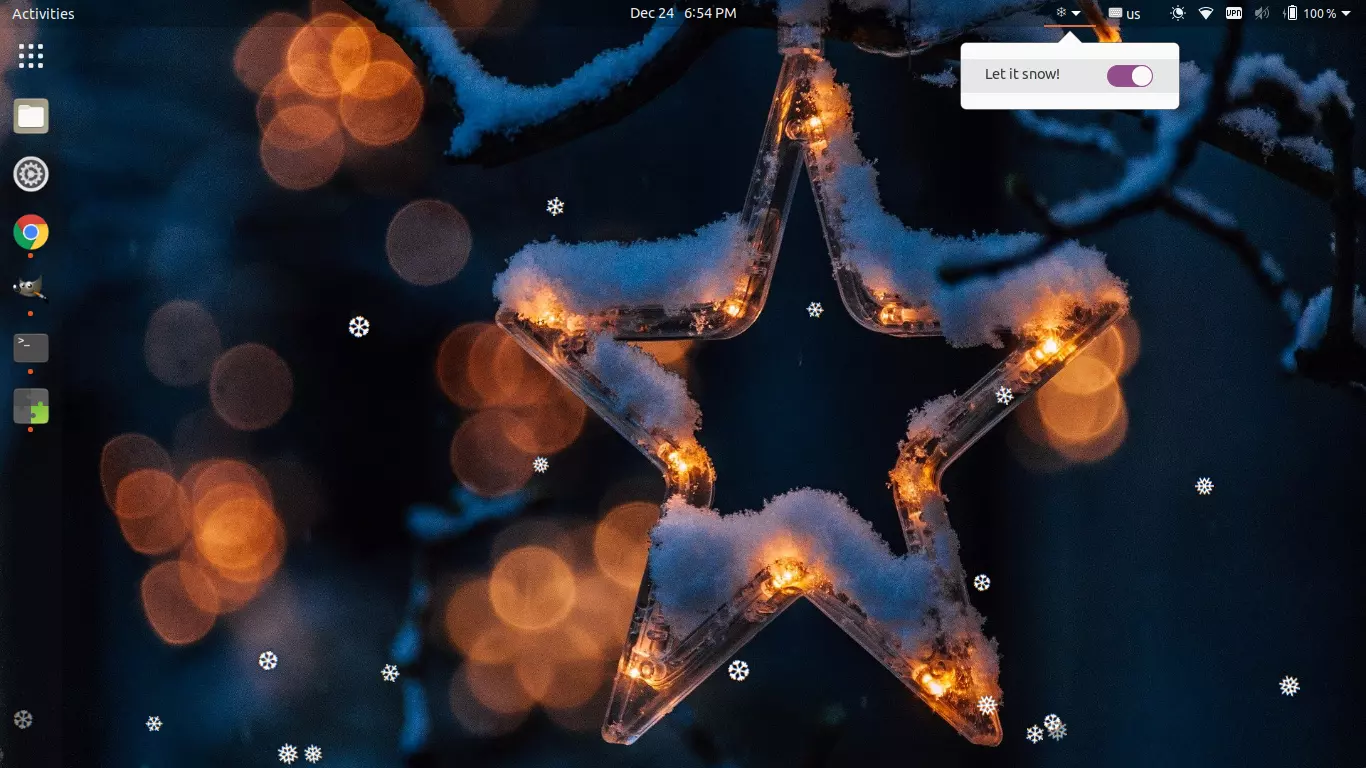
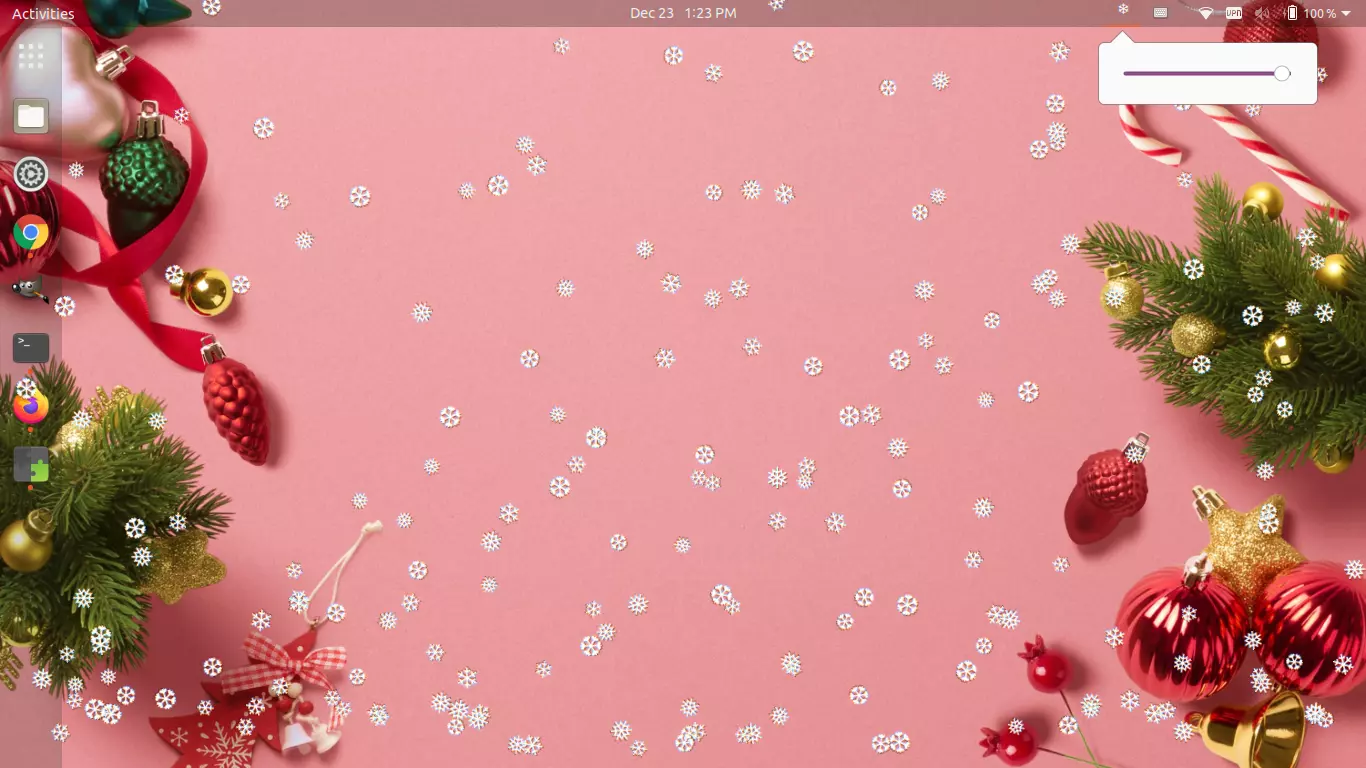
Let it Snow extension:
Similar to the previous extension, but with a few more features. This extension adds an indicate applet allows to control how much snow you want. It works with multiple monitors and will NOT fall over currently active window.
Sadly, the extension so far supports GNOME up to v3.38 though it works good in Ubuntu 20.04.
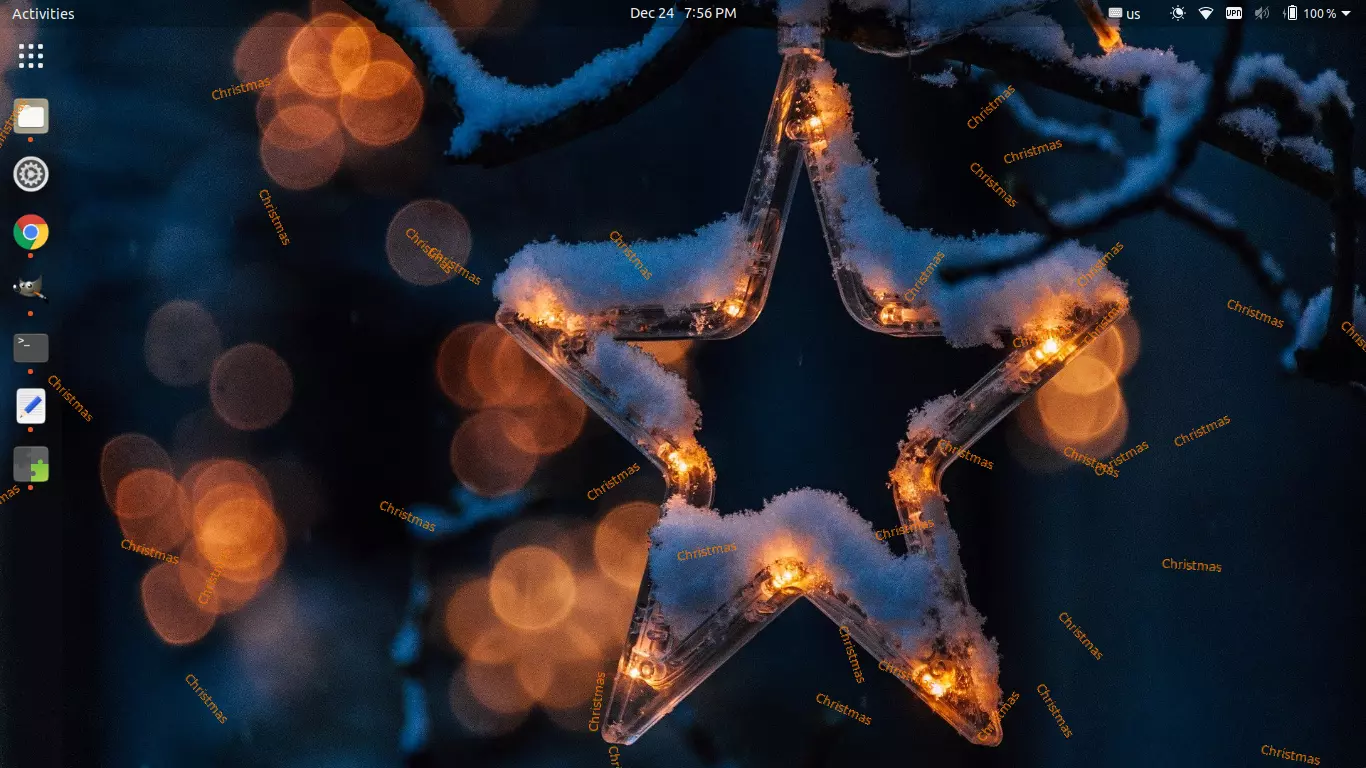
The extension adds falling text animation in GNOME desktop. Though the author says it can simulate leaves, snow, fireworks, and ufos, but I don’t know how!
Via Gnome Extensions app, user may configure the TEXT to fall, color, font, direction, and a few other behaviors.
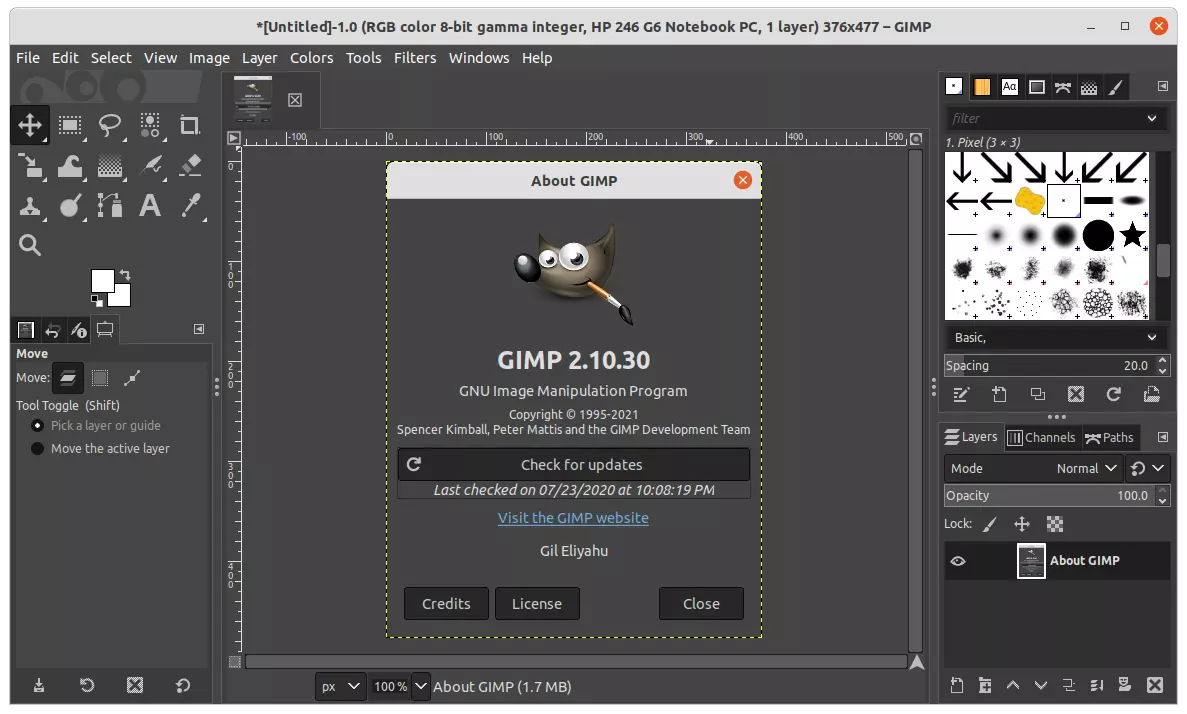
GIMP image editor got a new bug-fix release for the current 2.10 stable series today. Here’s what’s new and how to install it in Ubuntu 20.04 & Ubuntu 21.10.
GIMP 2.10.30 improved several file format supports. PSD support received various types of improvements allowing it to load more sub-cases of PSD. And, AVIF export now favors AOM encoder.
Color picking from Colors dockable can now use the Freedesktop API when available. The screenshot plugin for GNOME 41 has been dropped due to restricted API. And, in KDE it uses in priority the Freedesktop API.
Do not follow subpixel font rendering choice from system settings for text layer rendering.
Rewrite the core selection drawing logics so that it works on macOS Big Sur and over.
On Windows, move from GetICMProfile() to WcsGetDefaultColorProfile() API because the former is broken in Windows 11.
Extension .avif now associated to GIMP.
Various improvements to metadata support.
How to Install GIMP 2.10.30 in Ubuntu:
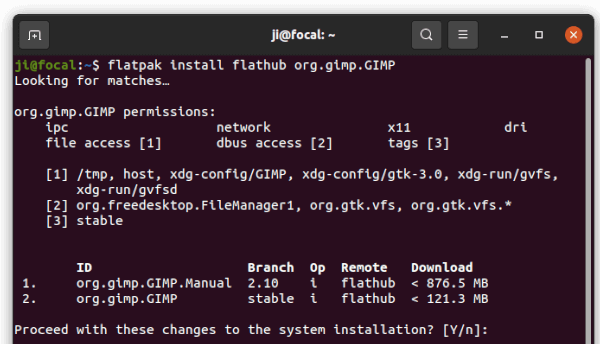
1. GIMP Flatpak:
The project team recommends the flatpak package, the universal Linux package format runs in sandbox. Flatpak works on most Linux though it takes more disk space.
The package is available at flathub.org. Users need to follow the setup guide and install the flatpak via the command in the bottom of the link page.
2. GIMP Snap:
The image editor is also available as Snap, another universal package format developed by Canonical, the company behind Ubuntu.
The snap version is not updated at the moment. It however will automatically update to the latest (once published) after installed it. And the snap is available in Ubuntu Software:
3. Ubuntu PPA
For those stick to the NATIVE .deb package, GIMP 2.10.30 is available to install via this unofficial PPA in Ubuntu 20.04, Ubuntu 21.04, and Ubuntu 21.10 for 64-bit PC and/or arm64/armhf devices (e.g., Raspberry Pi).
Ubuntu 18.04 is excluded due to outdated system library. For choice, user may use this PPA which depends updated FFmpeg library that may break other packages in your system.
1.) Firstly, either search for and open terminal from the Activities overview screen, or press Ctrl+Alt+T on keyboard. When terminal opens, run command to add the PPA:
sudo add-apt-repository ppa:ubuntuhandbook1/gimp
Type user password (no visual feedback) when it asks and hit Enter to continue.
2.) Next, install GIMP 2.10.30 either by running apt command in terminal:
sudo apt install gimp gegl libgegl-0.4-0
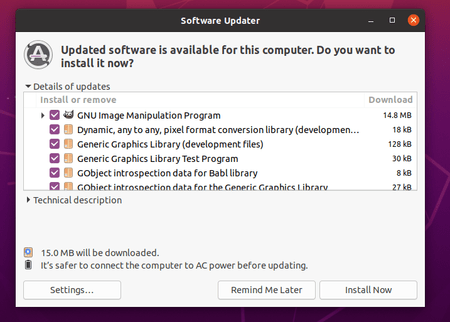
or upgrade the editor using Software Updater (Update Manager):
Remove PPA and restore GIMP:
For any issue, you can purge the Ubuntu PPA which will downgrade the installed packages to the stock versions. To do so, firstly install the ppa-purge utility:
HPLIP, HP’s inkjet and laser printers drivers for Linux, released 3.21.12 a few days ago with new Linux Distros support.
The released added Fedora 35, MX Linux 21, and Elementary OS 6 support. Since HPLIP package in these Linux Distros’ own repositories is always old, users may now easily install the latest version via the official script by HP.
And, nothing else in the release except for the new systems support.
Download & Install HPLIP 3.21.12
To get the software package, download the “hplip-x.xx.x.run” file from the link page below:
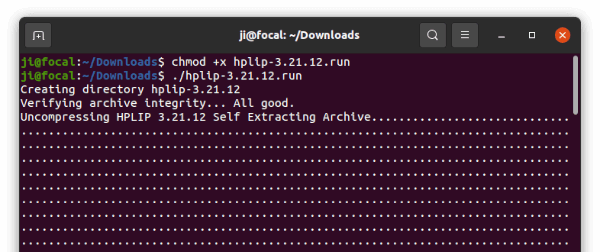
Next, search for and open a terminal window from start menu. And, run command to grant executable permission, and run the installer script to install it:
cd ~/Downloads && chmod +x hplip-*.run && ./hplip-*.run
Just follow the terminal output and answer questions. It will build and install the software automatically.
Tip 1: For those still using Python 2 and getting into python-pyqt5 dependency issue, see this workaround.
Tip 2: For unsupported Linux systems, you may manually install dependencies and built from the tarball. For Ubuntu based systems, there’s a tutorial teaches how to compile.
How to Remove HPLIP:
Running the “hplip-x.xx.x.run” installer will generate a source folder in user Downloads directory. If you don’t see it, re-run it via command:
~/Downloads/hplip*.run --target ~/Downloads/hplip
Then in file manager, go to “Downloads”. Right-click on ‘hplip’ folder and select ‘Open in Terminal’, finally run the uninstall script in pop-up terminal window:
2D jump’n’run game SuperTux released 0.6.3 Beta recently with many exciting new features.
SuperTux is a free open-source side-scroller inspired from the Super Mario Bros. Player may control a penguin called Tux in game to run and jump through multiple worlds, fighting off enemies, and reclaim Penny.
By releasing the 0.6.3 Beta, the game supports for WASM compilation. So, it can be played directly in the browser. There are also many great new features introduced in the release, including:
Swimming
Wall jumping
Autotiles
New snow tiles, objects
Add-on creator
Optional integration with Discord
Official binaries for FreeBSD, Linux 32-bit and Ubuntu Touch
For Ubuntu and other Linux, it’s available in the system repositories. Just search for and install it via your system app store (Ubuntu Software).
And the package for the latest 0.6.3 Beta is available to download in Github releases via Assets. For Linux user, download the ‘.Appimage’ package, add executable permission in file Properties dialog, and finally click run it to start the game.