Mozilla Firefox web browser 95.0 was released today with security and performance improvements.
The release introduced new RLBox sandboxing technology that uses WebAssembly to isolate potentially-buggy code. And, it’s enabled by default on all platforms (desktop and mobile) to protect users from accidental defects as well as supply-chain attacks.
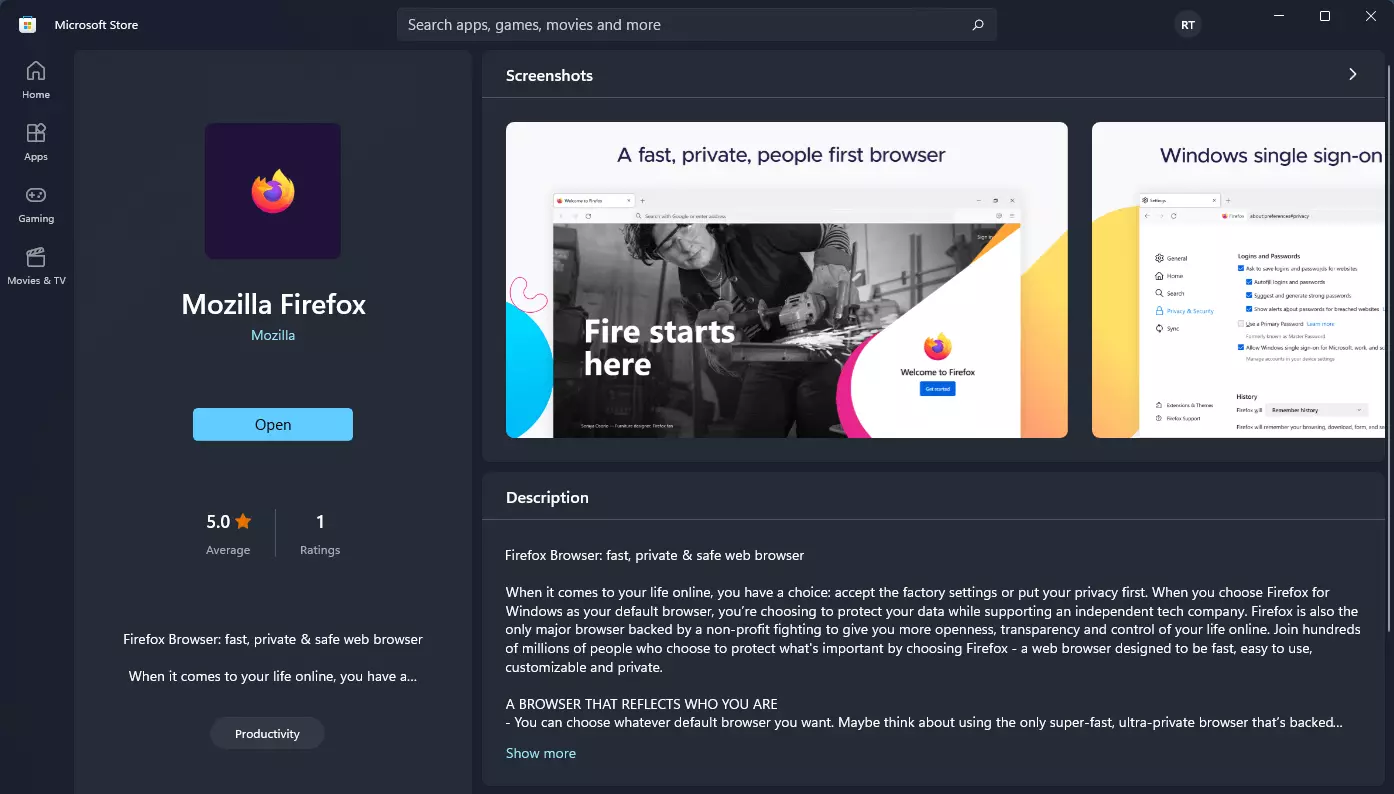
For Windows 10 and Windows 11, Firefox now is available in Microsoft Store for easy install. MacOS user now has less CPU usage during event processing, and less power usage when decoding video (e.g., streaming Netflix and Amazon Prime Video).
Firefox in Microsoft Store
Other changes in Firefox 95 include:
Picture-in-Picture (pop out video) now has option to toggle buttons to left/right.
Enable site isolation for all users to protect against side-channel attacks such as Spectre.
Faster content process startup on macOS.
Improved page load performance.
Various bug-fixes.
How to Get Firefox 95 in Ubuntu Linux:
For Ubuntu 21.10 with the pre-installed Firefox as Snap, user should now has the latest release since it updates automatically. Other Ubuntu releases may search for and install it from Ubuntu Software (snapcraft.io/firefox).
For those prefer the classic DEB package (defaults in Ubuntu 21.04 & earlier), just wait and Ubuntu will publish the package in next few days. At that time, either use ‘Software Updater‘ or run command below will upgrade the Firefox package:
sudo apt upgrade
Mozilla also provides Linux tarball in its website. User may just extract it and click run the executable file to launch the web browser. Along with the release note, get it from the link below:
This simple tutorial shows how to install the latest Tesseract OCR engine in all current Ubuntu releases (Ubuntu 24.04, Ubuntu 22.04, and Ubuntu 20.04) via PPA.
Tesseract is the most accurate open-source OCR engine that reads a wide variety of image formats and converts them to text in over 40 languages. Tesseract 5.0.0 was officially released a few days ago that features:
Faster training and OCR performance while less memory usage via ‘fast bloats’.
Support for latest macOS and Apple Silicon
Better ARM/ARM64 support.
API improvements and more.
How to Install Tesseract OCR in Ubuntu:
The optical character recognition engine is available in Ubuntu repositories though it’s always old.
Thanks to Alexander Pozdnyakov, the maintainer of Tesseract OCR in Debian/Ubuntu official repository, also maintains few PPAs with the latest packages. And, most CPU architectures (amd64, i386, arm64/armhf, ppc64el, s390x) are supported.
Option 1: Add Tesseract 4.x PPA
For the latest release of Tesseract OCR 4 (v4.1.3 so far), the stable PPA contains the packages for Ubuntu 18.04, Ubuntu 20.04, Ubuntu 21.10, and old Ubuntu 16.04/14.04.
Press Ctrl+Alt+T on keyboard to open terminal. When it opens, run the command below to add the PPA:
sudo add-apt-repository ppa:alex-p/tesseract-ocr
Type user password when it asks (no visual feedback) and hit Enter to continue.
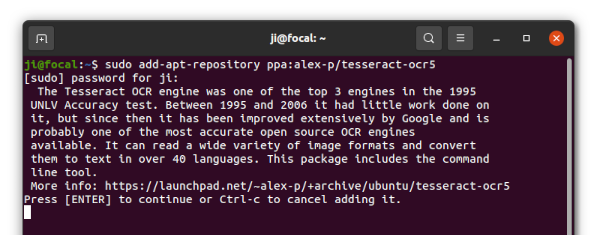
Option 2: Add Tesseract 5 PPA
The new 5.x release series (5.4.1 so far) is available in the another PPA for Ubuntu 25.04, Ubuntu 24.04, Ubuntu 22.04, and Ubuntu 20.04.
Also, press Ctrl+Alt+T to open terminal and run command:
sudo add-apt-repository ppa:alex-p/tesseract-ocr5
NOTE: install the OCR from this PPA will override the old 4.x packages, though it’s not 100 % API compatible with v4.0.
Option 3: Add Tesseract repository for Debian:
For Debian Stretch, Buster, Bullseye, and Sid, there’s apt repositories for both Tesseract v4 and v5. User may follow the link button below to add the repository:
After adding a PPA or repository from the previous options, run command in terminal to refresh system package cache in case you’re still running old Ubuntu 18.04 and earlier:
sudo apt update
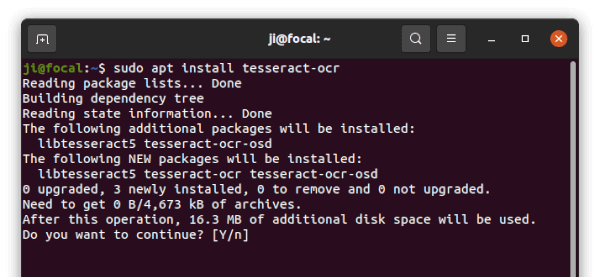
And, finally install the software engine via command:
sudo apt install tesseract-ocr
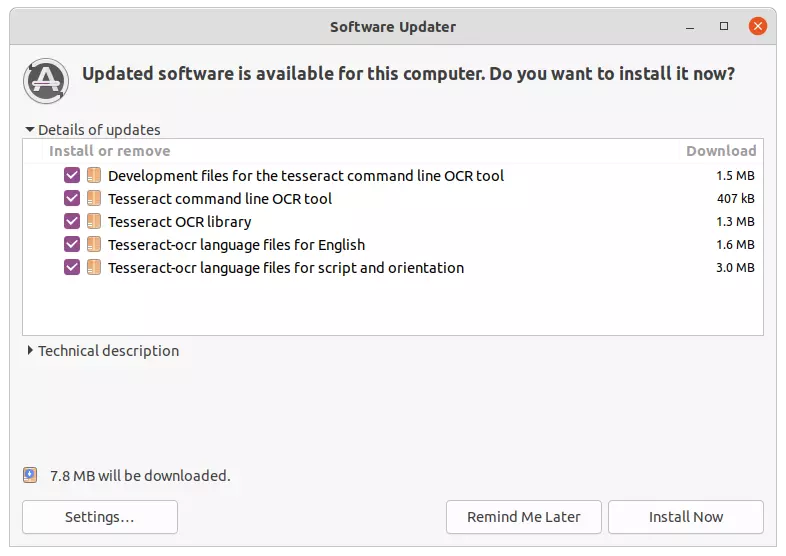
Or, upgrade the package using Software Updater:
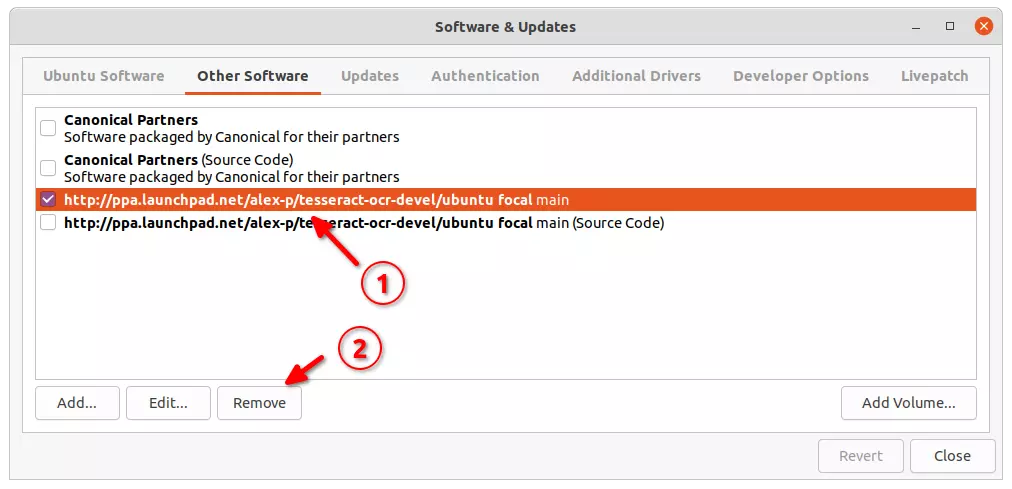
How to Remove PPAs & uninstall Tesseract OCR:
To remove the PPAs, either run previous add-apt-repository command with --remove flag, or use Software & Updates utility under ‘Other Software’ tab.
For those don’t like the Snap package, this is a step by step guide shows how to install latest Blender via its official Linux tarball in Ubuntu.
The latest Blender is quite easy to install in Ubuntu since it’s available in Ubuntu Software. However, it’s Snap package!
For choice, the Blender foundation provides the portable Linux tarball, but it lacks app shortcut for launching from system start menu. So, I’m writing this how to tutorial to deal with it.
NOTE: This tutorial should work on most Linux (e.g., Debian, Fedora, Linux Mint) that support .desktop file, though the title said for Ubuntu.
Install Blender via Linux Tarball:
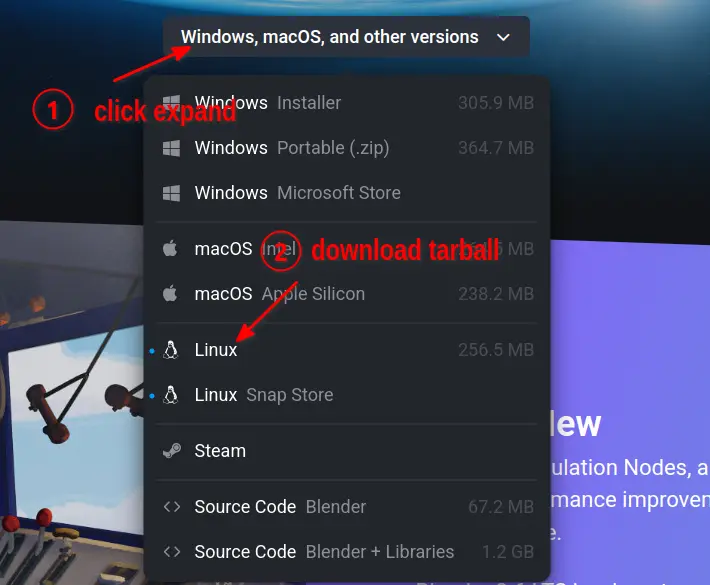
1. Download Linux Tarball
First, go to the official download page. Click download Blender for Linux. It’s a 64-bit tarball ‘blender-x.x.x-linux-x64.tar.xz‘ for modern PC/laptop:
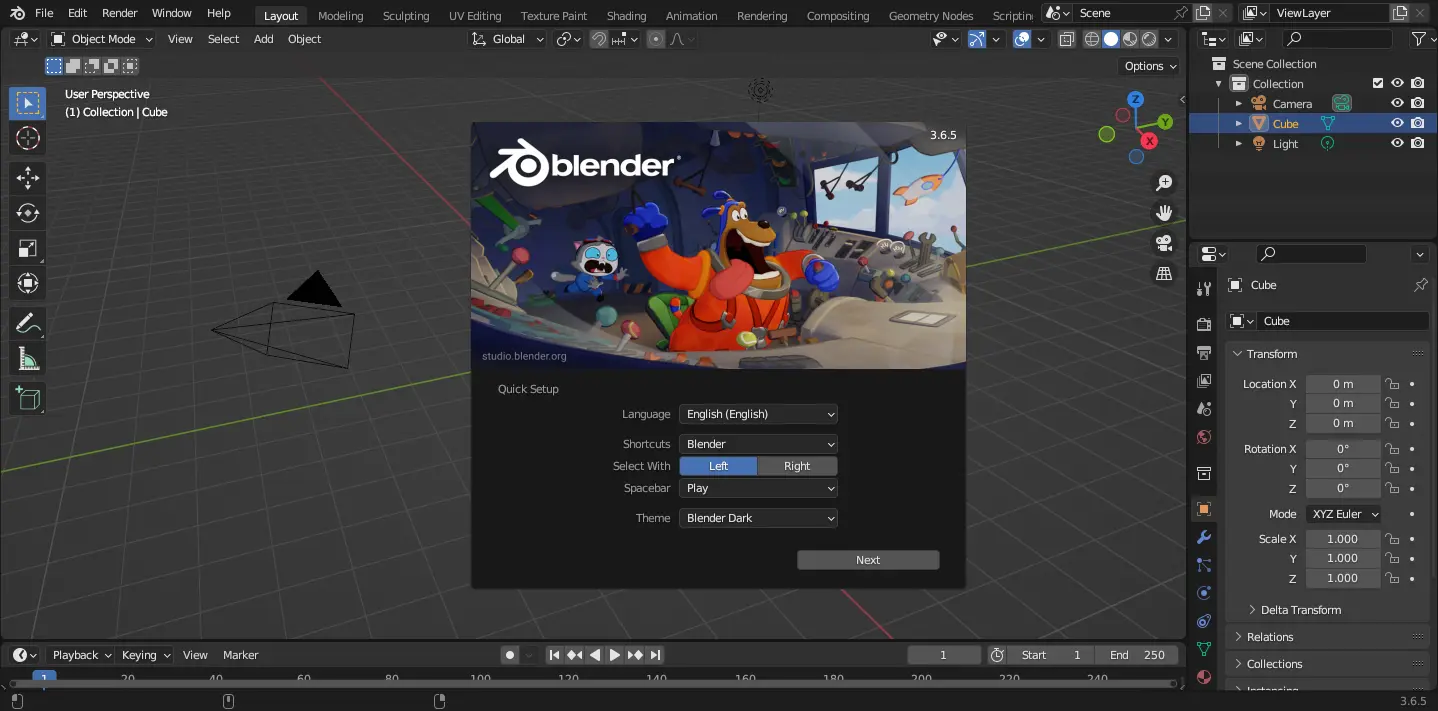
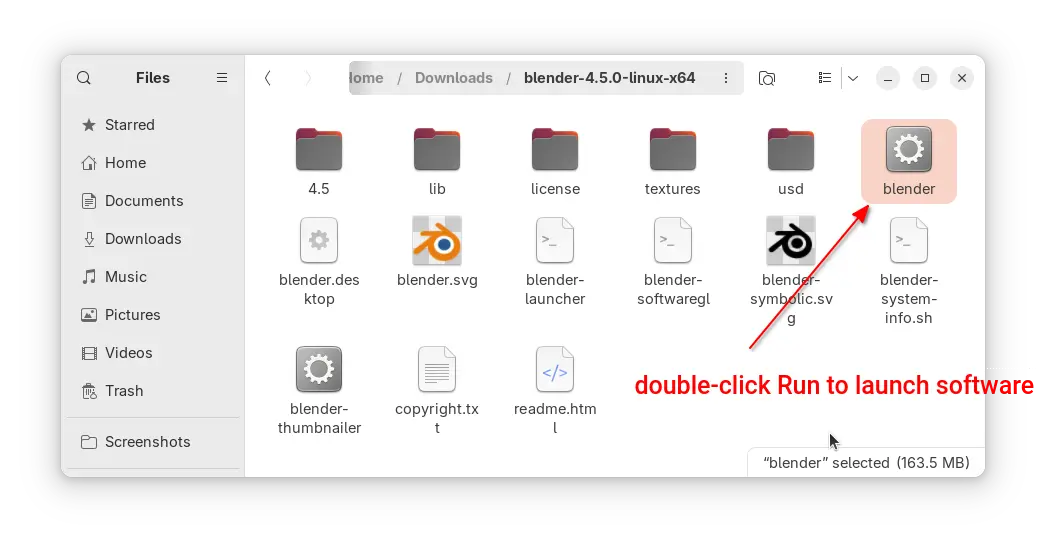
After downloading the package, extract, and finally click run the executable file from extracted folder will launch the 3D creation software.
If you want to make it show in system start menu (Activities overview search results), you need to do following more steps.
2. Extract Tarball to /opt for global use:
Here I’m going to extract the tarball to /opt directory and create app shortcut for Blender.
1.) Press Ctrl+Alt+T on keyboard to open terminal. When it opens, run command to backup old blender folder under ‘/opt’ if any:
sudo mv /opt/blender /opt/blender.back
Ignore ‘No such file or directory’ output. It means you don’t have old file to backup.
2.) Create new blender folder under /opt:
sudo mkdir -p /opt/blender
3.) Extract Blender tarball from Downloads folder to the new created folder:
sudo tar -Jxf ~/Downloads/blender-*-linux-x64.tar.xz --strip-components=1 -C /opt/blender
NOTE: Instead of running the commands above in terminal, user may decompress the tarball in file manager and move source folder to the desired location. However, moving to /opt needs root permission. So, open file manager via sudo nautilus ~/Downloads command is required
3. Verify if the Blender executable works:
After extracting the Linux tarball into /opt/blender. User may run command to list that directory to verify:
ls /opt/blender
And, run this command should launch the software:
/opt/blender/blender
Sometimes, app may refuse to launch due to missing shared library. If so, copy the library name and search in packages.ubuntu.com under ‘Search the contents of packages’ to find out the required package and install it.
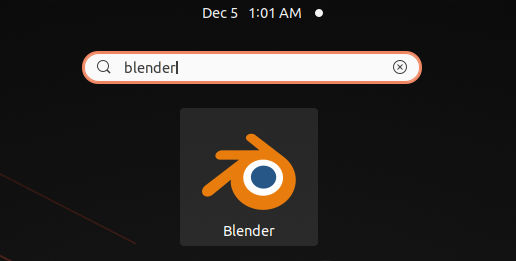
4. Create app shortcut for Blender:
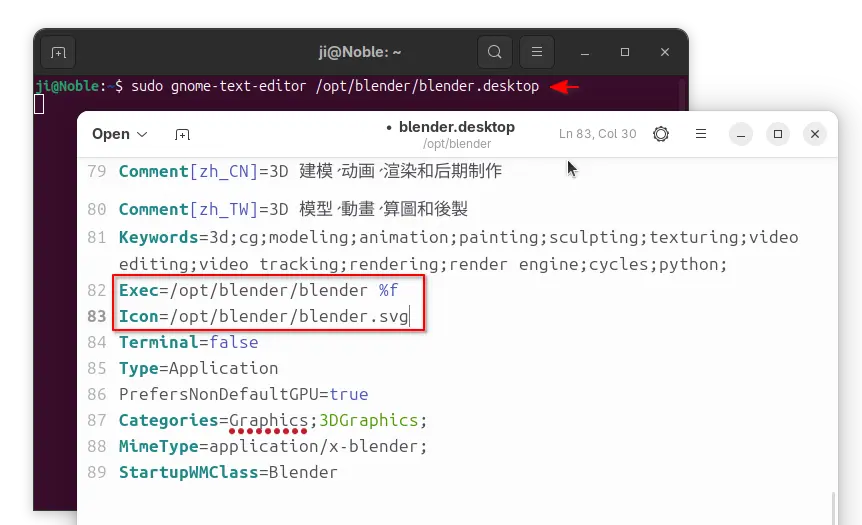
The Linux tarball includes the shortcut file by default, though it won’t work since PATH to executable varies depend where you put the folder. Run command in terminal to open the file via gedit text editor:
For Ubuntu 22.04 and earlier, replace gnome-text-editor with gedit in command. For non-GNOME desktop, use mousepad for XFCE, xed for cinnamon, or nano command line editor works for most cases.
When it opens, change the ‘Exec’ and ‘Icon’ lines into:
Here I copied the app shortcut file to local folder for single user use. And, the app icon shows in ‘Activities’ overview search result few moments later. Though, it’s better to change the ownership to yourself.
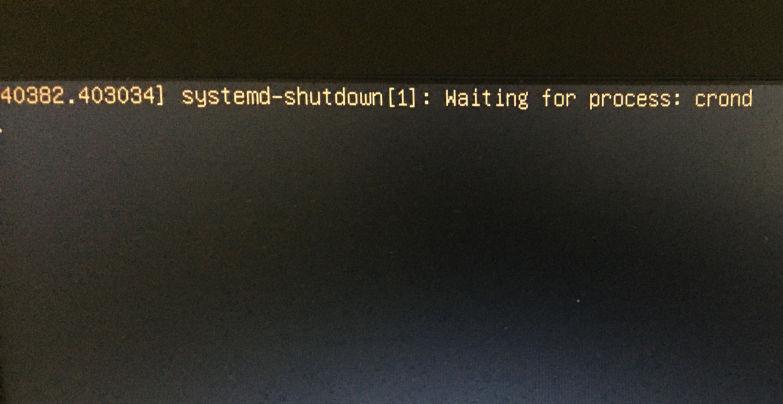
My Ubuntu laptop recently runs into a power-off issue. Every time when I shutdown or reboot the machine, it stuck at blank screen with text message “systemd-shutdown[1]: waiting for process: crond” for more than a minute.
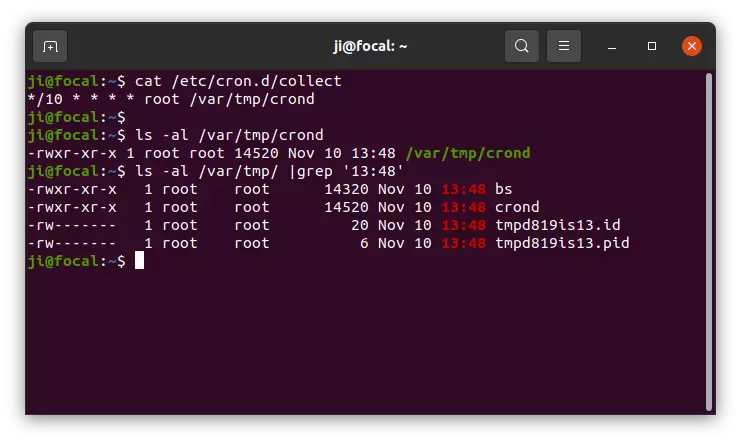
According to the keyword ‘crond‘, it has something to do with the cron schedule job. And, thanks to this thread, user may run the command below to list all current schedule cron jobs:
find /etc/cron* -type f | xargs ls -ltr
And there you’ll find that the schedule job ‘/etc/cron.d/collect‘ tries to run an unknown crond binary under ‘/var/tmp’ every 10th minute (e.g., 5:10, 5:20, 5:30 …). So the problem may not occur when shutdown/reboot within a few minutes after login.
The /var/tmp directory stores temporary files or folders that are preserved between system reboots. According to @bird7676 in that thread, the files were probably created by Free Download Manager.
Solution:
If you don’t use and have removed the Free Download Manager, simply remove these temporary files as well as the schedule job.
To do so, either use a system cleaner (e.g., BleachBit), or press Ctrl+Alt+T on keyboard to open terminal and run command below to remove the files:
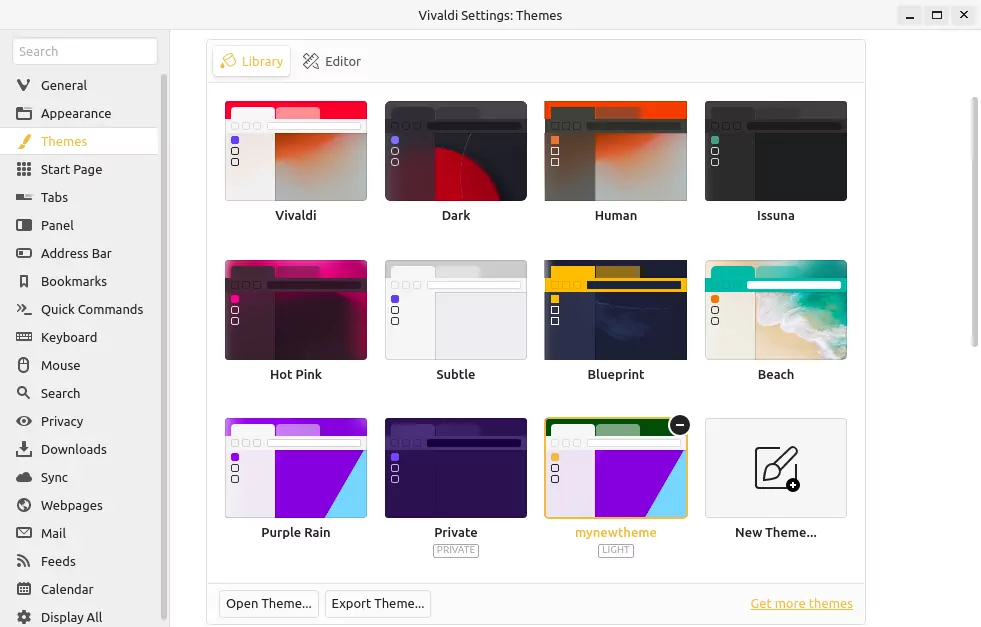
Vivaldi web browser released version 5.0 today with exciting new features.
The release makes it easy to change the app UI appearance via themes. Vivaldi comes with some themes with different colors, background image, blur, transparency and other settings. User may edit or create new theme easily with the built-in editor.
Vivaldi built-in themes & editor
And in ‘Themes’ setting page, it provides option to export theme into zip archive. So your friends may easily get the same Vivaldi appearance by opening the Zip archive in settings.
The browser now has built-in translation support powered by Lingvanex. By clicking on the icon from left panel, user may translate any text selection to the native language automatically by enabling ‘Auto-translate selected text’ option.
And according to the release note, only Vivaldi servers are involved, meaning you don’t have to share what you read with Big Tech’s ‘prying eyes’.
Other change in Vivaldi 5.0 include:
Additional way of showing downloads.
Provide rpm packages for ARM / ARM64.
Two-Level Tab Stacks on mobile and tablets.
Handle page actions as commands
Add parameter to search with selection command: to specify search engine
Add option to not show Calendar notifications.
Add Oauth support for Office365/Outlook in built-in Mail.
How to get Vivaldi:
The official download page offers Linux DEB for both 64-bit PC and arm64 machines (e.g., Raspberry Pi).
Vivaldi also has an official apt repository, with it you can install the browser and get future updates through Software Updater utility.
Open terminal either via Ctrl+Alt+T keyboard shortcut or by searching for terminal from application menu. When it opens, run following commands one by one:
Adding an app shortcut icon to the Desktop in Ubuntu is not that easy for beginners by default. User has to first open the folder that stores the app shortcut files (usually /usr/share/applications). Then drag and drop the .desktop files into user’s “Desktop” folder. Make executable in file properties dialog and finally select ‘Allow Launching‘ via context menu option.
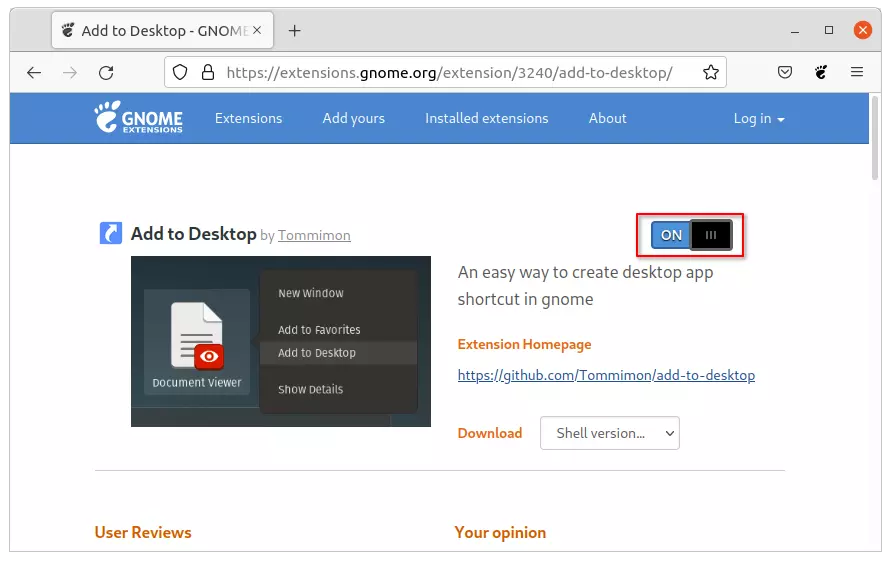
To make life easier, a Gnome extension is available to make the process to create a desktop shortcut for apps as easy as few clicks. Since Ubuntu uses full-screen app launcher, it’s not Windows 10/11 style drag and drop adding desktop icons. Instead, it adds ‘Add to Desktop‘ option to app icon’s context menu.
Like in Linux Mint and/or Zorin OS, user just needs to search the app in ‘Show Applications’ or ‘Activities’ overview screen, right-click on the app icon, and finally click ‘Add to Desktop’ to pin to desktop.
Install ‘Add to Desktop’ Extension:
1. To install a Gnome extension, first press Ctrl+Alt+T on keyboard to open terminal and run command to make sure the ‘chrome-gnome-shell‘ package is installed.
sudo apt install chrome-gnome-shell
2. Next go to extension web page via the link button below and turn on the toggle icon to install it:
Don’t see the toggle icon? Install browser extension via ‘Click here to install browser extension‘ link and refresh the web page.
NOTE: The extensions support for all recent Gnome versions, so it works on all current Ubuntu releases including Ubuntu 18.04, Ubuntu 20.04, Ubuntu 21.10. For other Linux with GNOME (e.g., Debian, Fedora), user needs to enable desktop icon support first (e.g., using Desktop Icon NG).
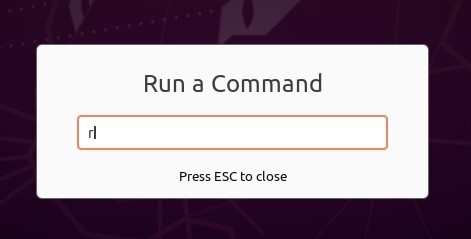
The extension should work immediately after installation. If not, try restarting Gnome Shell by either logging out and back in, or pressing Alt+F2, type r and hit Enter in ‘Run a Command’ box.
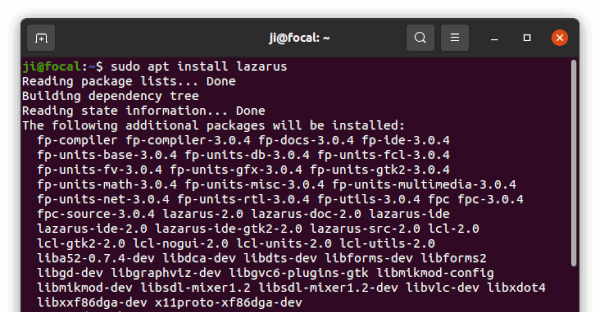
This is a step by step guide shows how to install the Lazarus IDE in Ubuntu 18.04, Ubuntu 20.04, Ubuntu 22.04 and their derivatives, e.g., Linux Mint, Elementary OS and more.
Lazarus is a free Delphi compatible cross-platform IDE for rapid application development using the Free Pascal compiler. User may install the project either from Ubuntu repository or by using the official DEB packages.
Lazarus IDE in Ubuntu
Option 1: Install Lazarus via Ubuntu repository:
Ubuntu includes Lazarus in its own repositories, but it does not provide updates for the package. So the package will always be old, though Ubuntu 21.10 has v2.0.12, most recent release at the moment.
The good side is that user may install the package on 64-bit modern PC, old 32-bit PC on Ubuntu 18.04, and/or arm64/armhf devices (e.g., Apple silicon and Raspberry Pi).
To install the package, press Ctrl+Alt+T on keyboard to open terminal. When it opens, paste the command below and hit Enter:
sudo apt install lazarus
This command will install Lazarus, fpc compiler, as well as all other required packages:
Once installed, search for and open the IDE from activities overview and enjoy!
Option 2: Install Lazarus via its official DEB packages:
The IDE provides official Linux packages available to download at the sourceforge.net. You can always get the latest version from the link button below, though it’s only provides packages for modern 64-bit and old 32-bit PC.
fpc-laz – the Compiler, some command line tools, base units and non visual components like database access
fpc-src – the sources of fpc and its packages, needed for code browsing
lazarus-project – the IDE, visual components and help files
Grab all the 3 packages. Then, open file manager and go to ‘Downloads‘ folder, right-click and choose ‘Open in Terminal‘ to open terminal with that folder as working directory. Finally, run command to install them:
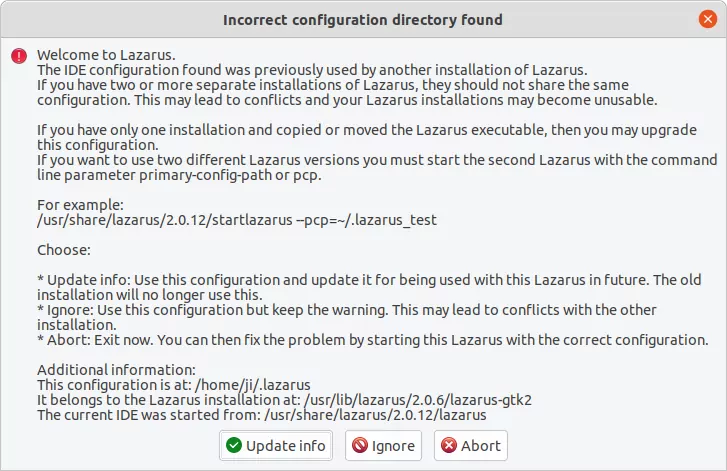
NOTE: the official package conflicts with the one in Ubuntu own repository. Though the IDE supports for having multiple package versions in same system, installing Lazarus via either way in this tutorial will remove another (if any) automatically.
And it will prompt to either upgrade or downgrade configuration when switching between different app versions on first startup.
Uninstall Lazarus:
To remove the Lazarus IDE, run command below in terminal will do the trick for the software installed via both methods.
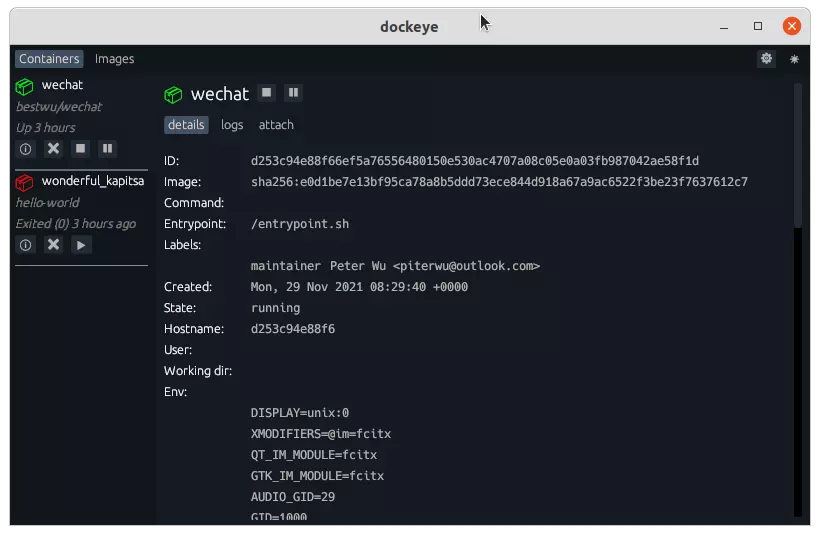
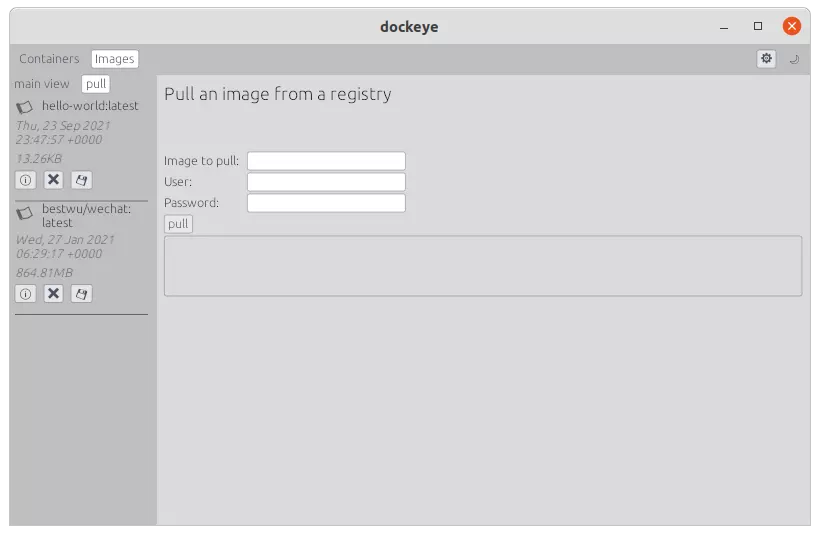
Running applications via Docker in Ubuntu Linux? Dockeye is a free open-source tool to manage your containers and images via a graphical user interface.
Dockeye is written in Rust programming language. It provides a dark UI (light mode is also available) that list Docker containers and images in tabs. For each container, it provides options to control start, stop, pause, and remove operations.
User may also check the detailed information about a container, including ID, image, maintainer, labels, environment, network info, CPU, Memory and other system resource usage. And, app running log is available in tab for debugging purpose.
Also, it lists images with information about creation time, architecture, size, docker version, as well as delete and save as tar archive options. And, it offers the option to pull an image from a registry.
Toggle Dark and Light via top right corner button under title bar(min, max, close)
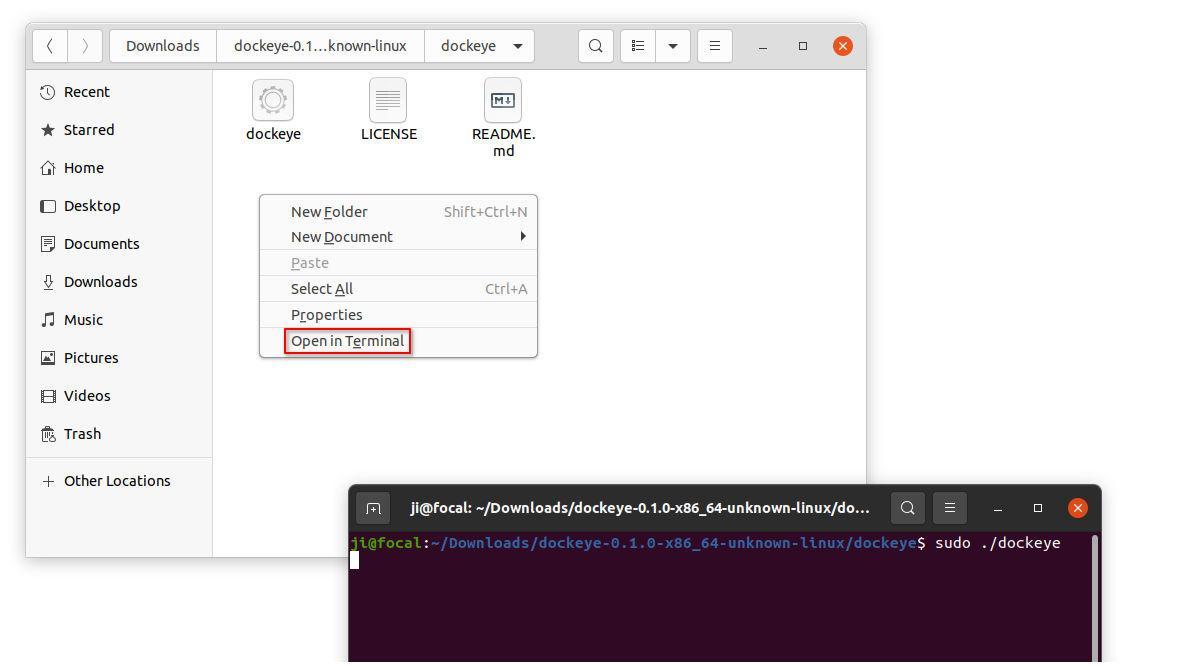
How to Get Dockeye in Ubuntu Linux:
Dockeye is a new project. It provides package for Arch Linux via AUR. User may use command to get it:
paru -S dockeye
For other Linux including Ubuntu, grab the package from the github releases page:
So far (Nov 2021), it provides only Linux tarball. Extract and navigate to the folder that contains the app executable. Finally, right-click on blank area and select ‘Open in Terminal‘ and then run command below to start it:
sudo ./dockeye
As new project, it may have bugs. To help improving it, please report issues at this page.
In Windows 10, user may right-click on the ‘File Explorer’ icon on panel to access pinned folders (e.g., Desktop, Downloads and Documents) quickly.
Ubuntu has first implemented this feature in Ubuntu 21.10, though it seems to be not working properly due to bug. Ubuntu 20.04 may manually add the context (right-click) menu options so user can right-click on the ‘Files’ icon to choose open favorite folders quickly.
Step 1: Copy File Manager .desktop file to local folder:
The file manager’s shortcut icon is handled by the relative .desktop file located in “/usr/local/applications” directory. It’s recommended to copy the file to local user directory, so the changes will function for current user only.
1. Press Ctrl+Alt+T on keyboard to open terminal. When it opens, copy the file to local directory via command:
This command will open the file in Gedit text editor. When it opens, do following steps one by one:
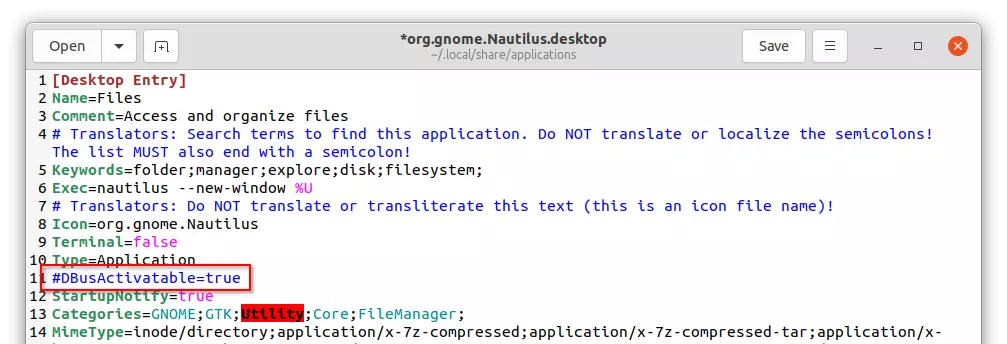
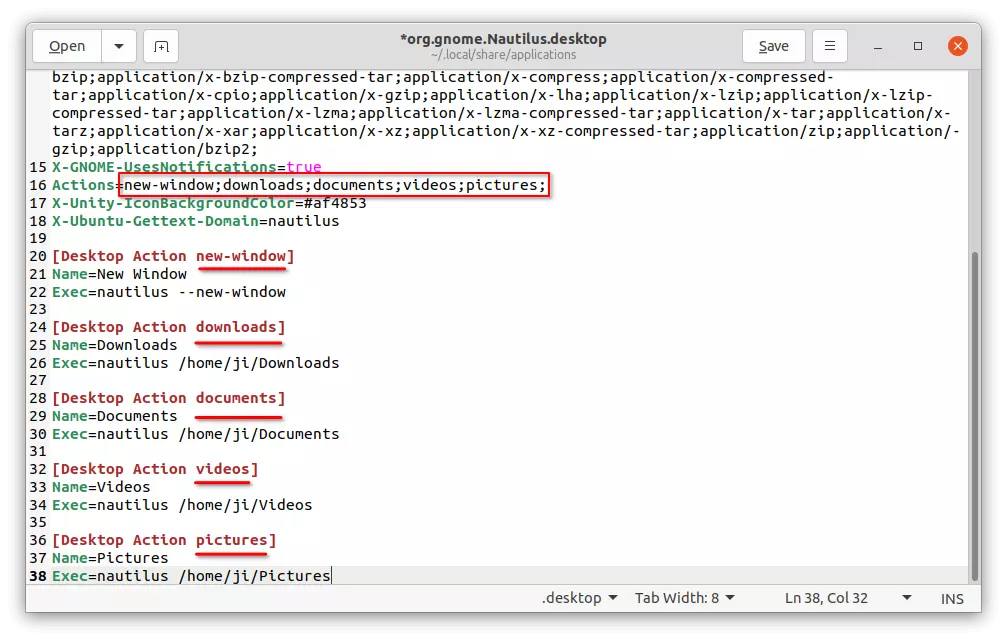
1.) First, comment the “DBusActivatable=true” line by adding ‘#‘ at the beginning to disable it. Or, the ‘Exec’ value will be overrided.
2.) Add more values to “Actions“, such as downloads, documents, videos and whatever as you prefer. And, separate them via ‘;‘ without blank space.
Accordingly, add the “[Desktop Action downloads]”, “[Desktop Action documents]”, “[Desktop Action videos]” segments in the bottom. And, each segment has:
“Name” to display in the right click menu.
“Exec” command to open the desired folder, usually nautilus /home/USERNAME/folder
Step 3: Restart Gnome Shell to apply change:
After saving the file, restart Gnome Shell. In Ubuntu 20.04 default Xorg session, simply press Ctrl+Alt+F2, then try r in pop-up dialog and hit Enter.
The ‘Files‘ icon in left dock panel should now take use of the .desktop file in user directory and provide the quick access folders you set via right-click menu.
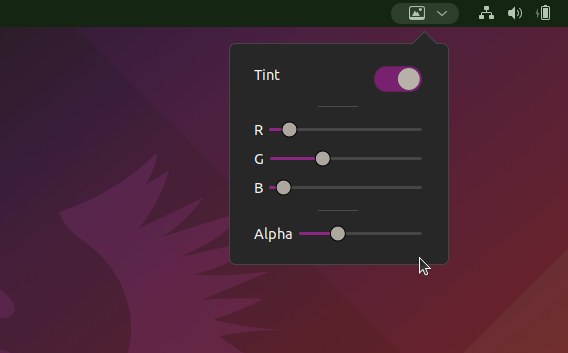
For people with dyslexia, scopic sensitivity, and related conditions, GNOME has an extension to adds a a translucent colored overlay over your desktop that may help.
It’s ‘ColorTint’ that adds an indicator applet in system tray area. User may click the drop down menu options to enable/disable the overlay, change the color via RGB slider bar, and adjust transparency via the Alpha slider.
How to Install ColorTint:
The extension works on GNOME 40 (Ubuntu 21.10) and GNOME 3.32 (Ubuntu 18.04), however lacks Ubuntu 20.04 support…
1.) Firstly, press Ctrl+Alt+T on keyboard to open terminal. When it opens, run command to install the ‘chrome-gnome-shell’ package to enable ability to install Gnome Extension via web broser:
sudo apt install chrome-gnome-shell
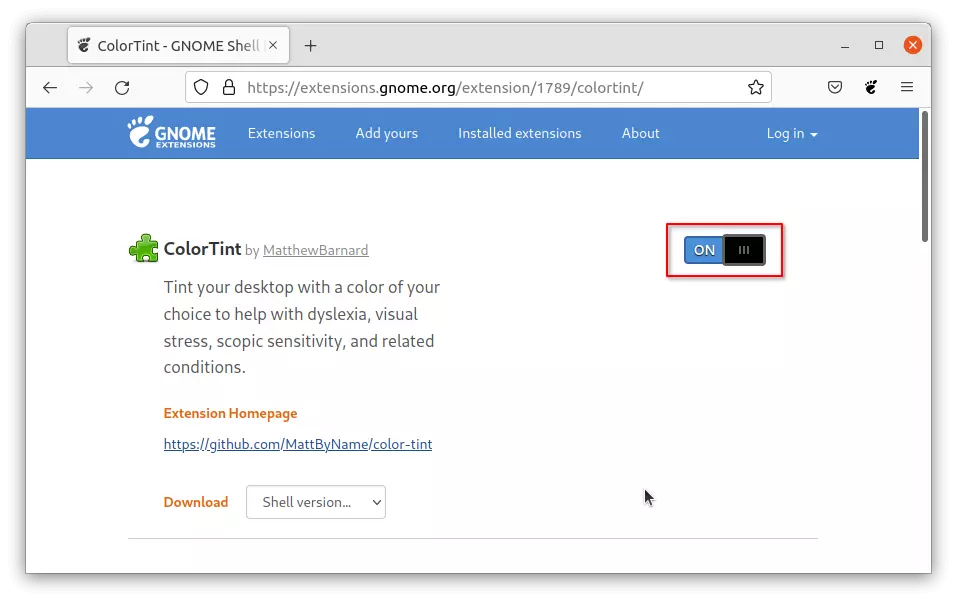
2.) Next, go to the link below and turn on the slider icon to install the extension:
Don’t see the toggle icon? Try installing the browser extension via the link in the page and then refresh it.
NOTE: The pre-installed Firefox in Ubuntu 21.10 is a Snap package that so far does not support for installing Gnome Extensions, use another browser or install Firefox as native Deb package via command:
sudo apt install firefox
And, to manage all installed extensions, install ‘Gnome Extensions‘ app either from Ubuntu Software or by running command in terminal: