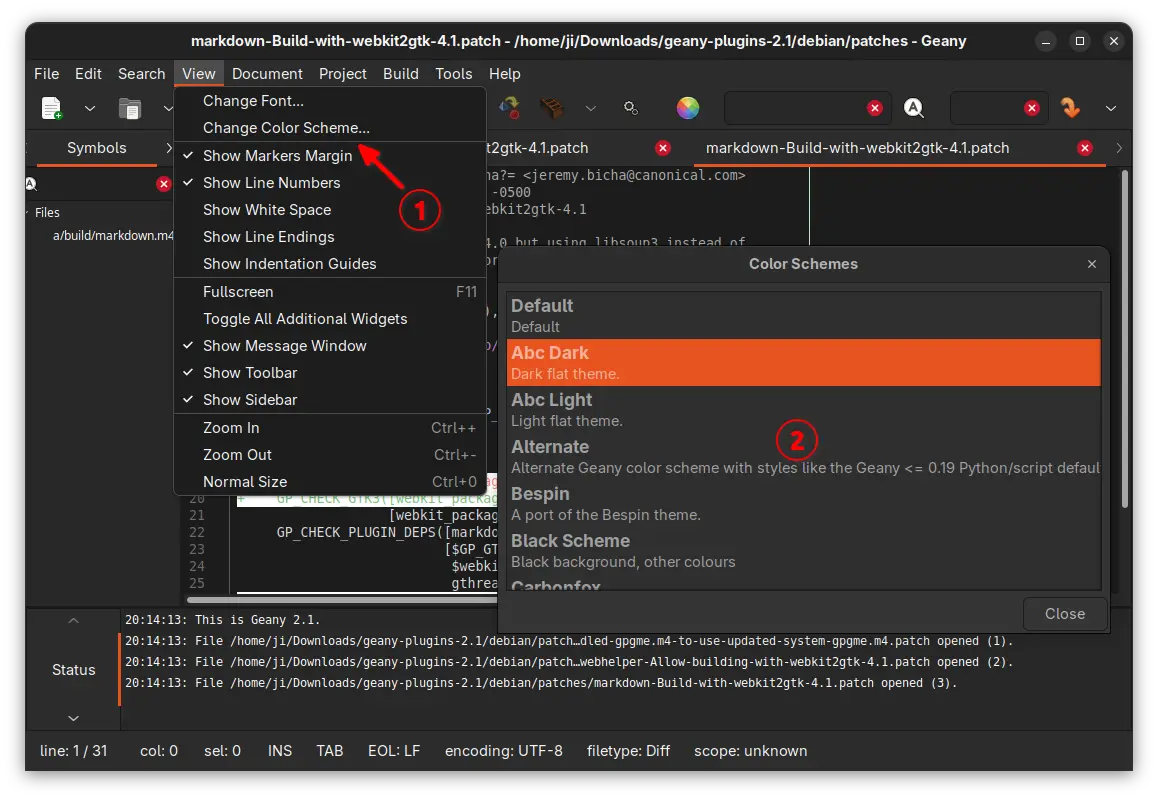
Archives For November 30, 1999

This is a step by step beginner’s guide shows how to install Telegram instant messaging app in Ubuntu 22.04 & Ubuntu 24.04.

The popular Telegram Messenger is available in most platforms. For Linux, it available as official tarball, universal Flatpak ans Snap packages. And, Ubuntu has third-party repositories to make it easy to keep updated.

So, as far as I know there are 4 ways to install the app in Ubuntu Linux. Choose any one that you prefer.

Telegram Desktop (image from flathub.org)

Continue Reading…

For Ubuntu 22.04/23.10, Fedora & other Linux with Wayland, Shutter screenshot tool can finally take screenshots for selected area and app windows!

Shutter is (or was) an excellent feature rich screenshot tool, with image editing and uploading support.

It was one of my top favorite apps, but removed from Ubuntu repositories due to lack of maintenance. Though, it’s later added back to system repository, thanks to open-source community’s work by porting it to GTK3.

Continue Reading…

Scribus, the popular free open-source desktop publishing software, announced the new stable 1.6.x release series on the first day of 2024!

It’s been more than 4 years since the last stable 1.4.8, while 1.5.x release series is available as development branch.

The new Scribus 1.6 includes many new features! If you have the default 1.5.8 dev package from Ubuntu system repository, then most of them are already in use.

Features include:

  • Resource Manager for online resources such as dictionaries
  • canvas rendering improvements on Hi-DPI screens.
  • New commands added to scripting engine
  • New PDF-based output preview
  • Adobe® Illustrator® look like “Symbol” or clone feature.
  • most often requested text features

Continue Reading…

This simple tutorial shows how to install the most recent xxHash for faster hash checking in Ubuntu Linux.

xxHash is extremely fast non-cryptographic hash algorithm, working at RAM speed limit. It can be useful to check integrity for large amounts of data, index data, and/or used in cryptographic applications like digital signatures.

The library includes the following algorithms:

  • XXH32 : generates 32-bit hashes.
  • XXH64 : generates 64-bit hashes.
  • XXH3/XXH128 (since v0.8.0): generates 64 or 128-bit hashes, using vectorized arithmetic.

I’m new to hash algorithm, but doing hash check regularly when trying out different Linux distributions. And I use sha256, since the most sites provide sha256sum files for the hash code of their disco images.

Continue Reading…

This is a step by step beginner’s guide shows how to install VS Code IDE and keep it up-to-date in Ubuntu 22.04, Ubuntu 23.04, Ubuntu 24.04 using 3 different ways.

Microsoft provides official code packages for Linux through native .deb (for Debian/Ubuntu), .rpm (for Fedora/SUSE), and universal Snap package run in sandbox.

For choice, there’s also a community maintained Flatpak package which also runs in sandbox.

So, there are 3 common ways to install this IDE in your Ubuntu Desktop!


Continue Reading…

Gnome Files, aka the default Nautilus file manager in Ubuntu & Fedora workstation, keeps moving with new features!

In the passed few month, there are minor but beginner friendly features merged into this popular file manager. They include “Enter Location” menu option, sidebar toggle button in sidebar, and badge icon to folder icon in ‘properties’ dialog.

NOTE: The new features introduced in this post are merged to master branch but NOT released yet! They may be available in next GNOME versions, backport to current, or even removed!

Continue Reading…

Alacritty, the popular free open-source GPU-accelerated terminal emulator, release new major 0.13.0 version few days ago.

The release introduced new features, including persist config option in hints config section, warnings for unused configuration file options, support for keybindings with dead keys, dynamically loading conpty.dll on Windows, as well as:

  • Back/Forward mouse buttons support in bindings
  • Copy global IPC options (-w -1) for new windows
  • Bindings to create and navigate tabs on macOS
  • Support startup notify protocol to raise initial window on Wayland/X11
  • Debug option prefer_egl to prioritize EGL over other display APIs
  • Inline vi-mode search using f/F/t/T
  • window.blur config option to request blur for transparent windows
  • --option argument for alacritty msg create-window
  • Support for DECRQM/DECRPM escape sequences
  • Support for kitty’s keyboard protocol

The release now uses TOML instead of YAML for configuration files. Run alacritty migrate command will automatically convert all the configuration files.

Other changes include:

  • Bundle mode-specific bindings in any mode.
  • Disable OSC 52 paste ability by default.
  • Deprecated draw_bold_text_with_bright_colors, key_bindings, and mouse_bindings.
  • Removed background_opacity, colors.search.bar, mouse.url, mouse.double_click.
  • See the github releases page for more.

How to Get Alacritty:

The Github releases page, provides official packages for Windows, MacOS, and Linux.

For Ubuntu users who are new to this terminal emulator, I’ve a tutorial teaching how to install Alacritty step by step.

Alacritty, is a free and open-source terminal emulator, written in Rust programming language. It works in Linux, Windows, MacOS, and uses OpenGL API for GPU hardware acceleration for fast response and high performance.

The terminal emulator features vi mode, allows to move around the viewport and scrollback using the keyboard. And, vi search and normal search for anything in the scrollback buffer.

Option 1: Install Alacritty via Snap package

For Ubuntu users, the easily way to install the terminal emulator is using the Snap package. It’s available in Ubuntu Software (App Center for 23.10), though run in sandbox.

Alacritty terminal emulator in App Center

Or, user can install it by running the command below in terminal:

snap install alacritty --classic

Option 2: Install Alacritty through Cargo (official)

The terminal emulator is also available to install through Cargo, the Rust package manager.

1. Just open terminal (Ctrl+Alt+T) and run command to install Cargo first:

sudo apt install cargo

2. Then, install the required dependency packages:

sudo apt install cmake pkg-config libfreetype6-dev libfontconfig1-dev libxcb-xfixes0-dev libxkbcommon-dev python3

3. Finally, use cargo to install the terminal package:

cargo install alacritty

When done, run ~/.cargo/bin/alacritty to start the terminal.

4. The cargo package manager does not install the desktop entry for Alacritty. So, you need to manually create one by running command:

nano ~/.local/share/applications/alacritty.desktop

Then, paste following lines in the terminal window:

[Desktop Entry]
Type=Application
Exec=/home/ji/.cargo/bin/alacritty
Icon=alacritty
Terminal=false
Categories=System;TerminalEmulator;
Name=Alacritty
Comment=A fast, cross-platform, OpenGL terminal emulator
StartupNotify=true
StartupWMClass=Alacritty
Actions=New;

[Desktop Action New]
Name=New Terminal
Exec=/home/ji/.cargo/bin/alacrittyalacritty

NOTE: You need to replace ji to your username in the line above. Then, press Ctrl+S to save, and Ctrl+X to exit.


For the icon to display, run single command below to download img file and save to local icon folder:

wget https://raw.githubusercontent.com/alacritty/alacritty/master/extra/logo/compat/alacritty-term.png -O ~/.local/share/icons/alacritty.png

Or, you can download the icon from github web page and manually copy to .local/share/icons directory.

Option 3: Ubuntu PPA

For those who prefer the Ubuntu PPA repository, keep an eye on this launchpad page for all 3rd party PPAs.

Uninstall Alacritty

Depends on how you install the terminal emulator, either remove the Snap package from Ubuntu Software or by command:

snap remove alacritty

Or, run command to uninstall the cargo package:

cargo uninstall alacritty

You may also remove Cargo itself, if there’s no other rust packages installed, as well as some dev dependency libraries to free up some disk space.

sudo apt remove --autoremove cargo cmake pkg-config libfreetype6-dev libfontconfig1-dev libxcb-xfixes0-dev libxkbcommon-dev

Also remove the desktop entry (shortcut file) by running command:

rm ~/.local/share/icons/alacritty.png ~/.local/share/applications/alacritty.desktop


SMPlayer media player released version 23.12 few days ago, with important bug-fixes and new API.

The new released fixed the compatibility issues when using MPV 0.37 as backend. They include video playback can not be resumed from pause, as well as the issue getting the audio and video codec on mpv 0.37.

SMPlayer 23.12 also implemented the new OpenSubtitles API. Since, the old API on OpenSubtitles.org is deprecated, and to be turned off by the end of 2023. If you use the service for getting subtitles, then it’s highly recommended to upgrade as soon as possible.

SMPlayer 23.12

For Ubuntu 23.10, the SMPlayer 22.7.0 installed from system repository, either freezes or pops-up following error on video playback:

Oops, something went wrong. MPlayer/mpv has finished uxexpectedly. Exit code: 1

The issue has been fixed in my test by installing the new version 23.12.

Other changes in SMPlayer 23.12 include:

  • Fix loading playlists with extension m3u8.
  • Fix video jitter/shudder when clicking on timeline bar.
  • Other bug fixes.

How to Install SMPlayer 23.12

The player provides official .exe for Windows, .dmg for MacOS, and .rpm/.deb/.snap/.flatpak/.AppImage for Linux, which as available to download at Github releases page:

For Ubuntu, user can choose to install the Snap package (run in sandbox), directly from Ubuntu Software or App Center. Or, use the official PPA (with ARM devices support) by running the commands below one by one:

sudo add-apt-repository ppa:rvm/smplayer
sudo apt update
sudo apt install smplayer

It somehow does not provide package for Ubuntu 23.10. However, download & install the package for 22.04 works good in my case in 23.10 laptop.

For Debian from version 8 to 12 (Bookworm), SMPlayer is also available to install in both amd64 and i386 through the OBS repository.

Uninstall

For Ubuntu user, depends on which package you installed, either remove Snap from Ubuntu Software.

Or, remove the .deb package by running command in terminal (Ctrl+Alt+T):

sudo apt remove --autoremove smplayer

If the PPA was added, either remove it from “Software & Updates” tool under “Other Software” tab, or run command in terminal:

sudo add-apt-repository --remove ppa:rvm/smplayer

This tutorial shows how to install Oracle VirtualBox in Ubuntu 22.04 and/or Ubuntu 24.04

VirtualBox is a popular free open-source tool for running different operating systems in virtual machines.

The tool is available in Ubuntu system repositories, but old. So, here’s the step by step how to install guide for latest version for beginners.

VirtualBox VM Manager

NOTE: VirtualBox so far only support x86_64 (amd64) CPU architecture type. Meaning for modern Intel & AMD CPUs.

Step 1: Download & Install the .deb package (Optional)

Oracle provides official .deb & .rpm packages for installing the software in Debian/Ubuntu & Fedora based systems.

User can select download the package by going to its website via the link below:

Next, open the Downloads folder, then either double click on the package or use right-click menu “Open With Other Application” and select open the .deb package you just downloaded via Software Install (or App Center). Finally, click install button to install it.

NOTE: The installing process may fail sometimes due to old package in your system, in the case, just uninstall the old one (go to bottom for how) then try to re-install again.

Once installed, search for and launch it either from start menu or ‘Activities’ overview depends on your desktop environment.

Step 2: Add VirtualBox repository to keep it up-to-date

The .deb package you installed via ‘Step 1’ used to automatically add the repository. However, it does NO longer do the trick in recent versions.

So, here’s how to do it step by step via the new Ubuntu PPA policy.

1. Download & install the key

First, press Ctrl+Alt+T on keyboard to open up a terminal window.

When it opens, run command to make sure “/etc/apt/keyrings” directory exist:

sudo mkdir -p /etc/apt/keyrings

Then, run command to use wget to download key, dearmor it (so unreadable), and finally save it to that directory:

wget -q -O- https://www.virtualbox.org/download/oracle_vbox_2016.asc | sudo gpg --dearmor --yes --output /etc/apt/keyrings/oracle-virtualbox-2016.gpg

You can finally verify the key file, by running command:

cat /etc/apt/keyrings/oracle-virtualbox-2016.gpg

As the screenshot above shows you, it should outputs unreadable text.

2. Add VirtualBox repository

Before adding the source repository, first run command to get system code name:

cat /etc/os-release

The apt repository so far only support Debian Stable (& old stable), Ubuntu 22.04 & 20.04 LTS (focal, jammy). For all their based systems, use the code-name you got via this command.

Then, in terminal window, run command to create & edit a sources file:

sudo nano /etc/apt/sources.list.d/virtualbox.sources

Then in the terminal window, paste following lines:

Types: deb
URIs: https://download.virtualbox.org/virtualbox/debian
Suites: jammy
Components: contrib
Architectures: amd64
Signed-By: /etc/apt/keyrings/oracle-virtualbox-2016.gpg

Replace jammy (for 22.04, Mint 21.x) according to last command output, such as noble for 24.04/Mint 22, focal for 20.04/mint20.

When done, press either Ctrl+S or Ctrl+O and hit Enter to save file, then press Ctrl+X to exit.

Finally, verify the sources file by running command:

cat /etc/apt/sources.list.d/virtualbox.sources

It should outputs the content you just added into that file.

3. Update system package cache

After setup the source repository, run command to refresh your system package cache:

sudo apt update

The terminal output should print a line looks like:

“Hit:5 https://download.virtualbox.org/virtualbox/debian jammy InRelease”

4. Install or Update Virtualbox

If you skipped the “Step 1”, then you can install it (7.0.x series at the moment) by running command in terminal:

sudo apt install virtualbox-7.1

Finally, when a newer release is out, you’ll be able to update it through Software Updater (Update Manager) tool.

Uninstall

To remove VirtualBox, open terminal (Ctrl+Alt+T) window and run command:

sudo apt remove --autoremove virtualbox virtualbox-7.1

And, remove the source repository by simply deleting the key & sources files:

sudo rm /etc/apt/keyrings/oracle-virtualbox-2016.gpg /etc/apt/sources.list.d/virtualbox.sources

Also, run sudo apt update to refresh package cache.