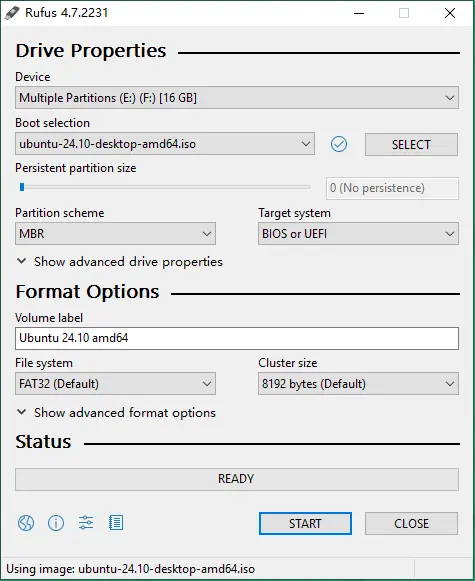
Archives For November 30, 1999

Linux Kernel 6.2 was release this Sunday. Linus Torvalds announced it at lkml.org:

So here we are, right on (the extended) schedule, with 6.2 out.

Nothing unexpected happened last week, with just a random selection of small fixes spread all over, with nothing really standing out. The shortlog is tiny and appended below, you can scroll through it if you’re bored.

Wed have a couple of small things that Thorsten was tracking on the regression side, but I wasn’t going to apply any last-minute patches that weren’t actively pushed by maintainers, so they will have to show up for stable. Nothing seemed even remotely worth trying to delay things for

What’s New in Kernel 5.16

  • Initial support for NVIDIA RTX 30 “Ampere” GPU accelerated graphics with Nouveau open-source driver.
  • Intel Arc graphics support being stable and enabled out-of-the-box!
  • Raspberry Pi 4K @ 60Hz display support.
  • New PlayStaion driver with Sony DualShock 4 controller support.
  • Added OneXPlayer senser and fan driver.
  • Dell Data Vault WMI driver.
  • Google Chrome OS Human Presence Sensor support
  • RealTek RT1318 and Rockchip RK3588 support.

If you want to learn more features about Kernel 6.2, read this blog post.

How to Install Kernel 6.2 in Ubuntu 22.04+/Linux Mint 21

NOTE: The Mainline Kernel packages are not appropriate for production use. Only install it for testing purpose or for specific drivers.

The Mainline Kernel PPA has built the packages for Ubuntu and  its based systems with modern 64-bit (amd64), arm64/armhf mobile, ppc64el and s390x CPU architecture types support.

User can select download the packages from the link page below:

For modern 64-bit PC/laptop, they are:

  1. linux-headers-6.2.0-060200-xxxxxx_all.deb
  2. linux-headers-6.2.0-060200-generic_xxx_amd64.deb
  3. linux-modules-6.2.0-060200-generic_xxx_amd64.deb
  4. linux-image-unsigned-6.2.0-060200-generic_xxx_amd64.deb

After downloading them, right click on blank area in Downloads page and select “Open in Terminal”. Finally, install the kernel packages via command:

sudo apt install ./linux*.deb

Alternatively you can download and install the kernel packages via terminal commands ( open terminal via Ctrl+Alt+T):

cd /tmp/

wget -c https://kernel.ubuntu.com/~kernel-ppa/mainline/v6.2/amd64/linux-headers-6.2.0-060200-generic_6.2.0-060200.202302191831_amd64.deb

wget -c https://kernel.ubuntu.com/~kernel-ppa/mainline/v6.2/amd64/linux-headers-6.2.0-060200_6.2.0-060200.202302191831_all.deb

wget -c https://kernel.ubuntu.com/~kernel-ppa/mainline/v6.2/amd64/linux-image-unsigned-6.2.0-060200-generic_6.2.0-060200.202302191831_amd64.deb

wget -c https://kernel.ubuntu.com/~kernel-ppa/mainline/v6.2/amd64/linux-modules-6.2.0-060200-generic_6.2.0-060200.202302191831_amd64.deb

sudo dpkg -i *.deb

Once installed, restart your computer and verify by running uname -a command in terminal!

Uninstall Linux Kernel 6.2:

Restart your machine and select boot with the previous kernel in boot menu under ‘Grub2 -> Advanced Option for Ubuntu’. Then run command to remove Linux Kernel 6.2:

sudo apt remove --autoremove linux-headers-6.2.0-060200 linux-modules-6.2.0-060200-generic

Xfce’s Parole media player announced the 4.18.0 released a day ago. Here’s how to install it in Ubuntu 20.04, Ubuntu 22.04, Ubuntu 22.10 and their based systems.

Parole is a modern simple video player based on the GStreamer. It’s an free opensource app fit well in the lightweight XFCE desktop, though also works in other Linux desktops.

The new version 4.18.0 was released last night. It’s been more than 2 years since the last release, there’s however NO big changes but only bug-fixes, minor improvements, and translation updates.

Changes in Parole 4.18.0 according to the NEWS file:

  • Hovering mouse wheel over a speaker icon can also increase volume now.
  • Reduce playback control panel to stay 2 seconds when in full-screen mode.
  • Fix memory leak when loading cover image.
  • Some icon updates and translation updates.

How to Install Parole 4.18.0 via PPA in Ubuntu:

The project does not provide official binary packages. Besides building from the source tarball, XUbuntu, Linux Lite, Linux Mint, and of course other Ubuntu based systems can get it from this unofficial PPA.

NOTE: Parole seems not working good in GNOME desktop with Wayland session. Meaning Ubuntu and Fedora workstation with default desktop environment need to switch to classic Xorg for this app.

1. First, press Ctrl+Alt+T on keyboard or search for and open terminal window from start menu. When it opens, run command to add the PPA:

sudo add-apt-repository ppa:ubuntuhandbook1/apps

Type user password (no asterisk feedback) when it asks and hit Enter to continue. The PPA support for Ubuntu 20.04 and higher with both amd64 and arm64/armhf cpu architecture types.

2. Some Ubuntu based systems may need to manually update package index after adding PPA. To do so, run command:

sudo apt update

3. Finally, either upgrade the media player from an existing version (if any) using Software Updater (Update Manager), or run command in terminal to install it:

sudo apt install parole

Uninstall Parole or Restore original package

To restore the original version, run command in terminal to purge the PPA as well as downgrade the package:

sudo apt install ppa-purge && sudo ppa-purge ppa:ubuntuhandbook1/apps

Or, you can remove the Ubuntu PPA either via “Software & Updates” tool under “Other Software” tab, or run command:

sudo add-apt-repository --remove ppa:ubuntuhandbook1/apps

To remove the media player, use command:

sudo apt remove --autoremove parole

For Ubuntu 24.04, Fedora workstation 39/40, Arch, Manjaro, etc, with GNOME desktop 43 ~ 46, there’s now an extension to add “Auto Brightness” toggle button in quick settings (aka system menu).

Meaning user don’t have to open System Settings and go to Power page again and again to turn on/off the function. Just open the top-right corner system tray menu, there’ll be a toggle button to quickly turn on/off auto brightness just like on a smartphone.

NOTE: Your laptop MUST support auto brightness feature and have GPU driver properly installed. To verify, just open System Settings and find out if there’s Automatic Screen Brightness option under Power tab.

How to Install the Auto Brightness quick menu button

The extension so far supports GNOME from version 43 to 46. It is available in EGO, which however lack of update for recent GNOME versions. If you want this quick toggle button, then it’s easy to install from the source tarball.

1. First, click the link below to download the source tarball.

For choice, you may go to the Github project page for the source code.

2. After downloaded the source package, do following steps one by one to install it:

  • Extract the downloaded package, and navigate to the extracted folder.
  • Open another file window and navigate to .local/share/gnome-shell/extensions directory.
  • Finally, drag and drop the sub-folder from extracted folder to new opened window.

Tips: .local is a hidden folder, you need to press Ctrl+H to view (and press again to hide) in file manager. The gnome-shell and extensions sub-folders may NOT exist under ‘.local/share‘ if this is the first extension you’re going to install. Just create manually.

3. Next log out and back in.

Install either GNOME Extensions or Extension Manager from App Center (filter by Debian package), and launch it. Finally, turn on the “Auto Brightness Toggle” extension for displaying the new button in top-right system status menu.

Uninstall:

As the last screenshot shows you, in “Extension Manager” window just click the up/down arrow beside the toggle switch. Then, you’ll see the ‘Remove’ button for removing the extension.

Alternatively, you may delete the theme folder under .local/share/gnome-shell/extensions directory, and log out and back in to apply.

The lightweight audacious music player announced the beta release of the next v4.3 a few days ago.

Usually, the final release will be out in next or next few months with mostly no change since beta. So far, this beta release include the following new features.

The new release added plugin support for Pipewire, which is a low latency sound server that is default in Ubuntu since 22.10.

Also, it added a plugin for Opus audio decoding support. Though it previously supports Opus through FFmpeb library compiled with --enable-libopus.

Audacious 4.3 also added again GTK3 as well as Qt6 support. In current v4.2 stable, I prefer to use Qt UI since GTK2 interface looks ugly due to incorrect icon size.

However, Qt UI lacks automatic light and dark mode switch depends on system color scheme in GNOME (default desktop environment in Ubuntu). With the new GTK3 build, it now looks good in my case in Ubuntu 22.04 with better integration.

Audacious 4.3 GTK3 UI

Other changes in Audacious 4.3 Beta include:

  • Implement Meson build system.
  • Allow copying file path in song info dialog
  • Support Ogg FLAC audio streams
  • Support reading embedded lyrics tags
  • Support new song length database format in SID plugin
  • Increased M3U file size limit from 16 MB to 256 MB
  • Support Publisher and Catalog Number tags
  • Add file filter to Export Playlist file dialog
  • Removed alarm plugin due to serious bugs

How to Get Audacious 4.3 Beta:

Audacious website provides the Windows EXE and source code for downloading at the link below:

For all current Ubuntu releases, including Ubuntu 18.04, Ubuntu 20.04, Ubuntu 22.04, Ubuntu 22.10, just open terminal (Ctrl+Alt+T) and run the commands below one by one to install it:

sudo add-apt-repository ppa:ubuntuhandbook1/apps
sudo apt update
sudo apt install audacious audacious-plugins

Uninstall:

To uninstall Audacious packages installed from PPA, open terminal (Ctrl+Alt+T) and run command:

sudo apt remove --autoremove libaudcore5 audacious-plugins-data

And remove the PPA repository via command:

sudo add-apt-repository ppa:ubuntuhandbook1/apps

The Transmission BitTorrent client released version 4.0.0 a few days ago. Here’s PPA repository contains the package for Ubuntu 20.04, Ubuntu 22.04, Ubuntu 23.10, Linux Mint 21/20.

According to the release note, transmission 4.0 features new C++ and gtkmm code-base, with much less CPU and memory usage than before. It also adds support for using BitTorrent v2 and hybrid torrents, support for IPv6 blocklists, and more.

How to Install Transmission 4.0.4 via Ubuntu PPA

I’ve built the new release packages into this unofficial PPA for Ubuntu 20.04 and higher. Ubuntu 18.04 is not supported due to dependency library version mis-match.

The new web user interface depends on NPM (Node.js package manager). It requires internet connection while building process, but launchpad build farm does NOT have. Meaning so far the PPA package does not include new web UI via JavaScript, but the old web user interface for remote control is stilling working in my case in Ubuntu 22.04.

1. First, press Ctrl+Alt+T on keyboard to open a terminal window. When it opens, run command to add the PPA:

sudo add-apt-repository ppa:ubuntuhandbook1/transmission

Type user password (no asterisk feedback) when it asks and hit Enter to continue.

2. After adding the PPA, you can then launch Software Updater (Update Manager) and upgrade the system pre-installed transmission package to the new 4.0.0 release.

For Ubuntu based system without the BitTorrent client pre-installed, you may run command below to install it:

sudo apt update && sudo apt install transmission-gtk

You may replace transmission-gtk with (or add) following package:

  • transmission-qt – Qt user interface for KDE, LXQt, etc.
  • transmission-cli – command line interface.
  • transmission-daemon – the daemon for running in background, and access via webUI

Uninstall Transmission 4.0.4

You can choose to downgrade the BitTorrent client to system pre-installed version, by running command in terminal:

sudo apt install ppa-purge && sudo ppa-purge ppa:ubuntuhandbook1/transmission

Or, remove the software packages instead by running command:

sudo apt remove --autoremove transmission-gtk transmission-qt transmission-cli transmission-daemon

And remove the PPA repository either via “Software & Updates” tool by removing the source line under “Other Software” tab, or by running command:

sudo add-apt-repository --remove ppa:ubuntuhandbook1/transmission

That’s all. Enjoy!

Ubuntu has an indicator applet to quickly prevent screen goes blank, lock screen, and/or automatically suspend on system idle.

It’s “Caffeine”, a more than 10 years old tool, that’s now available as Gnome Shell Extension. Which is useful when watching movies, or doing automation process that needs screen to keep alive.

Previously, it acts an indicator applet in the system tray on top-panel. By clicking on it will prevent (or allow again) screen blank and auto suspend when system idle.

Now it’s available as an extension for the default Ubuntu Desktop, which adds a button in the upper right system menu, to quickly toggle on/off system idle feature.

Besides prevent screen blank infinitely, there’s now also sub menu options to do the action in just 5, 10, or 30 minutes. Once you enable Caffeine along with one of the time options, it shows the applet with count down timer in the aggregation icons on top-bar.

As well, instead of showing notifications, it now display volume control style OSD in center of bottom screen when toggling on/off Caffeine option.

How to Install Caffeine in Ubuntu:

NOTE: Caffeine works on all current Ubuntu (Ubuntu 18.04, Ubuntu 20.04, Ubuntu 22.04, and Ubuntu 24.04), Fedora and other Linux with GNOME Desktop. Though, the features mentioned above are only for GNOME 43 so far.

For Ubuntu 22.04 and Ubuntu 24.04, search for and install “Extension Manager” from Ubuntu Software (or App Center).

Install Extension Manager in Ubuntu Software/App Center

Then launch it and use the tool to search and install Caffeine extension.

For old Ubuntu 18.04 and other Linux with GNOME, use the ON/OFF switch at the page below to install it:

Caffeine also has a configuration page can be opened either via “Extension Manager” or “Gnome Extensions” app. There you can do:

  • toggle display applet or not.
  • show notification or not.
  • enable the app when there’s full-screen app.
  • set keyboard shortcut.
  • enable the app when launching custom applications.

Transmission, the default torrent downloading app for Ubuntu, announced the new major 4.0.0 release today!

The new release migrated the codebase from C to C++ programming language. And now it uses the gtkmm toolkit instead of GTK for its user interface.  With the code improvements, it can even have 50% less CPU and 70% fewer memory usage.

Transmission 4.0.0 introduced support for using BitTorrent v2 and hybrid torrents. In ‘Preferences’ ->’Network’ settings page, there’s option to set default public trackers. And in “Seeding” settings page, it allows to call a custom script when done seeding.

Other changes in Transmission 4.0.0 include:

  • New version system (v3.00 -> v4.0.0)
  • Remote control GUI now use RPC API ‘table’ mode, resulting smaller payloads and less bandwidth usage.
  • Rewrite Web app in JavaScript with fully mobile support.
  • Support IPv6 blocklists.
  • See github release page for details.

How to Install Transmission 4.0.0 in Ubuntu:

Windows and macOS users can download the new release package from the software website:

For Linux user, there’s no package at the moment of writing. But as a lazy man, I use this pre-installed app to download torrents in Ubuntu frequently. If possible, I’ll make a deb package in case no PPA packages available in next few days.

UPDATE: here it is the PPA for Transmission 4.0.0 with Ubuntu 20.04, Ubuntu 22.04, and Ubuntu 22.10 support. Sadly, new WebUI excluded but it seems working with old web interface.

Want to hear your sound in microphone? Here’s a stupid simple tool to the job in Linux.

It’s Whisper, a new free and open-source GTK4 application, allowing listen to microphone through your speaker. Which, is useful for testing your microphone or for listening to your voice.

As the screenshot shows, the app is quite easy to use. Just select the microphone and speaker from the list, and click ‘Connect’. Then, you can say something or make some noise through microphone to see the magic.

As a GTK4 application, it follow system color scheme by switching between light and dark automatically. However, it needs both PulseAudio and Pipewire to make things work, which is default in Pop! OS 22.04, Ubuntu 22.10, Ubuntu 23.04, Fedora 35/36/37, etc.

How to Install Whisper in your Linux

As mentioned above, this application requires Pipewire audio server. For current Ubuntu 22.04 LTS, it’s NOT the default, though you can enable it by following this tutorial (NOT recommend for beginners).

Whisper is available to install as universal Flatpak package. You can install it by following the steps below one by one:

1. First, press Ctrl+Alt+T on keyboard to open terminal. When it opens, run command to install Flatpak daemon:

sudo apt install flatpak

Other Linux can follow this setup guide to enable Flatpak support.

2. Then, run command to install Whisper as Flatpak package:

flatpak install https://dl.flathub.org/repo/appstream/it.mijorus.whisper.flatpakref

3. After installation, search for and launch it from start menu (Show Applications) like normal app and enjoy!

How to Remove Whisper

To remove the software package, also open a terminal window and run command:

flatpak uninstall --delete-data it.mijorus.whisper

Also run flatpak uninstall --unused to remove useless runtime libraries.

This simple tutorial shows how to easily check your SSD health in Ubuntu and/or Linux Mint desktop.

I’ve been running Ubuntu Linux on my old laptop for about 7 years. Everything works well, but it recently refuses to boot sometimes when pressing on the physical power button. Not sure what’s the problem, but I guess it’s something to do the data reading issue from SSD drive.

In Windows 10, I prefer to use CrystalDiskInfo which is super easy to understand for beginners. For Linux, there’s a tool GSmartControl available for choice.

1. First, the tool is available in most Linux’s system repositories. User can just search for and install it from system package manager. For Ubuntu, it’s available to install via Ubuntu Software app:

For those familiar with Linux command can run a single command in terminal (Ctrl+Alt+T) to install it:

sudo apt install gsmartcontrol

2. After that, search for and launch it from start menu (or Activities overview). It will list your SSD drive in the app window.

By double-clicking on the disk icon or go menu “Device -> View Details” will open the information dialog that you need.

Things are not so easy to read for beginners. But it will highlight something that is not going well with red text font or background.

By moving mouse cursor over any item in the app window, there will be a tool-tip pop-over that explain with detailed information. As the screenshot below shows, it shows you:

  • power-on time.
  • total disk read and write.
  • read error rate.
  • temperature and other information.

For those prefer a percentage value of the device life, go “Statistics” tab and check the value of Percentage Used Endurance Indicator. In my case as the screenshot shows, there should be still 93% left.

And you can click on “View Output” button to view all the info as text, copy and paste them into online forums to ask for help! Or, run a “Self-Tests” manually to see if there’s any error.

LibreOffice, the default office suite in most Linux, announced the new 7.5 feature release today!

The new release has greatly improved the dark mode support. It now has fully dark appearance, instead of leaving the document background white in dark mode.

LibreOffice 7.5 now has new icons for standard app shortcuts, MIME types, and macOS specific app shortcuts. App start center now includes a filter box for Recent Documents.

A better single-toolbar user interface is available under “View -> User Interface” menu, with context-aware controls and their customization support.

The “Writer” app gains new Plain Text content control and Combo Box content control. And, Content Control now supports titles and tags, as well as exporting to PDF.

For “CALC”, data tables are now supported in charts, the Function Wizard allows to search for descriptions. And, Impress & Draw gets a new set of default table styles.

Other changes in LibreOffice 7.5 include:

  • Much more visible bookmarks in writer.
  • Initial machine translation based on DeepL translate APIs
  • Ability to define a custom color for Grammar mistakes in the Application Colors dialog.
  • “Spell out” number formats in CALC.
  • Ability to crop inserted videos in the slide and still play them
  • Run presenter console can run as a normal window.

See short video about new features of LibreOffice 7.5:

How to Install LibreOffice 7.5 in Ubuntu Linux.

LibreOffice is available to install in 4 different package formats: Deb, Flatpak, AppImage, and Snap.

NOTE: User can install all of them side by side in same machine, meaning have duplicated app icons in start menu (‘Activities’ overview search results).

Option 1: Deb package

Libreoffice website offers official .deb packages, which is however built for supporting all Debian based systems.

For better integration, the LibreOffice Fresh PPA is HIGHLY recommended for Ubuntu Linux. User can press Ctrl+Alt+T on keyboard to open terminal and run command to add it:

sudo add-apt-repository ppa:libreoffice/ppa

NOTE: The PPA so far contains LibreOffice v7.5 for only Ubuntu 22.04 and Ubuntu 22.10

Then, run regular updates via Software Updater (Update Manager) app will update the pre-installed LibreOffice packages to the latest!

Option 2: Snap package

Snap is an universal package runs in sandbox. Ubuntu 20.04 and higher can easily search for and install LibreOffice as Snap from Ubuntu Software.

As mentioned, install LibreOffice Snap will cause duplicated app icons to the pre-installed package.

Option 3: Flatpak package

Flatpak is another universal package runs in sandbox. It’s a competitor to Snap. Users can run following commands one by one to install LibreOffice as Flatpak.

  • First, press Ctrl+Alt+T on keyboard to open terminal. Then run command to install Flatpak daemon:
    sudo apt install flatpak
  • Next, install the office suite as Flatpak via command:
    flatpak install https://dl.flathub.org/repo/appstream/org.libreoffice.LibreOffice.flatpakref

Option 4: AppImage

AppImage is an non-install package format runs in most Linux. It’s a good choice to try AppImage until the LibreOffice Fresh PPA updated for the new release packages.

Just grab the package from the official website:

Then, right-click and go file “Properties” dialog, add executable as program permission under Permission tab, and finally click run the AppImage to launch the office suite.

Uninstall:

For the LibreOffice PPA package, open terminal and run command:

sudo apt install ppa-purge && sudo ppa-purge ppa:libreoffice/ppa

It will remove the PPA repository and downgrade the office suite to the pre-installed version.

For the Flatpak package, run the command below to remove it:

flatpak uninstall --delete-data org.libreoffice.LibreOffice

For other two, either uninstall via Ubuntu Software or just remove the package file.