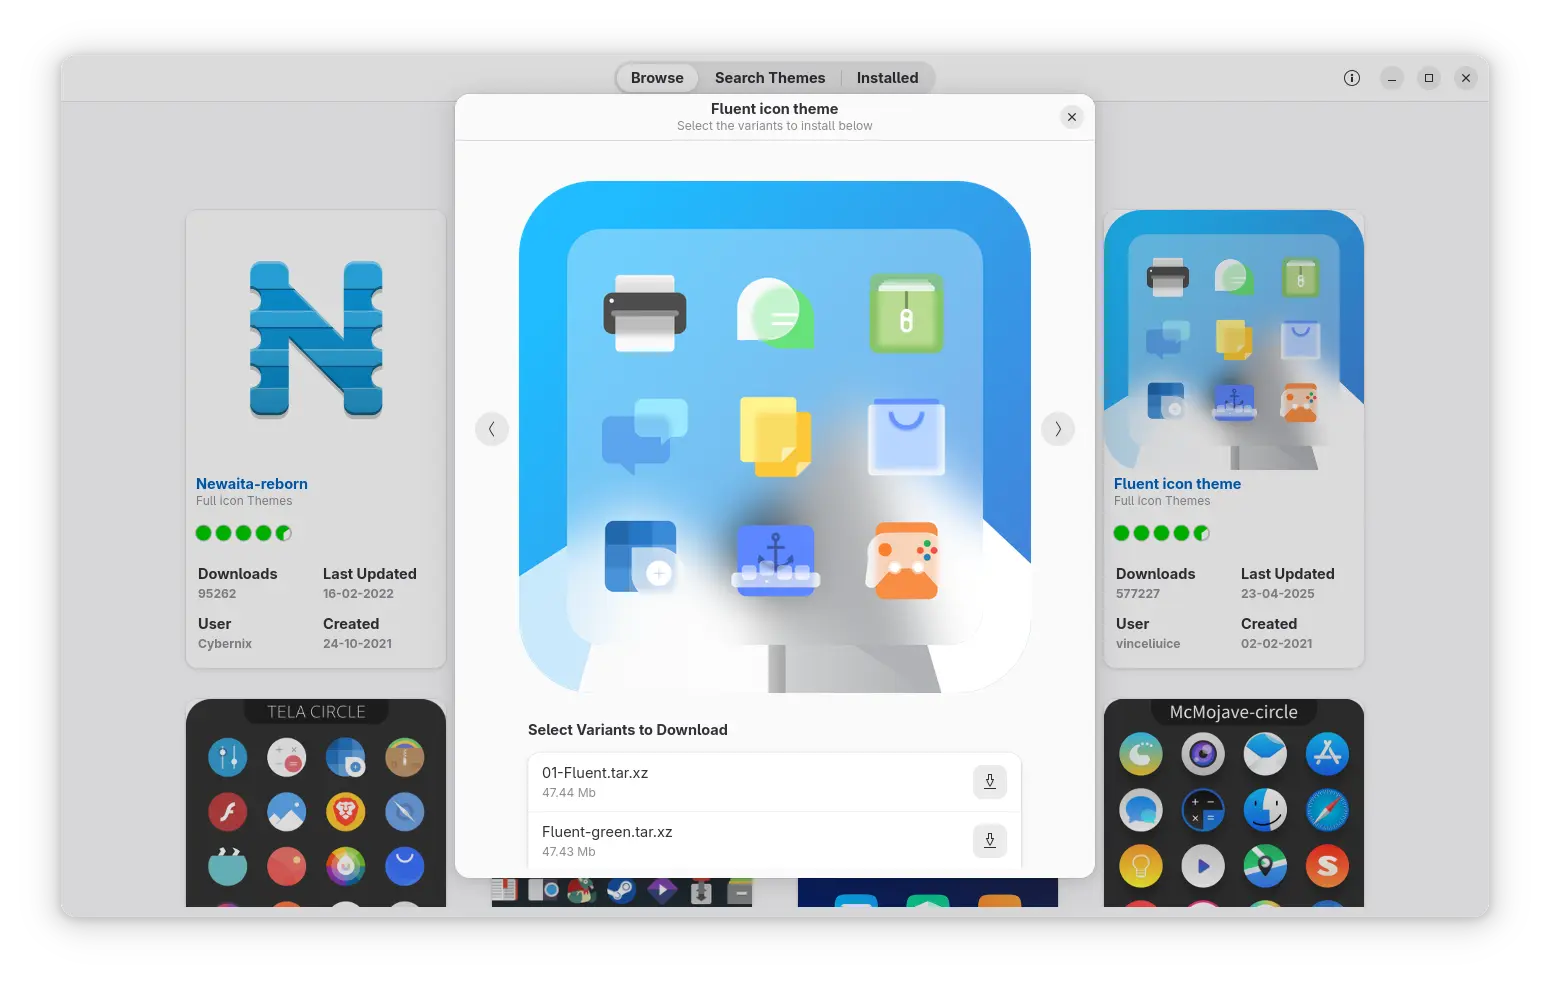
Archives For November 30, 1999

Looking for a personal data backup program? Pika Backup is a good choice for Ubuntu, Fedora, and other Linux with GNOME desktop.

Pika Backup is free open-source tool to backup your personal data into either local disk (e.g., an USB stick) or remote server using secure shell or sftp. It’s a modern GTK4 + libadwaita app that offers a stylish and easy to use user interface.

The utility is based on BorgBackup (aka Borg), features data de-duplication technique to save time and disk space since only changes are stored for daily backups. With the power of authenticated encryption technique, it also supports password protect for your data.

The app starts in a clean UI with a “Configure Backup” button to get started creating repositories to store backups. The top-left ‘+‘ icon is also present to do the same job.

Once click on “+” icon, it will ask you to create a new repository or select an existing repository to use in next dialog.

You may select to back your data into a remote server via ssh remote file transfer by specifying URL, e.g., “ssh://user@server.example.org/~/backup“, however borg need to be installed in the server side. For choice, the “sftp://” prefix can be used without borg.

Remote Location

Data can also be saved in local folder or removable devices, such as an USB drive. It will create a sub-folder in selected directory or device and save backup either encrypted or not depends on your selection.

After creation, it will recognize the USB repository automatically once you plug it in, allows you to either edit or select use the repository.

Local repository (USB Stick)

After creating / choosing the backup repository, it brings you to the file selecting screen. There you can choose any file folders, and exclude any for the backup. When you done data selection, click the green “Back Up Now” button to start. It indicates the process with how many percentage finished and how much time left.

setup backup

Backups are stored in unreadable files. You have to open the Pika Backup tool to mount the backups using “Browse saved files” under Archives tab. Then recover files or folder via opened file manager using copy & paste actions. This is not friendly in my opinion since no recover option present.

Archives tab to browser and manage your backups

Scheduled backups are not supported so far, and excluding files from a backup via regular expressions and alike is not implemented yet. Start in v0.4.0, it supports for schedule backup hourly, daily, weekly, or monthly with given time or day. It can also delete old archives automatically by keeping user selected number of last backups.

Install Pika Backup in Ubuntu Linux:

The Pika Backup software is available for most Linux via the universal Flatpak package.

Open terminal either via Ctrl+Alt+T keyboard shortcut or by searching for and opening it from ‘Activities’ overview screen. When it opens, run following commands one by one:

1.) Install flatpak daemon, if you don’t have it, by running command:

sudo apt install flatpak

For Ubuntu 18.04, users have to add the Flatpak PPA first.

2.) Next add the flathub repository, considered as official place hosts flatpak packages:

flatpak remote-add --if-not-exists flathub https://flathub.org/repo/flathub.flatpakrepo

3.) Finally install the backup utility via this command:

flatpak install flathub org.gnome.World.PikaBackup

Like normal apps, you can search for and open it from ‘Activities’ overview screen.

Uninstall Pika Backup:

To remove the software, paste the command below into terminal and hit run:

flatpak uninstall --delete-data org.gnome.World.PikaBackup

And you may clear up unused run-time by running command:

flatpak uninstall --unused

YOGA Image Optimizer is a graphical tool to batch convert photos into JPEG, PNG and WEBP, and compress file sizes while having equivalent quality.

It’s a free and open-source tool based on YOGA command line tool, which can also convert and optimize 3D models from various formats to glTF and GLB.

YOGA:

The YOGA backend uses Python Pillow library to convert images into PNG, JPEG, or WebP as you prefer. And it uses Google’s Guetzli library to generate JPEG that are typically 20-30% smaller than libjpeg while having some quality. Google’s Zopflipng and libwebp libraries are in use for optimizing other two image formats.

The command line tool also support converting and optimizing 3D models using the Open Asset Import Library (Assimp).

YOGA Image Optimizer:

The official front-end for YOGA provides an easy to use graphical interface to do converting and optimizing process in Linux and Windows.

Simply open a batch of photo images (press Shift or Ctrl while choosing files), it shows the thumbnails, input file name and size, as well as output name and file format.

Before you clicking “Optimize”, you can choose output format and set compress level for each or a selection of images.

YOGA Image Optimizer also features:

  • Multi-thread support. You can set how many CPU cores to use.
  • GTK theme support. It allows to choose between all installed GTK theme for the app only.
  • Dark Mode.
  • Custom output pattern.

Install YOGA Image Optimizer in Ubuntu Linux:

For Linux, the software can be installed either via universal Flatpak package or using pip (Python Package Installer).

1. Flatpak Package

Open terminal by pressing Ctrl+Alt+T on keyboard, you can then run following commands one by one to get the software via Flatpak in Ubuntu 20.04 and higher. For Ubuntu 18.04, you need to add this PPA before getting started.

a. ) Install the flatpak daemon if you don’t have it:

sudo apt install flatpak

b.) Add the Flathub the preferred repository hosting Flatpak package:

flatpak remote-add --if-not-exists flathub https://flathub.org/repo/flathub.flatpakrepo

c.) Finally install the image converter and optimizer via command:

flatpak install flathub org.flozz.yoga-image-optimizer

(Optional) For any reason, you can easily remove the software by running command in temrinal:

flatpak uninstall --delete-data org.flozz.yoga-image-optimizer

2. Install the package via pip3:

For those don’t like the Flatpak package, use the Python pip3 package installer. It however does NOT create app shortcut for launching it from the ‘Show Applications’ start menu.

a.) Firstly, open terminal and run command to install required libraries:

sudo apt install git build-essential python3 python3-dev python3-pip libgirepository1.0-dev libcairo2-dev pkg-config gir1.2-gtk-3.0

b.) Next install the package via command:

sudo pip3 install yoga-image-optimizer

The pip package does not has app shortcut, you need to either run yoga-image-optimizer command to start it from terminal and create a .desktop file manually.

(Optional) To remove the package, use command:

sudo pip3 install yoga-image-optimizer

For Reddit users, Gtkeddit is another GTK app for Linux desktop and mobile.

It’s a free and open-source app written in C++. With the libadwaita library (formerly libhandy), it has an adaptive UI that works on Linux phones such as the Pinephone.

The software has dark mode for working at night, though I don’t find how to enable it in Ubuntu using the Flatpak package. And it allows you to browser without an account.

Compare to Giara, another Reddit App written in Python with GTK4, the UI navigation feels good and smoother in Gtkeddit. Though it freezes every time during loading new content, maybe due to my poor VPN network connection.

All functions including new post, rely and comment work in new navigation page instead of a pop-over dialog. And the developer promoted that it works better on Pinephone, boots and runs faster on slow hardware.

Other features in Gtkeddit:

  • Browse home feed
  • Search subreddits/users/posts
  • Submit Text/Url/Images/Videos
  • View images, galleries
  • Watch Reddit/Youtube videos in app
  • View and reply to posts/comments
  • Save posts / comments
  • Browse user Saved/Upvoted/Downvoted/Hidden/Gilded posts
  • Browse user Subreddits

How to Install Gtkeddit:

Most Linux can install the app via the Flatpak package from the flathub page. For Ubuntu users, there’s a step by step guide for Ubuntu 18.04, Ubuntu 20.04 and higer.

1.) Firstly, open terminal (Ctrl+Alt+T) and run command to install the daemon if you don’t have it:

sudo apt install flatpak

Flatpak supports Ubuntu 18.04 and even Ubuntu 16.04, you have to add the Ubuntu PPA first!

2.) Then add the flathub repository, the preferred place to get Flatpak apps.

flatpak remote-add --if-not-exists flathub https://flathub.org/repo/flathub.flatpakrepo

3.) Finally, install the Reddit App via command:

flatpak install flathub io.gitlab.caveman250.gtkeddit

Like normal apps, open it by searching from start menu and enjoy!

Uninstall Gtkeddit:

To remove the app, simply use command:

flatpak uninstall --delete-data io.gitlab.caveman250.gtkeddit

Remove the --delete-data if you want to keep the personal data for the app. And run command to run unused runtime which may free up more disk spaces.

flatpak uninstall --unused

For Gnome fans, Apostrophe is a clean and intuitive Markdown editor you should try!

Apostrophe is one of the Gnome Circle Apps that provides a modern and distraction-free writing environment for Linux.

The editor supports for inputting via Pandoc’s Markdown, CommonMark, GitHub Flavored Markdown, MultiMarkdown and Plan Markdown formats.

The app has Light, Dark, and Gray (maybe) UI appearance. The ‘Hemingway Mode’ is available which will disable the backspace key. And ‘Focus Mode’ will highlight the current line, remove header and bottom bar to provide a zen-like environment when writing.

With inline preview, it formats your text automagically for you. By Ctrl+Clicking on anything, it shows popover preview, links, footnotes, equations.

Live Preview can be set to full window, right / bottom part, or a separate window. In bottom right it indicates how many words you wrote. It also counts characters, sentences, paragraphs, and read time.

And you can save you work as PDF, HTML, ODT. An advanced export dialog allows exporting to more formats including:

  • LibreOffice Text Document.
  • Microsoft Word(docx).
  • EPUB v3.
  • HTML5 Slideshow (reveal.js, DZSlides)
  • LaTeX (tex)
  • LaTeX Beamer Slideshow (tex, pdf)
  • Textile, Texinfo, and more.

How to Install Apostrophe in Ubuntu Linux:

The software is available as universal Flatpak package. You can install it in Ubuntu 16.04, Ubuntu 18.04, Ubuntu 20.04 and higher via following steps:

1.) Open terminal from start menu, and run command to add the Flatpak PPA for Ubuntu 16.04 and Ubuntu 18.04:

sudo add-apt-repository ppa:flatpak/stable

And run sudo apt-get update command to update cache afterwards.

2.) Install the Flatpak daemon if you don’t have it:

sudo apt install flatpak

3.) Add Flathub repository (considered official) that hosts the package:

flatpak remote-add --if-not-exists flathub https://flathub.org/repo/flathub.flatpakrepo

4.) Finally install Apostrophe Markdown editor:

flatpak install flathub org.gnome.gitlab.somas.Apostrophe

Uninstall:

To remove the editor as well as your personal app data, run command in terminal:

flatpak uninstall --delete-data org.gnome.gitlab.somas.Apostrophe

For those don’t like Electron apps, ‘Psst’ is a new GTK client for the Spotify music service.

Since the official Spotify app for Linux is a web app running via Chromium engine, native Linux apps may be preferred. And ‘Psst’ is a free open-source app written in Rust programming language with GTK framework for user interface. Besides Linux, it also works on Windows and macOS.

The software is in very early development stage. It lacks features and defaults to GTK and pure X11, with Wayland backend in the works. So far, it features:

  • Dark / Light mode.
  • Vorbis track playback
  • Browsing saved albums and tracks
  • Save / unsave albums and tracks
  • Browsing followed playlists
  • Search for artist, albums, and tracks
  • Audio volume control
  • Audio loudness normalization
  • Media keys control
  • Open Spotify links
  • Genre playlists and “For You” content

Like ‘Spot’, another GTK client for Spotify, it only works with premium accounts!! Though there’s a hack to make it work with free accounts.

How to Install Psst in Ubuntu:

The app so far provides pre-build binary packages, available to download at the link below:

For Ubuntu based systems, grab the ‘psst-deb.zip‘, extract and install the .deb package, either by double-clicking or using Gdebi package installer (install Gdebi from Ubuntu Software).

NOTE: The app so far even don’t have a logo icon. When launching from the start menu (‘Show Applications’), it will show a gear icon instead.

See Psst in github

Want to cut a clip out of a video and share with your friends? Try Video Trimmer, a stupid easy way for those working on Linux.

In Linux there are quite a few ways to cut clips or trim videos either in graphical or using command line tools. While video editors are heavy to do the job, FFmpeg is the most efficient choice. And Video Trimmer offers an intuitive user interface for those hate Linux commands.

It’s a free and open-source GTK app based on FFmpeg. By importing video via top-left “Open” button, you can preview the video and write down the start and end timestamps. And the top-left button turns to ‘Trim‘ for cutting the clip out.

It outputs the clip as a new video file. And the process is super fast and does not reduce the video quality, because it just cuts the data steam but never re-code.

Install Video Trimmer in Linux:

The source code of the project is hosted on gitlab. Besides building from the source, you can install it on most Linux via the Flatpak package.

For beginners, you can open terminal from start menu and run following commands one by one in Ubuntu to get the software.

1.) Install the flatpak daemon for running the app via command:

sudo apt install flatpak

2.) Add the flathub repository which hosts the software package by running command:

flatpak remote-add --if-not-exists flathub https://flathub.org/repo/flathub.flatpakrepo

3.) You can finally install the app via command:

flatpak install flathub org.gnome.gitlab.YaLTeR.VideoTrimmer

After that, open it from start menu and enjoy!

Uninstall Video Trimmer:

To remove the app as well as its data, open terminal and run command:

flatpak uninstall --delete-data org.gnome.gitlab.YaLTeR.VideoTrimmer

For command line users want to search on DuckDuckGo, ddgr is the free open-source tool to search from Linux terminal.

It’s a tiny tool written mostly in Python3. And it’s quite easy to use. For instance, run the command below will search ‘Windows 11’ and output 10 results per page.

ddgr Windows 11

You can then type n / p / f and hit Enter to go next page, previous page, or to the first page.

By typing o 1 will open the first result, and c 1 will copy the first URL into clipboard. And you can type ? to get more actions in the search output.

Result number per page can be set via --num. And you can specified website to search via --site flag.

For example, search Ubuntu 21.10 on Ubuntu.com with 3 results per page, run:

ddgr --num 3 --site ubuntu.com ubuntu 21.10

To automatic open the first result in web browser, use -j or --ducky flag. For example:

ddgr --ducky Windows 11

For Ubuntu Server without desktop UI, you can firstly specify text-based web browser, w3m in the case, easily via:

export BROWSER=w3m

Other features include:

  • DuckDuckGo Bangs
  • Search and option completion scripts (Bash, Fish, Zsh)
  • Search file type: filetype:mime
  • HTTPS proxy support
  • Do Not Track set by default

How to Install ddgr in Ubuntu:

The nifty tool is available in Ubuntu repositories. You can install it simply by running command in terminal:

sudo apt install ddgr

As Ubuntu does not provide the software updates, you can always get the latest .deb package from the link below:

Looking for a lightweight photo editor and management app for Linux? Try Fotoxx, a free and open-source software which is super fast.

Fotoxx is a GTK application to organize and manage a large image collection, edit and optimize photos, and perform batch operations.

Unlike other image editor, Fotoxx has app menus in the left pane with ability to toggle file view, and edit photos. While providing many functions to meet the needs of serious photographers, it remains fast and easy to use.

The software can view and edit most image formats including RAW files. It works internally with 24-bits/color, and outputs 8 or 16 bits/color JPEG, PNG, or TIFF.

The image editing functions include:

  • Select object or area, select hairy or irregular edge, find gap.
  • Rotate, crop, retouch, resize, and paint.
  • Blur, sharpen denoise, adjust color.
  • Apply effects, e.g., sketch, cartoon, line drawing and more.
  • image warp, unwarp, transform.
  • Composite image: HDR, HDF, panorama, etc.
  • Batch convert, RAW conversion.
  • View and edit meta data.
  • Zoom in/out, redo/undo, and more.
  • Use GIMP, Rawtherapee, etc as plugins

See video about Fotoxx:

How to Install The Latest Fotoxx in Ubuntu via PPA:

The software offers only source tarball available to download at the link below:

Ubuntu has the photo manager in the Software App, however it’s always old.
To install the latest Fotoxx, use the Ubuntu PPA which so far supports for Ubuntu 20.04, Linux Mint 20, and Ubuntu 21.04.

1.) First open terminal from system app launcher. When it opens, run command to add the PPA:

sudo add-apt-repository ppa:xtradeb/apps

Type user password, no asterisk feedback, for sudo prompt and hit Enter to continue

2.) Next run command to install the photo management software:

sudo apt install fotoxx

Once installed, open it from system app launcher and enjoy!

Remove Fotoxx as well as the PPA:

To remove the Ubuntu PPA, simply open Software & Updates utility and navigate to Other Software tab. There highlight the relevant line and remove it.

To remove Fotoxx, run command:

sudo apt remove --auto-remove fotoxx

Working with PDF files regularly in Ubuntu Linux? QPDF Tools is a nifty tool to manage your PDF documents.

It’s a free and open-source software, easy to use Qt based user interface for Ghostscript and Stapler, with ability to compress, split, merge and rotate your pdf documents.

The main window is simple and works with 4 buttons. Click the action you want to do for the PDF documents. Then select the PDF along with a few options and click the button to go.

The Compress a PDF file option will change the resolution for printing, Ebooks, or screen optimized. It also reduce the file size depends on the option you choose.

It however may stuck a few seconds when you clicking ‘Save‘ button on exporting file dialog.

While ‘Merge PDF files‘ option allows to add multiple PDF files, arrange them, and convert them into single, the ‘Spile a PDF file‘ option allows to extract all PDF pages or export from one page to another. And ‘Rotate a PDF file‘ can rotate left or right with live preview.

How to Install QPDF Tools:

The DEB package for Ubuntu, Debian, Linux Mint, as well as the source tarball are available to download at the link below:

The software developer also maintains an Ubuntu PPA that support all current releases, e.g., Ubuntu 18.04, Ubuntu 20.04, Ubuntu 20.10, and Ubuntu 21.04. The packages for old releases, e.g., Ubuntu 12.04, Ubuntu 14.04, and Ubuntu 16.04 are also available.

1.) Open terminal from system app launcher. When it opens, run command to add the PPA:

sudo add-apt-repository ppa:silash35/qpdftools

2.) Then refresh package cache (optional for Ubuntu 20.04 & higher) and install the tool via commands:

sudo apt update
sudo apt install qpdftools

Once installed, open the tool from your system application launcher and enjoy!

Uninstall QPDF Tools

While the Ubuntu PPA is used to install or upgrade the software package, you can safely remove it either by running command in terminal:

sudo add-apt-repository --remove ppa:silash35/qpdftools

Or by going to ‘Software & Updates’ -> ‘Other Software’, and remove the relevant line.

To remove the software, either use Synaptic Package Manager or run command:

sudo apt remove --purge qpdftools

I used to create bootable Ubuntu USB installer with UNetbootin, then with Ubuntu’s built-in USB creator. Now Ventoy is a good choice that I use often to try different operating systems.

Why Ventoy:

Different to other USB creators, you don’t need to format your USB stick again and again to write data from ISO images. With Ventoy, it just format your USB one time, create a small (34 MB in my case) EFI partition, and leave all other spaces free in another partition.

Without extracting, just drag and drop to move ISO images into USB drive, and it will boot them! Like normal USB drive, you can put your photos and other data along with ISO images. Ventoy will find what to boot and show them all in startup menu.

Ventoy features:

Ventoy is a free and open-source tool written mainly in C. It features:

  • Just copy ISO to USB and boot it! No extraction needed.
  • Mutil-boot support. As many ISO images as your USB stick can store.
  • Save all other data along with ISO images, just like a normal USB driver.
  • 700+ ISO files supported (Windows, Linux, WinPE, Unix, Vmware, Xen).
  • Windows auto installation supported
  • Also support Local Disk, SSD, NVMe, SD Card
  • and more.

How to Install Ventoy:

The software provides ISO image as well as installers for Windows and Linux. Download them from the link below:

a.) using Ventoy’s graphical app for Linux:

The software now provides graphical user interface for Linux since version 1.0.52. Both GTK and Qt are supported. And it runs in either modern 64-bit PC, old 32-bit machine, ARM64 OS like Phytium/Kunpeng, and mips64el Loongson 3A MIPS OS.

Simply download the “linux.tar.gz” tarball from the above button, extract, and right-click on the executable to “Run” it will bring up the UI:

Same to the Windows app and Web UI, plug your USB into computer and select it from the app window (click Refresh if you don’t find it). And use either “Install” or “Update” button to install /upgrade Ventoy to the USB drive.

From the “option” menu, it’s possible to enable Secure Boot support, select partition to MBR for compatibility or GPT for most modern PCs. You may also preserve some space at the end of the disk.

NOTE: Installing Ventoy will format the USB stick. All data will be lost. Make a backup before getting started!

After installation, copy and paste some system discs (iso images) into the USB stick. Then start or re-start your machine, and select boot the USB. It will bring you into menu of iso image entries, like the picture shows:

b.) Install Ventoy in Linux from command line:

Also download the “linux.tar.gz” tarball. Then extract, and right-click on blank area in generated folder to open the directory in terminal via ‘Open in Terminal’ menu option.

When terminal opens, copy and paste the command below into it and hit Enter to install Ventoy to USB:

sudo ./Ventoy2Disk.sh -i /dev/sdb

If your machine boot with UEFI mode, also add -s flag for secure boot support, so the command will be:

sudo ./Ventoy2Disk.sh -i -s /dev/sdb

Type ‘y’ to confirm twice. If everything’s done successfully, it will prompt ‘Install Ventoy to /dev/sdb successfully finished.

c.) Install Ventoy in Windows or Linux via Web UI

The software also has a Web UI which has same appearance to the Windows app.

As the previous step did, download ‘linux.tar.gz‘, extract and go to source folder. Then right-click on blank area to select ‘Open in Terminal‘.

When terminal opens, run command to start the Web UI service:

sudo ./VentoyWeb.sh

Next in web browser go to “http://127.0.0.1:24680” will open the web installation page:

In the web UI, select your USB device and click ‘Install’. Also for UEFI mode enable ‘Secure Boot‘ under options.

When everything’s done, you’ll find the USB driver mounted with name “Ventoy”, put ISO images into it and boot it when required. As mentioned, you may treat it as normal USB disk by storing photos, documents, etc, along with disc images.