
![]()

Want to password protect your files in Linux? Here’s a stupid simple app to do the job for beginners.
There are quite a few ways to secure your data in Linux, e.g., encrypt the whole disk, encrypt a folder, or compress files into encrypted archive.
News, Tutorials, Howtos for Ubuntu Linux
![]()
Want to password protect your files in Linux? Here’s a stupid simple app to do the job for beginners.
There are quite a few ways to secure your data in Linux, e.g., encrypt the whole disk, encrypt a folder, or compress files into encrypted archive.
![]()
Ubuntu 26.04 LTS finally breaks the longstanding security tradition by now displaying the asterisk feedback when typing sudo password in terminal or command console.
As you know, most Linux distributions by default do not show any feedback when user is inputting password in terminal or any other command console for sudo authentication.
![]()
KeePass Password Safe released new 2.60 version few days ago. Here are the new features and PPA update for Ubuntu users.
The new release of this free open-source password manager application added support importing .csv passwords exported from Mozilla Firefox web browser.
![]()
Want to scan your files for security threats? Here a new app can do the job for Linux Desktop.
It’s Lenspect, a free open-source Python written application that features a lightweight user interface designed for GNOME. And, it uses VirusTotal as backend for scanning.
![]()
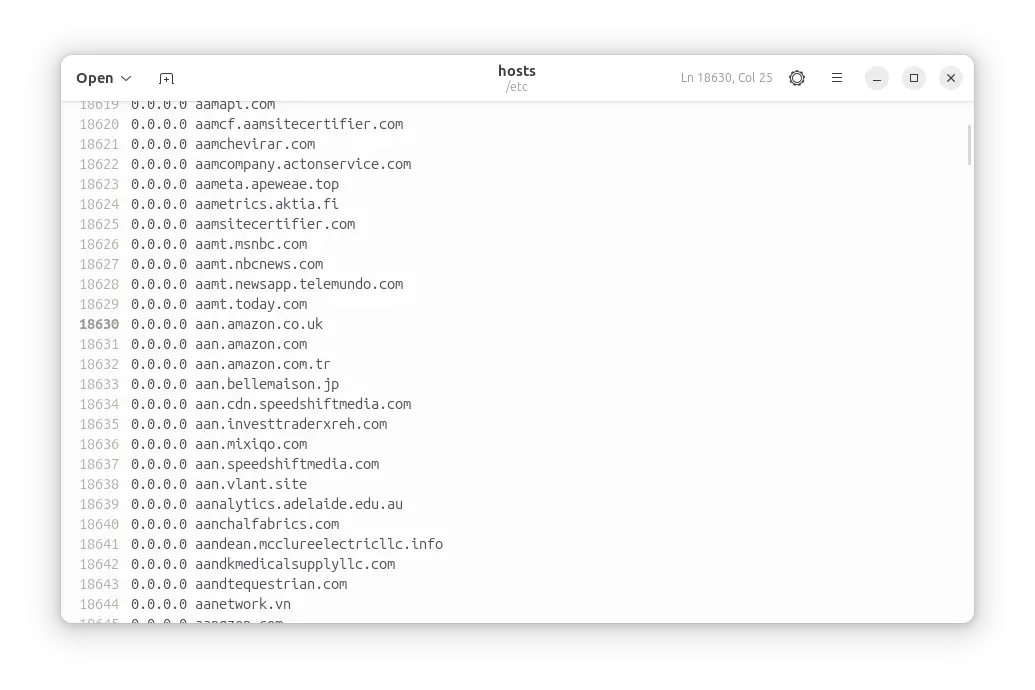
This tutorial shows how to block ads, trackers, and malware domains system-wide in Ubuntu and other Linux desktop using hBlock.
hBlock is a free open-source script that collects a large list of domains that serve ads, tracking scripts and malware from multiple sources. It blocks them by mapping all those domain names to 0.0.0.0 using hosts file, thus it works system-wide.

When launching some apps (e.g., GParted, Synaptic, or Grub Customizer), install/uninstall packages with App Center or Software Updater, it always pops-up a dialog asking for admin password to authenticate.
This is great for security! But for lazy men those who don’t want to type user password again and again after logged in (or unlocked screen), it may be OK to disable the authentication window when using their computers at home or other safe places.
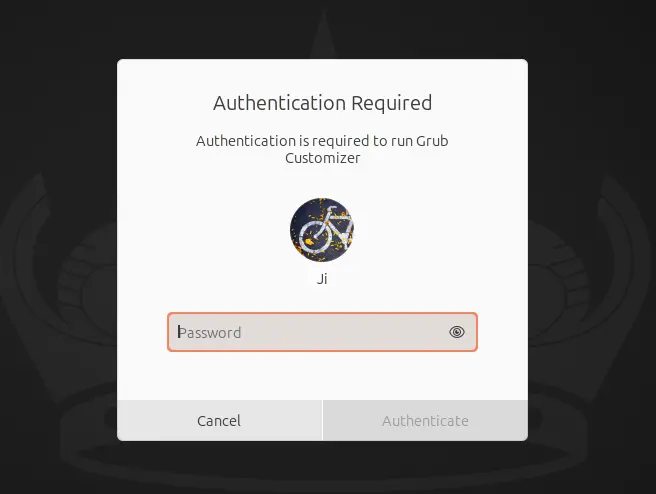
Password Authentication Pop-up in Ubuntu
![]()
Ubuntu is working on a new desktop security center and prompting-client. Here’s how to try it out in current Ubuntu 24.04 LTS.
It’s an experimental new feature that will land in next Ubuntu 24.10. Which, provides graphical interface to make it easier for users to control the file/folder access permission for Snap apps.
For example, when browsing web via Firefox (the preinstalled Firefox is a Snap package). You found a good image and want to save it to local folder, or you just want to download something. Before the downloading process starts, it will pop-up a dialog as the screenshot shows you, asking for user permission to allow writing to the file or folder.
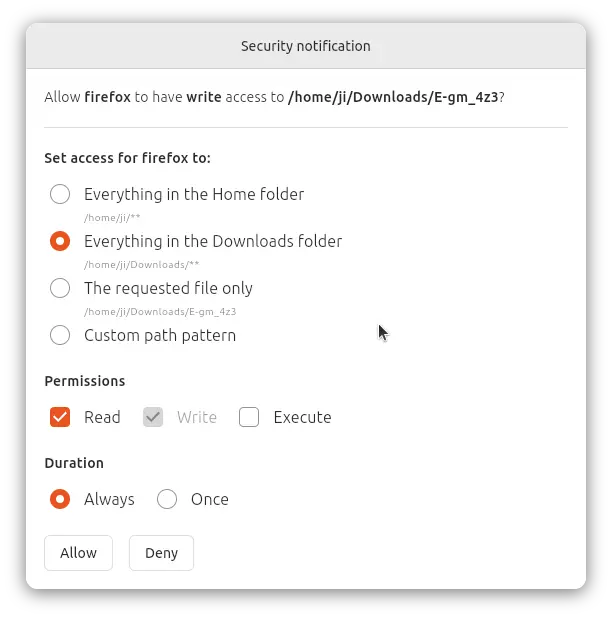
Pop-up for file/folder access permission
This tutorial shows how to enable One Time PassWord in Ubuntu 24.04 for either local or remote SSH login.
One Time PassWord, OTPW in short, is a PAM module which is useful for allowing a user to login public or shared computer/server using a single-use password, that works only for one time.
By generating a list OTPW passwords, and configuring your system to allow OTPW logins, it will ask random one of the OTPW passwords on every login. And, that password will never work again once logged in successfully with it.
![]()
This is a step by step tutorial shows how to encrypt Ubuntu, while preserving its data, after you installed it on your computer.
While installing Ubuntu 24.04, if you didn’t choose to use the entire disk, then there’s no graphical option to enable encryption. You can however manually encrypt the full Ubuntu system afterward.
So, on every boot of the Ubuntu system, it asks to input password to unlock boot entry (if /boot partition is also encrypted), then asks again to unlock disk partition before user being able to login.
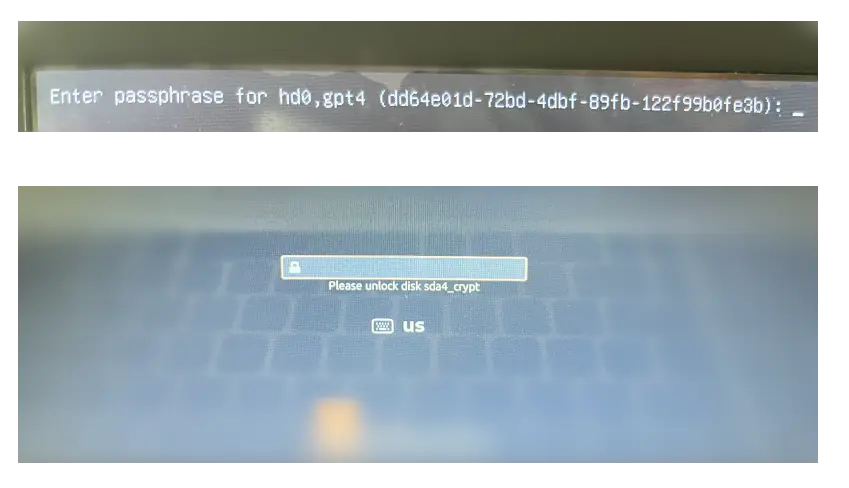
it asks password twice to unlock boot entry & then root partition

This is a step by step beginner’s guide shows how to encrypt your home directory in Ubuntu 24.04 LTS.
As you may know, the new installer in Ubuntu 24.04 only supports encrypting the entire disk. If you want to dual boot Ubuntu with another OS in single disk, there’s no option so far to encrypt only the Ubuntu file-system partition.
In the case, you may choose to encrypt your home folder to keep personal data and files safe.
There’s NO visible difference after encrypted your home directory. You can login just like before, read and write files, run apps and play games. Because, it’s automatically decrypted using your password.
But, if you lost your computer/laptop, then no one can access your files in the home folder, without the login password or the encryption passphrase. Accessing from another operating system will show something like the screenshot below shows you:
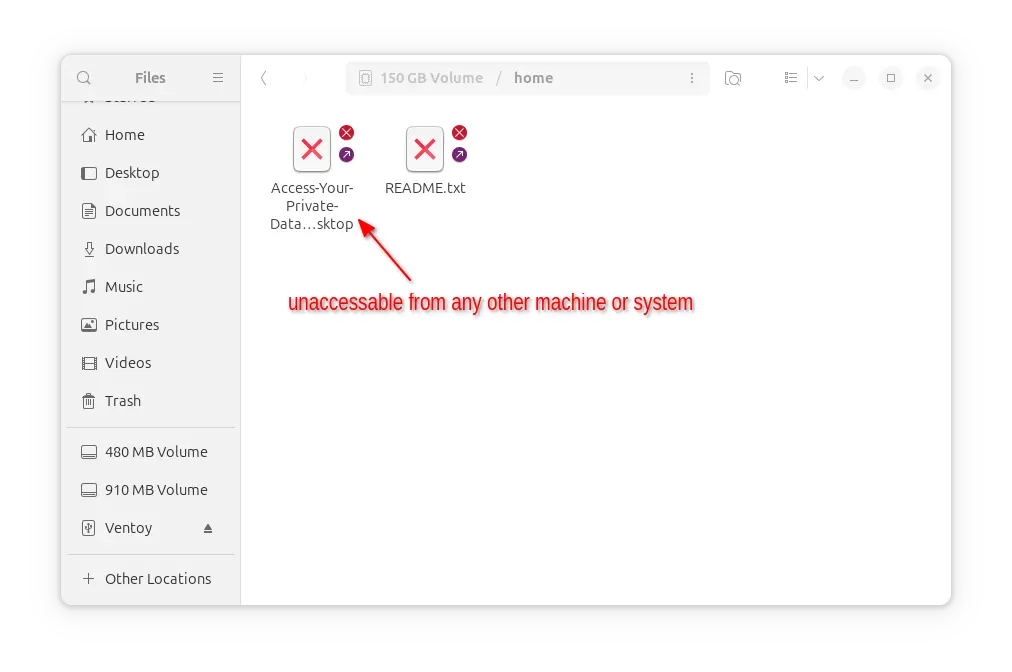
Encrypted home is not accessible from other machine or OS


