NVIDIA announced the first stable release of the 555 series driver for Linux few days ago.
It’s NVIDIA 555.58, the latest new feature branch version. The release now uses GSP firmware by default on all GPUs that support it (e.g., Tesla T4, T10, A100 series).
GSP, stands for GPU System Processor, acts like a CPU embedded into the GPU, it can be used to offload GPU initialization and management tasks. To disable this feature, user can just add NVreg_EnableGpuFirmware=0 kernel parameter to /etc/default/grub config file if boot with Grub2.
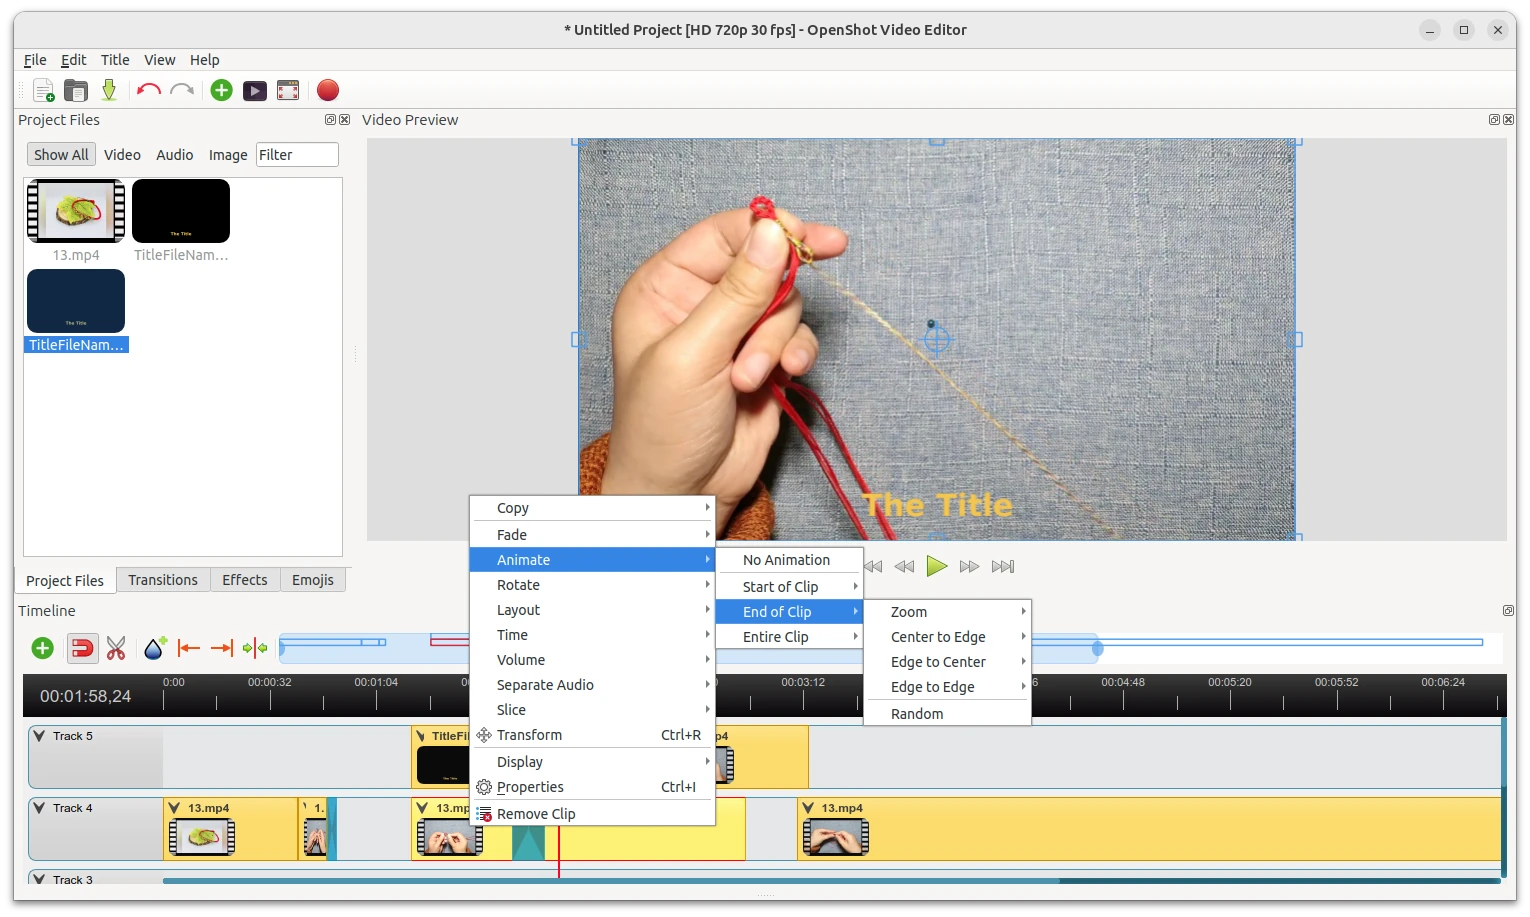
OpenShot released version 3.2.0 a few days ago with great performance improvements.
OpenShot is a free open-source Qt-based video editor works on Linux, Windows, and macOS. Due to its beginner friendly menu options, built-in title templates, and animated titles (Blender powered), I prefer it over Kdenlive and Shotcut.
However, the video editor was sluggish, froze frequently, and slow for video preview playback every time after made changes. It made me crazy quite often, so I turned to learn using Kdenlive for basic editing.
In OpenShot 3.2.0, the video editor has significant performance enhancements. It’s now running smoothly out-of-the-box in my Ubuntu 24.04 laptop!
Celluloid, free open-source GTK4 GUI front-end for MPV, released new 0.27 version hours ago.
Celluloid, formerly GNOME MPV, is a media player interacts with mpv via the client API, allowing access to mpv’s powerful playback capabilities, while providing a modern user interface that looks native in Ubuntu, Fedora Workstation, and other Linux with GNOME Desktop.
The new 0.27 release introduced floating header-bar in the windowed mode. It can be enabled, along with floating controls, either in “Preference” dialog or by running gsettings command. They only appear when moving mouse cursor over the video, so user can watch video without distraction.
Floating header-bar & controls only appear on mouse hover
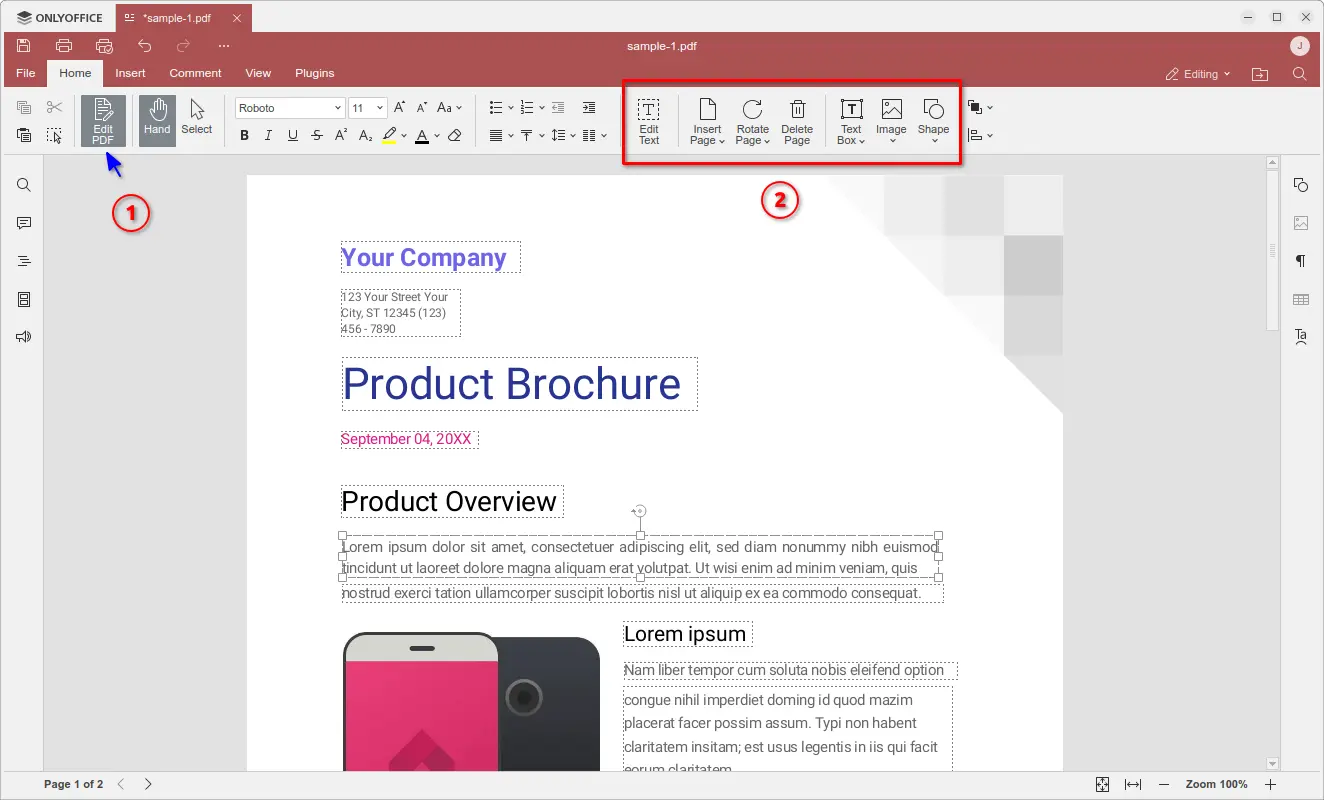
OnlyOffice, the popular free open-source office suite, announced new 8.1 release for its desktop editors.
The Desktop Editors is the offline use version of OnlyOffice office suite. It’s made up of Document, Spreadsheet, Presentation, and PDF Form apps, and, supports collaborative editing by connecting to a cloud service.
The new 8.1 release finally added full-featured PDF editing support for the both online and offline apps. After opened a PDF file, go to Home -> Edit PDF to toggle between viewing and editing mode.
When in editing PDF mode, you’ll see the tool-bar options to edit text, add, rotate and delete pages, insert various objects, such as text boxes, shapes, images, hyperlinks, tables, and more.
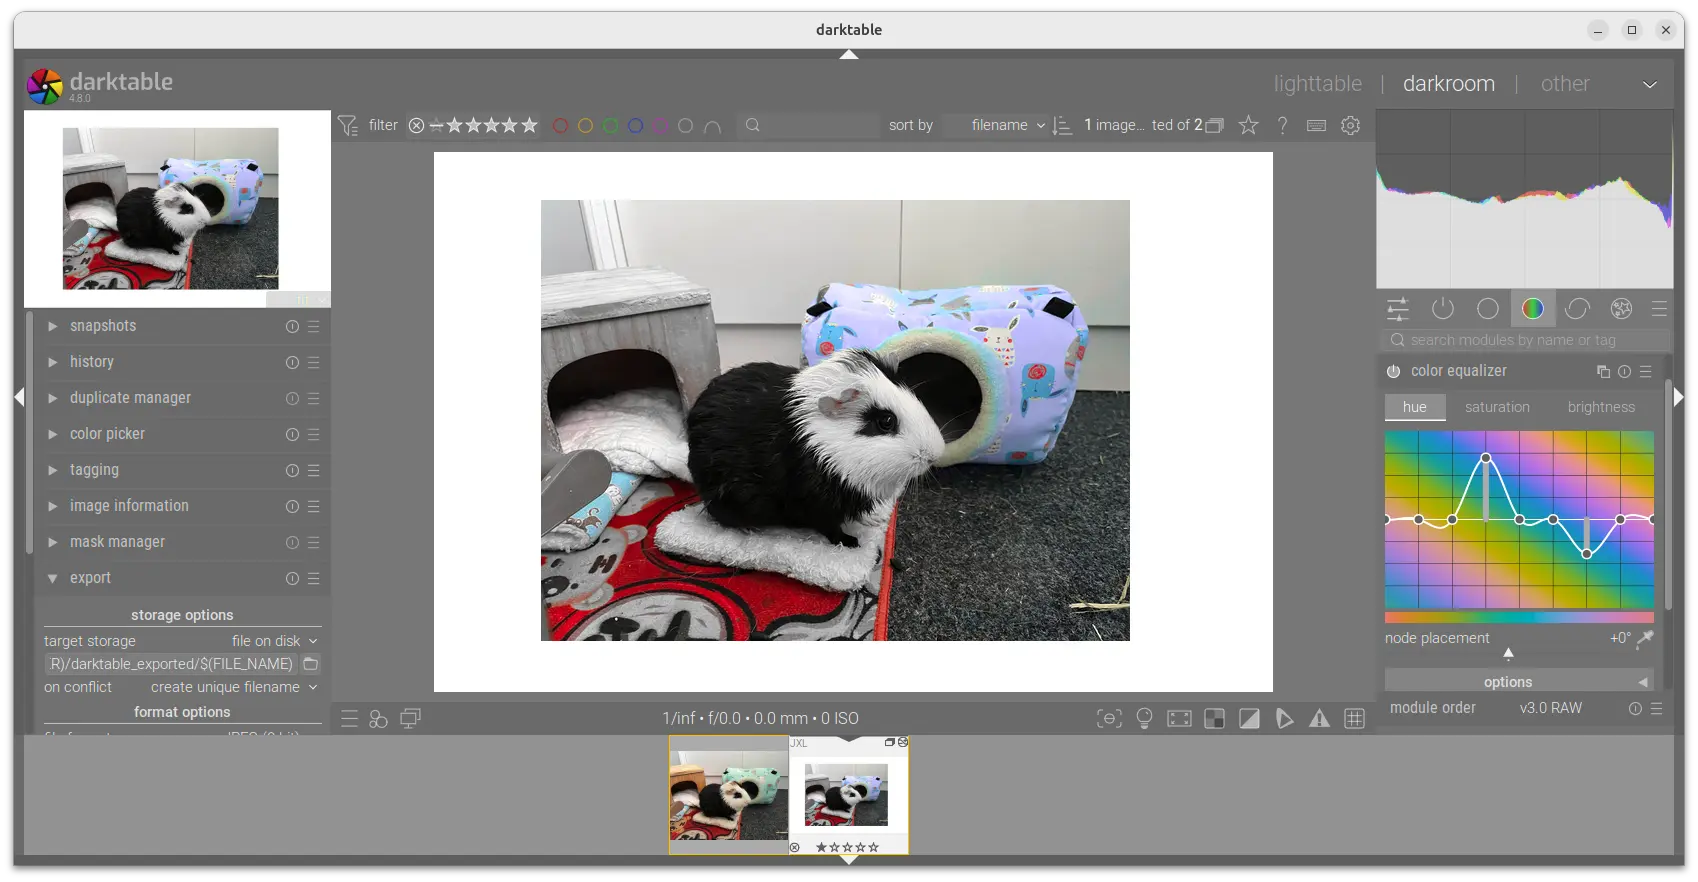
Darktable, the free open-source raw image processing software, released new 4.8.0 version this Friday!
Darktable 4.8.0 introduced a few new modules. They include the color equalizer module, allowing to control hue, lightness, and/or saturation based on colors.
There are as well new Enlarge Canvas module, allowing to add areas on top, bottom, left, and/or right of the image, and fill with different colors, or some other part of the image by using Retouch module.
By drag-and-dropping from the filmstrip to the new Overlay module, it can now add overlay on top of current image. And, the overlay can be scaled, rotated and shifted horizontally or vertically.
Darktable 4.8.0 Enlarge Canvas and Color Equalizer
KeePassXC, the popular free open-source KeePass and KeePassX based password manager, released version 2.7.9 few days ago.
The new KeePassXC 2.7.9 installed as Snap finally uses new desktop portal for native messaging integration. Meaning without using an external script, it now has out-of-the-box browser integration support. However, KeePassXC seems no longer provides official support for Snap package.
So far, Firefox (native + Snap), Chromium Snap, Google Chrome native, Brave native are tested and work with KeePassXC installed as Snap. Though, user may need to grant permission by running the command below in terminal:
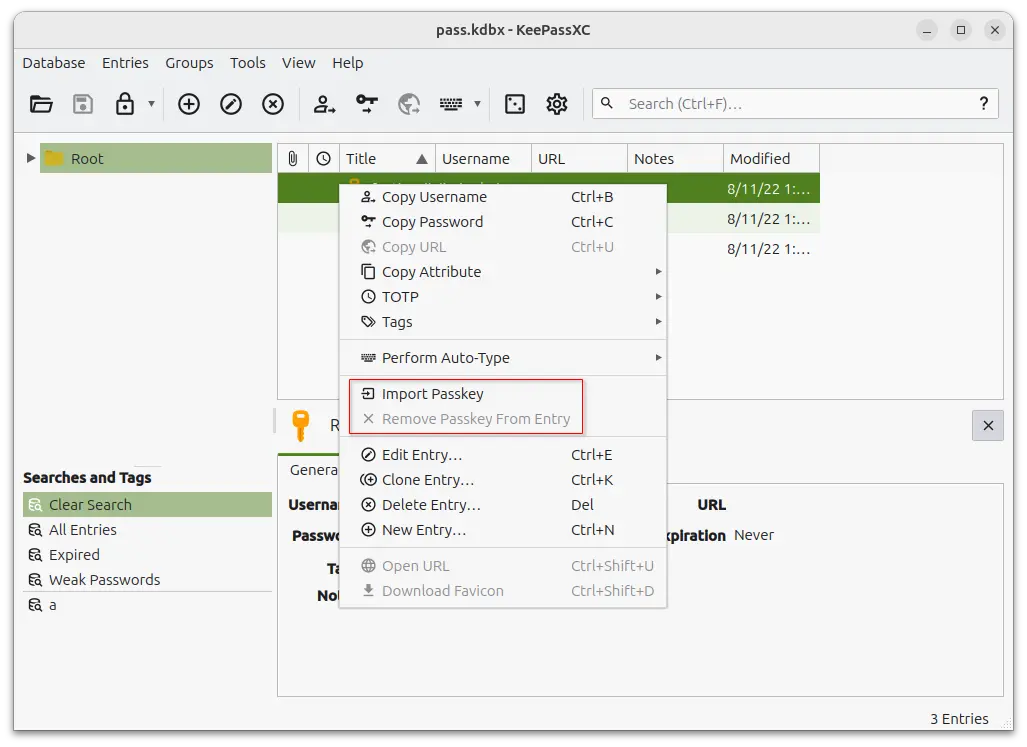
Since version 2.7.7, the password manager added basic Passkeys/WebAuthn support, and added a context menu option to import passkeys. In the new release, it improved the feature by adding a new “Remove Passkey from Entry” context menu option.
HPLIP, the free open-source HP developed Linux driver for HP inkjet and laser based printers, released version 3.24.4 today!
The development of HPLIP seems lagging behind. Rather than supporting for current Ubuntu 24.04, the new release adds installer support for Ubuntu 23.10, which will reach end of life next month.
It also added support for Debian 12 and Fedora 39, both of which were released in last year.
Besides new Linux Distributions support, HPLIP 3.24.4 also added new printers support! They include:
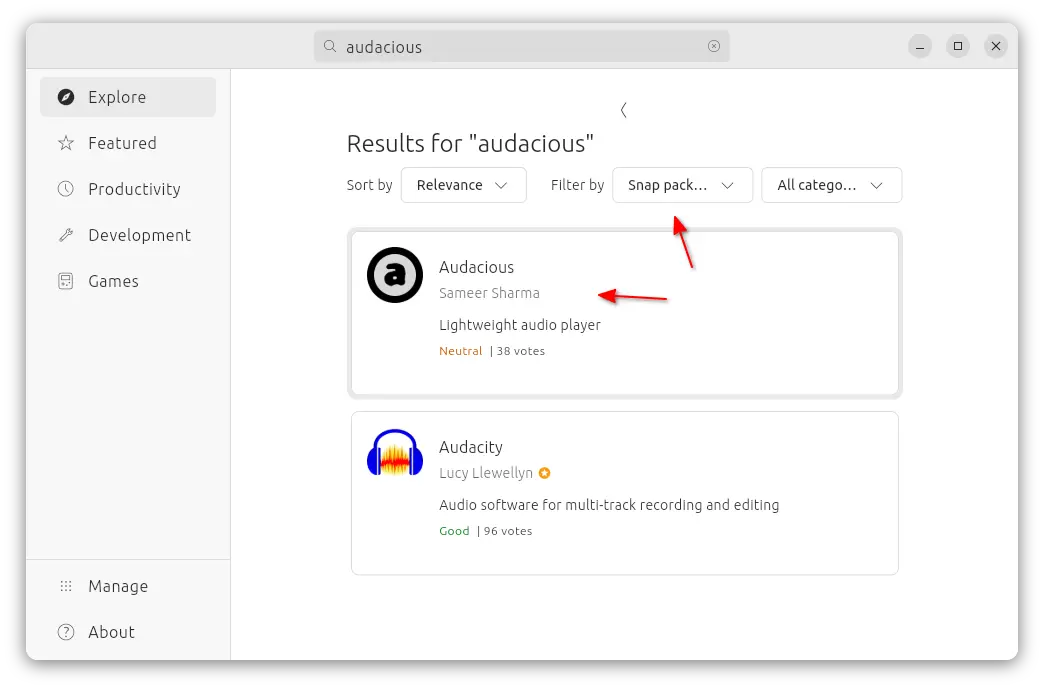
Audacious, the popular lightweight audio player, released new 4.4 version this Wednesday!
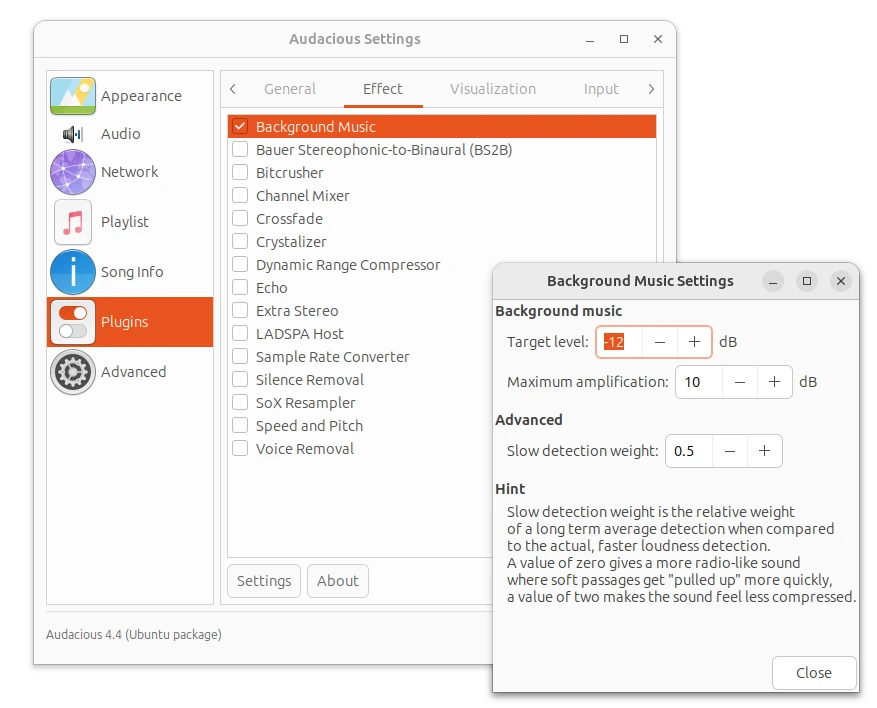
The new release of this free open-source music player restores Lyrics plugin for GTK interface, and adds new provider chartlyrics.com. Thanks to Michel Fleur, there’s now “Background Music” plugin, under “Effect” tab in the Plugin page, allows to make the sound equally loud within and between tracks.
The Scrobbler (Last.fm) plugin now also works on macOS and Windows. And, the Song Change plugin now allows to run custom command when a song is stopped.
Audacious 4.4 now defaults to GTK3 + Qt6, though Qt5 and GTK2 are still supported. It improved Wayland support for GTK interface, but the classic Winamp interface does NOT work properly on Wayland, thus users are recommended to run Audacious via XWayland (default behavior if available) therefore.
Other changes in Audacious 4.4 include:
Add Disc Number support
Read ReplayGain values in Opus files from R128 tags
For Ubuntu users, it’s available to install via Ubuntu PPA (native .deb package), Snap package, or Flatpak package (runs in sandbox environment).
Method 1: Audacious Snap package
If you’re OK running the audio player in sandbox environment, then Audacious is easy to install through Ubuntu Software (or App Center) as Snap package.
Method 2. Install Audacious via Flatpak
Most Linux can install the audio player as Flatpak package, that runs in sandbox. So far, it supports amd64 and arm64 platforms.
All current Ubuntu user can press Ctrl+Alt+T on keyboard to open terminal and run the 2 commands below one by one to get it.
After installation, search for and launch it from start menu or Gnome overview. Log out and back in if app icon not visible.
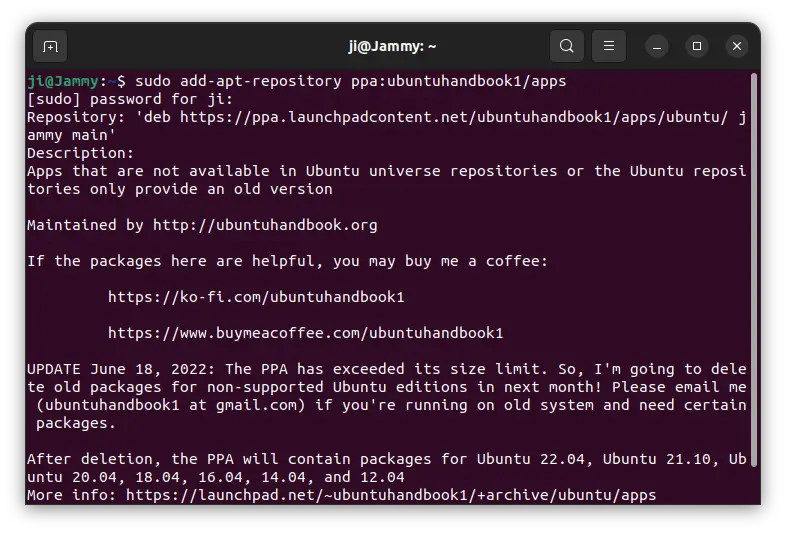
Method 3. Install Audacious from Ubuntu PPA
For Ubuntu 18.04, Ubuntu 20.04, Ubuntu 22.04, Ubuntu 23.10, and Ubuntu 24.04 users, I’ve uploaded the new release package into PPA for amd64 and arm64/armhf machines.
Changes in the PPA package:
Packages for Ubuntu 18.04 and Ubuntu 20.04 are built with Qt5 + GTK3, since Qt6 is NOT available.
Qt6 + GTK3 for Ubuntu 22.04 and higher.
The dependency library name changes that follow upstream policy in Ubuntu 24.04:
libaudcore5 -> libaudcore5t64
libaudgui5 -> libaudgui5t64
libaudqt2 -> libaudqt2t64
libaudtag3 -> libaudtag3t64
1. First, press Ctrl+Alt+T on keyboard to open terminal. When it opens, run command to add the PPA:
sudo add-apt-repository ppa:ubuntuhandbook1/apps
Type user password (no visual feedback, just type in mind) when it asks and hit Enter to continue.
2. Then, update system package cache:
sudo apt update
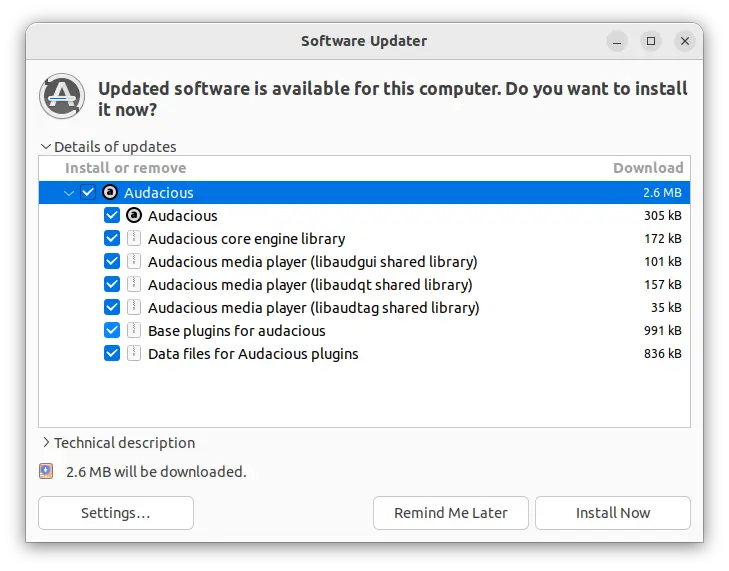
3. If you have an old version of the music player installed, you can now update the package to the latest using “Software Updater” utility.
Or, run the command below in terminal to install or upgrade the package:
sudo apt install audacious audacious-plugins
NOTE: For Ubuntu 22.04 runs into “Error opening output stream” issue, open “Settings” and set audio output plugin to “PulseAudio” output.
Uninstall Audacious
To remove the audio player installed as Flatpak, open terminal (Ctrl+Alt+T) and use command:
Also clean up runtime library via flatpak uninstall --unused.
If you want to restore the music player to the stock version available in system repository. Run command below to purge PPA as well as downgrade installed packages:
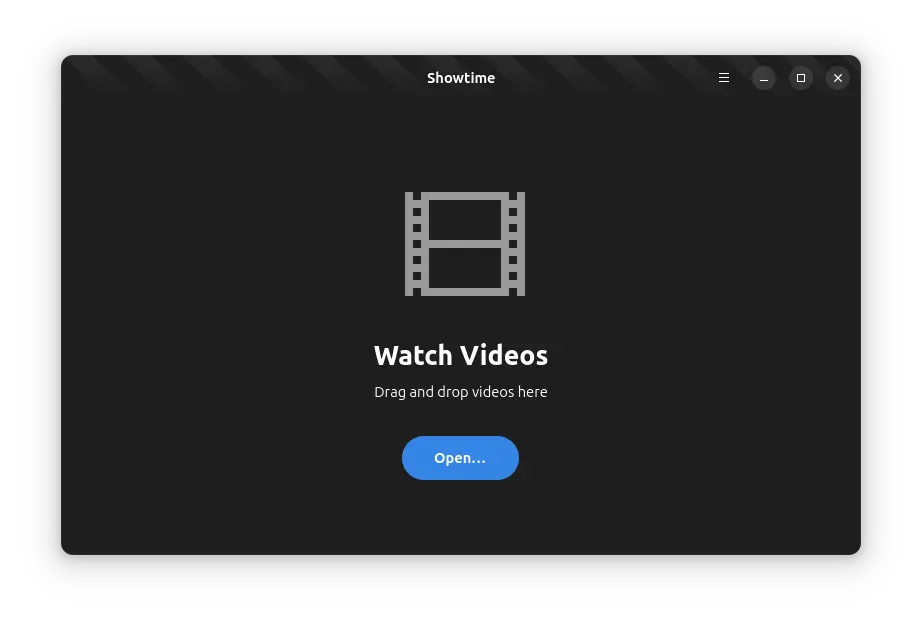
GNOME, the default desktop for Ubuntu, expects to replace its core Totem video player with ‘Showtime’, which is still in development stage.
Due to switch to GTK4, GNOME has replaced some of the core apps, including image viewer, text editor, camera app, and terminal emulator. And, Decibels is proposed as core app for playing audio files.
As the current Totem video player has not been maintained for nearly a year and sticks to GTK3, Showtime is submitted and accepted into the GNOME Incubator, which will be the core app if it reaches the required maturity.