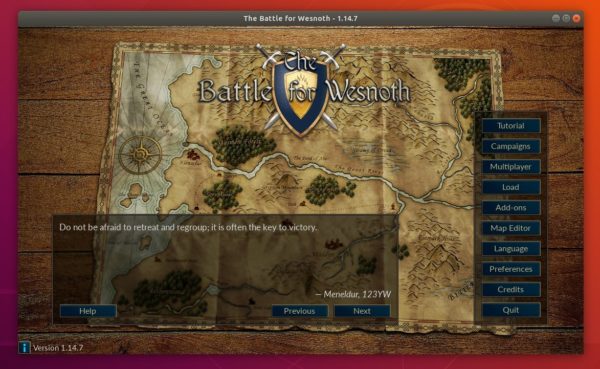
Archives For News

Free open-source software updates and Linux news

Firefox 55

Mozilla Firefox web browser has reached the new stable 56.0 release a day ago.

Firefox 56 features a built-in screenshot tool, allows you to take, save, and share screenshots without leaving the browser.

The new release updated the Preferences section with a search tool so users can find a specific setting quickly.

Other changes in Firefox 56:

  • improved Send Tabs feature, it can be discovered even by users without a Firefox Account
  • Added hardware acceleration for AES-GCM
  • New Encoding Standard-compliant implementation written in Rust
  • Updated the Safe Browsing protocol to version 4
  • Reduced update download file size by approximately 20 percent
  • Improved security for verifying update downloads
  • Added Layout Panel to CSS Grid DevTools

Download / Install Firefox in Ubuntu:

The best way to install the latest Firefox in Ubuntu is waiting for the distribution builds published in security/updates repository.

Be patient, it will be available in a few days. At that time, you can simply install/upgrade it via Software Updater:

For those who don’t want to wait, download the official Firefox package, extract and run the executable to launch Firefox 56.

Opera web browser reached the new stable 48 release earlier today with new and improved features.

Opera 48 release highlights:

  • Add measurement, time zone, currencies converters in Search pop up tool.
  • Capture your favorite parts of the web with the Snapshot tool
  • Add option to remove unwanted autocomplete suggestions in the search and address bar.
  • O-Menu cleaned up
  • All importing bookmarks from Edge and Yandex
  • UI improvements for HiDPI displays.
  • Update to Chromium version 61.
  • And see the release note for more.

How to Install Opera 48 in Ubuntu:

The opera website offers official .deb binaries for Ubuntu Linux, available for download at the link below:

If you have a previous release installed, and enabled the official Opera Linux repository, upgrade it via Software Updater:

To manually add the Opera for Linux repository, open terminal via Ctrl+Alt+T or from app launcher, when it opens, run commands:

1. Add the opera repository:

sudo sh -c 'echo "deb http://deb.opera.com/opera-stable/ stable non-free" >> /etc/apt/sources.list.d/opera.list'

2. Get the key:

wget -O - http://deb.opera.com/archive.key | sudo apt-key add -

Finally either install Opera via your system package manager or upgrade the browser via Software Updater.

Adobe Brackets, a modern open-source code editor for the web, has reached the 1.11 release a day ago. Here’s how to install it in Ubuntu 14.04, Ubuntu 16.04, Ubuntu 17.04, and derivatives.

What’s New in Brackets 1.11:

  • Brackets now supports ECMAScript 2015. Quick-type listing now shows classes, methods, arrow functions, generator functions and much more. Brackets also supports linting of ECMAScript 2015 code, with ESLint defaulting as Javascript linter, as well.
  • Brackets now offers full support for the Linux platform.
  • Fix a few minor issues found by lgtm.
  • Fix extension registry link in README.md
  • Fix CTRL+Space handling while the CodeHintList is open
  • Fix wrong function call in ProjectManager.js
  • Double click on search result header closes search results window
  • Add mapping for stylus mode in LanguageManager
  • Now reverse inspect can be disabled by setting the ‘livedev.enableReverseInspect’ pref to false
  • Upgrade brackets-eslint to 3.2.0
  • See the release note for more.

How to Install Brackets 1.11 in Ubuntu:

Adobe offers the official .deb packages in the github release page.

For those who want to receive updates though Software Updater, you can use the Webupd8Team PPA which provides Brackets packages for Ubuntu 14.04, Ubuntu 16.04, Ubuntu 17.04, and derivatives.

1. Open terminal via Ctrl+Alt+T or from app launcher. Run command to add the PPA:

sudo add-apt-repository ppa:webupd8team/brackets

Input your password (no visual feedback while typing) when it prompts and hit Enter.

2. Then you’re able to upgrade the code editor via Software Updater utility:

or install it for the first time via commands:

sudo apt-get update

sudo apt-get install brackets

Uninstall:

To remove the PPA repository, launch Software & Updates utility and navigate to Other Software tab.

To remove Brackets code editor, either use system package manager or run command:

sudo apt-get remove --autoremove brackets

Free accounting software GnuCash got a new update recently for its 2.6 stable series.

GnuCash 2.6.18 is primarily comprised of bug fixes, including 2 bugs that are six years old. They are:

  • Calendar of upcoming SXes has various display issues.
  • Interdependent report options fail to change state after using apply for a limited number of times.
  • Set Invoice/Bill items date correctly from imported CSV.
  • unifying “Clear the entry.” tooltip on Loan Repayment Calculator.
  • Persian currency symbol is doubled.
  • Added Catalan Accounts for the New Account Assistant
  • Fixed errors from loading init.py.
  • Run the python bindings tests in a CMake build.
  • Implement dist, distcheck, and uninstall targets for CMake build.

How to Install GnuCash in Ubuntu:

The GetDeb repository contains the most recent GnuCash packages for Ubuntu 16.04, and Ubuntu 17.04, though the 2.6.18 is not available at the moment (Be patient, it will be available in a few days).

1. To add the repository, open terminal (Ctrl+Alt+T) and run command:

sudo sh -c 'echo "deb http://archive.getdeb.net/ubuntu $(lsb_release -sc)-getdeb apps" >> /etc/apt/sources.list.d/getdeb.list'

For Linux Mint 18.x, replace $(lsb_release -sc) in the code with xenial.

2. Then install the key so to trust the updates from the repository via command:

wget -q -O - http://archive.getdeb.net/getdeb-archive.key | sudo apt-key add -

3. Once the new release is published in that repository, use Software Updater to upgrade it:

or install GnuCash for the first time via either system package manager or run commands:

sudo apt-get update

sudo apt-get install gnucash

Uninstall:

To remove GnuCash financial-accounting software, either use system package manager or run command:

sudo apt-get remove --autoremove gnucash

To remove GetDeb repository, launch “Software & Updates” utility and navigate to Other Software tab.

Gscan2pdf, a simple GUI tool to produce PDFs or DjVus from scanned documents, has reached the new 1.8.7 release that is primarily comprised of bug fixes and some improvements.

Gscan2pdf 1.8.7 release highlights:

  • Add units to scan and edit paper dialogues.
  • Remove unsupported libsane-perl offered as Frontend choice
  • Fixed support for Poppler (pdftops) as postscript backend.
  • Remove “reload recursion limit” option in Edit/Preferences. Set reload recursion limit as triangular number of number of scan options. i.e. if there are 5 scan options, the recursion limit is 5+4+3+2+1=15
  • Fixed crash with scanimage frontend due to empty cache
  • Ghost save button, rather than hiding save dialogue if all pages removed.
  • Fixed bug causing profile dropdown to be cleared after setting profile
  • Filter out integers from tool warnings, analogous to the hex warnings from unpaper.
  • Fixed visibility of options in save dialogue (again).
  • Right mouse click in thumbnail panel makes the page range (e.g. in save dialogue) default to “selected”.
  • Take filename of PDF to email from default filename settings (and therefore from metadata). If this produces a blank filename, use “document.pdf”.
  • Fixed bug requiring scan dialog to be requested twice after changing frontend
  • Update to Hungarian translation

How to Install Gscan2pdf 1.8.7 in Ubuntu:

The developer’s PPA offers the latest packages for Ubuntu 14.04, Ubuntu 16.04, Ubuntu 17.04, and derivatives.

Open terminal via Ctrl+Alt+T or by searching for “terminal” from app launcher. When it opens, do following steps:

1. Add the PPA via command:

sudo add-apt-repository ppa:jeffreyratcliffe/ppa

Type in your password (no visual feedback while typing due to security reason) when it prompts and hit Enter.

2. For those who have a previous release installed, upgrade it through Software Updater:

For the first time, you can either install it via Synaptic Package Manager or by running following commands in terminal:

sudo apt-get update

sudo apt-get install gscan2pdf

How to Remove:

To remove gscan2pdf, either use your system package manager or run command:

sudo apt-get remove --autoremove gscan2pdf

And the PPA can be removed via Software & Updates utility, under Other Software tab.

Stellarium, a planetarium software shows a 3D simulation of the night sky, has reached the 0.16.1 release. Here’s how to install it in Ubuntu 16.04, Ubuntu 17.04, Ubuntu 17.10, and derivatives.

Stellarium 0.16.1 is a bug-fix release with some important new features:

  • Added moons of Saturn, Uranus and Pluto
  • Added improvements for AstroCalc tool
  • DSO catalog was updated to version 3.2:
    • Added support ‘The Strasbourg-ESO Catalogue of Galactic Planetary Nebulae’ (Acker+, 1992)
    • Added support ‘A catalogue of Galactic supernova remnants’ (Green, 2014)
    • Added support ‘A Catalog of Rich Clusters of Galaxies’ (Abell+, 1989)
  • Added support asterisms and outlines for DSO
  • Added improvements for the GUI

How to Install Stellarium 0.16.1 in Ubuntu:

The official Stellarium PPA has built the packages for Ubuntu 16.04, Ubuntu 17.04, Ubuntu 17.10, and their derivatives.

1. Open terminal either via Ctrl+Alt+T or from app launcher. When it opens, run command to add the PPA:

sudo add-apt-repository ppa:stellarium/stellarium-releases

Input your password (no visual feedback while typing) when it prompts and hit Enter.

2. Then upgrade Stellarium from an existing release with Software Updater utility:

Or run following commands to install the software for the first time:

sudo apt-get update

sudo apt-get install stellarium

Uninstall:

To remove the software, either use your system package manager or run command:

sudo apt-get remove --autoremove stellarium

And remove the PPA via “Software & Updates” utility under Other Software tab.

The open-source non-linear video editor, Pitivi 1.0, is finally near after thirteen years of development.

Pitivi 1.0 release candidate “Ocean Big Chair”, marked as version 0.99, has many bug-fixes and performance improvements. There are quite a few important fixes thanks to the students who contributed in Google Summer of Code.

The development is focused on bug fixing until Pitivi 1.0. A flatpak repository has been created so Ubuntu users can easily install the latest release of Pitivi via following steps.

How to Install Pitivi via Flatpak in Ubuntu:

1. For Ubuntu 16.04, first open terminal (Ctrl+Alt+T) and run following commands to install flatpak daemon while it’s not available by default:

  • Add the PPA repository for flatpak:
    sudo add-apt-repository ppa:alexlarsson/flatpak

    Input your password (no visual feedback while typing) when it prompts and hit Enter.

  • Then install flatpak for Ubuntu 16.04 and derivatives:
    sudo apt update
    
    sudo apt install --install-recommends flatpak

2. Then run command to install Pitivi flatpak package:

flatpak install --user http://flatpak.pitivi.org/pitivi.flatpakref

Once installed, launch the video editor either from your application launcher or via command:

flatpak run org.pitivi.Pitivi

In addition, to update the Pitivi flatpak when a new release is available, run command:

flatpak --user update org.pitivi.Pitivi

And to uninstall the flatpak, run following command in terminal:

flatpak --user uninstall org.pitivi.Pitivi stable

The FlightGear flight simulator has reached the 2017.3 release earlier today with a huge list of changes.

Though it’s not official announced at the moment, FlightGear 2017.3 features following changes according to the changelog:

  • Aircraft: detailed Carrier USS Harry Truman and escort group, with many animated elements, using experimental wave motion
  • Multiple flightplans fixed and is now possible to be controlled from Nasal.
  • Starting on carriers fixed
  • Enabling of display lists for random vegetation provides a massive performance boost for random vegetation.
  • More than 1000 screenshots now allowed
  • Support for AI wake turbulence added.
  • new Mediterranean tree textures, new desert shrub textures
  • See more in the changelog.

How to Install FlightGear in Ubuntu:

The official website refers to the PPA repository, which contains FlightGear packages for Ubuntu 14.04, Ubuntu 16.04, Ubuntu 17.04, though the 2017.3 release is not made into PPA at the moment of writing.

1. Add the PPA by opening terminal, either via Ctrl+Alt+T or by searching it from app launcher, and running command:

sudo add-apt-repository ppa:saiarcot895/flightgear

Input your password (no visual feedback while typing) when it prompts and hit Enter.

2. Then you can upgrade FlightGear via Software Updater once it’s published in the PPA repository.

Or install it for the first time via commands:

sudo apt-get update

sudo apt-get install flightgear

Uninstall:

To uninstall FlightGear, simply run following command in terminal:

sudo apt-get remove --autoremove flightgear

And remove the PPA by launching “Software & Updates” utility and navigating to Other Software tab.

HPLIP 3.17.9 Released with New HP Printers Support

Last updated: September 19, 2017

HPLIP, an open-source HP developed Linux drivers for HP printers, has reached the 3.17.9 release hours ago with many new printers support and new Distro’s support.

New Linux Distro’s supported in HPLIP 3.17.9:

  • openSuse 42.3 (64-bit)
  • LinuxMint-18.2 (32-bit and 64-bit)
  • Fedora-26 (32-bit and 64-bit)
  • RHEL -7.3 (64-bit)

New printers supported in the release:

  • HP OfficeJet Pro 7720 Wide Format All-in-One
  • HP DeskJet AMP All-in-One Printer
  • HP OfficeJet 5220, 5230, 5232 All-in-One Printer
  • HP ENVY Photo 6220, 6230, 6232, 6234, 7120, 7130, 7134, 7155, 7164, 7800, 7820,7855 All-in-One Printer
  • HP ENVY 5020, 5032 All-in-One Printer
  • HP DeskJet Ink Advantage 3735 All-in-One
  • HP AMP 130 All-in-One Printer
  • HP OfficeJet Pro 7730 Wide Format All-in-One
  • HP DeskJet Ink Advantage 5075 All-in-One Printer
  • HP PageWide Enterprise Color 765dn
  • HP PageWide Managed Color E75160dn
  • HP PageWide Enterprise Color MFP 780dn
  • HP PageWide Enterprise Color Flow MFP 785f, 785zs, 785z+
  • HP PageWide Managed Color MFP E77650dn, E77650dns, E77660dn
  • HP PageWide Managed Color Flow MFP E77650z, E77650zs, E77650z+, E77660z, E77660zs, E77660z+
  • HP ENVY Photo 5030 All-in-One Printer

Download / Install HPLIP 3.17.9:

To install the software, download the package “hplip-3.17.9.run” from the link below:

Then open terminal via Ctrl+Alt+T or search for “terminal” from app launcher. When it opens, run command:

cd ~/Downloads/ && chmod +x hplip-3.17.9.run && ./hplip-3.17.9.run

Input your password (no visual feedback while typing) when it prompts and hit Enter.

Then follow terminal outputs, answer some questions to build and install HPLIP on your system. When everything is done, plug/re-plug your printers and enjoy!

Blender 2.79 was finally released a day ago after 2 release candidates. Here’s how to install it in Ubuntu 14.04, Ubuntu 16.04, Ubuntu 17.04, and derivatives.

Blender 2.79 release highlights:

  • OpenCL support has improved and should be closer to parity with Blender’s CUDA capabilities.
  • 10~20% faster performance for modern x86_64 CPUs with AVX2
  • automatic DPI support for determining HiDPI displays
  • an overhaul to Blender’s video output support
  • new denoiser, PBR shader, shadow catcher, filmic color management
  • and over 700 bug-fixes.

How to Install Blender 2.79 in Ubuntu:

The official Blender tarball (non-install) for Linux is available for download at:

Install Blender in Ubuntu via Snap:

Blender 2.79 is also available as snap package, which is large in file, but bundles almost all required libraries. Available for Ubuntu 14.04, Ubuntu 16.04, and higher.

1. For Ubuntu 14.04 only, install snapd daemon if you don’t have it:

sudo apt-get install snapd xdg-open-snapd

2. If you have installed the snap package “blender-tpaw” (2.78c so far), first remove it via:

sudo snap remove blender-tpaw

3. Finally run command to install blender 2.79 snap maintained by another guy:

sudo snap install blender --classic

Install Blender 2.79 via PPA in Ubuntu:

Thomas Schiex’s PPA contains the Blender packages for Ubuntu 14.04, Ubuntu 16.04, Ubuntu 17.04.

NOTE that Blender 2.79 is not ready in the PPA at the moment of writing. Be patient, it will be there in a few days.

1. Open terminal via Ctrl+Alt+T or from app launcher. When it opens, run command to add the PPA:

sudo add-apt-repository ppa:thomas-schiex/blender

2. Then upgrade Blender if you have a previous installed via Software Updater:

or run commands to check updates and install blender package:

sudo apt-get update

sudo apt-get install blender

How to Remove:

To remove Blender packages either use your system package manager or run commands:

To remove Blender snap app, run command:

sudo snap remove blender

To remove Blender installed from PPA, run command:

sudo apt-get remove --autoremove blender

And to remove the PPA repository, launch “Software & Updates” utility and navigate to Other Software tab.