Archives For font

This is a step by step beginner’s guide shows how to manually download & install the new Gnome Adwaita Sans and Adwaita Mono fonts in all current Ubuntu releases.

GNOME introduced new interface font in version 48, named Adwaita Sans and Adwaita Mono. While, Ubuntu does not ship Adwaita fonts in system repository, user can install it manually by following steps.

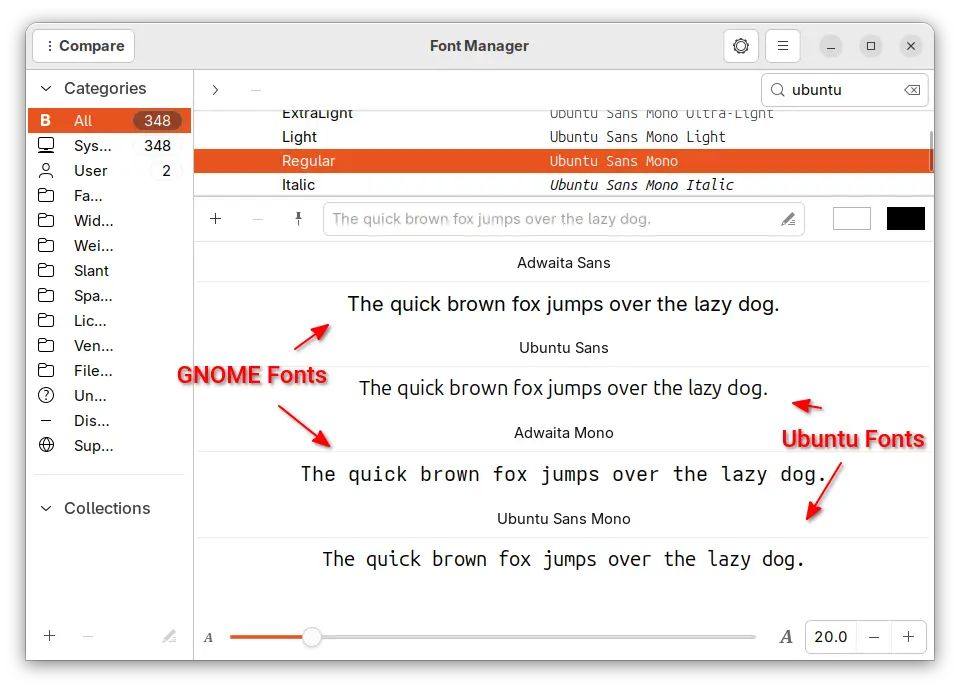
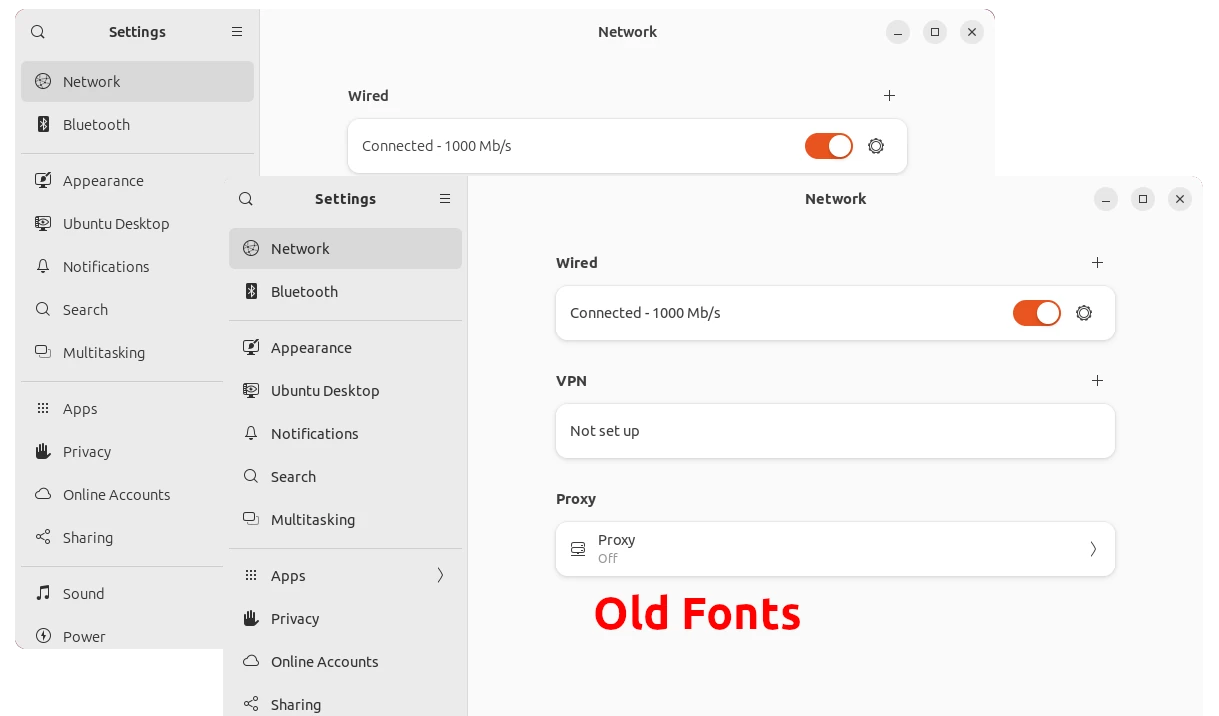
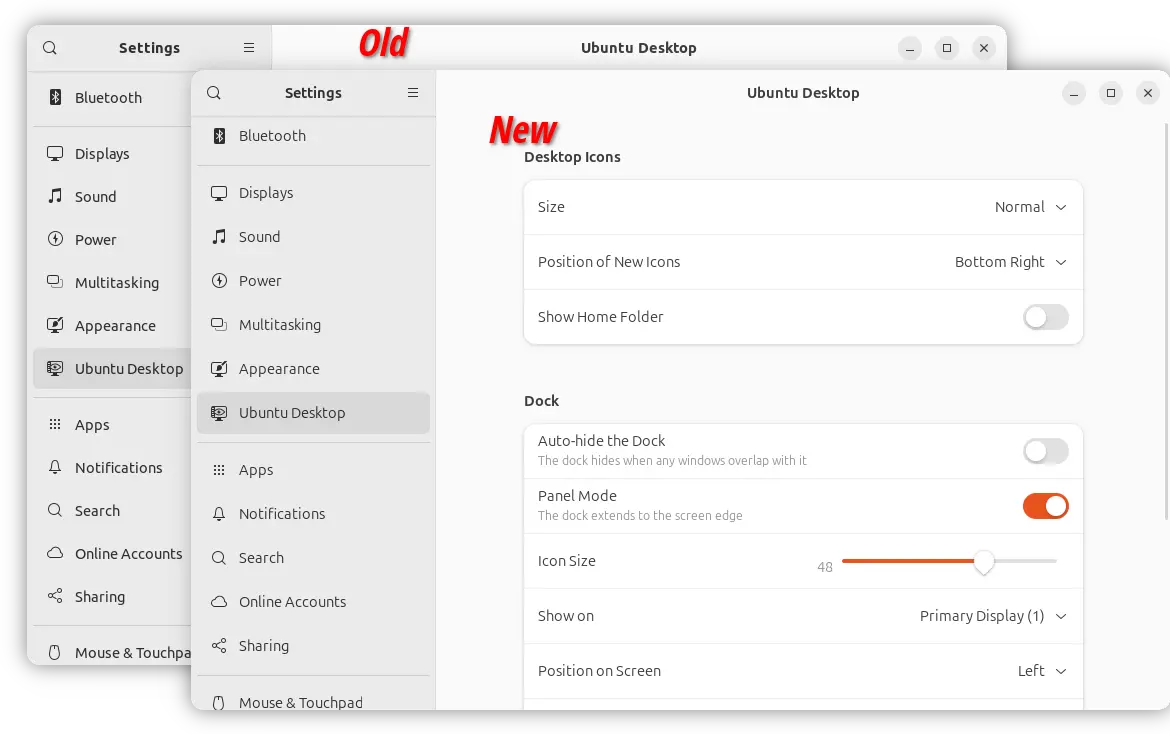
GNOME & Ubuntu Fonts compare in Font Manager

NOT only for Ubuntu, this tutorial should work for most other Linux. And, you may follow this tutorial for manually installing any other fonts.

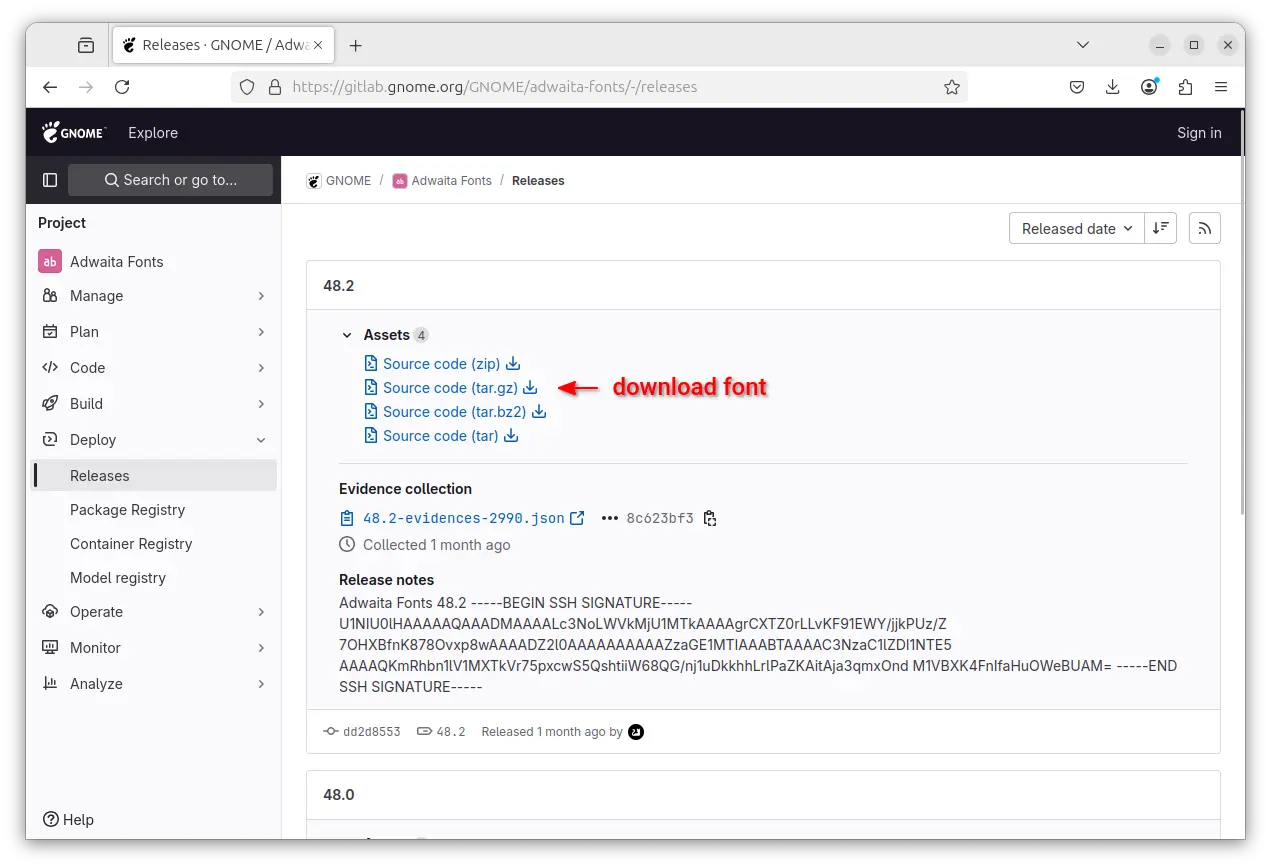
Step 1: Download Adwaita Fonts

First, download the source code of GNOME Adwaita Fonts from its project page via the link below:

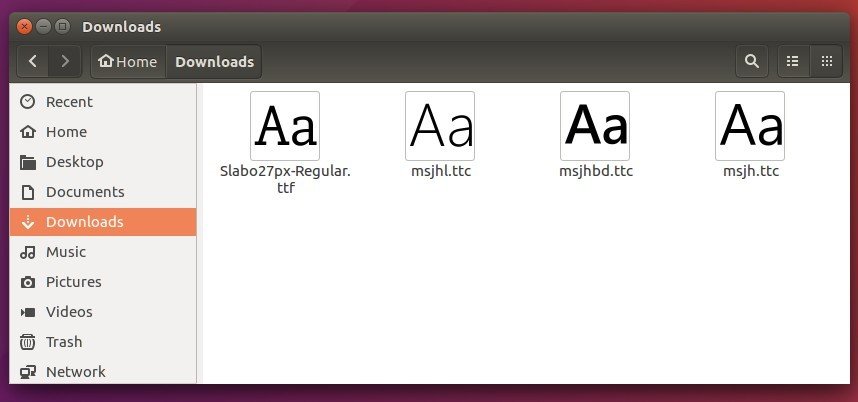
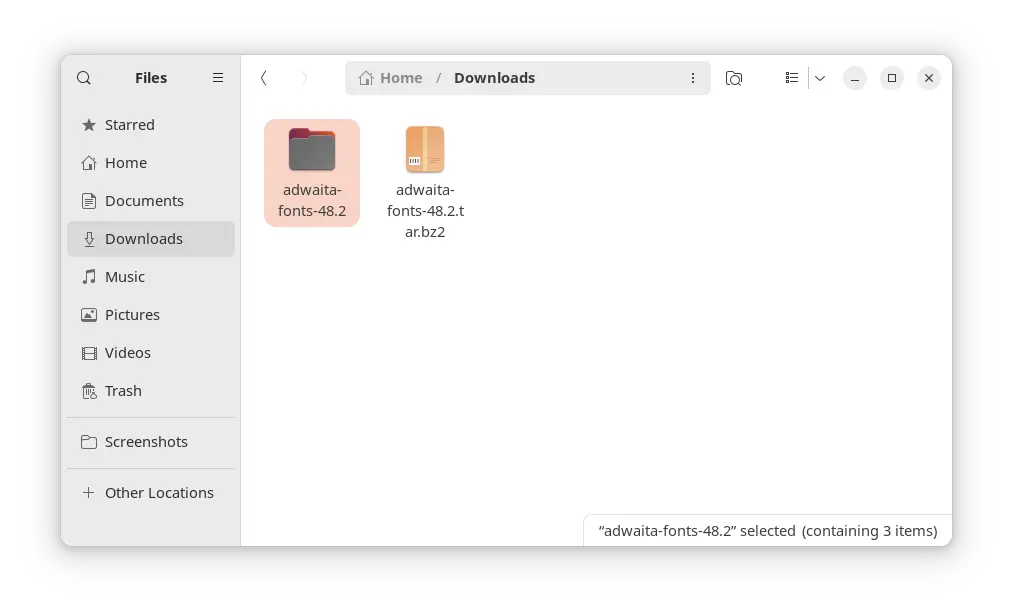
Then, open your Downloads folder and decompress the source tarball. In the extracted folder, you’ll see the font files (.ttf files) under mono and sans sub-folders.

Step 2: Install the Font files

To install manually downloaded fonts in Ubuntu and most other Linux, simply put the .ttf files into one of the following locations:

  • /usr/share/fonts for fonts that work system-wide (meaning for all users).
  • /usr/local/share/fonts – an alternative system-wide font directory.
  • .local/share/fonts or .fonts– for fonts that work for current user only.

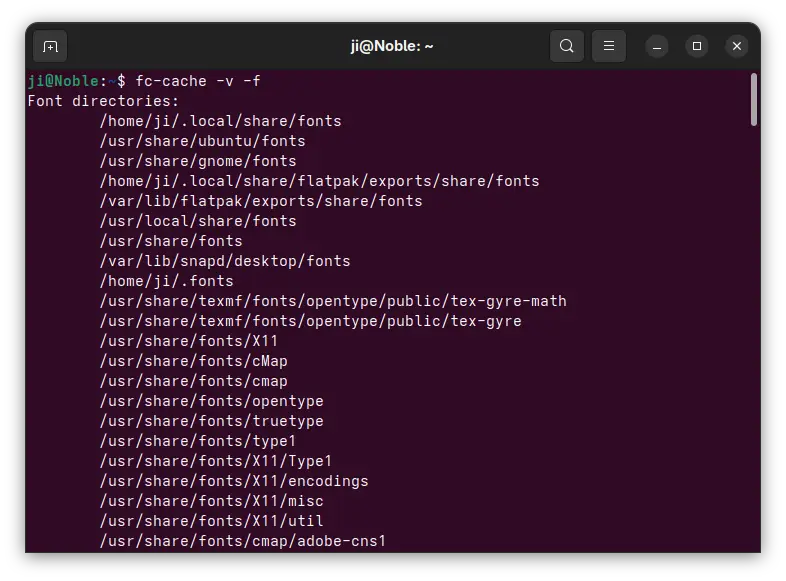
There are as well other locations, such as Ubuntu, GNOME, Flatpak, and Snap specific directories for storing font files. Run command fc-cache -v in terminal to list them all.

Option 1: Install Adwaita Fonts for current user only

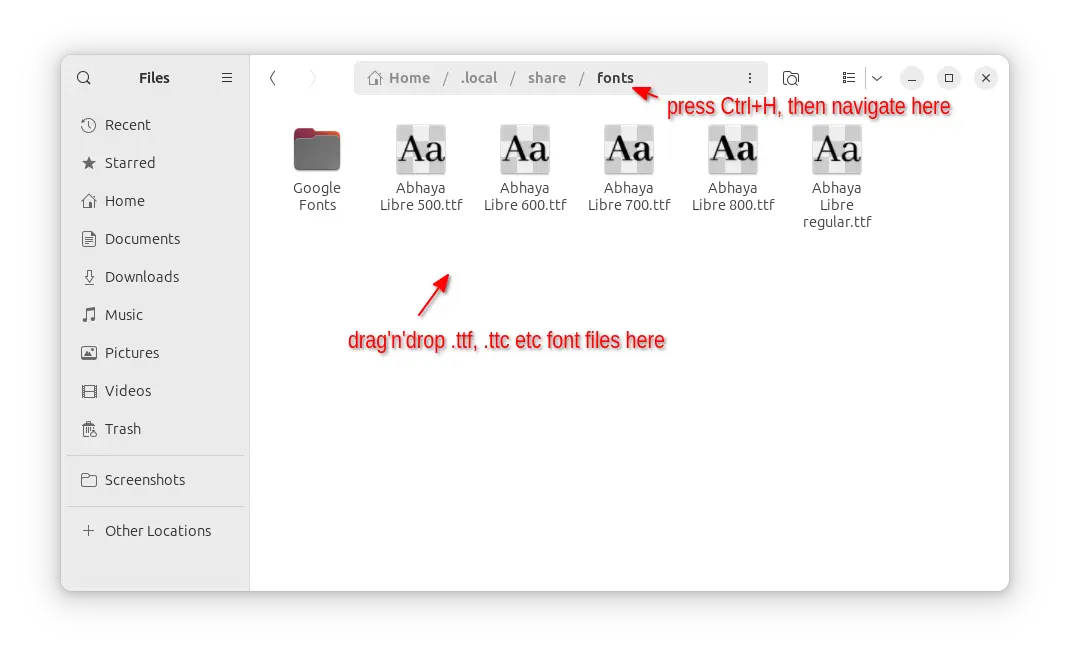
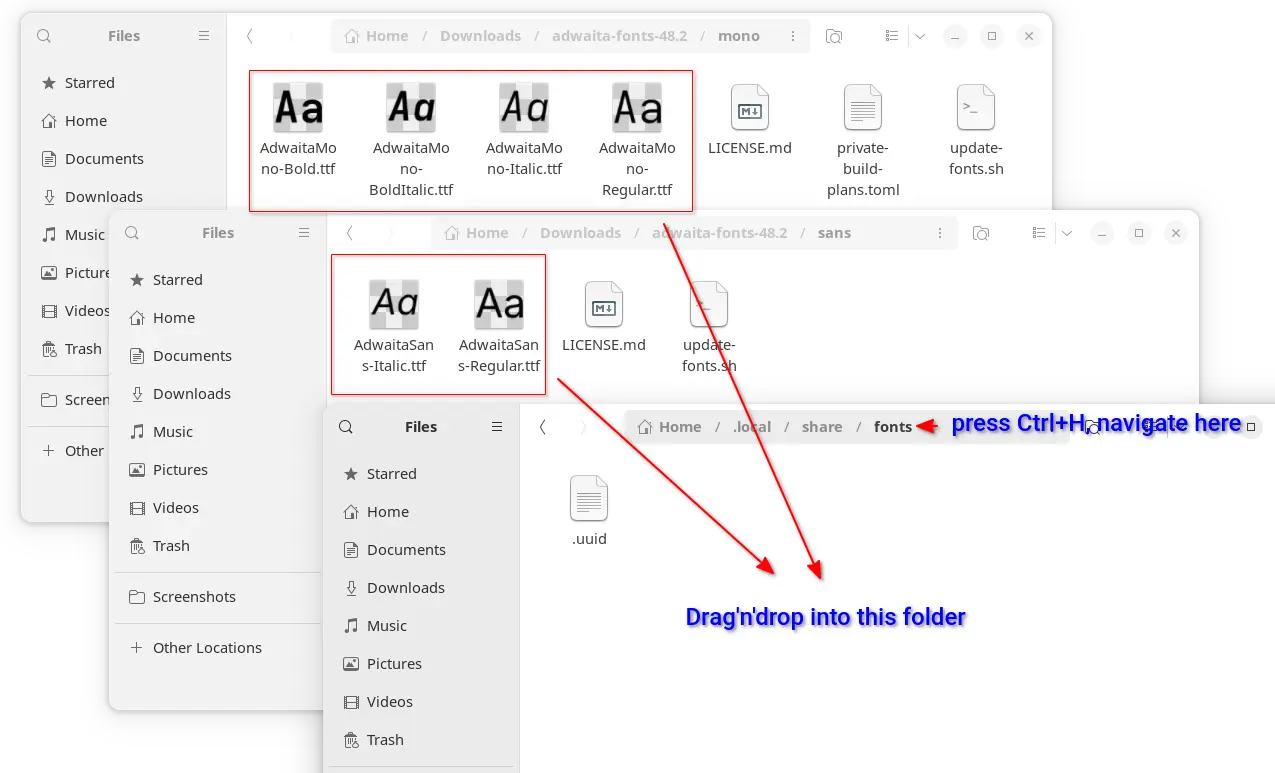
For current user only, open another file manager window, press Ctrl+H to show hidden files/folders, then navigate to .local -> share -> fonts (create if not exist).

Then, drag and drop the .tff font files from the extracted adwaita-fonts folder (mono and sans sub-folders) into that directory.

Finally, press Ctrl+Alt+T to open up a terminal window, and run command to re-generate font cache:

fc-cache -f -v

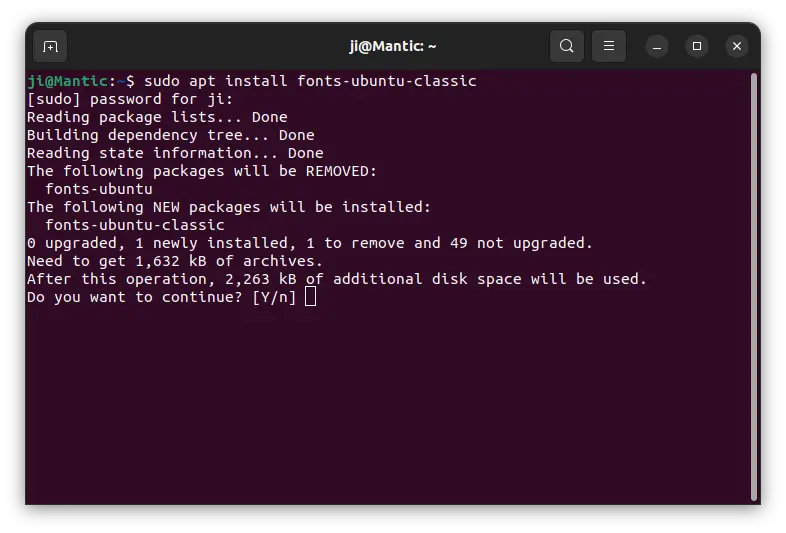
Option 2: Install Adwaita Fonts for all users

For system wide use, just move the .ttf files into /usr/share/fonts directory (or sub-directory) instead, though you need root permission to do the job.

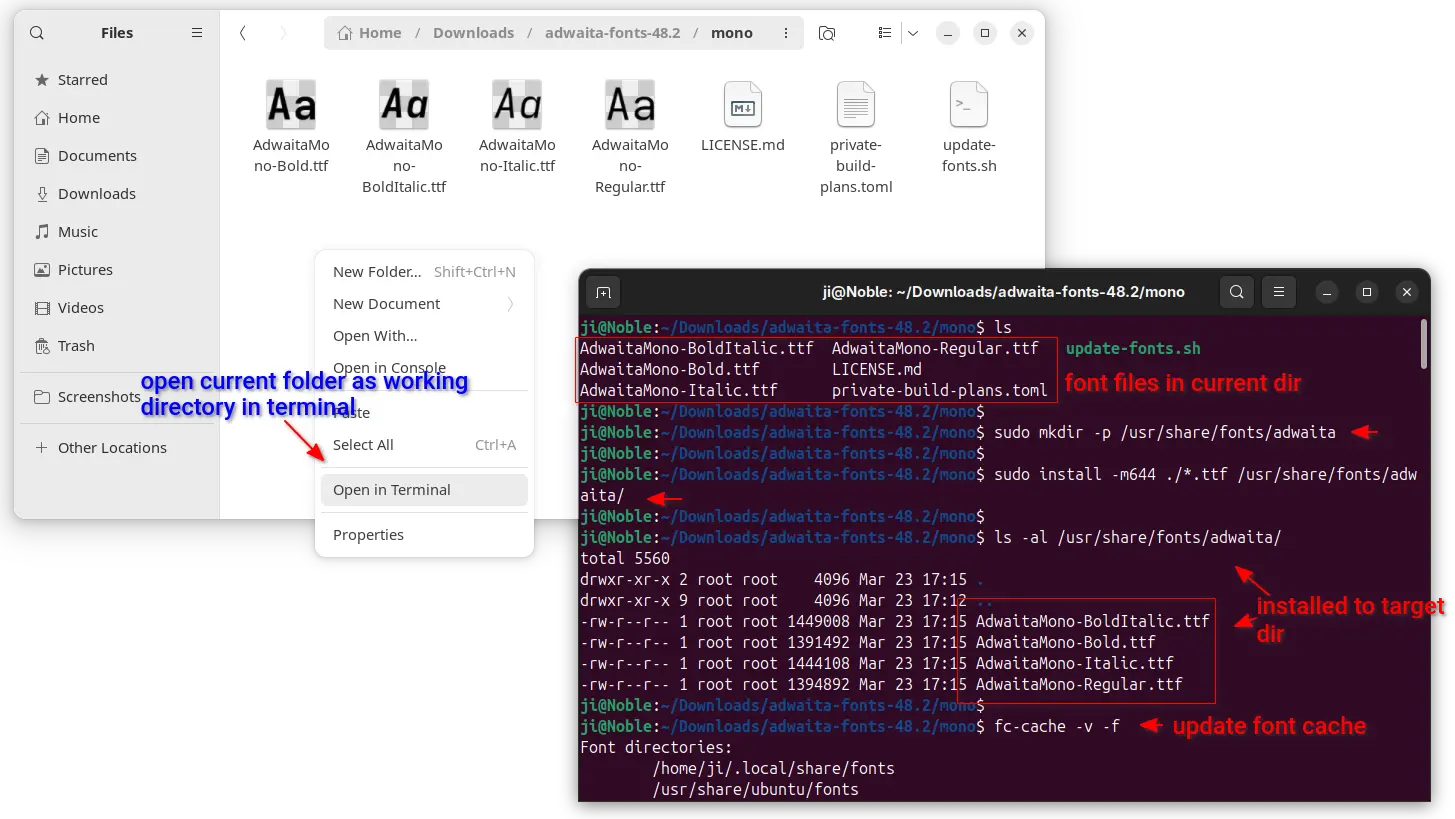
First, open file manager and navigate to the folder that contains the .ttf font files.

  1. Right-click on blank area and select “Open in Terminal” to open terminal window with that folder as working directory.
  2. When terminal opens, first run command to create a sub-folder, adwaita in the case, under target directory:
    sudo mkdir -p /usr/share/fonts/adwaita
  3. Then, run command to install (move and change permission to 644) all .ttf files from current to the location you just created:
    sudo install -m644 ./*.ttf /usr/share/fonts/adwaita

As the .ttf font files are separated into 2 folders (mono and sans sub-folders), you need to open another folder in terminal and re-do the steps above.

When done, also run fc-cache -f -v to apply changes.

Step 3: Apply the New Fonts

After installed font files into target location and updated cache, you may use following tools to apply/change font.

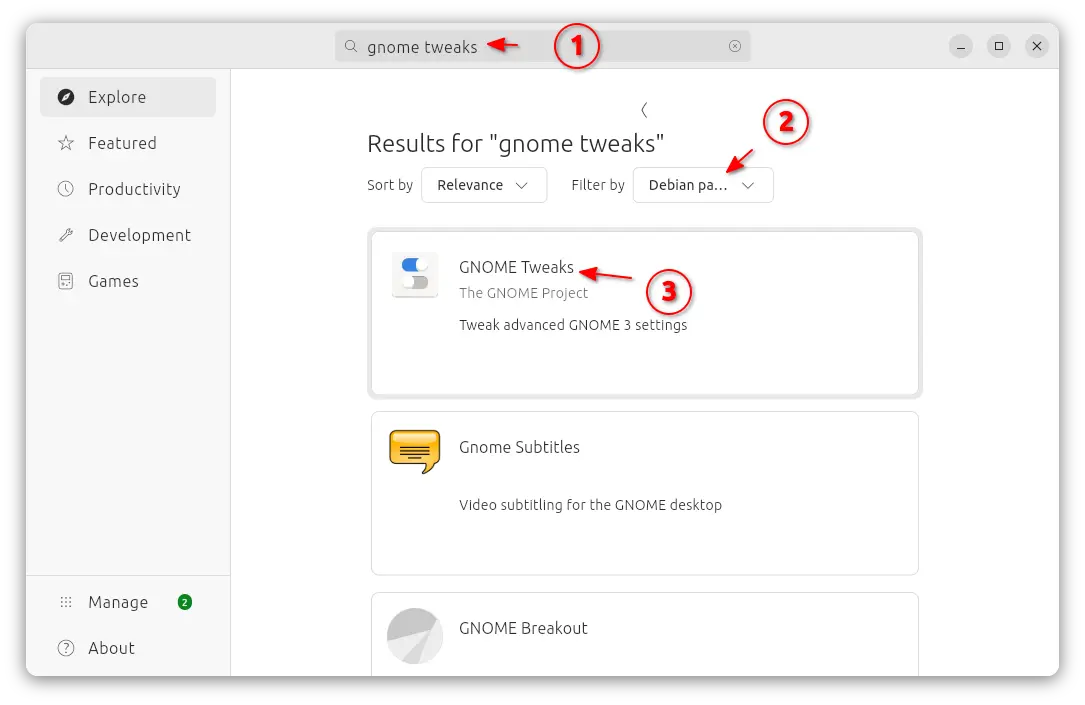
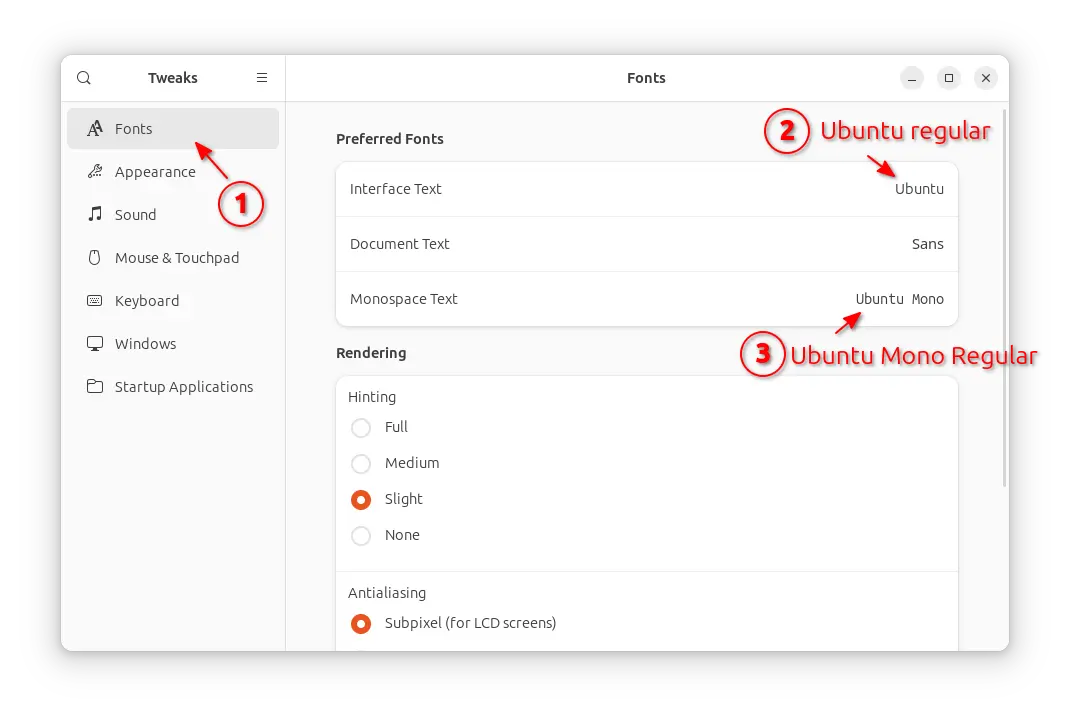
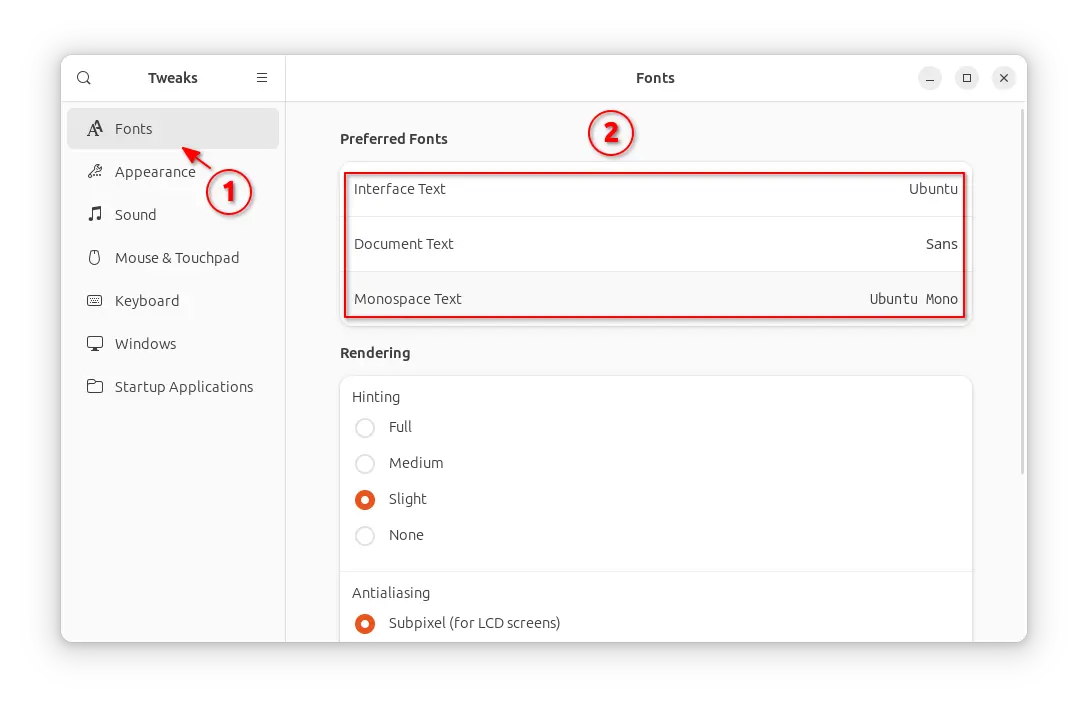
Option 1: Use GNOME Tweaks

For the default GNOME Desktop, GNOME Tweaks (available to install in Ubuntu Software / App Center) tool offers options to do the job in first tab.

NOTE: GNOME Tweaks v46 has bug changing fonts in Ubuntu 24.04, please try other ways instead.

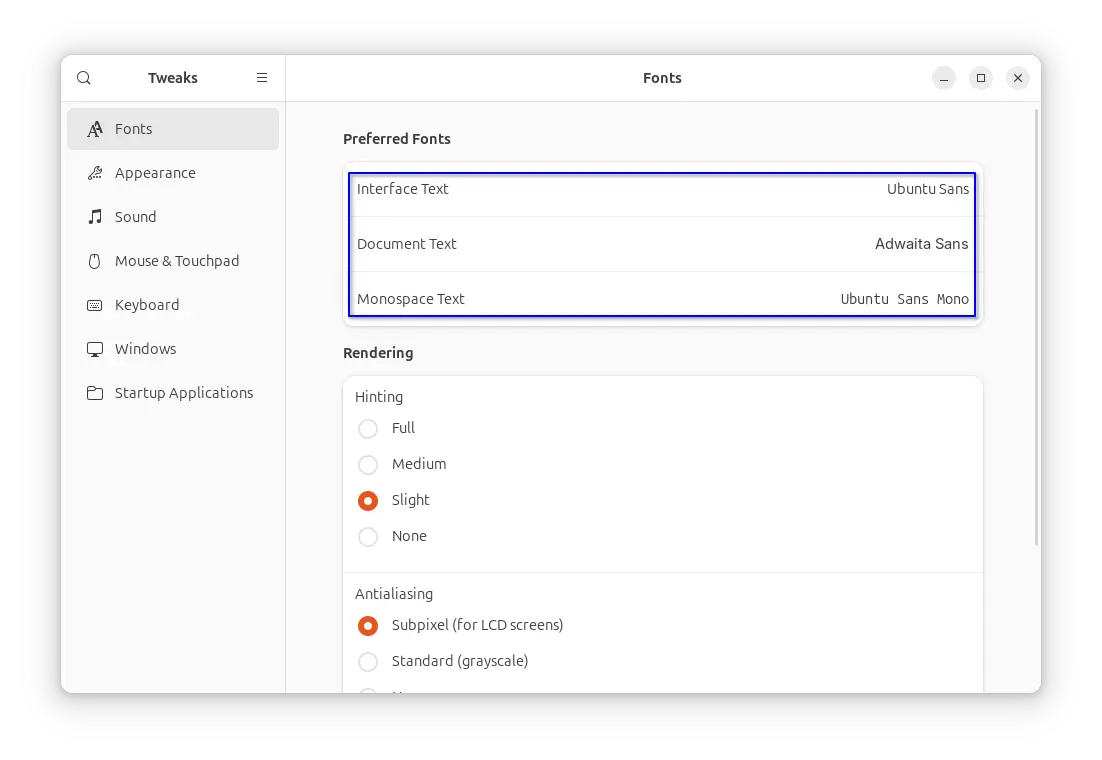
Tips: As you see in the screenshot, there are 3 font options:

  • Interface Text – the text font in panels, menus, buttons, Settings, app window titles, etc.
  • Monospace Text – font for fixed-width characters in, e.g., terminal, coding, and text editors.
  • Document Text – font for displaying document text in an application (GNOME Text editor now use “Monospace Text” font instead).

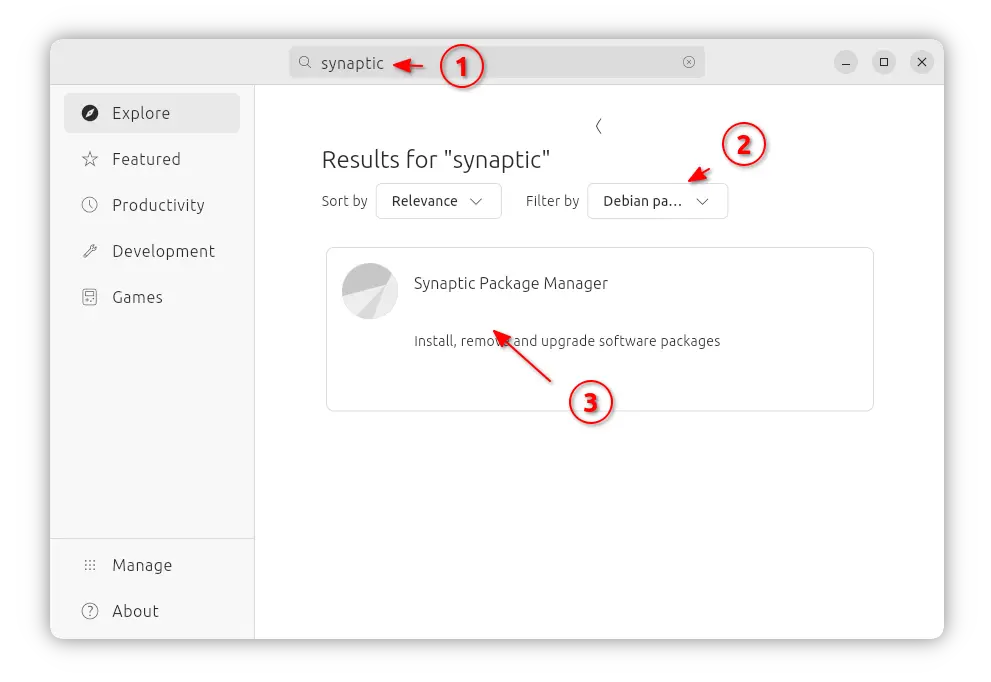
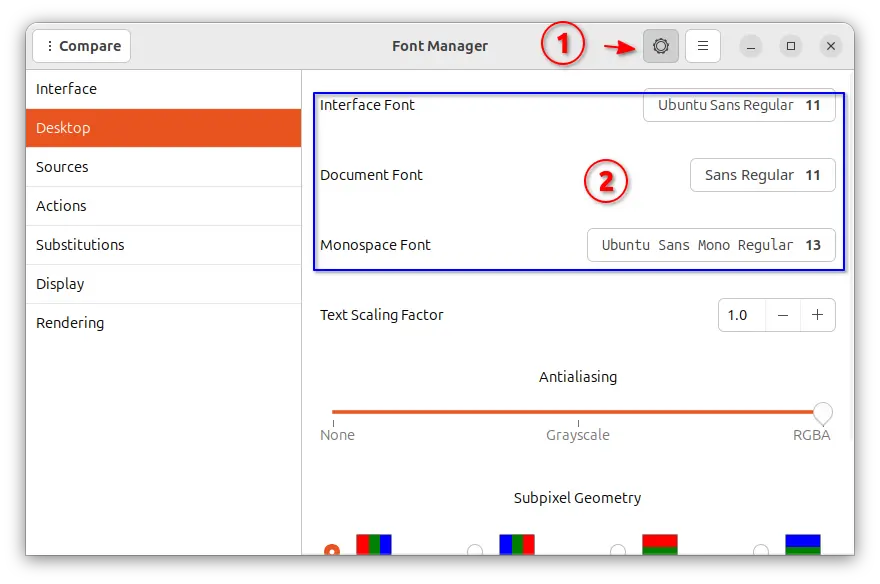
Option 2: Use Font Manager

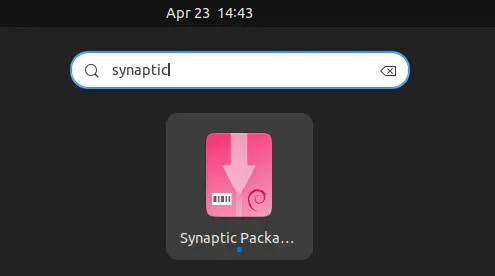
For non-GNOME desktop users who can’t find out the desktop specific font setting options, “Font Manager” also offers the options the change the fonts.

Simply search for and install the app from Ubuntu Software or App Center, then launch it, and click the setting gear icon in header, finally navigate to “Desktop” in left pane to get the options.

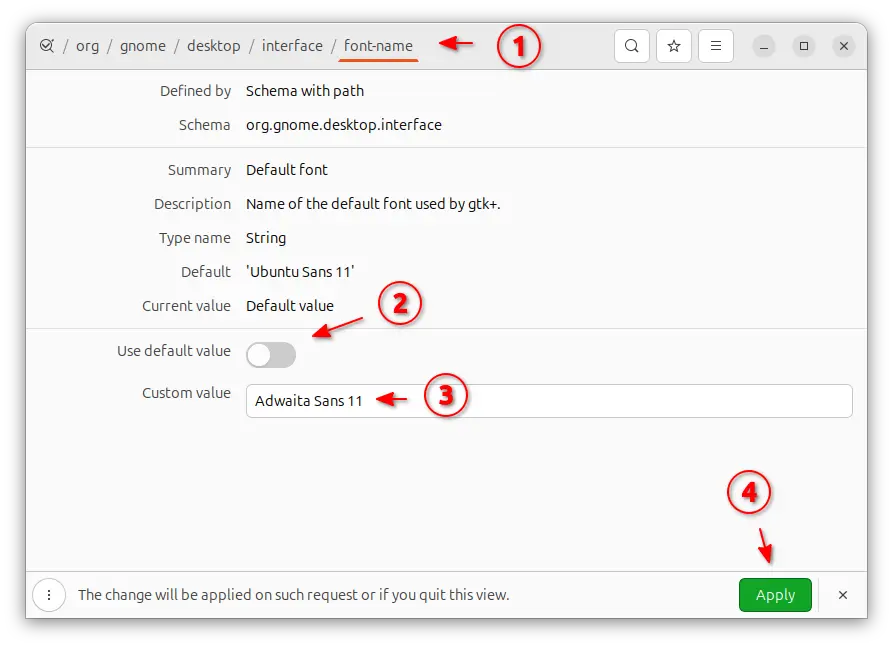
Option 3: Use Dconf Editor

Also for GNOME, the advanced dconf editor tool also provides the options to change fonts. While it also has options to easily reset fonts to default.

First, install Dconf Editor either from AppCenter (or Ubuntu Software) or by running command in terminal (Ctrl+Alt+T):

sudo apt install dconf-editor

Then, launch Dconf Editor and navigate to org/gnome/desktop/interface. Finally, find out and change the following key values:

  • document-font-name – for Document Text.
  • font-name – for Interface Text.
  • monospace-font-name – for Monospace Text.

For each key,  click turn off “Use default value”, then input a custom value Adwaita Sans 11 or Adwaita Mono 11 in the case, finally click the bottom right Apply button.

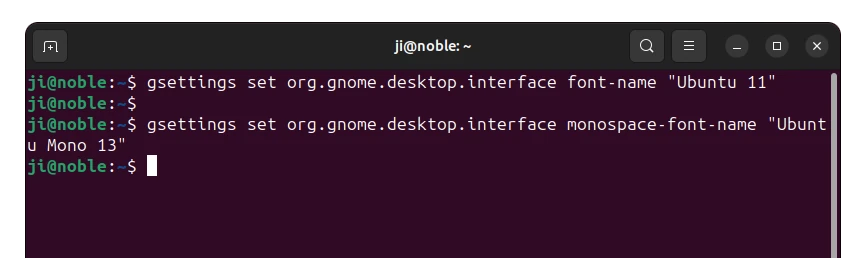
Option 4: Change fonts from command line (GNOME Only)

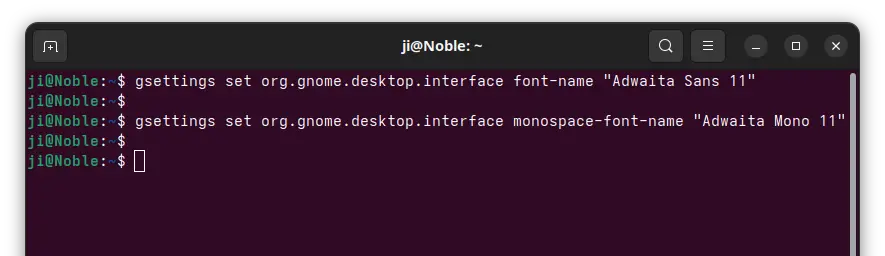
For the default GNOME desktop users who are OK with Linux command line, simply press Ctrl+Alt+T to open up a terminal window.

When terminal opens, run the commands below one by one to set Adwaita Fonts:

gsettings set org.gnome.desktop.interface font-name "Adwaita Sans 11"
gsettings set org.gnome.desktop.interface monospace-font-name "Adwaita Mono 11"
gsettings set org.gnome.desktop.interface document-font-name "Adwaita Sans 11"

For choice, you may replace number ’11’ in the command to increase or decrease fonts sizes.

Restore Default Fonts (GNOME Only)

As mentioned above, “Dconf Editor” offer options to reset fonts to default.

Just install & launch the tool, then navigate to org/gnome/desktop/interface, finally click edit each key and turn on “Use default value” option to revert back to default font.

For choice, you may open terminal and run the commands below one by one to restore the fonts:

gsettings reset org.gnome.desktop.interface font-name
gsettings reset org.gnome.desktop.interface monospace-font-name
gsettings reset org.gnome.desktop.interface document-font-name

For those who prefer the old system font, now it’s easy to get it in Ubuntu 23.10 via a new package!

Since Ubuntu 23.04, Ubuntu takes use a new slim font for the text in system menus, documents, and app windows.

Some users do NOT like the change, because the new font is thin and hard to focus on. And, I’ve written about how to get the previous font back in Ubuntu 23.04.

Now, Ubuntu 23.10 includes a new package fonts-ubuntu-classic in system repository. Make it easy to do the job even without a system restart.

Install the Classic Font in Ubuntu 23.10

To install the font, simply press Ctrl+Alt+T on keyboard to open terminal.

When terminal opens, run command:

sudo apt install fonts-ubuntu-classic

Run sudo apt update to update package cache if it says package not found.

After installation, your system font change without restart! For opened app windows, you need to close and re-open them. For ‘Files’, just run nautilus -q to reload.

(Optional) Install ‘fonts-ubuntu-console’

The package above does not install the old font for the command console.

For choice, you may download the package for Ubuntu 22.04:

wget https://launchpad.net/ubuntu/+archive/primary/+files/fonts-ubuntu-console_0.83-6ubuntu1_all.deb

Then, install it via:

sudo apt install ./fonts-ubuntu-console_0.83-6ubuntu1_all.deb

How to Uninstall

To restore the system default fonts, just open terminal (Ctrl+Alt+T) and run command to install the stock font packages back:

sudo apt install fonts-ubuntu fonts-ubuntu-console

Since Ubuntu 23.04 Lunar Lobster, the default system fonts for the texts in system menus, documents, and app windows have been changed.

The new font is slim. And, I’ve written a tutorial about how to try it out in Ubuntu 22.04 and 20.04. If you prefer the old one, here’s how to revert it back in Ubuntu 24.04 LTS.

Compare to Ubuntu 23.04/23.10, the new font in Ubuntu 24.04 looks better now in my opinion. Because, the default fonts have been changed:

  • from ‘Ubuntu Regular‘ to ‘Ubuntu Sans‘ for interface text.
  • from ‘Ubuntu Mono Regular‘ to ‘Ubuntu Sans Mono‘ for monospace text.

Default fonts changed in Ubuntu 24.04

Install old Ubuntu Fonts in Ubuntu 24.04

1. Install the classic font

Since Ubuntu 23.10, a new package fonts-ubuntu-classic is available in system repository for those who prefer the classic font.

To install the package, press Ctrl+Alt+T on keyboard to open up a terminal window. Then, run command:

sudo apt install fonts-ubuntu-classic

You may run sudo apt update to refresh system package cache first if the command above somehow does not work for you.

After installing the classic fonts, text in terminal may become un-readable. In the case, just log out and back in.

2. Download & install classic font for Console (Optional)

The classic font for console (terminal) so far is NOT available in Ubuntu 24.04 repository. For choice, you may manually download and install the package for Ubuntu 22.04.

To do so, launch a terminal window (Ctrl+Alt+T), and download the classic font for console package via command:

wget -c https://launchpad.net/ubuntu/+archive/primary/+files/fonts-ubuntu-console_0.83-6ubuntu1_all.deb

Next, install the package by running command:

sudo apt install ./fonts-ubuntu-console_0.83-6ubuntu1_all.deb

3. Apply the classic fonts

Option 1: Use Gnome Tweaks to apply classic fonts:

After installed the classic fonts, it won’t apply automatically, because the default font names have changed as mentioned.

To switch back the old ones, first search for and install GNOME Tweaks from App Center.

Next, launch Gnome Tweaks, and in the first “Fonts” tab:

  • Select Ubuntu Regular as Interface Text font. It will be displayed as ‘Ubuntu’ after selection.
  • And select Ubuntu Mono Regular for Monospace Text, if you also installed the classic font for console.

Option 2: use Linux commands to apply the classic fonts
For those who are OK with Linux commands, open up a terminal window (Ctrl+Alt+T) and run the commands below one by one instead:

gsettings set org.gnome.desktop.interface font-name "Ubuntu 11"
gsettings set org.gnome.desktop.interface monospace-font-name "Ubuntu Mono 13"

Lock & Prevent updating to new fonts

To prevent your system from automatically updating to the new fonts, you have to lock the old fonts packages that were just installed via the previous step.

Thanks to @Alex Farran, lock package version via Synaptic package manager only prevents itself and ‘Software Updater’ from upgrading the package. However, apt command and may be other tools can still upgrade the fonts. So, the best choice can be running the command below in terminal:

sudo apt-mark hold fonts-ubuntu fonts-ubuntu-console

For the graphical way (NOT work for apt), first open App Center, search for and install Synatic Package Manager.

Then launch “Synaptic”, click “Search” and search “fonts-ubuntu“. Finally, do:

  • Press and hold Ctrl then highlight both “fonts-ubuntu” and “fonts-ubuntu-console” packages.
  • Go to menu “Package -> Lock Version”.

How to go back the new Ubuntu Fonts

First, open terminal (Ctrl+Alt+T) and run command to unlock the font packages:

sudo apt-mark unhold fonts-ubuntu fonts-ubuntu-console

Then, also search for and launch Synaptic package manager.

When it opens, search “fonts-ubuntu“. Then do:

  • highlight both “fonts-ubuntu” and “fonts-ubuntu-console” packages via Ctrl + mouse click.
  • Go to menu “Package” and un-check “Lock Version” (skip if NOT enabled).
  • Next, right-click on both packages and select “Mark for Upgrade“.
  • Finally, click on “Apply” button.

When done, reset the font names by running commands in terminal (Ctrl+Alt+T) one by one:

gsettings reset org.gnome.desktop.interface font-name
gsettings reset org.gnome.desktop.interface monospace-font-name

The Ubuntu design team is working on new Ubuntu fonts and proposes to use as default in the upcoming Ubuntu 23.04.

For testing purpose, the team posted the .deb packages for the new fonts in this thread. User can try it out by installing in all current Ubuntu releases and report any issue in this page.

I’ve tried out the new fonts in Ubuntu 22.04 LTS. The text in system menu and application window becomes a bit thin and compact than before.

And, the document text in text editor looks enlarged, that I even doubted if the font size was changed mistakenly.

How to Install the New Fonts

First, press Ctrl+Alt+T on keyboard to open a terminal window. When it opens, run single command below to download the 2 font packages:

wget https://launchpad.net/ubuntu/+archive/primary/+files/fonts-ubuntu_0.863-0ubuntu3_all.deb https://launchpad.net/ubuntu/+archive/primary/+files/fonts-ubuntu-console_0.863-0ubuntu3_all.deb

Install wget via sudo apt install wget if it says command not found.

After downloaded the packages, use command to install them:

sudo dpkg -i fonts-ubuntu-console_0.863-0ubuntu3_all.deb fonts-ubuntu_0.863-0ubuntu3_all.deb

You can then remove the 2 packages in user home folder. And restart computer to apply changes after installation.

How to Restore original fonts

The stock fonts package version varies on different Ubuntu editions, so I would recommend to first install Synaptic package manager in Ubuntu Software.

Then, open “Synaptic” and do:

  1. Search and highlight “fonts-ubuntu” package.
  2. Go to menu “Package -> Force Version”.
  3. Select the old stock version from pop-up dialog, then click “Force Version” button.
  4. Finally, click “Apply”.
  5. Also, do the previous steps one by one for “fonts-ubuntu-console” package.

Also, restart computer to apply changes and done!

This simple tutorial shows how to fix the launching issue for TypeCatcher in Ubuntu 22.04 or other Linux with Python 3.9 & higher.

TypeCatcher is a simple GTK application to download and install Google webfonts for off-line use. The app is available to install in Ubuntu Software for all current Ubuntu releases. However, it does not launch in Ubuntu since 21.10.

TypeCatcher, download & install Google Fonts

When trying to launch it from command line, it outputs something like this:

Traceback (most recent call last):
File “/usr/lib/python3/dist-packages/typecatcher_lib/Application.py”, line 30, in on_activate
self.window = TypeCatcherWindow.TypeCatcherWindow()
File “/usr/lib/python3/dist-packages/typecatcher_lib/Window.py”, line 47, in __new__
builder = get_builder(‘TypeCatcherWindow’)
File “/usr/lib/python3/dist-packages/typecatcher_lib/helpers.py”, line 44, in get_builder
builder.add_from_file(ui_filename)
File “/usr/lib/python3/dist-packages/typecatcher_lib/Builder.py”, line 86, in add_from_file
ele_widgets = tree.getiterator(“object”)
AttributeError: ‘ElementTree’ object has no attribute ‘getiterator’

The issue is because of the removal of getiterator() methods from xml.etree.ElementTree module in Python 3.9, which was deprecated since Python 3.2.

As the announcement indicates, simply use iter() method instead will fix the issue.

Methods getchildren() and getiterator() of classes ElementTree and Element in the ElementTree module have been removed. They were deprecated in Python 3.2. Use iter(x) or list(x) instead of x.getchildren() and x.iter() or list(x.iter()) instead of x.getiterator().

1. First, search for and open a terminal window from either start menu or ‘Activities’ overview depends on your desktop environment.

2. When terminal opens, run command to edit the file that contains the ‘getiterator()’ method (see the first screenshot). In the case, it’s “/usr/lib/python3/dist-packages/typecatcher_lib/Builder.py”.

sudo gedit /usr/lib/python3/dist-packages/typecatcher_lib/Builder.py

replace gedit to your favorite text editor, or use nano command line editor that works in most Linux.

3. When files opens, find out and replace tree.getiterator with tree.iter.

For Gedit text editor, just go to menu, click open ‘Find and Replace’ dialog. Finally, insert tree.getiterator as ‘Find’, and ‘tree.iter‘ as ‘Replace with’, then click on ‘Replace All’ button.

For nano text editor, press Alt+R when the file opens in terminal window. Then type tree.getiterator when it indicates ‘Search (to replace)’, hit Enter, and insert tree.iter when prompts ‘Replace with’. Finally, hit Enter and type y. Or, just use arrow keys to find and replace the keyword (there are 2) manually. And, press Ctrl+x, type y, and hit Enter to save changes.

After saving the file, try to launch it either from ‘Activities’ overview or command line, and enjoy!

How to install FreeType 2.7 in Ubuntu 16.04 via PPA

Last updated: September 12, 2016

FreeType, a popular font rendering engine, has reached the 2.7 release with a new default mode for bytecode hinting: Subpixel hinting.

In case you are already using subpixel hinting (for example, by using the ‘Infinality patches’ as provided by some GNU/Linux or BSD distributions, or directly from bohoomil.com), be noted that the new mode might provide subtle differences; the code was simplified to make it much faster. If you are used to the old full-pixel hinting, you will see many rendering changes. If you really dislike them, you can disable them at compile time or using the new FREETYPE_PROPERTIES environment variable.

The new release also has improvements to its smooth rasterizer to make it about 20% faster, fixes to fuzzer, handling of raw CID fonts, and various other bug fixes and improvements. See details at FreeType.org.

Install FreeType 2.7 in Ubuntu 16.04:

The Ubuntu 16.04 build has been made into PPA, available for install/upgrade by following the steps below:

1. Open terminal (Ctrl+Alt+T) and run command to add the PPA repository:

sudo add-apt-repository ppa:no1wantdthisname/ppa

Type in your password (no visual feedback) when it asks and hit Enter.

2. To upgrade from a previous release, just launch Software Updater and you’ll see the new release available in the update list:

Or run the commands below to install or upgrade it from command line:

sudo apt update && sudo apt install libfreetype6

Undo:

Simply purge the PPA via ppa-purge will downgrade FreeType to the stock version in Ubuntu 16.04 repository:

sudo apt install ppa-purge && sudo ppa-purge ppa:no1wantdthisname/ppa

Want to install Microsoft fonts, Google web fonts for off-line use, or you just found a favorite font on the web and want to install it in Ubuntu?

Well here’s how to install the font files (.ttf, .ttc) downloaded from web, Google fonts page, or copied from your Windows OS.

Here are 4 font files shown in the picture above. In the steps below I’ll show you how to install and use it in Ubuntu Desktop.

Option 1: Install Fonts for current user only

If you want to install the fonts for current user use only, then simply open up a “Files” (file manager) window, press Ctrl+H to show hidden folder, and navigate to .local/share/fonts (create fonts sub-folder if not exist).

Next, drag’n’drop your font files into that directory, or a sub-folder of that directory.

Finally, press Ctrl+Alt+T on keyboard to open terminal, and run command to refresh the cache:

sudo fc-cache -fv

Next, your system configuration tool can find and allow you to apply the fonts

Option 2: Manually install Fonts to system wide use

To install fonts for all users use, do the following steps one by one instead.

1. Launch Terminal from start menu, or by pressing Ctrl+Alt+T on keyboard:

When it opens, paste following commands and run one by one.

2. In Ubuntu Linux, font files are installed to /usr/local/share/fonts or /usr/share/fonts. The former directory is recommended in this case for manual installation.

First create a sub folder in the font directory, ms_fonts, as example:

sudo mkdir /usr/local/share/fonts/ms_fonts

Type in your password when it asks (no visual feedback) and hit Enter.

3. Move all font files from your Downloads directory to the new created folder:

sudo mv ~/Downloads/*.ttc ~/Downloads/*.ttf /usr/local/share/fonts/ms_fonts/

4. Set permissions to these files by running the commands below one by one:

sudo chown root:staff /usr/local/share/fonts/ms_fonts -R

sudo chmod 644 /usr/local/share/fonts/ms_fonts/* -R

sudo chmod 755 /usr/local/share/fonts/ms_fonts

5. Finally builds font information caches for apps using fontconfig for their font handling:

sudo fc-cache -fv

Now you can apply new installed fonts via GNOME Tweaks (available in Ubuntu Software / App Center) in default GNOME desktop:

For Chrome browser, go to Settings -> Advanced settings-> Web contents -> Customize fonts.