For Ubuntu 23.04, Debian 12, Fedora 38 and other Linux with GNOME 43/44, there’s now an extension allows to monitor and control your remote Transmission downloads via system tray indicator.
It uses Transmission RPC protocol for interacting with remote PC/server that is running Transmission GTK, daemon, or Fragments.
With the indicator, user can easily add new download via torrent link, monitor all the downloading process, and one click to open the web UI with more options.
How to Install the Indicator Applet
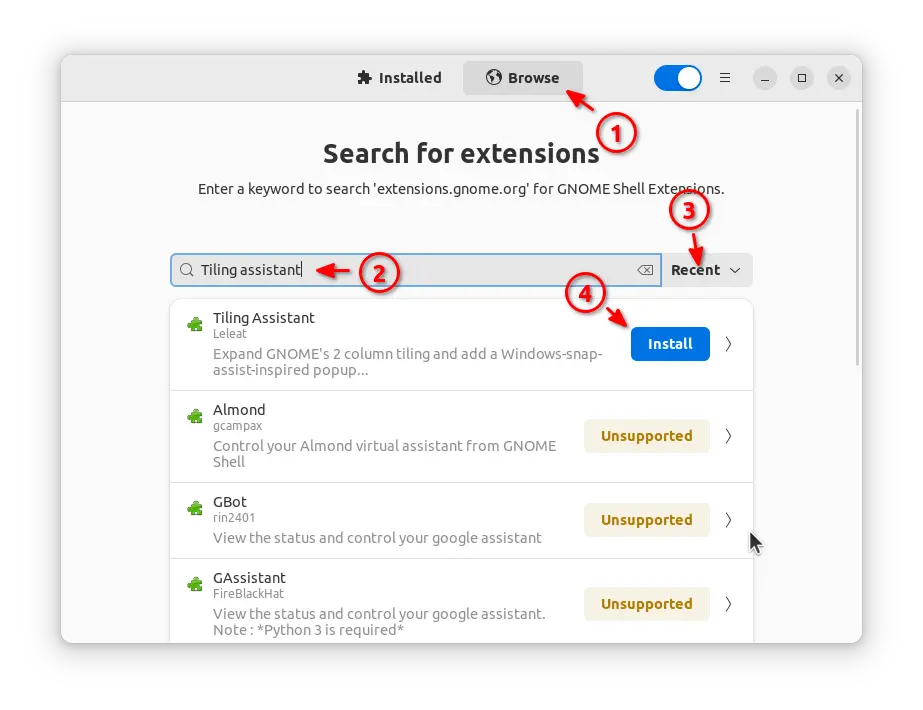
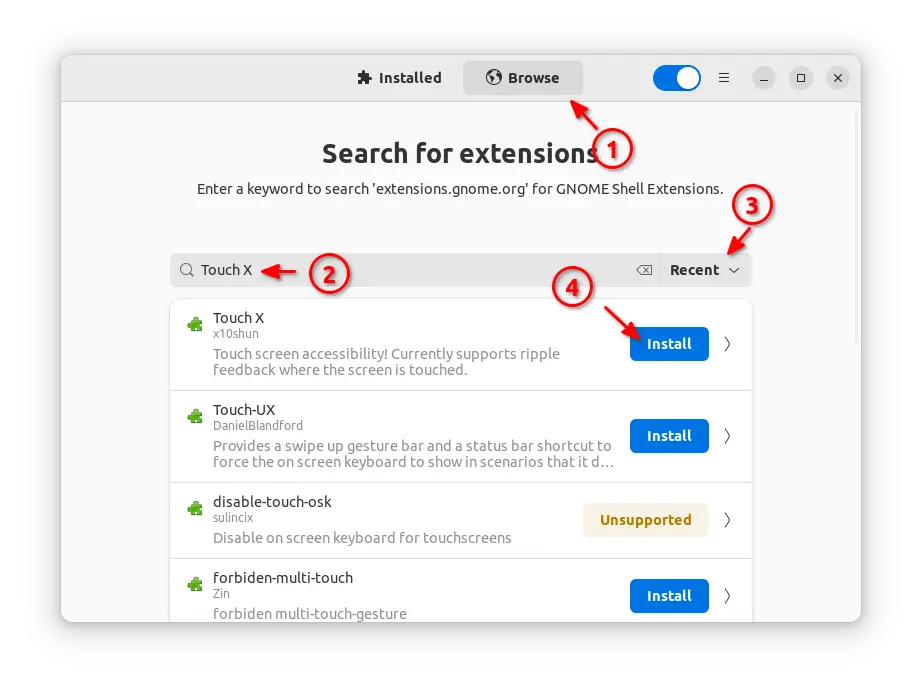
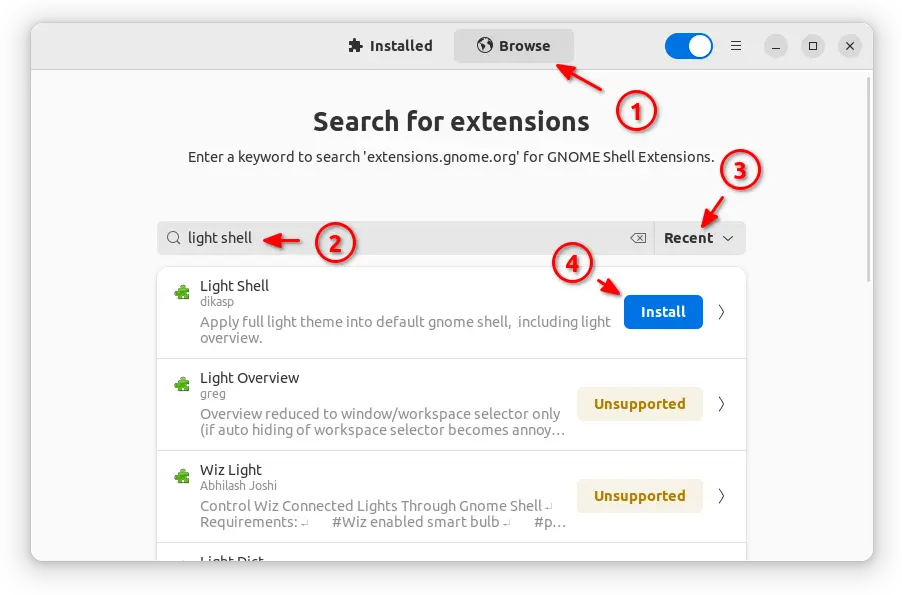
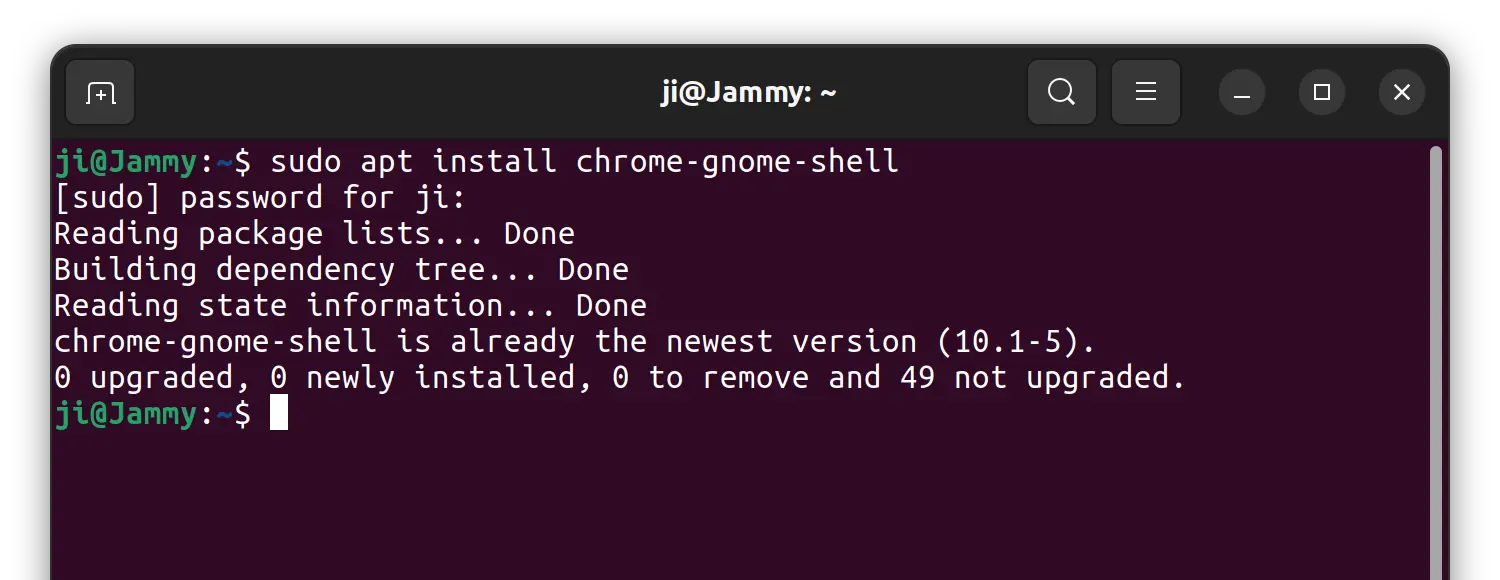
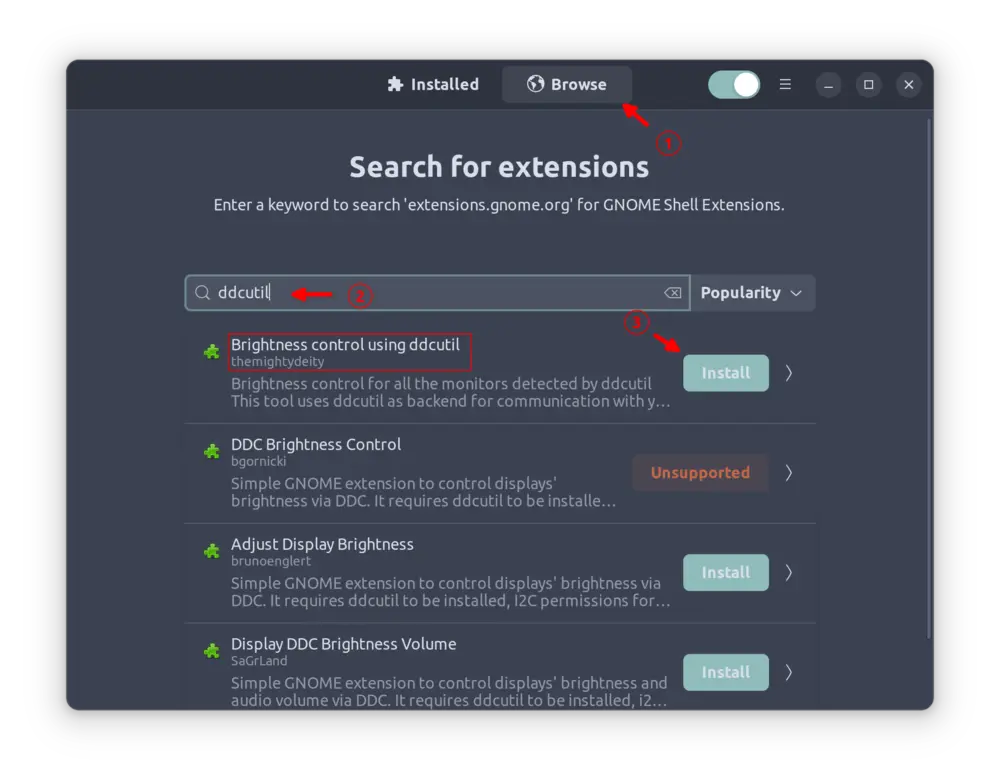
For Ubuntu 23.04 user, firstly search for and install “Extension Manager” from Ubuntu Software.
Install Extension Manager in Ubuntu 22.04+
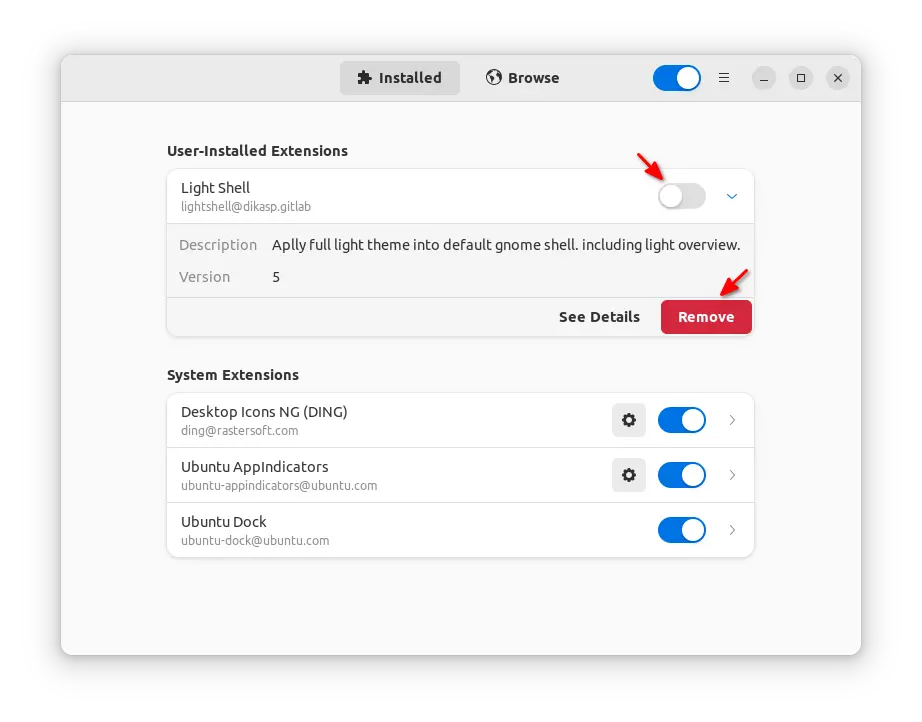
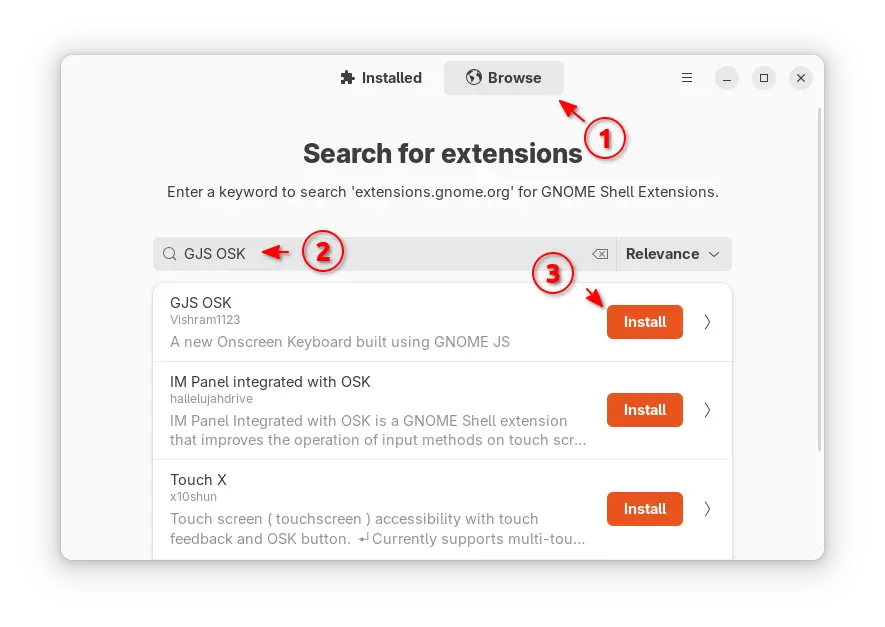
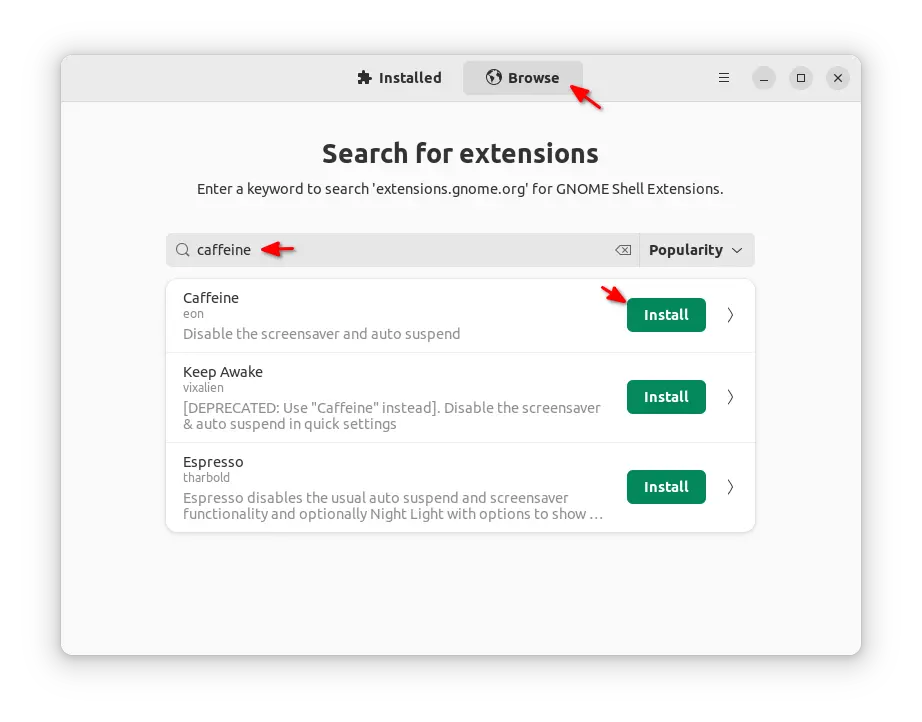
Then launch “Extension Manager” and use the tool to search and install “Transmission Daemon Indicator NG” extension.
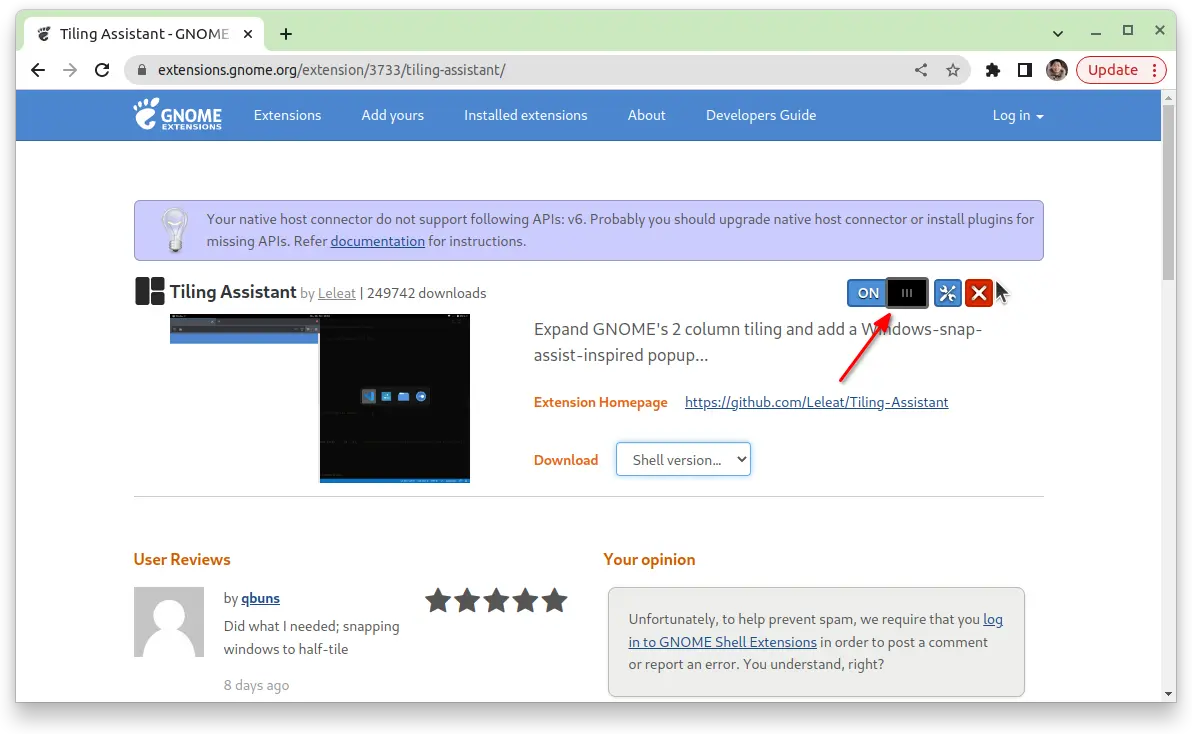
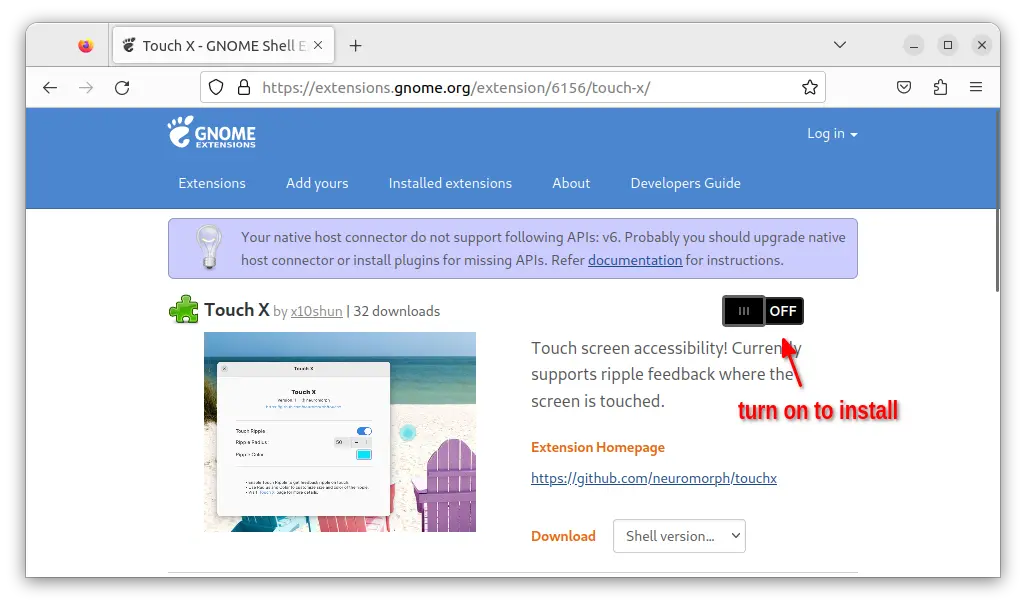
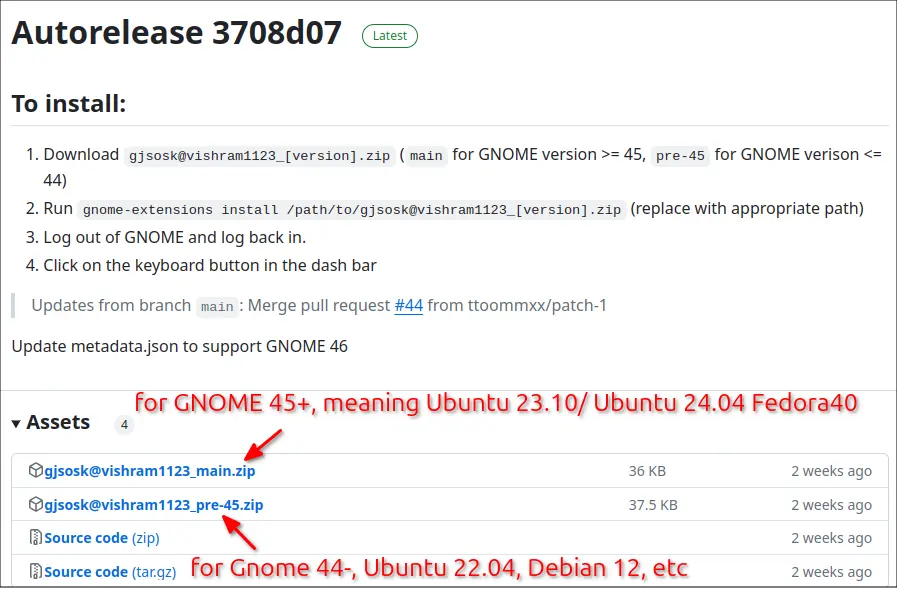
For other Linux with GNOME 43/44, just go to the link below:
Then, turn ON the toggle switch to install the extension. If you don’t see the ON/OFF switch, install browser extension and refresh the page.
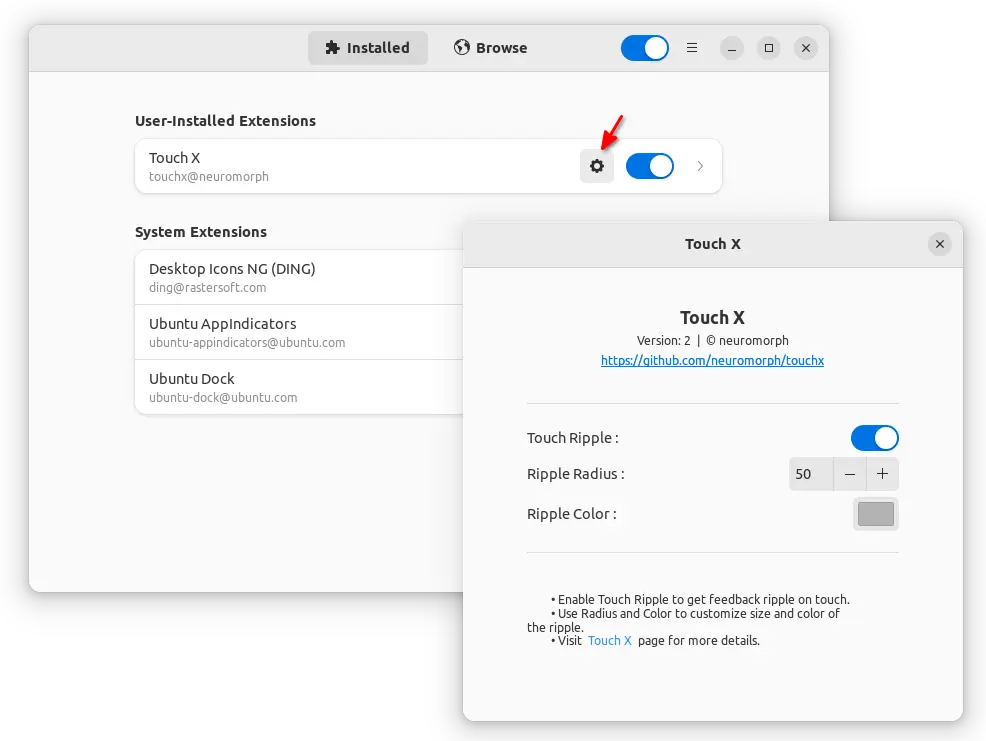
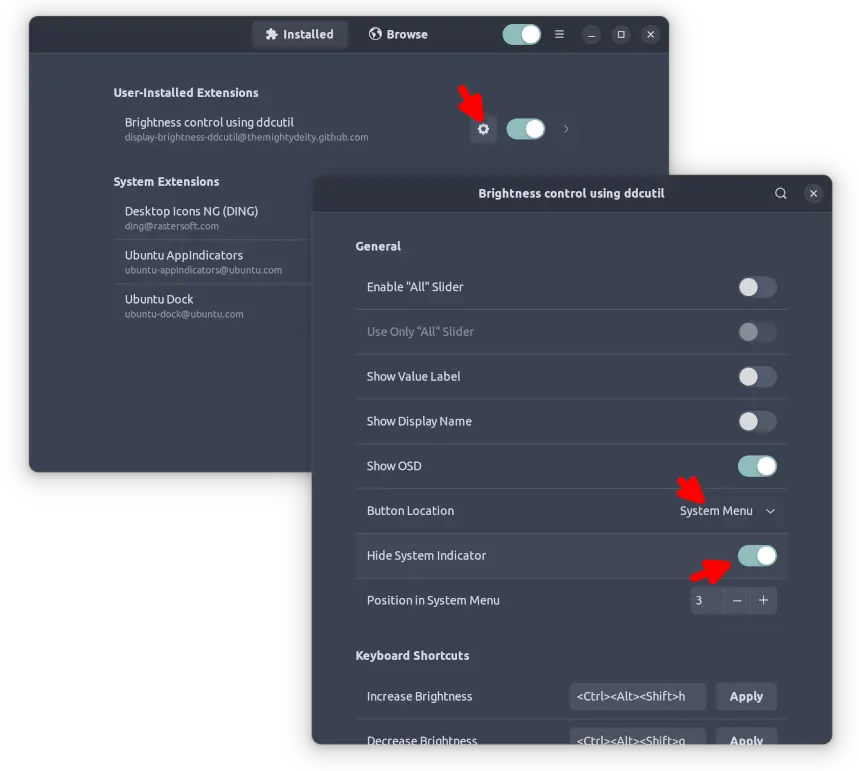
Configure the Indicator Applet
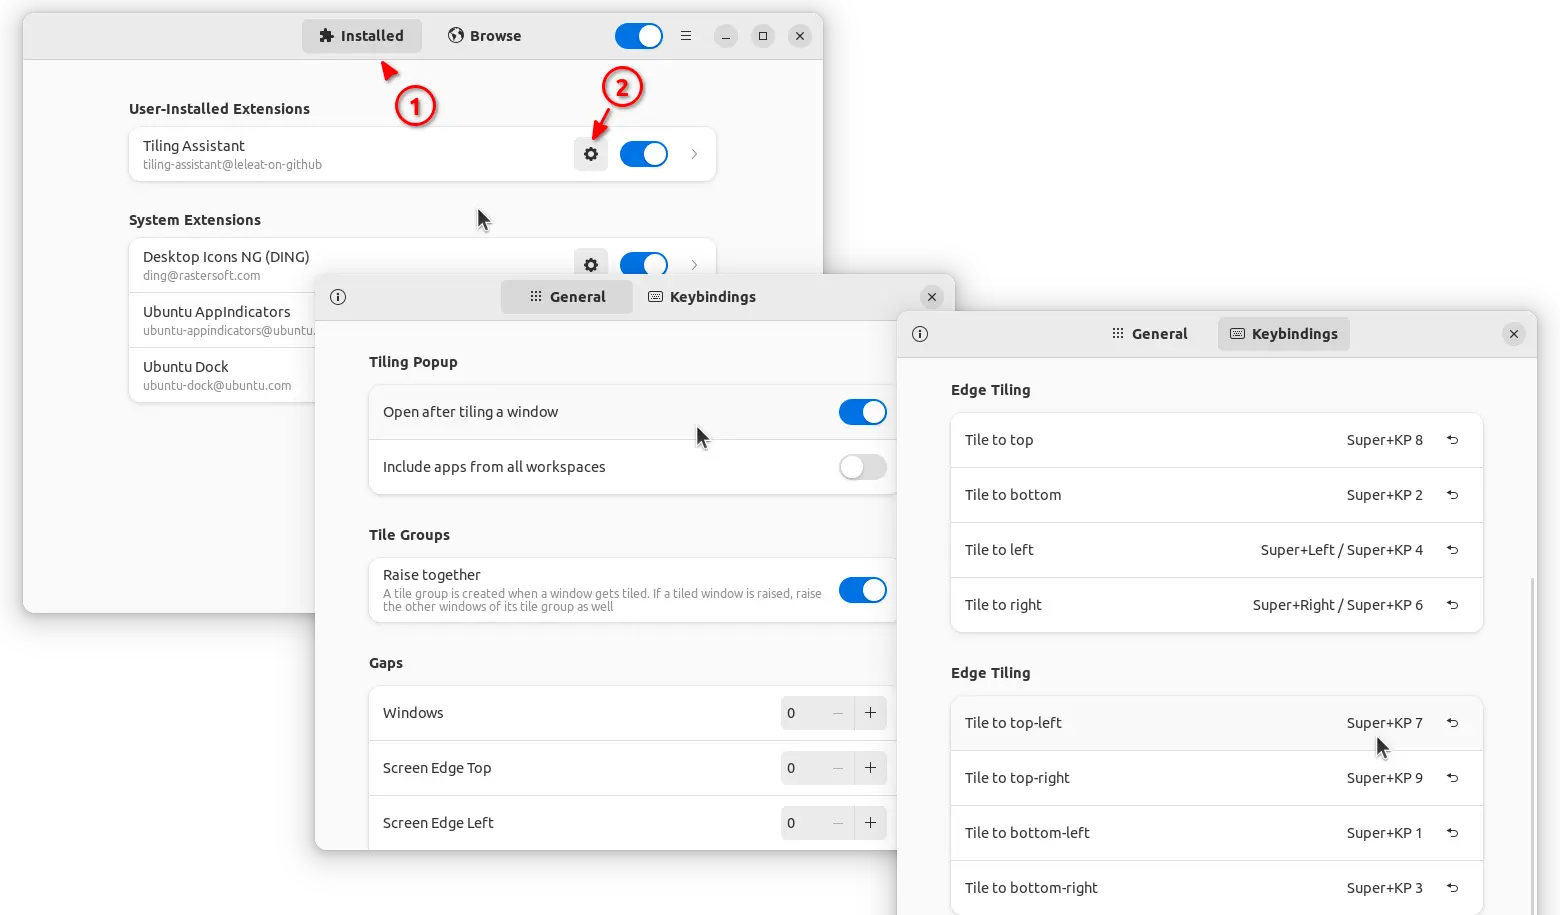
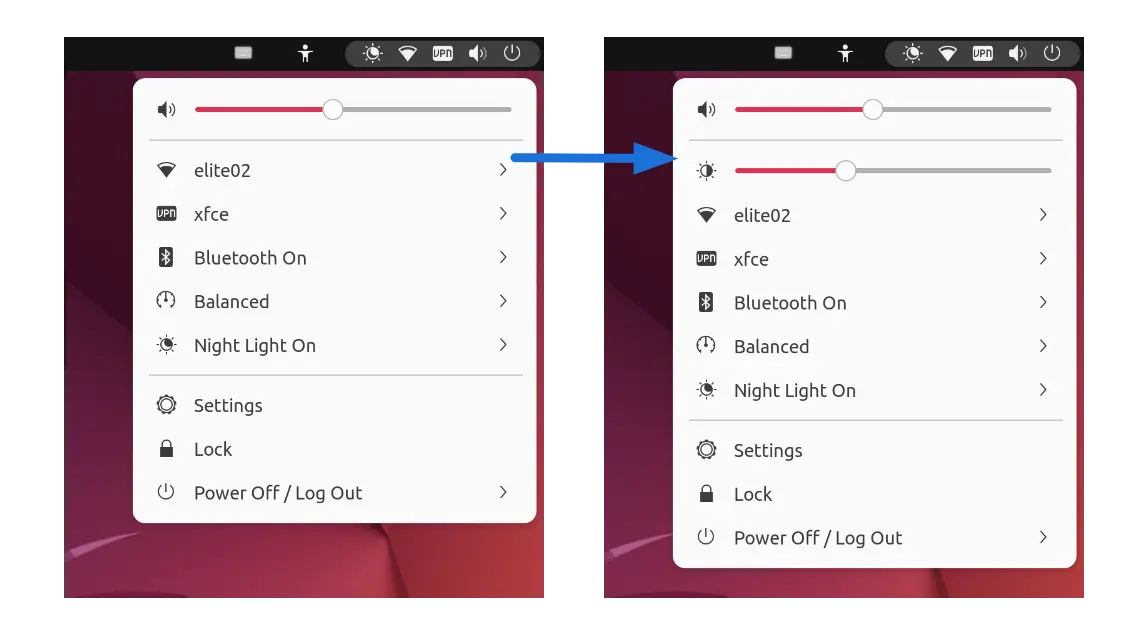
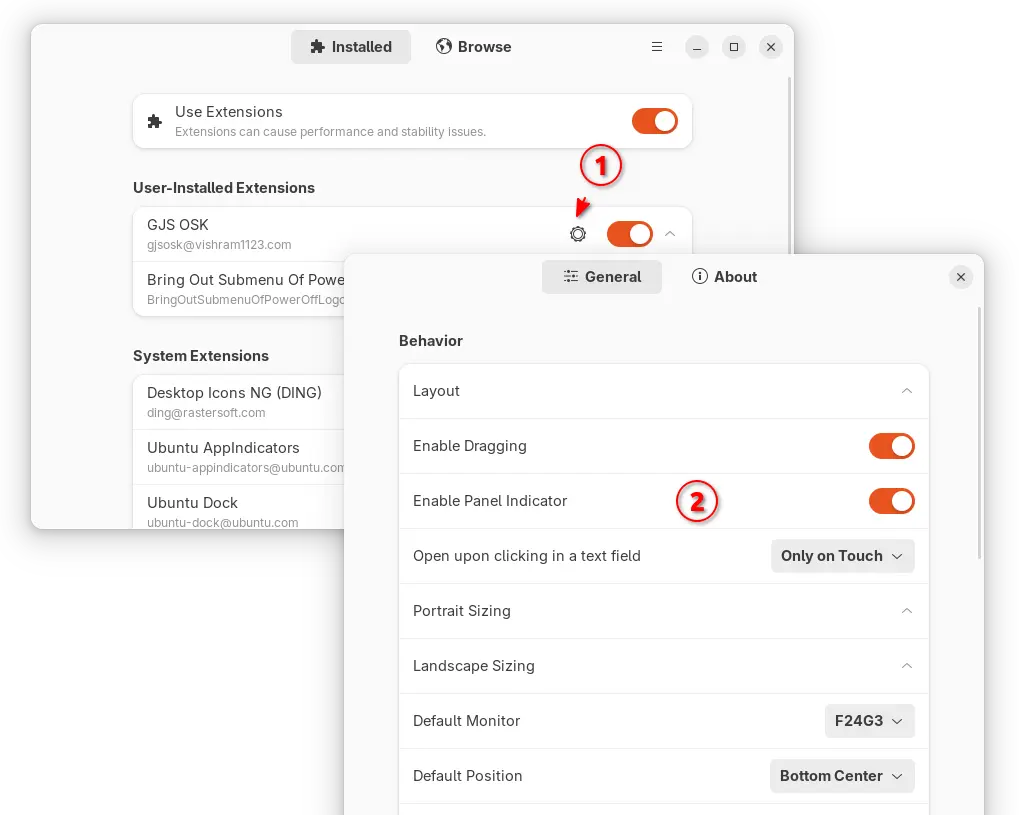
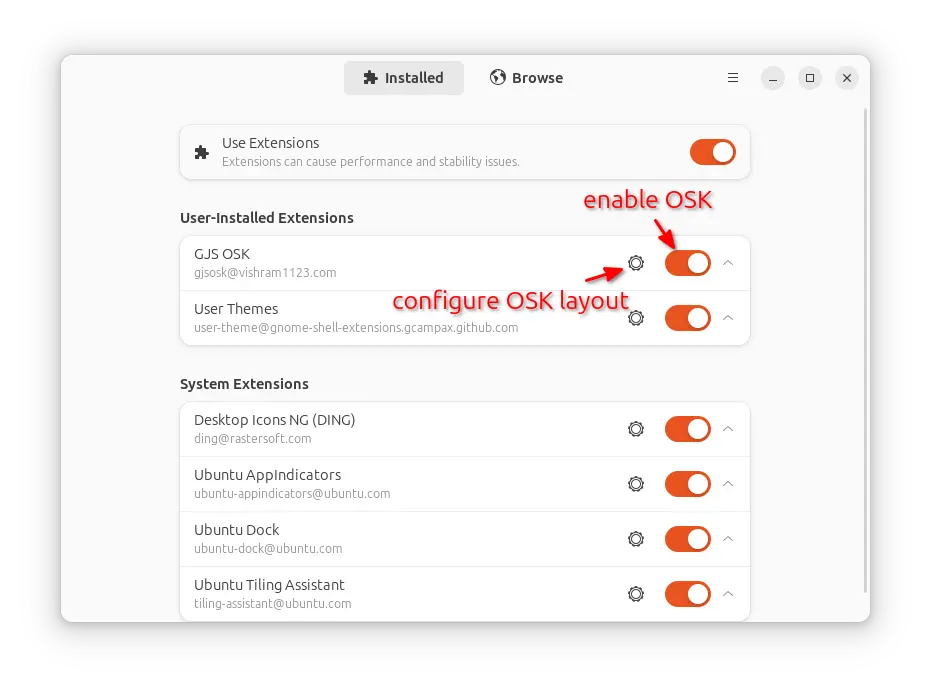
Once installed, the applet should appear immediately on your panel. You can open the settings page either from applet’s drop-down menu, or via “Extension Manager”.
Of course, in the server (either local or remote) that’s running Transmission, you have to enable the Remote Control first from preferences.
Transmission GTK, enable Remote Control
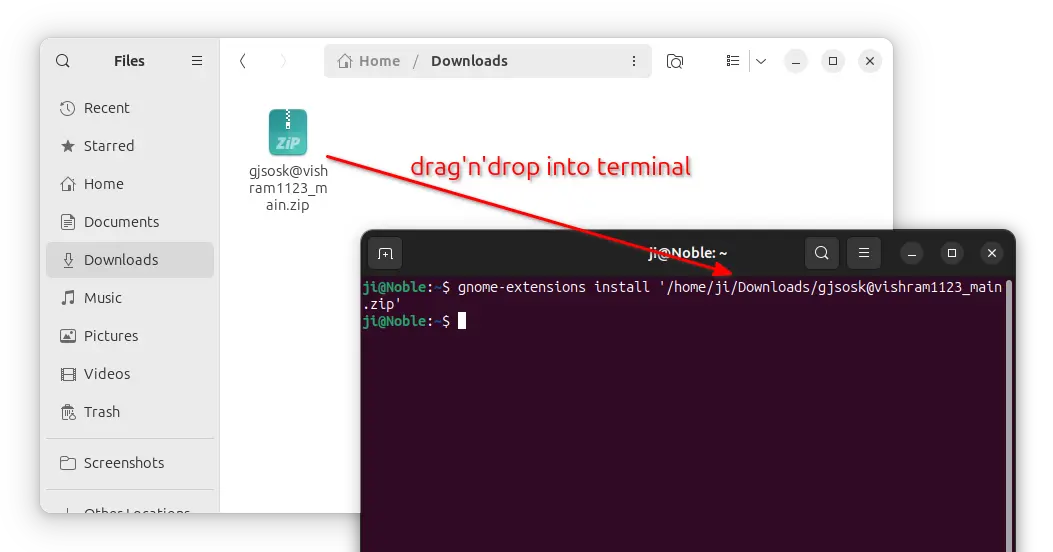
For Transmission daemon running in the background, edit the ‘/etc/transmission-daemon/settings.json‘ file to enable RPC remote control, setup user & password, whitelist, etc, before being able to connect.
Remember to use systemctl reload transmission-daemon.service to apply changes, since start or restart may reset your password in the config file.
Ubuntu (since 23.10) introduced new enhanced tiling window support! Here’s how you can try it out in Ubuntu 22.04 & Ubuntu 20.04.
For those who don’t know what is window tiling, it’s a window management behavior that snap window to screen edge/corner to be half or quarter-tile. So, you can work with 2, 3, or 4 app windows side by side in your screen.
Ubuntu so far has basic tiling support, that can only snap window to left or right half-tile. An enhanced tiling is available soon via a new built-in extension called “Tiling Assistant”.
By either dragging or use keyboard shortcut, user can tile window to left, right, top and bottom half, which is called Edge Tiling. And, tile window to top-left, top-right, bottom-left, and bottom-right quarter of screen, called Corner Tiling.
And, after tiling a window, it has a tiling pop-up feature that automatically show you ‘Super + Tab’ app switcher style pop-up to choose which app to auto-tile to the remaining screen space. And, when clicking focus (raise) a tiled window, all windows in the tile group raise together.
Like ‘Ubuntu Dock’, the new extension is a fork of the community maintained ‘Tiling Assistant’ extension. Which, support GNOME desktop from version 3.36 to 44 at the moment.
Ubuntu 22.04 user can firstly search for and install “Extension Manager” from Ubuntu Software.
Install Extension Manager in Ubuntu 22.04+
Then, launch the tool and use it to search & install “Tiling Assistant” extension under Browse tab.
For Ubuntu 20.04, first press Ctrl+Alt+T on keyboard to open terminal and run command to install the agent and Extensions app packages:
If you don’t see the ON/OFF switch, install browser extension with link in the page and then refresh!
After installed the extension, launch either “Extension Manager” or “Gnome Extensions” app and open the settings for that extension to configure the new tiling behavior.
Run Ubuntu on laptop or other machine with touchscreen? You can enable touch feedback with an extension.
It’s ‘Touch X‘, an extension that support GNOME from version 40 to 44. Meaning for Ubuntu 22.04, 23.04, Debian 12, RHEL 9, Fedora, Arch, Manjaro and other Linux with recent GNOME.
In these systems, it supports ripple feedback where the screen is touched. The feedback looks a bit like the locate mouse pointer function as the screenshot below shows you.
I don’t have a touchscreen device running Ubuntu. However, you can install and try the extension out by following steps one by one.
Install Touch X Extension
Firstly, open Ubuntu Software and use it to search and install the “Extension Manager” app.
Install Extension Manager in Ubuntu 22.04+
Then, click on top-left ‘Activities’ to open overview screen. When it opens, search for and launch “Extension Manager”.
Finally, navigate to ‘Browse’ tab in Extension Manager, search and install “Touch X” extension.
Once installed, switch back to “Install” tab. Then, click on the gear icon for that extension to open configuration page.
There you can change the color and radius of the ripple feedback.
For other Linux with GNOME, go to the extension web page via link below:
Want to configure the OSD (on-screen display) pop-up in Ubuntu and other Linux with GNOME? There’s an extension to do the job in GNOME 42 ~ 44.
When changing volume, screen brightness, device status (e.g., Bluetooth), etc via keyboard shortcuts in GNOME, there will be on-screen pop-ups indicate the status changes.
By default, these pop-ups occur in bottom center of screen and hide automatically in 1 seconds.
For those who prefer light theme, there’s an extension now to make all the GNOME Shell components to be light!
Ubuntu so far has light and dark mode options available in the ‘Appearance’ settings page. It can switch the color scheme for system menu, notification, and app windows.
However, other components, such as panel and dock, are always dark!
GNOME developer team has been working on the full light mode support. Before it’s going official, user can try it out via an unofficial extension.
With the extensions, the following part of your desktop will also go light:
Top panel.
Ubuntu Dock (left panel)
OSD (volume down/up pop-up)
Light Shell
Install Light Shell Extension
1. The extension so far supports GNOME 42, 43 and 44. Ubuntu user can first search for and install “Extension Manager” from Ubuntu Software.
Install Extension Manager in Ubuntu 22.04+
2. Then, click on top-left ‘Activities’ to open overview screen. Search for and launch “Extension Manager” tool.
3. When the tool opens, navigate to ‘Browse’ tab. Search for and install ‘Light Shell’ extension.
In case ‘Extension Manager’ does not work for you, go to the extension web page via the link below:
If you don’t see the ON/OFF toggle, install browser extension via link in that page and also press Ctrl+Alt+T on keyboard to open terminal and run command:
sudo apt install chrome-gnome-shell
Finally, refresh the web page.
Turn Off or Remove Light Shell
With the extension enabled, the dark mode (via Appearance settings option) will NOT go fully dark.
In the case, you can launch “Extension Manager“. Then either use the ON/OFF switch to disable the extension, or click expand and use “Remove” button to uninstall.
Running Ubuntu on Desktop PC or laptop with external monitor? You can add a slider in top-right system menu to control the screen brightness.
Unlike laptop’s built-in screen, most Linux today does not provide brightness control for external monitors.
Fortunately, there’s a ddcutil utility can do the job via ddc/ci protocol, which is supported in most external monitors. And, there’s an extension to add the slider control to system status menu.
brightness slider for external monitor
The extension supports all current Ubuntu releases, including Ubuntu 20.04, Ubuntu 22.04, and Ubuntu 24.04, as well as other Linux with recent Gnome desktop, such as Fedora Workstation, Debian, RHEL.
NOTE: DDC/CI is usually enabled by default. Just in case, use your monitor’s physical button to make sure the option is enabled!
1. First of all, press Ctrl+Alt+T on keyboard to open terminal. When it opens, run command to install the ddcutil utility in Ubuntu:
sudo apt install ddcutil
2. Next, add your current user to ‘i2c’ group to grant permissions:
sudo gpasswd --add $USER i2c
3. Install “Extension Manager” tool from Ubuntu Software (or App Center) for installing and managing extensions.
Install Extension Manager in Ubuntu Software/App Center
For Ubuntu 20.04, run command to install “Gnome Extensions” app instead, as well as agent package for browser integration.
4. Ubuntu 22.04 + can now launch “Extension Manager” and use the tool to search and install “Brightness control using ddcutil” extension.
For Ubuntu 20.04, go to this page in web browser, install browser extension if prompted (refresh after installation), and finally turn on the ON/OFF switch to install that extension.
5. The extension by default add an indicator applet in panel with brightness slider. To configure it, open ‘Installed’ tab in “Extension Manager” (or ‘Gnome Extensions’ app for Ubuntu 20.04).
Then, click on either gear button or ‘Settings’ button for that extension. Finally, set button location to “System Menu” and turn on “Hide System Indicator” for better integration.
Looking for an alternative on-screen keyboard for Ubuntu, Fedora or other Linux with GNOME? Try GJS OSK.
The built-in on-screen keyboard in Ubuntu and other Linux with GNOME is not so good. It lacks some keys, and does not raise up in most cases in Ubuntu 22.04.
In this tutorial, I’m going to introduce a new OSK application. It’s GJS OSK written in GNOME JavaScript. The application features on-screen keyboard with even more keys, such as F1 ~ F12, number 0,1,2,…9, Arrows, Ctrl buttons, and PrintScreen.
And, without sticking to the screen bottom, user can move the keyboard anywhere around the screen. Just click on quadruple arrow icon (see screenshot below) in the OSK, then you can drag moving it just like normal applications.
GJS OSK, allows to move around the screen
Also, it has an indicator applet on panel allows to one mouse click to show or hide the keyboard.
Support changing landscape and portrait size, font size, but sadly can NOT change the keyboard size.
Allow changing keyboard color.
Support QWERTY, QWERTZ, AZERTY, Dvorak layout.
GJS OSK with different background color
How to Install GJS OSK
NOTE: GJS OSK is a stand-alone on-screen keyboard. You need to disable system built-in on-screen keyboard first from Settings to avoid conflict.
Option 1: Install GJS OSK from EGO
GJS OSK is available as an extension in extensions.gnome.org (aka EGO), and so far it supports for GNOME from v42 to 47 (meaning Ubuntu 22.04 ~ 24.10).
Ubuntu users may first search and install “Extension Manager” from App Center or Ubuntu Software.
Install Extension Manager in Ubuntu Software/App Center
Then, launch Extension Manager and navigate to Browse tab, to search and install “GJS OSK”:
After installed the extension, you’ll see the indicator icon in top-right to toggle view/hide the on-screen keyboard.
And, by switching to “Installed” tab in Extension Manager, you may click on the gear icon to open the preferences dialog, and configure the extension layout, appearance, etc.
Option 2: Install the extension from source:
1. First, go to link below to download the source from Github release page:
For GNOME 45+, meaning Ubuntu 24.04/23.10, Fedora 39/40, Arch/Manjaro etc, select download the main.zip under ‘Assets’ section. While GNOME 44 and earlier, meaning Ubuntu 22.04, Debian 12, etc, can choose the pre-45.zip.
2. After downloaded the .zip package, you do NOT have to extract it. Just open up a terminal window (for Ubuntu, press Ctrl+Alt+T) and run command to install it:
gnome-extensions install /path/to/zip
Instead of typing /path/to/zip, you can just drag’n’drop it into terminal instead.
3. log out and back in. Then, launch either “GNOME Extensions” or “Extension Manager” app (both available in Ubuntu Software, App Center (filter via Debian Package), Gnome Software). Turn on the new “GJS OSK” extension, and click its gear icon to configure its layout.
Finally, click on the top-right corner keyboard indicator applet to show/hide the new on-screen keyboard.
Uninstall GJS OSK
To remove the extension, also launch “Gnome Extensions” or “Extension Manager”, click the “⋮” or arrow icon beside the toggle switch to expand, and select “Remove” the extension.
Want to send your application shortcut icons onto desktop, so you can click them to launch the corresponding apps? This simple tutorial is going to show you how to do the job in Ubuntu 24.04 with default GNOME Desktop.
As far as I know, there are 2 ways to easily add your app icons to the desktop in Ubuntu. They include:
Manually drag and drop the associated .desktop file on to desktop, add executable permission, and enable allow launching.
Another way is using an extension, which adds “Add to Desktop” context menu option to your app icons.
In Ubuntu, Fedora and other Linux with GNOME desktop, you may found that many applications have child dialogues attached to parent windows.
For example, when opening ‘About’ dialog for Files or adding custom shortcut in System Settings. The parent window will always attach the pop-up child dialog. User can not move it out of the way until close it.
For those who don’t like this feature, it’s easy to detach the child windows. And, this tutorial is going to show you how!
Option 1: Single command to detach child windows
For those who are familiar with Linux command, press Ctrl+Alt+T on keyboard to open a terminal window.
When terminal opens, run command:
gsettings set org.gnome.mutter attach-modal-dialogs false
It applies the change immediately once you hitting Enter, though it’s for current user only!
Option 2: Use Gnome Tweaks (Graphical)
Gnome Tweaks, the popular graphical configuration tool for GNOME desktop, also has the option to do the similar job.
First, search for and install “Gnome Tweaks” from Ubuntu Software (or Gnome Software):
Then, launch Gnome Tweaks and navigate to “Windows” in left. Finally, turn off the option for “Attach Modal Dialogs” option and done.
Ubuntu has an indicator applet to quickly prevent screen goes blank, lock screen, and/or automatically suspend on system idle.
It’s “Caffeine”, a more than 10 years old tool, that’s now available as Gnome Shell Extension. Which is useful when watching movies, or doing automation process that needs screen to keep alive.
Previously, it acts an indicator applet in the system tray on top-panel. By clicking on it will prevent (or allow again) screen blank and auto suspend when system idle.
Now it’s available as an extension for the default Ubuntu Desktop, which adds a button in the upper right system menu, to quickly toggle on/off system idle feature.
Besides prevent screen blank infinitely, there’s now also sub menu options to do the action in just 5, 10, or 30 minutes. Once you enable Caffeine along with one of the time options, it shows the applet with count down timer in the aggregation icons on top-bar.
As well, instead of showing notifications, it now display volume control style OSD in center of bottom screen when toggling on/off Caffeine option.
How to Install Caffeine in Ubuntu:
NOTE: Caffeine works on all current Ubuntu (Ubuntu 18.04, Ubuntu 20.04, Ubuntu 22.04, and Ubuntu 24.04), Fedora and other Linux with GNOME Desktop. Though, the features mentioned above are only for GNOME 43 so far.
For Ubuntu 22.04 and Ubuntu 24.04, search for and install “Extension Manager” from Ubuntu Software (or App Center).
Install Extension Manager in Ubuntu Software/App Center
Then launch it and use the tool to search and install Caffeine extension.
For old Ubuntu 18.04 and other Linux with GNOME, use the ON/OFF switch at the page below to install it: