![]()
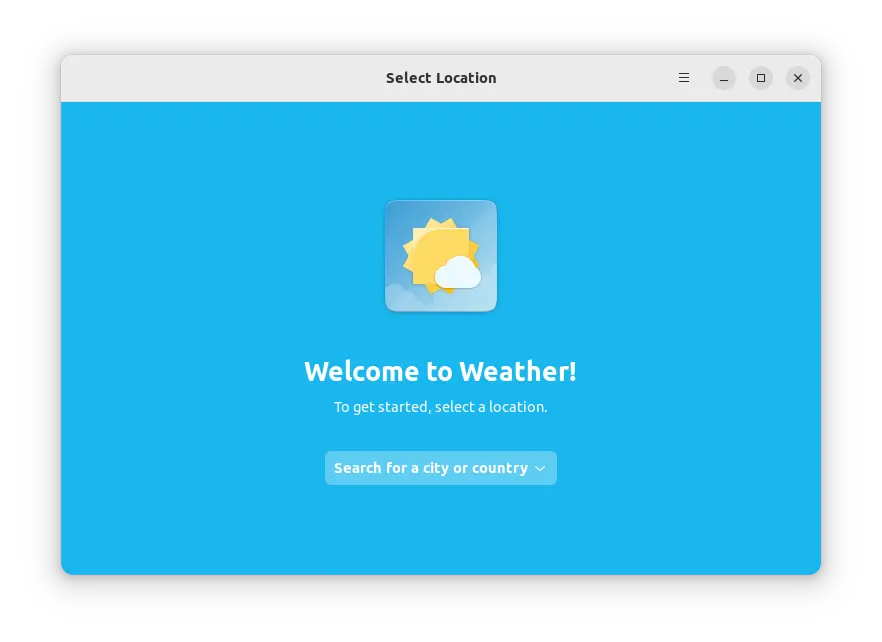
When first time logging in a user account, it always pop-up an initial setup dialog to setup online account, livepath, privacy, etc in Ubuntu.
It’s quite annoying if you create new user accounts regularly, since all options in that dialog are also available in system settings. In this case, you can follow this tutorial to disable this function in Ubuntu 22.04 and Ubuntu 24.04.
Tip: run /usr/libexec/gnome-initial-setup --existing-user command in terminal can manually launch Welcome dialog if need in Ubuntu.

Welcome dialog in user first login
Here I’ll show you how to disable the initial setup dialog in 3 ways. Choose one of below methods that your prefer:
- Method 1: Remove the software package.
- Method 2: Add a rule in the service file, so it will never meet the condition to pop-up the dialog.
- Method 3: Auto-generate
gnome-initial-setup-donefile, so it think you’re already done the initial setup
Method 1: Remove the Welcome package
The Welcome to Ubuntu dialog is handled by the gnome-initial-setup package. It’s safe to remove the package, as no other packages depend on it.
So, the most stupid and simple way to disable this feature is press Ctrl+Alt+T on keyboard to open terminal, and run command to remove the package:
sudo apt remove --autoremove gnome-initial-setup

Method 2: Disable welcome by editing the service (NOT Work for 24.04)
Without removing the package, you may also disable the feature by adding a rule into the systemd user service.
The old method by editing the “gnome-initial-setup-first-login.desktop” file under auto-start config folder (‘/etc/xdg/autostart‘) does no longer work in Ubuntu 22.04, due to rule X-GNOME-HiddenUnderSystemd=true. Meaning, the XDG Autostart config is overridden by a systemd service.
The key is the systemd service “gnome-initial-setup-first-login.service“. However, it’s running in per user level automatically at login. It’s easy to disable or mask the service for current user by running command:
systemctl --user --now mask gnome-initial-setup-first-login.service
Or, specify which user to disable/mask the service for via command:
systemctl --user --now --machine=USER_NAME_HERE@ mask gnome-initial-setup-first-login.service.service
But, I can’t figure out how to disable the service for all users, especially for non-exist user before you creating it, because you know it runs only on first login for new user (exactly until you done the welcome dialog that auto-generates gnome-initial-setup-done file in user’s .config folder.).
As a workaround, you can add a rule into the service file to skip Welcome dialog automatically for all users:
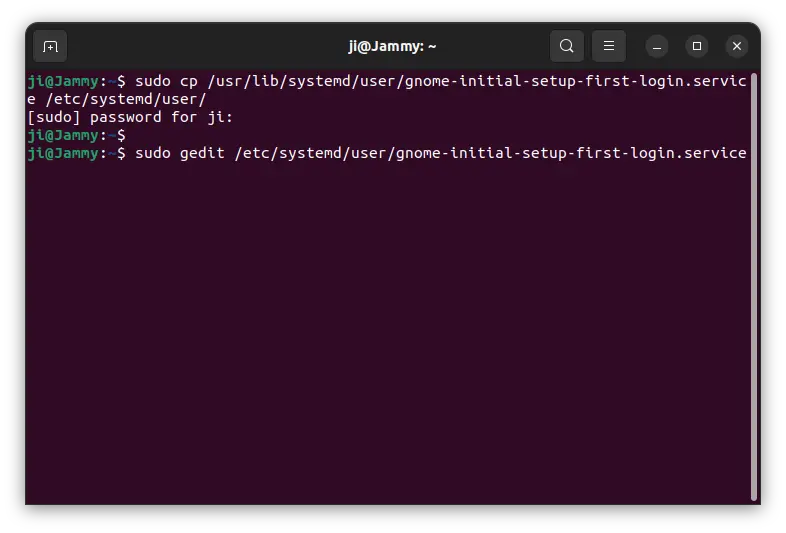
1. Firstly, press Ctrl+Alt+T on keyboard to open a terminal window. When terminal opens, copy the service file into “/etc” directory.
sudo cp /usr/lib/systemd/user/gnome-initial-setup-first-login.service /etc/systemd/user/
It works by editing the service file under ‘/usr/lib’, but changes will be overridden once Ubuntu published an update for it. So, it’s better to copy and paste it into ‘/etc’ which has higher priority.
2. Then, run command to edit the service file:
sudo gedit /etc/systemd/user/gnome-initial-setup-first-login.service
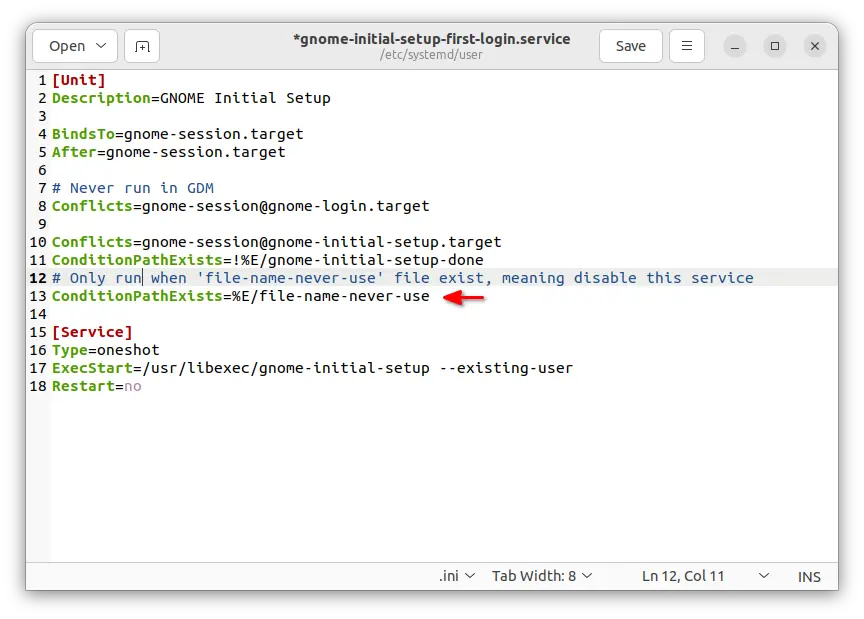
3. When the file opens, add following lines under [unit] section:
# Only run when ‘file-name-never-use’ file exist, meaning disable this service
ConditionPathExists=%E/file-name-never-use
It means only start the service when “file-name-never-use” file exist in user’s .config folder, while the first line started with # is description line.
Finally, save the file. For nano command line text editor, press Ctrl+S to save, then Ctrl+X to exit.
4. (skip this step if you’ve never edited the file) In case you’ve changed the XDG auto-start for gnome-initial-setup, open terminal (Ctrl+Alt+T) and run command:
sudo gedit /etc/xdg/autostart/gnome-initial-setup-first-login.desktop
When file opens, make sure there’s a line X-GNOME-HiddenUnderSystemd=true, so it won’t run because of the service you configured in previous steps.
That’s all, you can now try creating a user account and logging in to see the magic!
Method 3: Generate ‘gnome-initial-setup-done’ file on user creation
As you see in the last screenshot, the first login service contains a line ConditionPathExists=!%/gnome-initial-setup-done. Meaning it only launches the initial setup dialog when ‘gnome-initial-setup-done‘ file does NOT exist in user .config folder.
And, on user creation, Ubuntu and many other Linux automatically copy all the files in /etc/skel directory to the home directory of new user account. They are usually hidden .bashrc, bash_logout, .profile files run automatically at login (or log out) to setup PATH variable, command aliases, tab completion, etc.
By creating a .config sub-folder, that includes gnome-initial-setup-done file, under /etc/skel, will make all new created users include that sub-folder as well as that file in their home directory. So, at every login it thinks the initial setup has done and won’t pop-up the dialog.
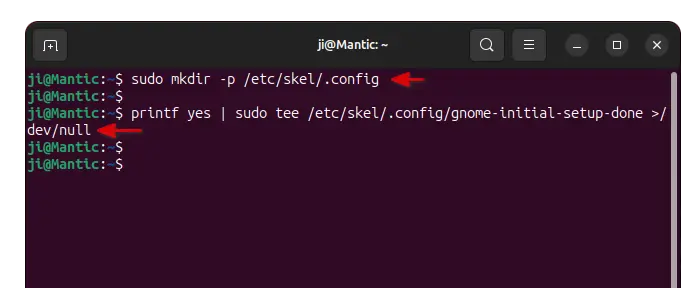
To so do, simply press Ctrl+Alt+T on keyboard to open terminal. Then, run commands (thanks to @smart caraxabill):
- First, create the
.configsub-folder under/etc/skel:sudo mkdir -p /etc/skel/.config
- Then, create the
gnome-initial-setup-donefile and inputyesas it content.printf yes | sudo tee /etc/skel/.config/gnome-initial-setup-done >/dev/null
Restore the Initial Setup Dialog
Depends on which method you chose, undo the change by:
For method 1, just install the package back by running command in terminal (Ctrl+Alt+T):
sudo apt install gnome-initial-setup
For the method 2, just remove the service file under /etc so the original one will be in use:
sudo rm /etc/systemd/user/gnome-initial-setup-first-login.service
And for the last method, remove the .config sub-folder from /etc/skel directory to undo the change:
sudo rm -R /etc/skel/.config
That’s all. Enjoy!