Want to send your application shortcut icons onto desktop, so you can click them to launch the corresponding apps? This simple tutorial is going to show you how to do the job in Ubuntu 24.04 with default GNOME Desktop.
As far as I know, there are 2 ways to easily add your app icons to the desktop in Ubuntu. They include:
Manually drag and drop the associated .desktop file on to desktop, add executable permission, and enable allow launching.
Another way is using an extension, which adds “Add to Desktop” context menu option to your app icons.
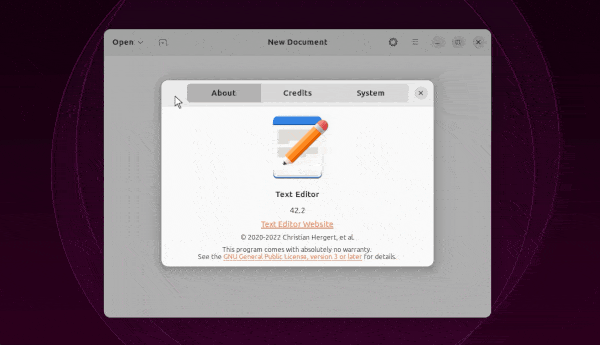
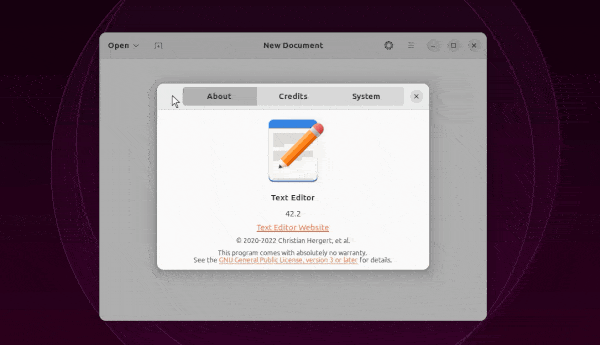
In Ubuntu, Fedora and other Linux with GNOME desktop, you may found that many applications have child dialogues attached to parent windows.
For example, when opening ‘About’ dialog for Files or adding custom shortcut in System Settings. The parent window will always attach the pop-up child dialog. User can not move it out of the way until close it.
For those who don’t like this feature, it’s easy to detach the child windows. And, this tutorial is going to show you how!
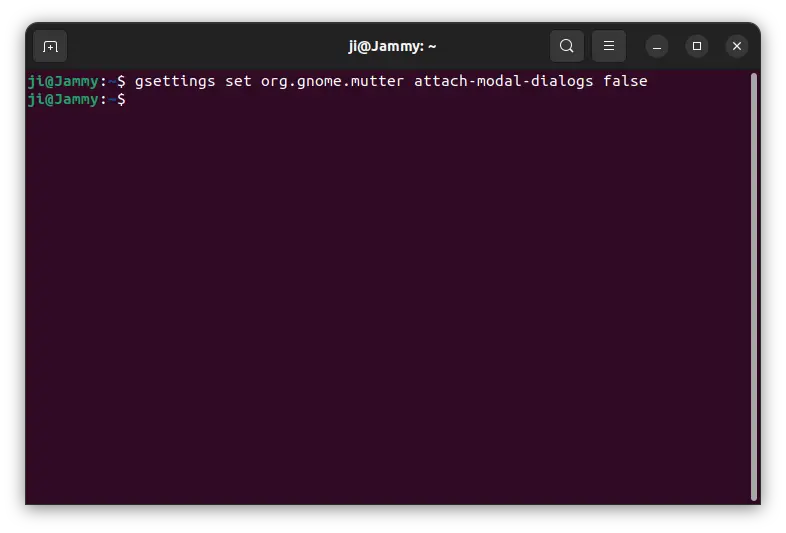
Option 1: Single command to detach child windows
For those who are familiar with Linux command, press Ctrl+Alt+T on keyboard to open a terminal window.
When terminal opens, run command:
gsettings set org.gnome.mutter attach-modal-dialogs false
It applies the change immediately once you hitting Enter, though it’s for current user only!
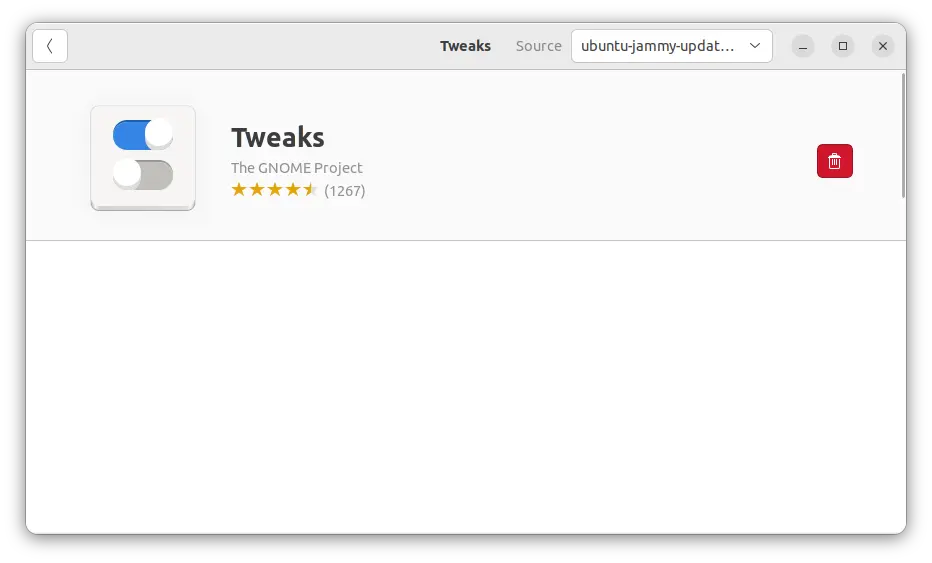
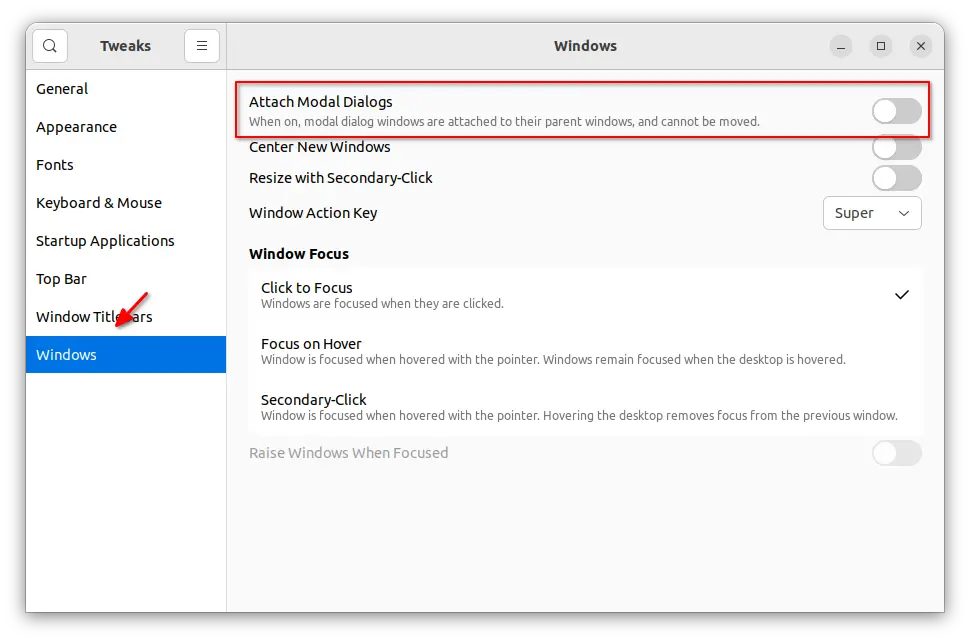
Option 2: Use Gnome Tweaks (Graphical)
Gnome Tweaks, the popular graphical configuration tool for GNOME desktop, also has the option to do the similar job.
First, search for and install “Gnome Tweaks” from Ubuntu Software (or Gnome Software):
Then, launch Gnome Tweaks and navigate to “Windows” in left. Finally, turn off the option for “Attach Modal Dialogs” option and done.
Ubuntu has an indicator applet to quickly prevent screen goes blank, lock screen, and/or automatically suspend on system idle.
It’s “Caffeine”, a more than 10 years old tool, that’s now available as Gnome Shell Extension. Which is useful when watching movies, or doing automation process that needs screen to keep alive.
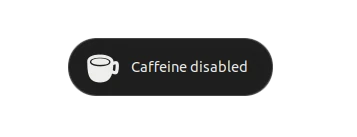
Previously, it acts an indicator applet in the system tray on top-panel. By clicking on it will prevent (or allow again) screen blank and auto suspend when system idle.
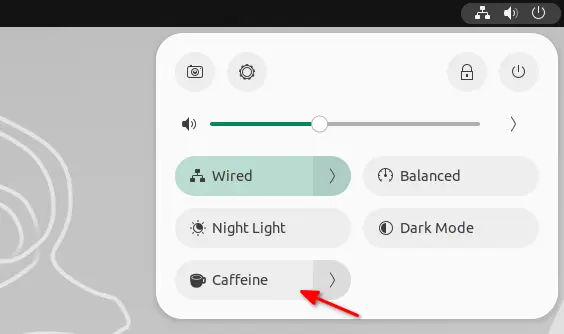
Now it’s available as an extension for the default Ubuntu Desktop, which adds a button in the upper right system menu, to quickly toggle on/off system idle feature.
Besides prevent screen blank infinitely, there’s now also sub menu options to do the action in just 5, 10, or 30 minutes. Once you enable Caffeine along with one of the time options, it shows the applet with count down timer in the aggregation icons on top-bar.
As well, instead of showing notifications, it now display volume control style OSD in center of bottom screen when toggling on/off Caffeine option.
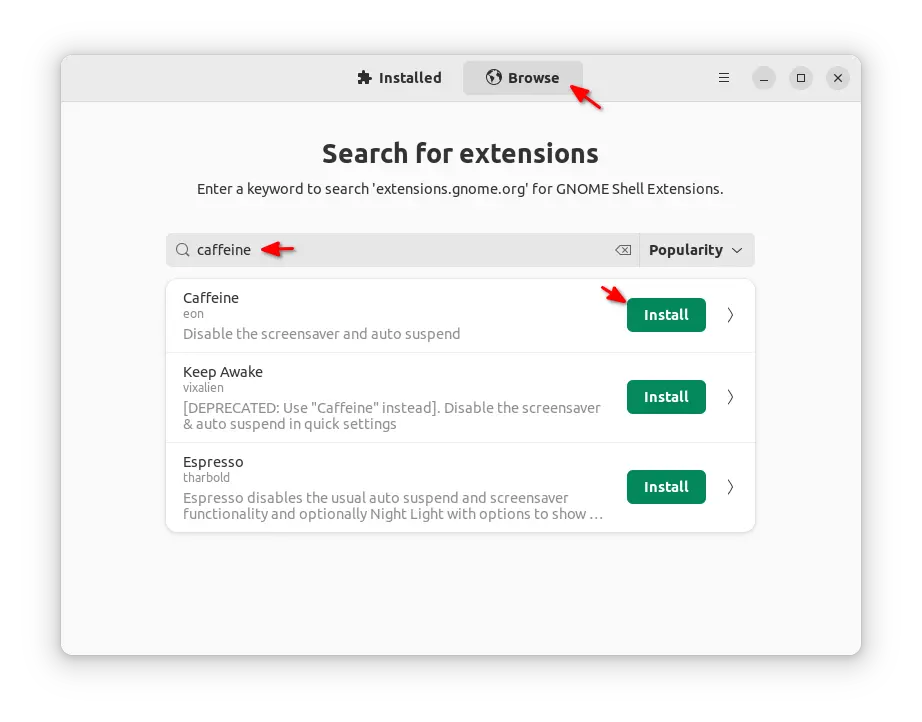
How to Install Caffeine in Ubuntu:
NOTE: Caffeine works on all current Ubuntu (Ubuntu 18.04, Ubuntu 20.04, Ubuntu 22.04, and Ubuntu 24.04), Fedora and other Linux with GNOME Desktop. Though, the features mentioned above are only for GNOME 43 so far.
For Ubuntu 22.04 and Ubuntu 24.04, search for and install “Extension Manager” from Ubuntu Software (or App Center).
Install Extension Manager in Ubuntu Software/App Center
Then launch it and use the tool to search and install Caffeine extension.
For old Ubuntu 18.04 and other Linux with GNOME, use the ON/OFF switch at the page below to install it:
I don’t remember when’s the last time auto-save session feature works correctly in my Ubuntu machine. While, enabling hibernation could be the best choice now to save and restore all open app windows in Ubuntu.
But for those who really like the auto-save session feature, here’s an Gnome Shell extension can do the job partially.
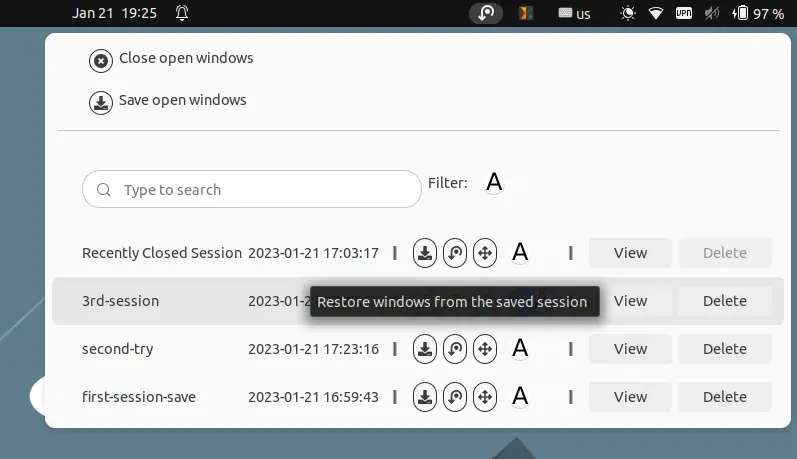
It’s ‘Another Window Session Manager’, an extension which adds an indicator icon on top panel system tray area. It provides an option to manually save all open windows, then allows to restore either manually via menu button or automatically at login.
Save open windows
Not only for classic Xorg, but it also supports Wayland session. Also, it remembers window size, position, and workspace. The downsides are that it does not restore the window workspace correctly sometimes, and restores some apps in empty window rather than last open files or URLs.
The extension is not perfect so far, but anyhow it’s better than nothing!
How to Install this session restore extension:
The extension so far support for Gnome 40, 41, 42 and 43. Meaning not only for Ubuntu 22.04, Ubuntu 22.10, it also works in Fedora 35/36/37 workstation, Rocky Linux 9, Arch, and other Linux with recent GNOME desktop.
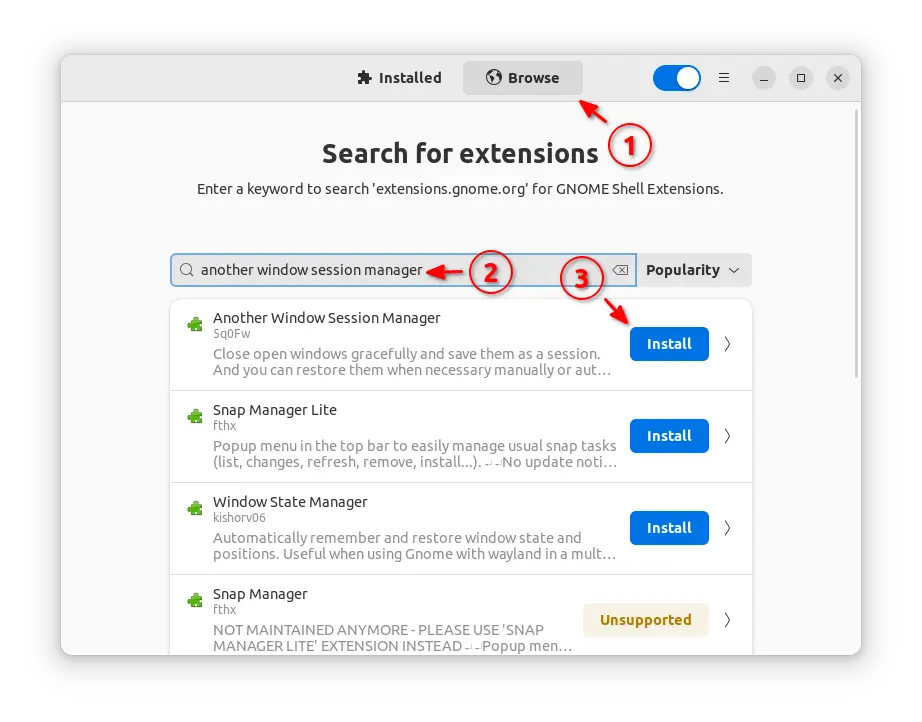
For Ubuntu 22.04+, first search for and install “Extension Manager” app from Ubuntu Software.
Install Extension Manager in Ubuntu 22.04+
Then, use the tool to search and install “Another Window Session Manager” under Browse tab.
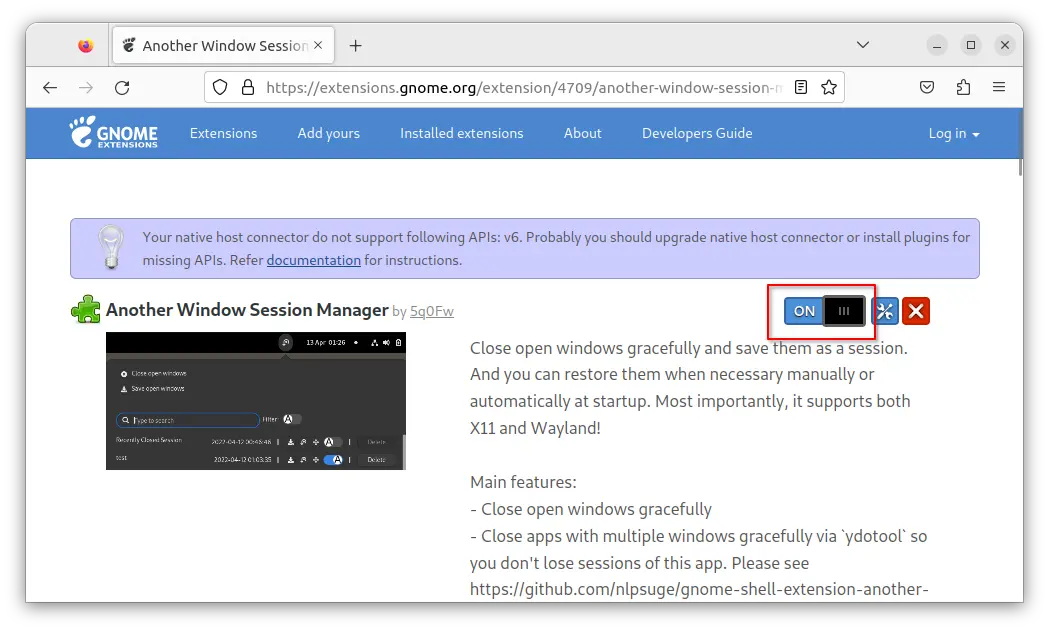
For Fedora 35/36/37 and other Linux with GNOME, visit the extension web page and use ON/OFF switch to install it.
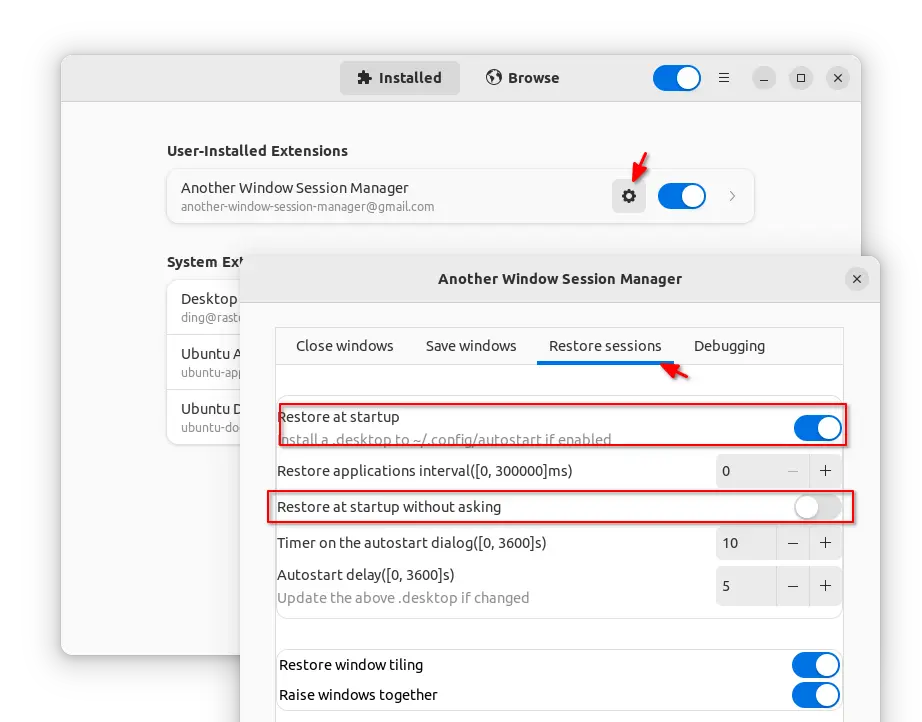
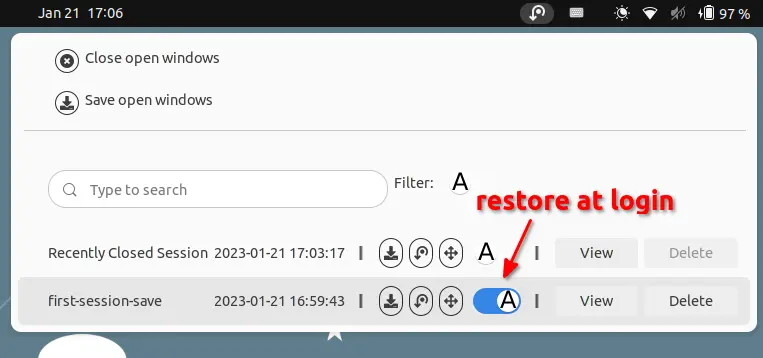
Enable Restore open windows at login
The feature to restore all open app windows on startup after user login is not enabled by default.
You can need to do following steps one by one to enable the function:
First, go to ‘Installed’ tab in Extension Manager. Then open the configuration dialog for the extension, by clicking on the gear button. (or install Gnome Extensions app and use the tool to open the settings).
Next, navigate to “Restore Sessions” tab and:
enable ‘Restore at startup’ toggle option.
enable ‘Restore at startup without asking’ to skip the confirm dialog on each login (optional)
Finally, open the indicator menu, and turn on the ON/OFF switch for your saved session, so it will restore automatically at next login.
When first time logging in a user account, it always pop-up an initial setup dialog to setup online account, livepath, privacy, etc in Ubuntu.
It’s quite annoying if you create new user accounts regularly, since all options in that dialog are also available in system settings. In this case, you can follow this tutorial to disable this function in Ubuntu 22.04 and Ubuntu 24.04.
Tip: run /usr/libexec/gnome-initial-setup --existing-user command in terminal can manually launch Welcome dialog if need in Ubuntu.
Welcome dialog in user first login
Here I’ll show you how to disable the initial setup dialog in 3 ways. Choose one of below methods that your prefer:
Method 1: Remove the software package.
Method 2: Add a rule in the service file, so it will never meet the condition to pop-up the dialog.
Method 3: Auto-generate gnome-initial-setup-done file, so it think you’re already done the initial setup
Method 1: Remove the Welcome package
The Welcome to Ubuntu dialog is handled by the gnome-initial-setup package. It’s safe to remove the package, as no other packages depend on it.
So, the most stupid and simple way to disable this feature is press Ctrl+Alt+T on keyboard to open terminal, and run command to remove the package:
sudo apt remove --autoremove gnome-initial-setup
Method 2: Disable welcome by editing the service (NOT Work for 24.04)
Without removing the package, you may also disable the feature by adding a rule into the systemd user service.
The old method by editing the “gnome-initial-setup-first-login.desktop” file under auto-start config folder (‘/etc/xdg/autostart‘) does no longer work in Ubuntu 22.04, due to rule X-GNOME-HiddenUnderSystemd=true. Meaning, the XDG Autostart config is overridden by a systemd service.
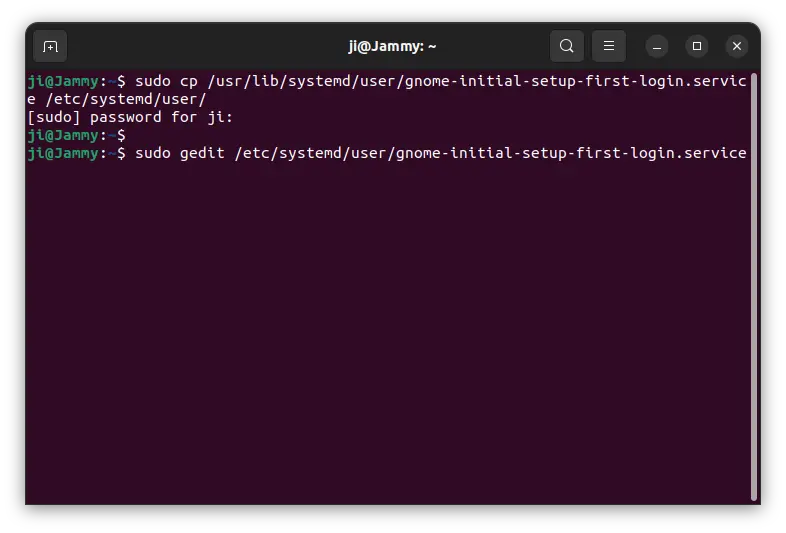
The key is the systemd service “gnome-initial-setup-first-login.service“. However, it’s running in per user level automatically at login. It’s easy to disable or mask the service for current user by running command:
But, I can’t figure out how to disable the service for all users, especially for non-exist user before you creating it, because you know it runs only on first login for new user (exactly until you done the welcome dialog that auto-generates gnome-initial-setup-done file in user’s .config folder.).
As a workaround, you can add a rule into the service file to skip Welcome dialog automatically for all users:
1. Firstly, press Ctrl+Alt+T on keyboard to open a terminal window. When terminal opens, copy the service file into “/etc” directory.
It works by editing the service file under ‘/usr/lib’, but changes will be overridden once Ubuntu published an update for it. So, it’s better to copy and paste it into ‘/etc’ which has higher priority.
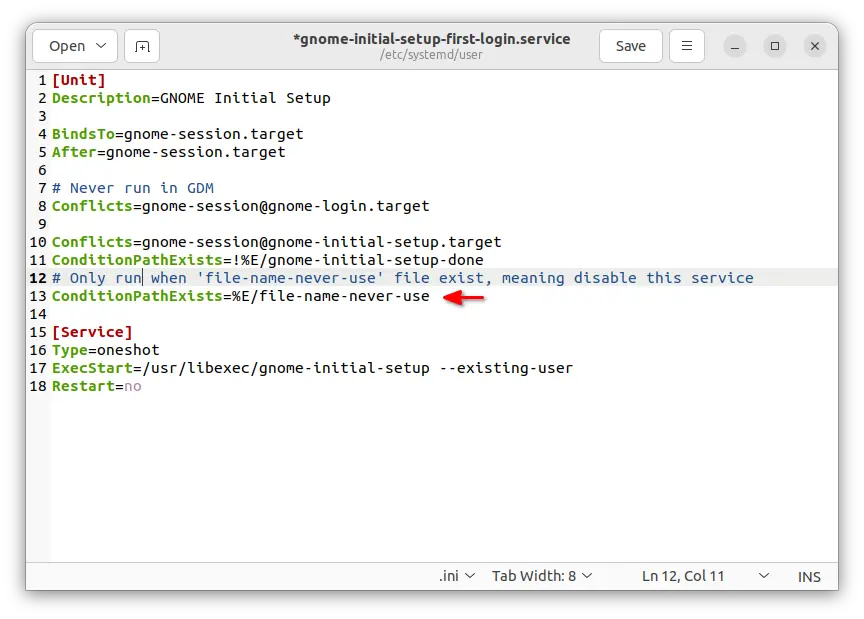
3. When the file opens, add following lines under [unit] section:
# Only run when ‘file-name-never-use’ file exist, meaning disable this service
ConditionPathExists=%E/file-name-never-use
It means only start the service when “file-name-never-use” file exist in user’s .config folder, while the first line started with # is description line.
Finally, save the file. For nano command line text editor, press Ctrl+S to save, then Ctrl+X to exit.
4. (skip this step if you’ve never edited the file) In case you’ve changed the XDG auto-start for gnome-initial-setup, open terminal (Ctrl+Alt+T) and run command:
When file opens, make sure there’s a line X-GNOME-HiddenUnderSystemd=true, so it won’t run because of the service you configured in previous steps.
That’s all, you can now try creating a user account and logging in to see the magic!
Method 3: Generate ‘gnome-initial-setup-done’ file on user creation
As you see in the last screenshot, the first login service contains a line ConditionPathExists=!%/gnome-initial-setup-done. Meaning it only launches the initial setup dialog when ‘gnome-initial-setup-done‘ file does NOT exist in user .config folder.
And, on user creation, Ubuntu and many other Linux automatically copy all the files in /etc/skel directory to the home directory of new user account. They are usually hidden .bashrc, bash_logout, .profile files run automatically at login (or log out) to setup PATH variable, command aliases, tab completion, etc.
By creating a .config sub-folder, that includes gnome-initial-setup-done file, under /etc/skel, will make all new created users include that sub-folder as well as that file in their home directory. So, at every login it thinks the initial setup has done and won’t pop-up the dialog.
To so do, simply press Ctrl+Alt+T on keyboard to open terminal. Then, run commands (thanks to @smart caraxabill):
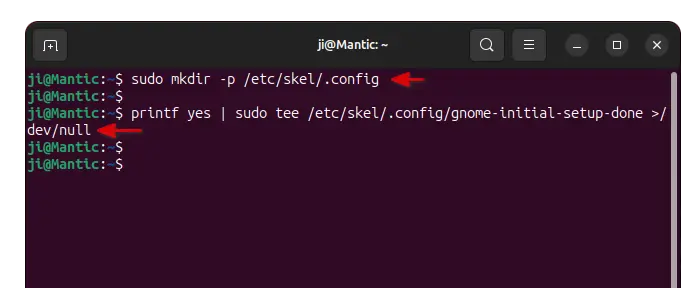
First, create the .config sub-folder under /etc/skel:
sudo mkdir -p /etc/skel/.config
Then, create the gnome-initial-setup-done file and input yes as it content.
printf yes | sudo tee /etc/skel/.config/gnome-initial-setup-done >/dev/null
Restore the Initial Setup Dialog
Depends on which method you chose, undo the change by:
For method 1, just install the package back by running command in terminal (Ctrl+Alt+T):
sudo apt install gnome-initial-setup
For the method 2, just remove the service file under /etc so the original one will be in use:
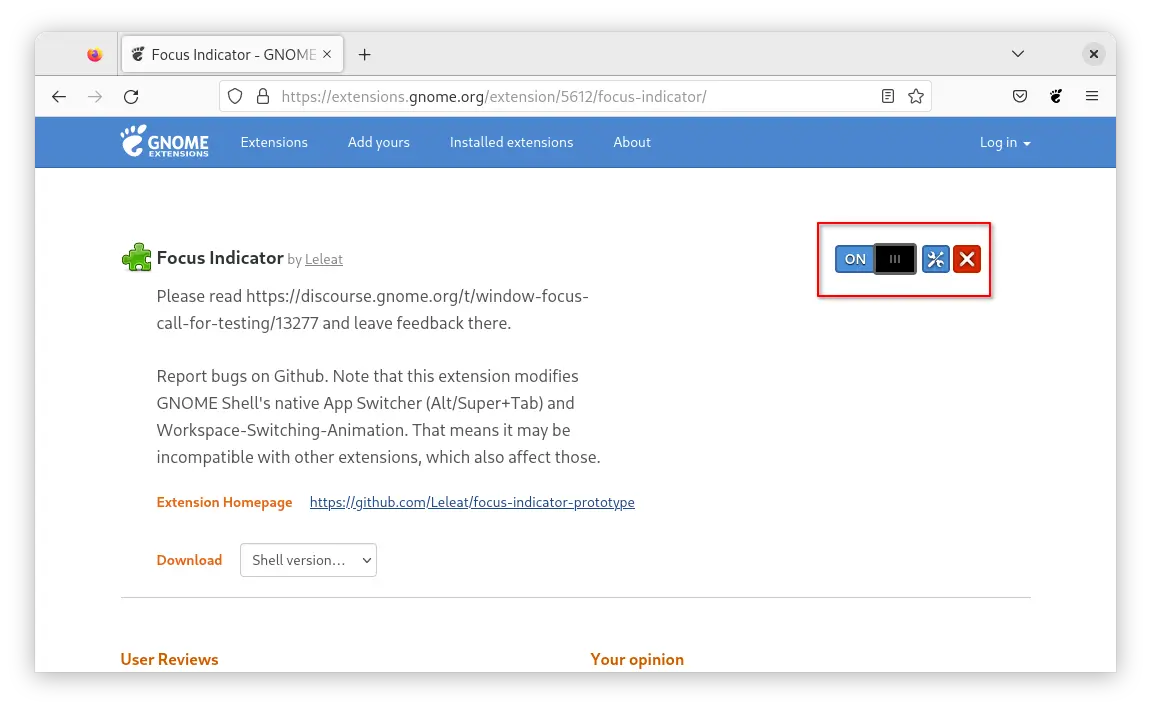
UPDATE 2024: The Focus Indicator is NO Longer available! See the GNOME Discourse page for more about it.
Gnome, the default desktop environment in Ubuntu & Fedora Workstation, is going to replace the app menu with a new window animation, for indicating window focus.
Meaning it will remove the app menu for current window, in the top-bar beside ‘Activities’ button. Because, it’s always confusing users who are new to GNOME.
Gnome to remove app menu, instead using a window animation
Instead, when switching workspaces, closing a window, or pressing Super + Tab, it will perform a short animation on newly focused window. As the GIF below shows you, it’s a window animation that scales up the window and then scales back, indicating that the window is on focus.
The downside so far is that it’s missing the behavior to indicate the process of launching a large or slow application …
How to Install the new Window Animation
The new function is available so far as a Gnome Shell extension called “Focus Indicator“, for testing purpose in GNOME 43. Meaning users of Ubuntu 22.10, Fedora 37, Arch and Manjaro, etc., can try it out by following the steps below.
1. For Ubuntu 22.10, firstly search for and install Extension Manager from Ubuntu Software.
Install Extension Manager in Ubuntu 22.04+
2. Then open the tool, and navigate to ‘Browse’ tab to search and install ‘Focus Indicator’:
For other Linux, just use ON/OFF switch in this web page to install the extension.
Configure the Window Focus animation
After installed the extension, use either Extension Manager or Gnome Extensions app to open the configuration dialog. Then, you can set the scale up/down delay, animation duration, scale factor, and so forth.
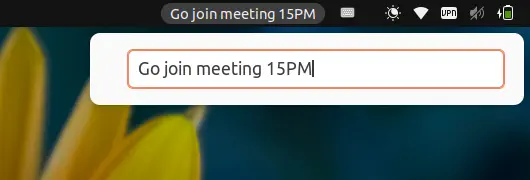
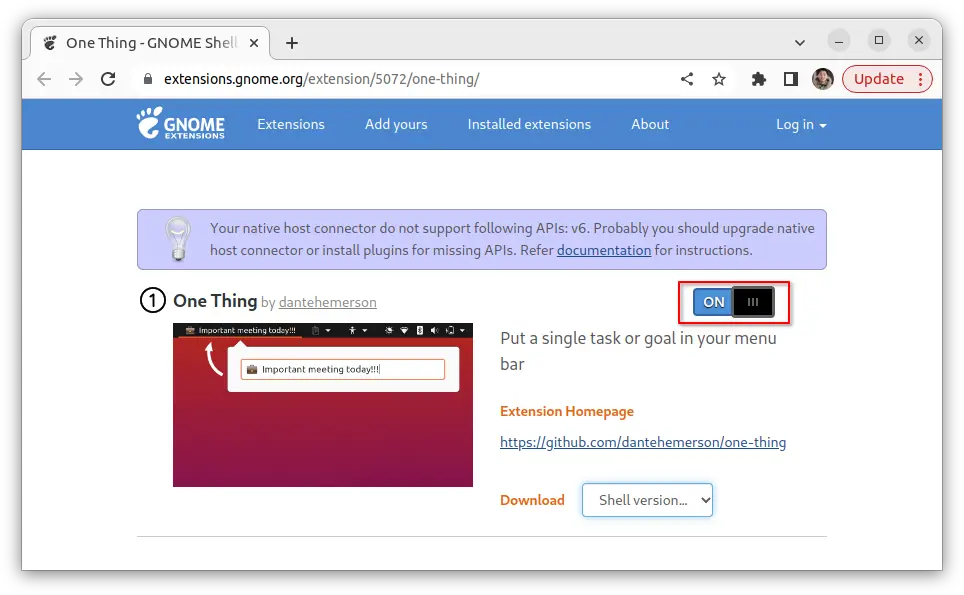
Have an important task to do in next few hours, or you have to write something down hurriedly? Here an extension allows to write one thing into the top-bar in Ubuntu, Fedora, and other Linux with GNOME Desktop.
It’s ‘One Thing‘, a gnome shell extension allows to write any word into top panel, to remind you something important!
With it, user can simply click the original text on panel to open the input box, type anything, and hit Enter to make it display in panel. And, it so far works in GNOME 3.36, 3.38, 40, 42, and 43, meaning for Ubuntu 20.04 | 22.04 | 22.10, Fedora 36/37, Debian 11, Rocky Linux 9, Arch and Manjaro Linux with GNOME.
How to Install this extension:
For Ubuntu 22.04 and Ubuntu 22.10, first search for and install ‘Extension Manager’ from Ubuntu Software.
Install Extension Manager in Ubuntu 22.04+
The launch and use ‘Extension Manager’ to search and install the ‘One Thing’ extension under Browse tab.
For Ubuntu 20.04 and other Linux, just go to the extension web page and use ON/OFF switch to install it:
Install browser extension and refresh the page if you don’t see the toggle icon! And for Ubuntu 20.04, make sure the agent package is installed by running command in a terminal (Ctrl+Alt+T) window:
sudo apt install chrome-gnome-shell
After installed it, an example text should appear immediately on top-panel. Click it and type your own text and enjoy!
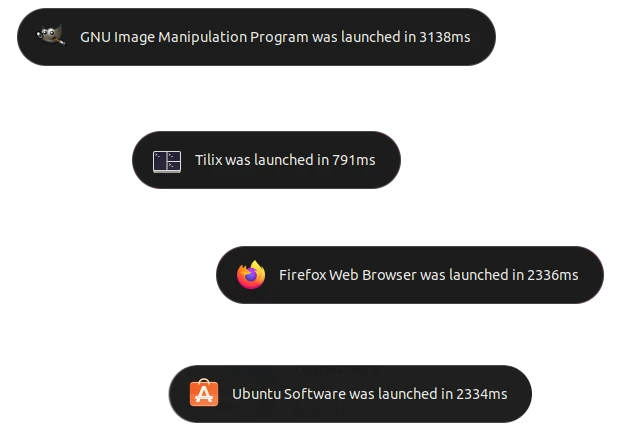
Want to measure your application launch time in Linux? There’s an extension can do the job for GNOME desktop.
Meaning Ubuntu, Fedora workstation, and other Linux with GNOME desktop can easily tell how much time it takes for launching an application, which is useful for benchmark and/or software developing purpose.
With the extension enabled, every time you launching an application, an on-screen display pops up shows the loading time in millisecond. Not only for native .deb/.rpm, but also for Snap and Flatpak applications.
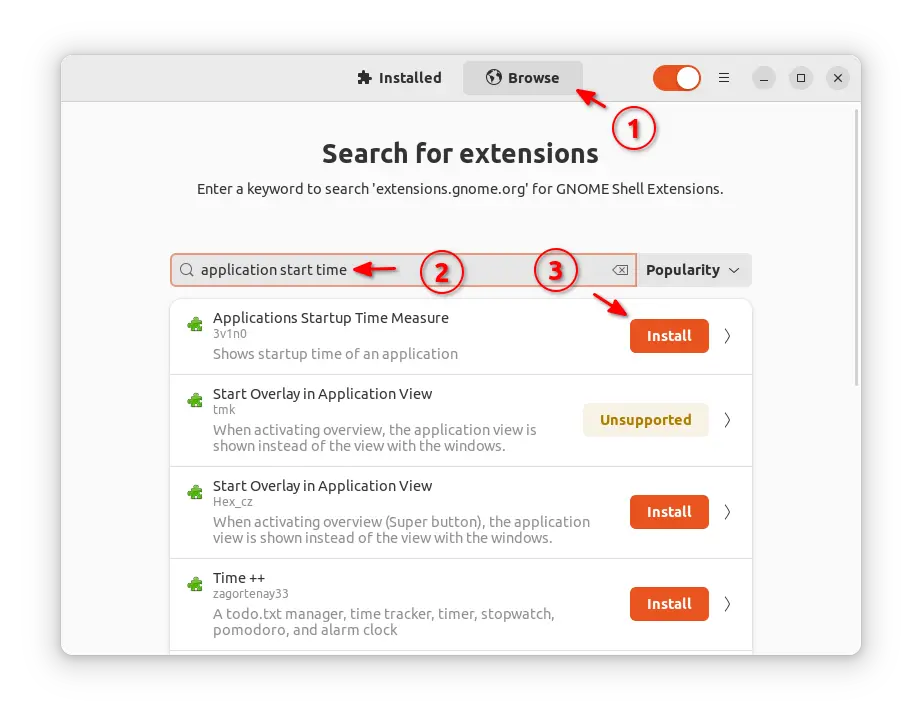
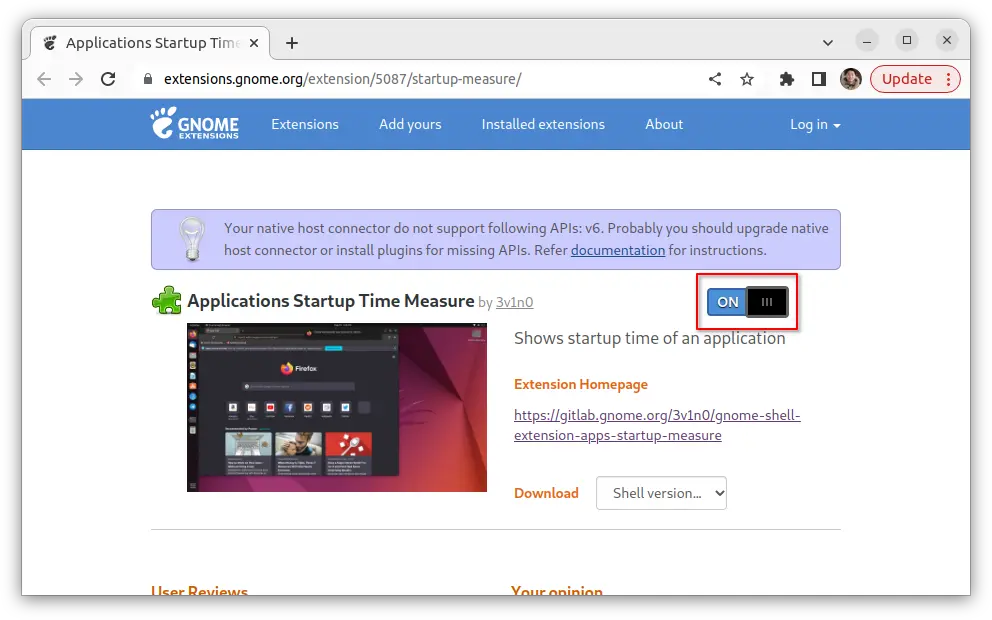
How to Install the App Start Time Measure extension
For Ubuntu 22.04, first search for and install “Extension Manager” from Ubuntu Software.
Install Extension Manager in Ubuntu 22.04+
Then launch “Extension Manager” and use it to search & install ‘application start time measure’:
For Ubuntu 20.04, first press Ctrl+Alt+T on keyboard to open terminal. When it opens, run command to install the agent package:
sudo apt install chrome-gnome-shell
Then, go to extension page in the link below and use ON/OFF switch to install it:
Install the browser extension if prompted via link in that page and refresh if you don’t see the ON/OFF switch.
After installing the extension, it should be enable automatically (verify via ‘Gnome Extensions’ or ‘Extension Manager’). You can then launch something and see the magic!
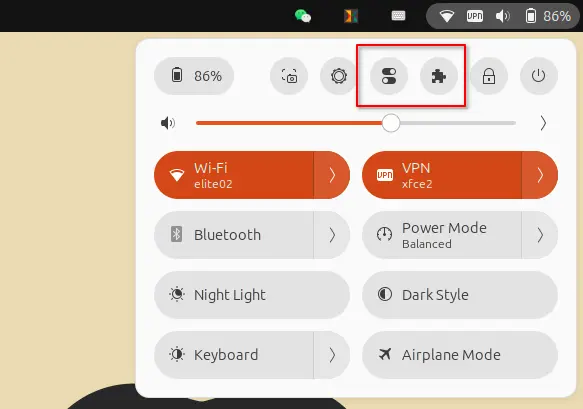
Use Gnome Tweak tool and/or Extensions app frequently? You can add them into top-right corner system menu in Ubuntu 20.04, Ubuntu 22.04, and Ubuntu 24.04.
Meaning you don’t have to search for and launch it every time from ‘Activities’ overview or ‘Show Applications’ screen. Like the built-in ‘Settings’ (Gnome Control Center), just click on top-right corner menu to launch your desired configuration tool.
This is implemented by an extension called “Tweaks & Extensions in System Menu”, which support GNOME version so far up to v46. Sadly, not updated at the moment for GNOME 43 which is default in Ubuntu 22.10 & Fedora 37.
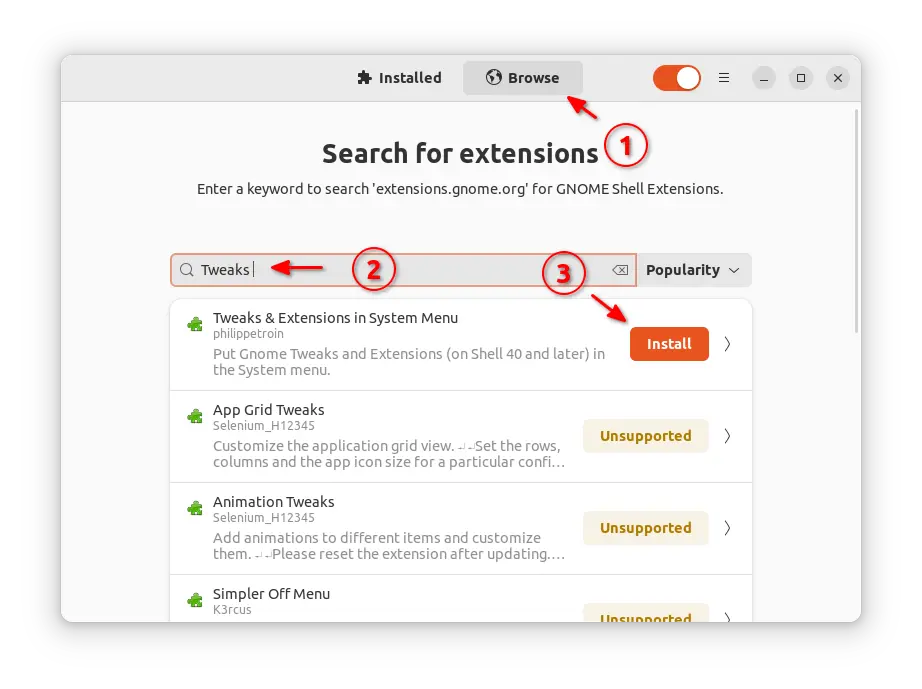
Install the Extension to add system menu options
For Ubuntu 22.04 and higher, first search for and install ‘Extension Manager’ from Ubuntu Software or App Center.
Install Extension Manager in Ubuntu 22.04+
Then launch “Extension Manager” and use it to install the ‘Tweaks in system menu’ extension under ‘Browse’ tab.
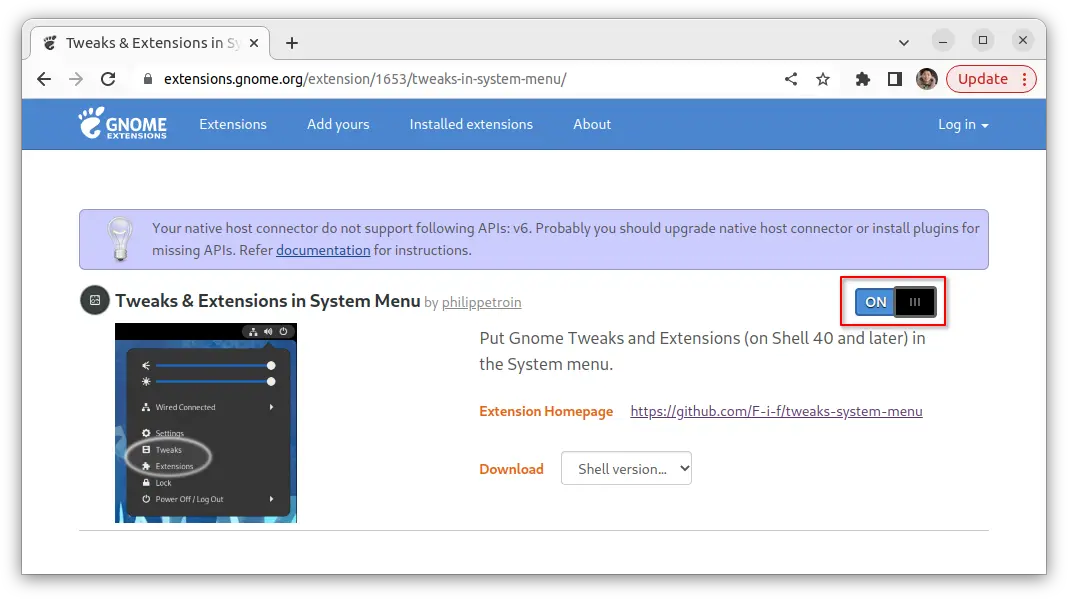
Finally, switch back to ‘Installed’ tab, and click on gear button for that extension to open the configuration dialog. Where you can TURN ON/OFF either option and set its position.
For Ubuntu 20.04 and old Ubuntu 18.04 (not tested), first open terminal by press Ctrl+Alt+T shortcut key on keyboard. And, run command:
sudo apt install chrome-gnome-shell
Then, use the ON/OFF switch to install it via the link page below:
Of course, you must have Gnome Tweak tool and Extensions app installed from Ubuntu Software, to make them visible in the system menu.
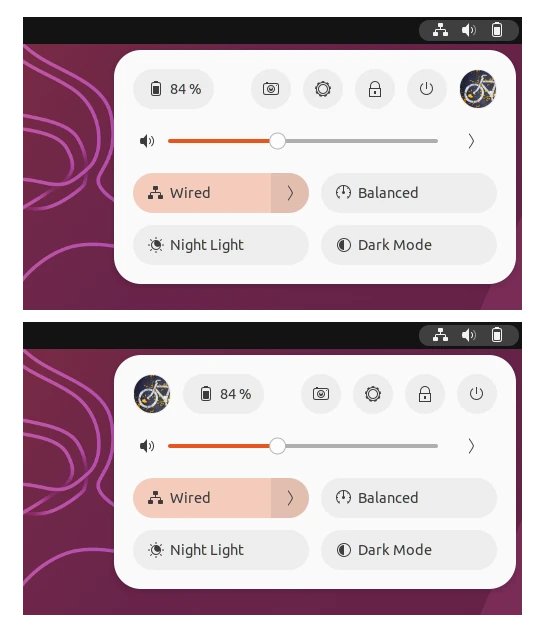
For Ubuntu 24.04 and Fedora Workstation with default GNOME 43 ~ 46, there’s now an extension to add user’s icon or figure (aka avatar) to the top-right corner system tray menu, which is also known as quick settings.
With it, the ‘Quick Settings’ menu will look like the screenshot below shows you. The avatar can be either in left or right. By clicking on it, will launch System Settings (Gnome Control Center) and automatically navigate to user settings page.