Archives For November 30, 1999

Kodi media center 18.4 was released today as another bug-fix release for Kodi 18 “Leia”. Here’s how to install it in Ubuntu 18.04, Ubuntu 16.04, Ubuntu 19.04.

Kodi 18.4 release highlights:

  • FFmpeg: Bump to 4.0.4-Leia-18.4
  • Load program from stream property without using streaminfo (video)
  • Fix initialization of AVD3D11VAContext structure (video, Windows)
  • Fix TS resume point, related to PR16314 (video)
  • Fixed memory leak, fixed segfault (video, Linux)
  • Fix PAPlayer to handle passthrough for TrueHD (audio)
  • Fix file times for vfs addons
  • And many interface and general fixes.

How to Install Kodi 18.4 in Ubuntu:

The Kodi stable PPA has made the new release packages for Ubuntu 16.04, Ubuntu 18.04, Ubuntu 19.04, and their derivatives.

1. Open terminal either via Ctrl+Alt+T keyboard shortcut or from application menu. When it opens, paste below command and hit run:

sudo add-apt-repository ppa:team-xbmc/ppa

Type user password (no asterisk feedback) when it prompts and hit Enter to continue.

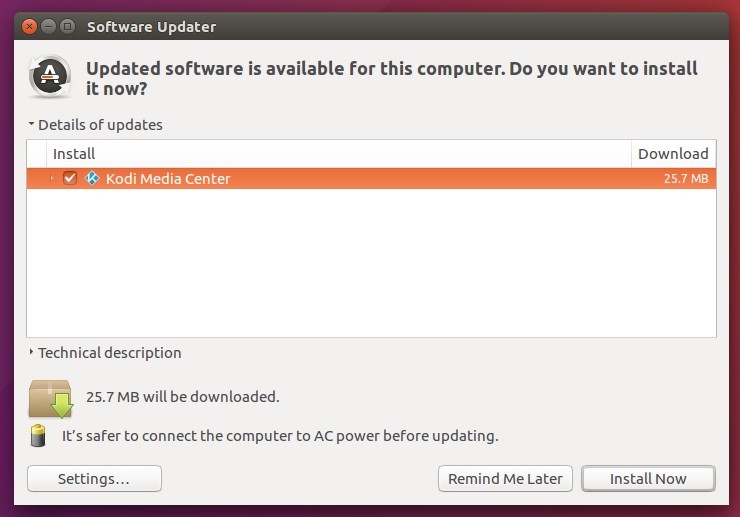
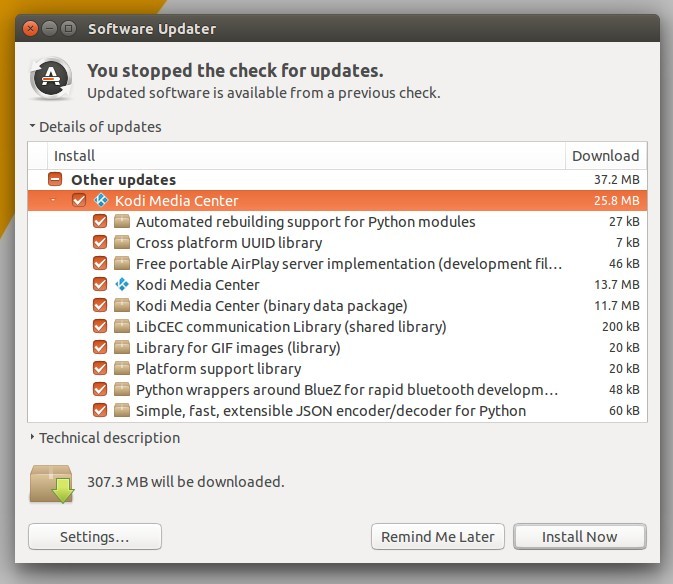
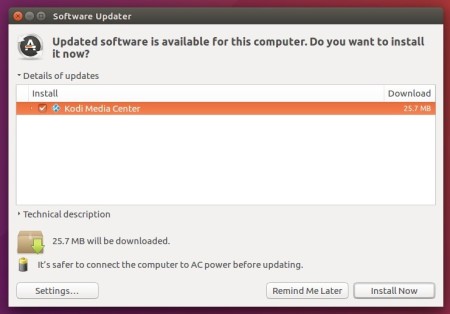
2. Then either upgrading Kodi from an existing version via Software Updater:

or refresh system package cache and install Kodi 18.4 via commands:

sudo apt update

sudo apt install kodi

For Ubuntu 18.04 and higher, you can skip the apt update command as it’s done automatically in step 1.

Uninstall:

To remove the Kodi PPA repository, simply open Software & Updates -> Other Software.

To remove Kodi, run command:

sudo apt remove --autoremove kodi kodi-data kodi-bin

Kodi media center released version 18.3 a day with DTS-HD audio support and many bug-fixes. Here’s how to install it in Ubuntu 16.04, Ubuntu 18.04, Ubuntu 18.10, Ubuntu 19.04, and derivatives.

Kodi 18.3, codename “Leia”, release highlights:

  • Fixed favourites widget not scrolling properly on 16:10 displays
  • Fixed API button was not reachable with a mouse on Settings window
  • Fixed Skin Settings window scrollbar focus
  • Fixed order of TV Show title and Episode title in Video Info dialog
  • Added Search button to the side menu in the Video and Music windows
  • Fixed Wall and Infowall views scroll to bottom on certain aspect-ratios
  • Fixed broken side menu navigation in the Addon Browser window
  • Fixed a Group Manager crash when adding a new group
  • Fixed EPG UI corruption and/or EPG data not showing with newly added channels
  • Fixed PVR guide window channel data being overwritten
  • Added support for DTS-HD audio tracks
  • Fixed wrong album or artist thumb art being picked from scraper results

How to Install Kodi 18.3 in Ubuntu:

The Kodi stable PPA has made the new release packages for Ubuntu 16.04, Ubuntu 18.04, Ubuntu 18.10, and their derivatives.

1. Open terminal either via Ctrl+Alt+T keyboard shortcut or from application menu. When it opens, paste below command and hit run:

sudo add-apt-repository ppa:team-xbmc/ppa

Type user password (no asterisks feedback) when it prompts and hit Enter to continue.

2. Then refresh system package cache and install Kodi 18.3 via command:

sudo apt update

sudo apt install kodi

For Ubuntu 18.04 and higher, you can skip the apt update command.

Uninstall:

To remove the Kodi PPA repository, simply open Software & Updates -> Other Software.

To remove Kodi, run command:

sudo apt remove --autoremove kodi kodi-data kodi-bin

Kodi “Leia” 18.2 was released a day ago with numerous bug-fixes and performance improvements. Here’s how to install it in Ubuntu 16.04, Ubuntu 18.04, and higher.

Kodi 18.2 is a bug fix release with no real new functionality. Release highlights include:

  • Fix performance and dependency regressions in GLES rendering path.
  • Fixes to the AML platform
  • VAAPI on Intel improvements.
  • Fixes and improvements across all aspects of PVR
  • Music experience improvements.
  • Huge number of improvements for the Android platform

How to Install Kodi 18.2 in Ubuntu:

The Kodi stable PPA has made the new release packages for Ubuntu 16.04, Ubuntu 18.04, Ubuntu 18.10, and their derivatives.

1. Open terminal either via Ctrl+Alt+T keyboard shortcut or from application menu. When it opens, paste below command and hit run:

sudo add-apt-repository ppa:team-xbmc/ppa

Type user password (no asterisks feedback) when it prompts and hit Enter to continue.

2. Then refresh system package cache and install Kodi 18.2 via command:

sudo apt update

sudo apt install kodi

For Ubuntu 18.04 and higher, you can skip the apt update command.

Uninstall:

To remove the Kodi PPA repository, simply open Software & Updates -> Other Software.

To remove Kodi, run command:

sudo apt remove --autoremove kodi kodi-data kodi-bin

Kodi media center, formerly known as XBMC, released the new stable 18.0 “Leia” a day ago. Here’s how to install it in Ubuntu 16.04, Ubuntu 18.04, Linux Mint 18.x, 19.x, and higher.

Kodi 18.0 is a big release with almost 10,000 commits, 3000 pull-requests. The key features include:

  • Retroplayer gaming and associated game control support
  • Digital Rights Management (DRM) decryption support
  • Music Library – new ways to explore and enjoy your music collection
  • Live TV improvements, support for Zattoo, Teleboy, and Sledovanitv.cz.
  • Full voice functionality on the main Android TV.
  • Improvements to audio and video playback, and Blu-ray support.
  • Mir/Wayland support for Linux

How to Install Kodi 18.0 in Ubuntu:

The Kodi stable PPA has made the new release packages for Ubuntu 16.04, Ubuntu 18.04, Ubuntu 18.10, and their derivatives.

1. Open terminal either via Ctrl+Alt+T keyboard shortcut or from application menu. When it opens, paste below command and hit run:

sudo add-apt-repository ppa:team-xbmc/ppa

Type user password (no asterisks feedback) when it prompts and hit Enter to continue.

2. Remove old Kodi package as it may prevent the new installation:

sudo apt remove --autoremove kodi kodi-data kodi-bin

3. Finally check updates and install Kodi 18.0:

sudo apt update

sudo apt install kodi

For Ubuntu 18.04 and higher, you can skip the apt update command.

Uninstall:

To remove the Kodi PPA repository, simply open Software & Updates -> Other Software.

To remove Kodi, run command in step 2.

Kodi 17.4 Released! How to Install it in Ubuntu

Last updated: August 24, 2017

Kodi media center, formerly known as XBMC, reached the 17.4 release a few days ago with a bunch of bug-fixes. Here’s how to install it in Ubuntu 14.04, Ubuntu 16.04, Ubuntu 17.04, and their derivatives.

Changes in Kodi 17.4 include:

  • Potentially fix crashing on Windows due to an issue in Python
  • Potentially fix crashing on Windows when enabling zeroconf
  • Fix sporadic crash on Windows when installing or updating add-ons
  • Fix issue for users with reverse proxies attempting to forward websockets.
  • Fix possible issue if Linux distro uses system ffmpeg and cause black screen with 10-bit H.265
  • Properly throttle scraping music information online to prevent overloading the provider
  • Fix native keyboard on iOS 11
  • Fix potential crash on Android O loading App icons
  • Fix non showing Kodi banner on Android O
  • Fix potential crash on Android with certain keymaps
  • Fix wrong detection of VP6 and VP8 videocodec on Android
  • Update FFmpeg to 3.1.9
  • Set hard requirement to use FFmpeg 3.1.x only
  • Fix for Hangup when viewing recording and pressing next/previous
  • Fix merged scraped album type and label correctly with that derived from tags from music files
  • Fix possible crash on Linux when using ALSA
  • Save skin settings immediatly after they have changed instead of only on shutdown

How to Install Kodi 17.4 in Ubuntu:

Kodi has an official PPA that contains the latest packages for Ubuntu 14.04, Ubuntu 16.04, and Ubuntu 17.04.

1. Open terminal via Ctrl+Alt+T or by searching it from app launcher. When it opens, run command to add the PPA:

sudo add-apt-repository ppa:team-xbmc/ppa

Input your password (no visual feedback while typing) when it asks and hit Enter.

2. For those who have previous release installed, upgrade the media center via Software Updater:

or run commands to check updates and install kodi:

sudo apt-get update

sudo apt-get install kodi

Once installed, log out and log in back with Kodi session, or launch Kodi from Unity Dash, Gnome app launcher, or other app launcher.

Uninstall:

Run command to purge the PPA which also downgrade Kodi to its stock version in your Ubuntu:

sudo apt-get install ppa-purge && sudo ppa-purge ppa:team-xbmc/ppa

To remove kodi, either use your system package manager or run command:

sudo apt-get remove --autoremove kodi

Kodi 17.1, the first bug-fix release for the v17 “Krypton”, has been released and made into PPA for Ubuntu 14.04, Ubuntu 16.04, Ubuntu 16.10, and Linux Mint 17 & 18.

According to the changelog, Kodi 17.1 brings a huge list of fixes and here are some of them:

  • Update Estuary and Estouchy with some bugfixes and improvements
  • Fix EDL skipping
  • Fix slow song smartplaylist
  • Several PVR fixes
  • Update Chorus webinterface
  • Fix addons not being marked broken when they are updated with broken flag
  • Add limiter on random songs which should prevent large memory usage on big libraries
  • Improve keyboard mapping during button mapping
  • Improve analog stick handling
  • Improve plugin performance when building the content list
  • Include RTMP inputstream add-on for Windows

Although the Kodi website does not announced the v17.1 release at the moment, you can now install or upgrade to Kodi 17.1 via following steps:

1. Open terminal by pressing Ctrl+Alt+T or searching for “Terminal” from Unity Dash / Start Menu. When it opens, run command to add Kodi PPA:

sudo add-apt-repository ppa:team-xbmc/ppa

Type in your password (no visual feedback due to security reason) and hit Enter.

2. Then upgrade Kodi Media Center from a previous release via Software Updater:

Or run the commands below one by one to install or upgrade Kodi:

sudo apt update

sudo apt install kodi

Once installed, you can either launch Kodi from app launcher or select log in Kodi session at login screen.

Kodi, formerly known as XBMC, finally reached the new stable 17.0 release. Here’s how to install it in Ubuntu via PPA.

Kodi 17.0, code-name “Krypton”, brings updated default UI, better organisation of settings, and many under-the-hood changes on Video Player, Music Library, PVR, audio on Android, and thousands of small bug-fixes and improvements to stability.

Kodi 17.0 features:

  • New default skins “Estuary” for TV, and “Estouchy” for touchscreen devices.
  • New default web interface
  • New inputstream add-ons with more protocols support.
  • hardware-accelerated DVD playback
  • Numerous improvements to Live TV and PVR functionality
  • Android implementation, and a wide variety of other changes.

How to Install Kodi 17 in Ubuntu / Linux Mint:

The Kodi Team announced that the official PPA will be updated soon with the new packages, available for Ubuntu 16.10, Ubuntu 16.04, Ubuntu 14.04, and Linux Mint 17 & 18.

At that time, you can follow the step below to install Kodi 17:

1. Open terminal from app launcher or via Ctrl+Alt+T shortcut key, when it opens, run command:

sudo add-apt-repository ppa:team-xbmc/ppa

Type in your password (no visual feedback) when it asks and hit Enter.

2. Then you can upgrade Kodi Media Center from an existing version, by launching Software Updater:

Or install it via following commands in terminal:

sudo apt update

sudo apt install kodi

Once installed, you can either launch Kodi from app launcher or log with Kodi session when you’re in login screen.

Uninstall:

To uninstall Kodi 17 and restore to the stock version in your Ubuntu repository, purge the PPA via ppa-purge tool via command:

sudo apt install ppa-purge && sudo ppa-purge ppa:team-xbmc/ppa

Kodi 16 Released, How to Install it via PPA

Last updated: February 21, 2016

Kodi 16.0 (codenamed “Jarvis”), formerly known as XBMC, has been officially released. Official binary packages available for Ubuntu 16.04, Ubuntu 15.10, Ubuntu 14.04, and even Ubuntu 15.04 in PPA.

Kodi 16.0 features event logging, long press button support, 4:3 non-linear stretch support, add-on manager changes, music library improvements, Android surface rendering, and many other important changes. For more details, read the official announcement.

How to Install Kodi 16.0 in Ubuntu:

1. If you don’t have Kodi’s official PPA added in your system, launch terminal from App Launcher or via Ctrl+Alt+T shortcut key and paste below command and hit run:

sudo add-apt-repository ppa:team-xbmc/ppa

Type in password (no visual feedback when typing) when it asks and hit Enter to continue.

2. For those who have a previous release installed, launch Software Updater and you’ll see Kodi 16.0 available in the update lists after checking for updates.

To install it for the first time, just run commands:

sudo apt-get update

sudo apt-get install kodi

Add --install-suggests option if you want to install audio codecs and other addons, so the last command will be:

sudo apt-get install --install-suggests kodi

Finally log out and select log in with Kodi session, or launch Kodi from Unity Dash in normal session.

The latest Kodi Media Center, formerly known as XBMC, now is available for Ubuntu 15.10 users through its official PPA repository.

The current version is Kodi 15.2 ‘Isengard’ which was released in the middle of this month. For those who want to install this release and receive future updates via Software Updater, follow below steps.

1. Add Kodi PPA

Open terminal from the Unity Dash, App Launcher, or via Ctrl+Alt+T shortcut key. When it opens, run below command to add PPA:

sudo add-apt-repository ppa:team-xbmc/ppa

2. If you’ve installed an old release from Software Center. Run Software Updater to upgrade to Kodi 15.2.

Or run below commands one by one in terminal to install or upgrade the software:

sudo apt-get update

sudo apt-get install kodi

Once installed, log with Kodi session at next login or launch it from the Unity Dash at next boot.

3. (Optional) To remove Kodi PPA, go to the Software & Updates -> Other Software tab or run below command in terminal:

sudo add-apt-repository --remove ppa:team-xbmc/ppa

To remove Kodi, do it via Software Center or run command:

sudo apt-get remove kodi && sudo apt-get autoremove

Kodi 15.2, the final maintenance release for Kodi 15 ‘Isengard’, has been announced today. This release brings a lot of bug-fixes on top of the 15.0 and 15.1 release.

Here are the fixes according to the release note.

  • Fix non DVB subtitles
  • Fix incompatible MySQL queries
  • Improvements on PulseAudio for Linux
  • Fix multi images in grouplists/layouts
  • Updated PVR add-ons: Tvheadend HTSP and MythTV
  • Fix refresh-rate switching on Android. This should improve on most devices like Nexus Player and NVIDIA SHIELD TV and others which use the Android API
  • Fix file time used in scanning library which may speed up scanning times on 32bit platforms
  • Fix video rewind on Windows. May still leave artifacts for some seconds.
  • Fix continues check on system partitions on Android
  • Fix MicroDVD subtitles
  • Fix subtitles positioning below video
  • Fix memory leak on opening Bluray menu for stream selection
  • Fix default sorting for songs over UPnP
  • Updated taglib that fixes a crash when playing flac files
  • Fix volume adjustment for XBOX controllers
  • Fixes side flyout appearing when using touch
  • Fixes freeze on win32 on away mode
  • Fix crash on osx 10.7 when trying to resolve hdd names
  • Fix Amlogic zoom problems on Android
  • Set default screen region for dvb subs (wrong placed subtitles)
  • Fix missing lyrics from tag when playing from musicdb url
  • Properly set the time format when setting/changing regions
  • Fix playback problems on AMLogic after ffwd or skip
  • Fix fallback for nb_no language
  • Fix empty LatestAlbum.Artist
  • Fix watched flag in Confluence media info 3 view

Install or Upgrade to Kodi 15.2 in Ubuntu:

The new release has been made into Kodi Stable PPA, available for Ubuntu 14.04, Ubuntu 15.04, and derivatives, such as Linux Mint 17.x and Elementary OS Freya.

1. Add Kodi PPA

Open terminal from the Unity Dash, App Launcher, or via Ctrl+Alt+T shortcut key. When it opens, run below command to add PPA:

sudo add-apt-repository ppa:team-xbmc/ppa

2. Refresh system package cache and install the media center.

You can do it either via Synaptic Package Manager, or by running below commands one by one:

sudo apt-get update

sudo apt-get install kodi

Once installed, log out and select log back with Kodi session. Or launch the media center from the Dash (may need restart).