Archives For November 30, 1999

For those want to check PC hardware specs in Linux, CPU-X is a good choice for user switching from Microsoft Windows.

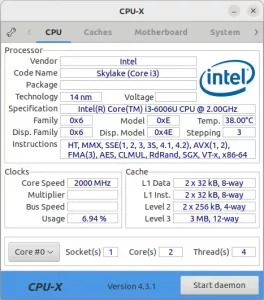
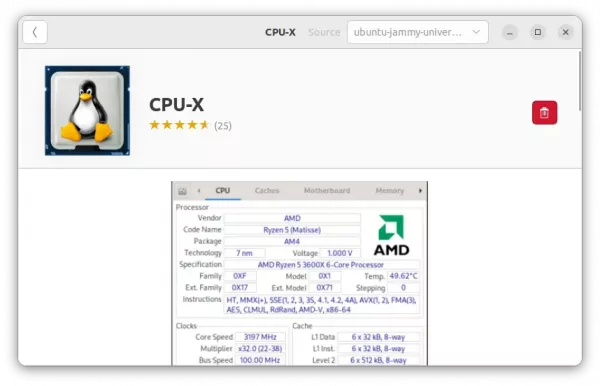
It’s a free open-source system profiling and monitoring application, that looks quite similar to CPU-Z for Windows. With it, you can check your CPU specification, vendor, codename, clocks, and L1/L2/L3 caches.

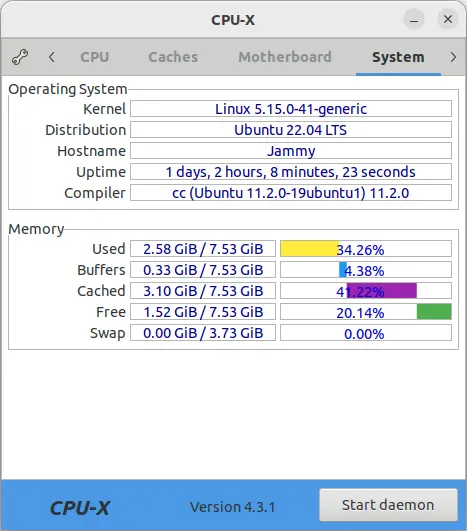
It also shows the motherboard manufacturer, model, BIOS brand and version, etc. As well, it shows graphic card vendor, driver, GPU chip, and basic operating system up-time, and monitor memory usage for you.

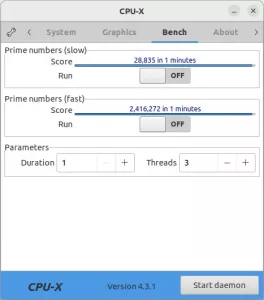
Benchmark is also available for running in either single or multiple cores. However, it does not provide a list of other CPU scores to compare with.

How to Install CPU-X in Linux:

The software is available in the official repositories of Ubuntu, Fedora, Debian Linux. User may simply search for and install it via your system package manager.

For Ubuntu user, simply search for and install it in Ubuntu Software:

CPU-X in Ubuntu repository is a little old. For the latest version with bug-fixes and updated database. Go download the “AppImage” from releases page:

Then, right-click on it and go ‘Properties’ to enable executable permission. And, finally click run the AppImage to launch the tool.

NeoFetch, the cross-platform command-line system information tool, has reached the major 2.0 release. Here’s how to install it in Ubuntu 16.04, Ubuntu 16.10, and other releases higher than Ubuntu 12.04.

    Neofetch is a CLI system information tool written in BASH. Neofetch displays information about your system next to an image, your OS logo, or any ascii file of your choice. The main purpose of neofetch is to be used in screenshots to show other users what OS/Distro you’re running, what Theme/Icons you’re using and etc.

    Neofetch is highly customizable through the use of commandline flags or the user config file. There are over 50 config options to mess around with and there’s the print_info() function and friends which let you add your own custom info.

Neofetch 2.0 is the biggest release in a long time. The majority of the script has been rewritten, restructered and cleaned up. Every function and variable name follows a proper naming scheme and a large number of bugs were fixed.

  • New Operating System support: ChaletOS, DracOS, Haiku, GNU Hurd, Korora, Netrunner, Pardus, iPhone 7 and 7 plus.
  • ASCII art handling written.
  • Now display your OS’s ascii logo if the distro’s logo isn’t found
  • Wallpaper support for Cinnamon desktop.
  • Added support for HyperTerm
  • Prefer dedicated GPU over integrated GPU in Linux.
  • Improved documentation & wiki
  • More and more.

How to Install NeoFetch 2.0 in Ubuntu:

For Ubuntu 12.04, Ubuntu 14.04, …, up to Ubuntu 17.04, the new release has been made into this PPA repsitory.

Run below commands one by one in terminal (Ctrl+Alt+T) to add the PPA to your system and install NeoFetch 2.0:

sudo add-apt-repository ppa:dawidd0811/neofetch

sudo apt update 

sudo apt install neofetch

Or directly download the “neofetch_2.0-1ubuntu1_all.deb” package from the link below and click install via Ubuntu Software:

Want to display system information on your desktop? Here’s the easiest way to display system details on Ubuntu Desktop with a good appearance.

For Ubuntu beginners, it’s not easy to config Conky files. Conky Manager is a simple tool which brings a easy-to-user interface for changing and editing themes.

Conky Manager is a new project and it’s still under development. So far, it only contains a few conky themes.

To install Conky Manager on Ubuntu and Linux Mint:

Press Ctrl+Alt+T to open up terminal, copy and paste below commands and run one by one from the ppa repository. Works on Ubuntu 13.10 Saucy, 13.04 Raring, 12.10 Quantal, 12.04 Precise and Linux Mint 16, 15, 14, 13.

sudo add-apt-repository ppa:teejee2008/ppa

sudo apt-get update

sudo apt-get install conky-manager

Enjoy!

3-bit or 64-bit? If you forgot which version you installed, here’s how to check it out!

In command line, just type this:

uname -m

Then you see the output:

  • i686 means 32-bit
  • x86_64 means 64-bit

If you’d like a GUI way, searh for and open details from Unity Dash.

Then you’ll see the result

Enjoy!