
![]()
This quick tutorial shows you how to easily install Oracle Java JDK 6, JDK 7 and/or JDK 8 (includes JRE) in Ubuntu 14.10 Utopic via PPA.
Thanks to Webupd8 Team for providing the installer scripts in PPA that automatically downloads Oracle Java package from its official site and installs it on your system.
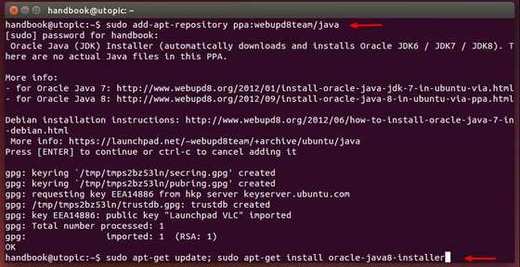
1. To add the PPA, press Ctrl+Alt+T on keyboard to open the terminal. When it opens, paste the command below and hit enter.
sudo add-apt-repository ppa:webupd8team/java
Type in your user password when prompts. Note that there’s no visual feed back when typing your password.
2. After added the PPA, run commands below one by one to install Java (you may replace number 8 in the code with 6 or 7):
sudo apt-get update

sudo apt-get install oracle-java8-installer
If you have two or more Java versions installed on your system, run command below to set Oracle Java to default (you may replace number 8 with 6 or 7):
sudo apt-get install oracle-java8-set-default
Finally, check out java version via:
java -version
You’ll see something like this:
java version “1.8.0_20”
Java(TM) SE Runtime Environment (build 1.8.0_20-b26)
Java HotSpot(TM) 64-Bit Server VM (build 25.20-b23, mixed mode)


Thank you Ji M. this tutorial was elaborate enough and very informative. it helped me set up my first ubuntu machine with java installed. Appreciate your effort