

This is a step by step tutorial shows you how to install the real Ubuntu OS on USB stick to create a ‘Windows To Go’ style USB drive. Tested with Ubuntu 14.04
Requirements:
Before getting started, you need to prepare something:
- A 8GB+ USB Drive.
- A Ubuntu Live CD/DVD/USB. In the case below, I created a bootable Ubuntu Live USB from the .iso image.
- A computer with an operating system installed.
And always backup your data on the USB flash drive!
To get started:
In my case I have a newly bought 16GB USB stick, a 4GB old USB stick, and a laptop multi-boot with Ubuntu based systems.
1. I don’t have a Ubuntu CD/DVD, so I decided to burn the Ubuntu .iso image into the old USB stick. To do so:
- Download Ubuntu image: releases.ubuntu.com
- Download UNetbootin: unetbootin.sourceforge.net. For Ubuntu, install it from Software Center.
- Plug in the USB stick.
- Start UNetbootin, and burn the .iso image into USB
2. Plug in the bootable USB drive to your computer and boot into the Live Ubuntu system.
IMPORTANT: For Windows 8 pre-installed machine, you have to disable “fast startup” and “secure boot” features.
To disable “fast startup”, go to Control Panel > Hardware and Sound > Power Options > System Settings > Choose what the power buttons do and uncheck the Turn on fast startup box.
To disable “secure boot”, follow this screenshot tutorial.
3. Now you’re in the Ubuntu Live system. Plug in the 8GB+ USB stick. Then launch Gparted from the Unity Dash.
In the top-right drop-down box select the USB drive (16GB in my case), and you should see something like below:
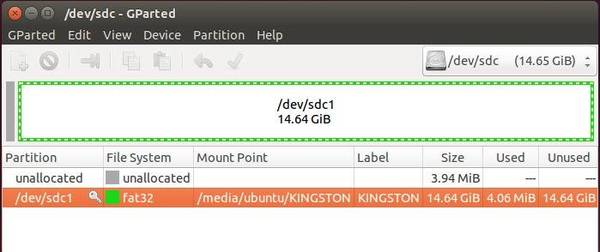
I have two USB flash drives plugged in the computer, the Hard Disk is /dev/sda, 4GB Live USB is /dev/sdb, and the 16GB USB drive is /dev/sdc.
4. From the right-click context menu, un-mount partitions on the USB drive and then delete them.
Click the green check mark button to apply changes, finally you have an unallocated flash drive, like:
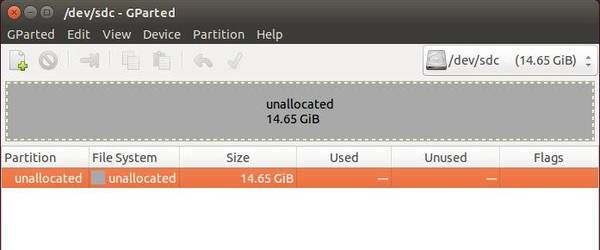
When done, close Gparted partition manager.
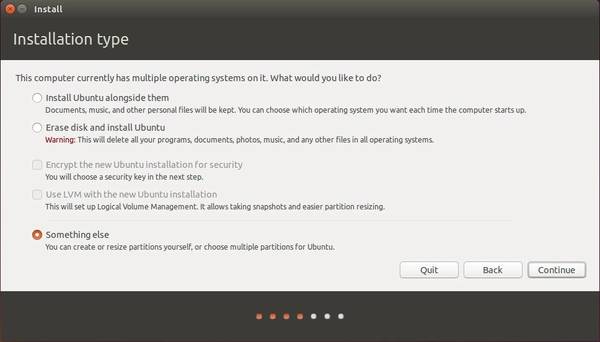
5. Click the desktop shortcut “Install Ubuntu” to bring up the Ubuntu installation wizard.
Follow the wizard until it asks you to choose where to install Ubuntu. Select the last option “Something else” and click Continue to bring up partition table.
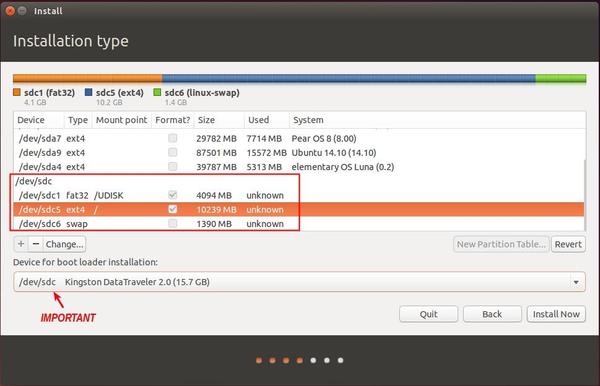
6. In the partition table, scroll down and highlight the “free space” under the USB drive (/dev/sdc in the case) and click the plus sign to create below partitions one by one:
- a FAT32 (or fat16) partition (required)
- must be /dev/sdc1 (or sdX1)
- mount point /NAME_HERE (/UDISK in the case)
- set the memory size by yourself, it can be used for normal data storage.
- leave others default.
- a EXT4 partition for Ubuntu (required)
- mount point “/” (without quotes)
- memory size 5G+
- leave others default.
- a swap partition (optional).
- You can skip this if RAM is large enough and you don’t need hibernation feature.
And very important is select install boot-loader to the USB flash drive (/dev/sdc in the case).
7. When everything’s done, click Install Now and confirm to format the partitions (Pay attention on which partitions to be formatted).

Click continue and finish the wizard. Once the installation complete, restart your computer and boot with the ‘Ubuntu To Go’ USB drive and enjoy!


I was wondering if you happen to know how to install ubuntu onto fixed state disks (compatible with Win 8). I understand that for bootable removable flash disks to work, the drives have to be of removable media and not fixed state disks.
Read this, http://askubuntu.com/questions/221835/installing-ubuntu-on-a-pre-installed-windows-8-or-later-uefi-supported
Did you now google ??
Hello,
Thank you very much for this awesome guide it helps a lot :) not like other crappy guides it’s really helps me to install ubuntu 15.10 to my 16Gb usb flash drive thanks ;)
Best regards
Ovidijus
My friend installed it on 16GB USB via old Compaq CQ60-101AU laptop. The installation was successful. However, the screen flickers continuously. Tried changing display driver to (proprietary-tested). The flickering stopped. However, after restart no window borders, no launcher, no taskbar. Hence, changed back to X-org default driver. How to fix this?
Also, whenever we boot via usb[ubuntu], it comes to Ubuntu boot prompt screen. Why? Is it normal if using Ubuntu USB?
I want to install Ubuntu on usb stick.
I want Ubuntu to have gcc support
It should also have video playing and audio playing as home purpose.
Can we do it. As I have tried for live cd it just had Ubuntu but I can play a video nor I can do development work.
Neeth; I was able to find instructions to create a live ubuntu usb stick and install java jdk then eclipse with java and c++ tools. To do so you must select use persistence. We are limited to 4 GB. And the data is stored in a file on the usb stick so we can’t put the usb stick into another pc and copy work files off of it. Which is why I’m looking into this method. After we make the bootable usb stick with Ubuntu loaded onto it we should be able to take that stick to another machine and see our user directory. Then we may copy our work files off to another computer or do whatever we want with them.
The resulting USB cannot be booted from a Mac. Is there a way to allow me to boot from a Linux USB that isn’t just an installer? I’ve used a try-it-out installer with persistence before, but I don’t like those as the storage is critically limited.
I managed to get this working with mid2014 MBP. Just download the 64amd release for mac from “http://cdimage.ubuntu.com/releases/14.04” and follow the steps in this tutorial :)
If the broadcom drivers wont work straight away (even tho they work on the installer), please follow this link: http://askubuntu.com/questions/626642/how-to-install-broadcom-wireless-drivers-offline
what are the problems may occur using this method compared to ordinary HDD installation?
Thanks this was very helpful and worked very well on an old HP, which I have now replaced with a MacBook Air (early 2015). The USB drive will not show up in the startup manager so I can’t boot to it from my new machine. I was wondering if there is a relatively simple change that can be made to the process above so that the usb install will be available in the Mac startup manager.
In these instructions, you’ve written that creating the swap partition on USB drive is optional. I’m going to create the swap partition on the USB drive, because I’m uncomfortable with the message I get about reformatting the swap partition on the hard drive.
This work is being done on a computer tower with Ubuntu 16.04 installed. I had put the Ubuntu 14.04 iso onto a (red) 8GB USB key. The target for installation is a (white) 8GB USB key.
The partition sizes for the (white) 8GB USB key that I chose were roughtly 1 GB for the fat32 partition, labelled dos; 6.5 GB for the ext4 partition labeled /; and 0.5 GB for the swap partition.
I was sure to set the Device for boot loader installation as sdc1
When I select the “Install Now” button, I get a message:
— begin message —
If you continue, the changes listed below will be written to the disks. Otherwise, you will be able to make further changes manually.
The partition tables of the following devices are changed:
SCSI9 (0,0,0) sdc
The following partitions are going to be formatted:
partition #5 of SCSI1 (0,0,0) (sda) as swap
partition #1 of SCSI9 (0,0,0) (sdc) as fat32
partition #5 of SCSI9 (0,0,0) (sdc) as ext4
partition #6 of SCSI9 (0,0,0) (sdc) as swap
— end message —
It looks like whether I create a swap partition on the (white) USB key or not, the installation wants to reformat the swap partition on the fixed disk in the tower computer. My understanding is that really shouldn’t make a difference, so it seems like a quirk with the installation program that a swap partition had to be created somewhere.
Upon rebooting the tower normally (i.e. from the internal disk), the rewriting of the swap partition didn’t seem to have an impact.
Ubuntu 14.04 now runs successfully from the (white) USB 2.0 flash drive. Opening a terminal window (which couldn’t be done with “Try Ubuntu”) works. I’ve installed Google Chrome so that I can message with Hangouts, resulting in the 6.5 GB root being 74% full.
Thanks for the instructions.
My friend installed Ubuntu 16.04 x64 on USB using this method. It was working fine. However, there was some issue when used on a nvidia graphics laptop. So, he changed from nouveau drivers to proprietary to test it. However, it ended in corrupted partition sdc5.
Using recovery rootshell, reverted back to nouveau drivers. It was all working fine except this one issue. The download percentage on software updater and other areas show a orange-white box instead of complete orange box.
You can view the uploaded image here: http://s32.postimg.org/49e54ybsl/Screenshot_Ubuntu_16_04_x64_Issue.png
Tried repair broken packages and ran fsck in recovery. However, the issue still not fixed.
Please help fix this issue for my friend.
Nice tutorial, very simple/easy, thanks for the info.
I just want to say that I had 3 SUCCESS remarks to make:
1) Ubuntu 16.04 also works fine as your tutorial describe.
2) Then, I added more 2 USBKEYS, build a RAID-0 including these 2 new USBKEYS and did move (copy) the “/usr/*” directory to the RAID volume. Changed the /etc/fstab and everything works fine after restart. Don’t have any numbers but it was much faster to load applications…
3) Did another install from “zero”, this time including 3 USBKEYS into the RAID-0, plus one FAT32 partition and another SWAP (as described in the tutorial). This time, EVERYTHING is on the RAID-0 (“/” root), yes it is working…
Still need to test more the 3rd Success (ALL in RAID), and then I will write a little doc and post here…
I did follow the following URLs:
http://askubuntu.com/questions/656/how-to-move-usr-to-a-new-partition
http://askubuntu.com/questions/505446/how-to-install-ubuntu-14-04-with-raid-1-using-desktop-installer
http://www.tecmint.com/create-raid0-in-linux/
Regards,
Valter
Hi Ji m, just want to report that your method (described in the tutorial) also works for Debian (Jessie 8.2 and 8.4):
1b) Install (Normal) in 1 USBKEY
2b) Install Advanced in 1 USBKEY
3b) Install Normal or Advanced in 2 USBKEYs as RAID 0
Debian support RAID from the INSTALLER, there is no need of any extra command!
Also, GRUB2 Bootloader, as described in the manual, support RAID (0 and 1) for boot device…
I am currently running tests…
So far the results are, in my point of view, (very) GOOD…
A Debian LXDE DESKTOP minimalist install uses only 1.1GB (I did with 4GB USBKEY)…
Regards,
Valter
HOST ON USB RAID – GUEST VM ON USB RAID (all USB2.0)
Hi, just want to say that I also did a test running a Guest Virtual Machine on a USB RAID STRIPE 0, from a Host Debian running on (another) USB RAID STRIPE 0…
Besides using USB2.0 sticks, the speed limitation of USB2.0 is NOT a problem, the RAID compensates by making thing almost twice as fast…
Your installation method is “bullet proof”, very simple, very easy and works for every kind of thinking… VERY COOL…
I am a big fan of “live usb” linuxes, and when using your “Fat2Boot” Method, the combination seems to open an entire NEW UNIVERSE OF POSSIBILITIES… I am amazed to the fact that now, using your Fat2Boot Method, I am able to construct in minutes things that I am thinking for lots of lots of years… CONGRATULATIONS and thank you for sharing with us.
Thanks to your method (and website), I now know that my old ideas were NOT SO CRAZY at all…
The root filesystem on a RAID USB was one of them, and combining it with the Fat2Boot thing, makes a quite nice Native Linux System to use and play…
Regards,
Valter
UBUNTU SERVER CD/DVD
The Ubuntu Server CD/DVD Image (also known as “alternate”) allows for the preparation of the installation to RAID… but, for USB sticks, the final step (“install grub”) FAILS…
Fails for Ubuntu 16.04 Server (I did the test)…
Fails for Lubuntu 16.04 Alternate (Also did the test)…
It seems that the failure is due to a minimalist detail, perhaps a single line of script on the installation of the Grub Bootloader (Debian does it differently)…
And, since I already did succeed using information from the previously indicated website, I think that a patch to the installer can be done very easily…
I plan to have a look at the install scripts to understand better what went wrong and how can we “patch” it to allow RAID USB STICKS install…
Regards all,
Valter
BOOT FROM CD/DVD, RUN ON USB…
Hi Ji m, just want to add some information…
It is also possible to place just the Grub “boot MBR on CDROM” and to use USBKEY(s) to run, so, it is one more option to run systems from USBKEY(s).
Grub has a tool called grub-mkrescue that can make a .ISO image to function as “rescue” CD/DVD/USB/Floppy image to a current installed system… so, by using it we can create a CD/DVD .ISO image to function as the Grub “boot MBR” on a CD/DVD ROM!
This “rescue CD/DVD” can also be used as a “normal” boot option…
I did the test with Debian on a RAID USBKEY(s)… works perfectly!
Of course, it should work for Ubuntu also, since it is a common Grub Tool…
Instead of “Rescue CD”, let’s call it: ALTERNATIVE CD/DVD BOOT…
It is VERY SIMPLE, just follow this little tutorial here:
https://www.gnu.org/software/grub/manual/html_node/Making-a-GRUB-bootable-CD_002dROM.html
Regards,
Valter
What is the purpose of the first partition (Fat32)? Why not just make a Root Partion (Ext4) and a swap partition only?
The purpose to have Fat32 partition is to provide a common storage space for the access of other type of systems like Windows.
this should be mentioned in the article, searching for fat32 on this page make me found this info, but this is not obvious
Hi,
While install ubuntu 16.04 on my USB hard drive (32GB), do I need to unmount my ISO USB (8GB) first ?
What if I create the primary 6GB swap with Ext4 while the rest set as primary Ext4, mount as /
Why some vido use logical instead of primary and some use Ext3 instead of Ext4. Acutally we need to create how many partitions?
Thanks
Hi, I followed your step complete the installation. It works well. But wenn I plug on my win10 tablet it doesn’t work. Just a black screen (not even in the boot loader menu yet).
Where is the problem
How can I fix it. Please help.
same problem. if you find solution please email to me. thanks, mo.
I followed everything to the T made sure to cross my T’s and dot my i in your instructions and it ended up writing over my windows installation :( good thing I have a recovery drive by me. But sucks cause I can’t remember what I had on my computer that was important.
Great guide! I tried other options to install ubuntu on a USB drive with persistence; however, none of them enabled me to use all the space on my USB drive. This method did allow me to use all the space. Well written! Thanks!
Jerry
Hi, I got a problem after installing ubuntu 16.10 in my USB, but somehow when I tried to use it, it just freeze at the desktop screen after login. Can someone help me. I need to use ubuntu asap