

This is a step by step tutorial shows you how to install the real Ubuntu OS on USB stick to create a ‘Windows To Go’ style USB drive. Tested with Ubuntu 14.04
Requirements:
Before getting started, you need to prepare something:
- A 8GB+ USB Drive.
- A Ubuntu Live CD/DVD/USB. In the case below, I created a bootable Ubuntu Live USB from the .iso image.
- A computer with an operating system installed.
And always backup your data on the USB flash drive!
To get started:
In my case I have a newly bought 16GB USB stick, a 4GB old USB stick, and a laptop multi-boot with Ubuntu based systems.
1. I don’t have a Ubuntu CD/DVD, so I decided to burn the Ubuntu .iso image into the old USB stick. To do so:
- Download Ubuntu image: releases.ubuntu.com
- Download UNetbootin: unetbootin.sourceforge.net. For Ubuntu, install it from Software Center.
- Plug in the USB stick.
- Start UNetbootin, and burn the .iso image into USB
2. Plug in the bootable USB drive to your computer and boot into the Live Ubuntu system.
IMPORTANT: For Windows 8 pre-installed machine, you have to disable “fast startup” and “secure boot” features.
To disable “fast startup”, go to Control Panel > Hardware and Sound > Power Options > System Settings > Choose what the power buttons do and uncheck the Turn on fast startup box.
To disable “secure boot”, follow this screenshot tutorial.
3. Now you’re in the Ubuntu Live system. Plug in the 8GB+ USB stick. Then launch Gparted from the Unity Dash.
In the top-right drop-down box select the USB drive (16GB in my case), and you should see something like below:
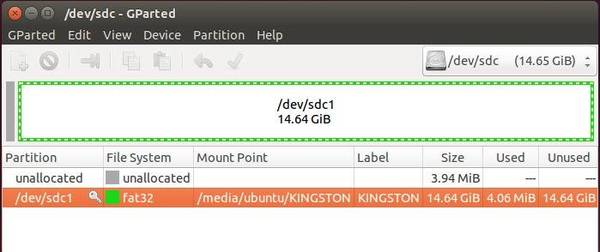
I have two USB flash drives plugged in the computer, the Hard Disk is /dev/sda, 4GB Live USB is /dev/sdb, and the 16GB USB drive is /dev/sdc.
4. From the right-click context menu, un-mount partitions on the USB drive and then delete them.
Click the green check mark button to apply changes, finally you have an unallocated flash drive, like:
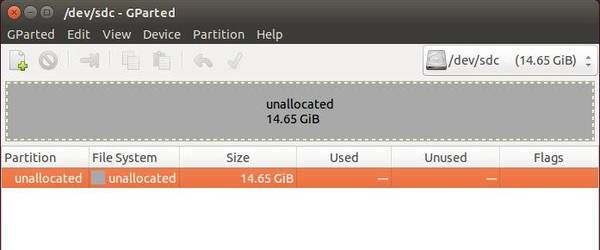
When done, close Gparted partition manager.
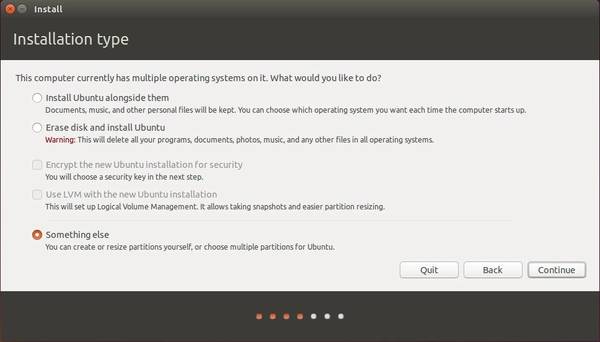
5. Click the desktop shortcut “Install Ubuntu” to bring up the Ubuntu installation wizard.
Follow the wizard until it asks you to choose where to install Ubuntu. Select the last option “Something else” and click Continue to bring up partition table.
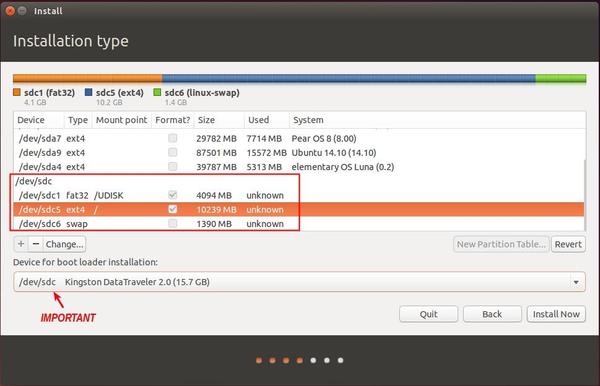
6. In the partition table, scroll down and highlight the “free space” under the USB drive (/dev/sdc in the case) and click the plus sign to create below partitions one by one:
- a FAT32 (or fat16) partition (required)
- must be /dev/sdc1 (or sdX1)
- mount point /NAME_HERE (/UDISK in the case)
- set the memory size by yourself, it can be used for normal data storage.
- leave others default.
- a EXT4 partition for Ubuntu (required)
- mount point “/” (without quotes)
- memory size 5G+
- leave others default.
- a swap partition (optional).
- You can skip this if RAM is large enough and you don’t need hibernation feature.
And very important is select install boot-loader to the USB flash drive (/dev/sdc in the case).
7. When everything’s done, click Install Now and confirm to format the partitions (Pay attention on which partitions to be formatted).

Click continue and finish the wizard. Once the installation complete, restart your computer and boot with the ‘Ubuntu To Go’ USB drive and enjoy!


