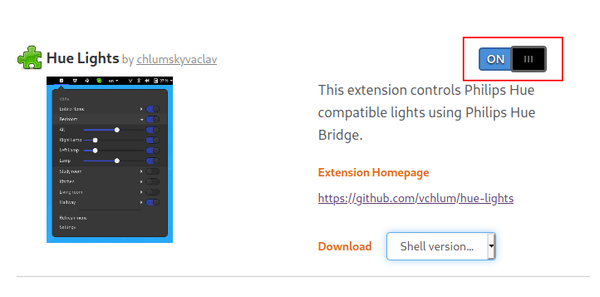
For those who have Philips Hue compatible lights, now it’s easy to control them via a Gnome Shell Extension.
Hue-lights is an extension that offers a system tray indicator to control Philips Hue compatible lights using Philips Hue Bridge. The extension groups the lights in zones and rooms, allows you to control the state, the brightness, and the color.
How to Install Hue-lights Gnome Shell Extension:
In your web browser, go to the extension web site and turn on the toggle icon to install it.
Once you installed the extension, the system tray indicator starts automatically and discovers Philips Hue bridges in your home network. For choice you may add the IP manually.
Don’t see the toggle icon? Follow the link to install the browser extension (if it prompts):
Then open terminal (Ctrl+Alt+T) and run command:
sudo apt install chrome-gnome-shell
And finally refresh the extension web page!
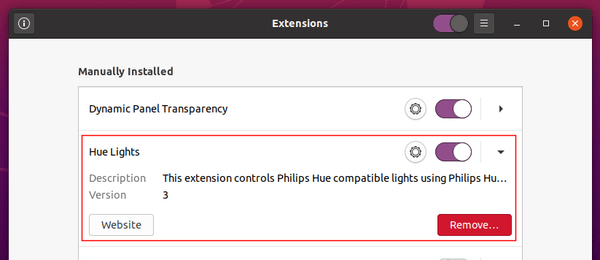
Uninstall the Extension:
To remove the extension, either turn off the toggle icon in the web page or use Extensions tool (install gnome-shell-extension-prefs package if you don’t have it).
This is a beginner’s guide shows how to easily extend functionality of GNOME Shell in Ubuntu 20.04 LTS, and Ubuntu 20.10.
Ubuntu by default includes three extensions: Desktop Icons, Ubuntu AppIndicators, and Ubuntu Dock.
Besides installing more from Gnome Shell extension website, you can run a single command to get a collection of extensions that provide additional and optional functionality.
The extensions include:
Applications Menu – add classic Gnome 2 menu in top-bar right after Activities.
Auto Move Windows – Move applications to specific workspaces when they create windows.
Horizontal workspaces – use a horizontal workspace layout.
Launch new instance – always launch a new instance when clicking app shortcut in the dash or the application menu.
Native Window Placement – Arrange windows in overview in a more compact way.
Places Status Indicator – add menu in top-bar to quick access user folders.
Removable Drive Menu – add system tray indicator to easy access and unmount removable devices.
Screenshot Window Sizer – Resize windows for gnome software screenshots.
User Themes – load shell themes from uer directory.
Window List – Display a window list at the bottom of the screen.
Workspace Indicator – add system tray applet to indicator in which workspace you are.
1.And the commands is (press Ctrl+Alt+T to open terminal and run the command):
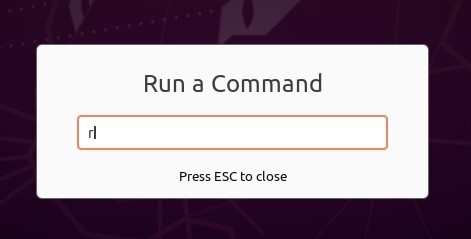
2. After running the command, restart Gnome Shell by:
press Alt+F2 on keyboard.
try r in the pop-up ‘Run a Command’ box.
hit Enter.
3. Finally open (or re-open) Extensions tool from app menu. You’ll see a list of new extensions. Enable any of them as you want and enjoy!
(Optional) If you don’t like them, simply run command to remove the package (restart Gnome Shell is required):
sudo apt remove gnome-shell-extensions
NOTE for clean freak: Even if you just need one or a few of the extensions, you can’t remove the package to get rid of the rest from showing in Extensions tool. As a workaround, you can install the extensions you need from extensions.gnome.org.
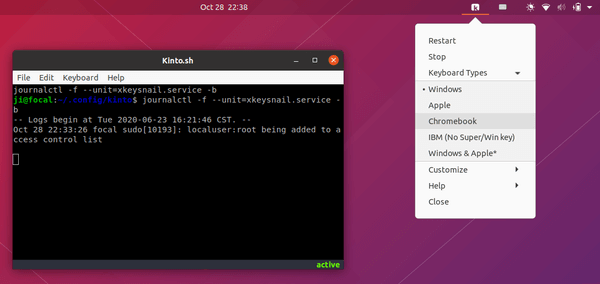
For Mac users want to change keybinds in Ubuntu Linux or Windows, Kinto is an easy system-wide solution with setup wizard and system tray indicator.
The software description says:
‘Type in Linux & Windows like it’s a Mac. Seamless copy and paste with all apps and terminals. The zero effort solution.‘
Kinto works for standard Windows, Apple and Chromebook keyboards. Different to most other re-mappers, it is a complete system-wide remap of your base level modifier keys.
GUI keys:
Physical
Ctrl
Win/Alt
Alt/Cmd
Spacebar
Virtual
Win/Super*
Alt
RCtrl
Spacebar
Terminal Keys:
Physical
Ctrl
Win/Alt
Alt/Cmd
Spacebar
Virtual
LCtrl
Alt
RCtrl
Spacebar
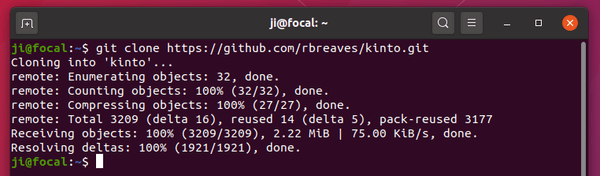
How to Install Kinto in Ubuntu:
Make sure you have python 3 installed, then follow the steps to grab the source and set it up.
1. Open terminal and run command to clone the source:
git clone https://github.com/rbreaves/kinto.git
2. Then run command to navigate to kinto folder, and run the setup.py script.
cd kinto && ./setup.py
If everything goes well, a setup wizard will pop-up
Just click on ‘Agree’ button, follow the wizard, hit Enter, and you’re done! The system tray indicator is not enabled by default, you can enable it from the File menu.
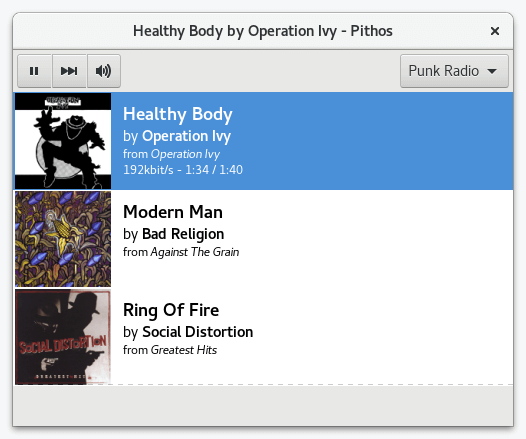
Pithos, native Pandora Radio client for Linux, released version 1.5.1 a day ago with minor bug-fixes and improvements.
Pithos is much more lightweight than the Pandora.com web client, and integrates with desktop features such as media keys, notifications, and the sound menu. The latest v1.5.1 release highlights include:
Add Quit to the app menu
Remove the limit of 95 stations
Handle Enter keypress in stations search
Fix app menu keybindings failing to work
Fix syntax error on Python 3.8
Fix an exception on newer versions of pygobject
Fix album art downloads in Flatpak
MPRIS: Fix media keys failing to bind on KDE
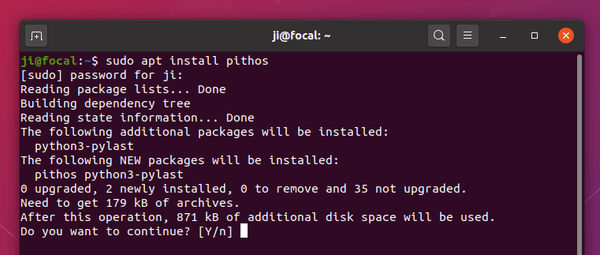
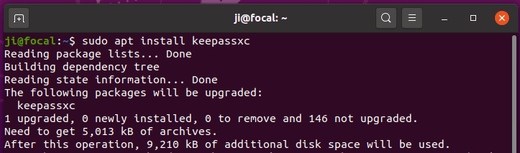
How to Install Pithos 1.5.1 in Ubuntu / Linux Mint:
If you’re OK with the containerized flatpak package. Pithos 1.5.1 has been made into flathub.org for most Linux systems.
For those prefer .deb package, the unofficial PPA is available for Ubuntu 18.04, Ubuntu 20.04, Linux Mint 20, Ubuntu 22.04.
1. Open terminal and run command to add the PPA:
sudo add-apt-repository ppa:ubuntuhandbook1/apps
2. Then check updates and install the client:
sudo apt update

sudo apt install pithos
How to Remove Pithos:
To remove the PPA, either go to Software & Updates -> Other Software or run command in terminal:
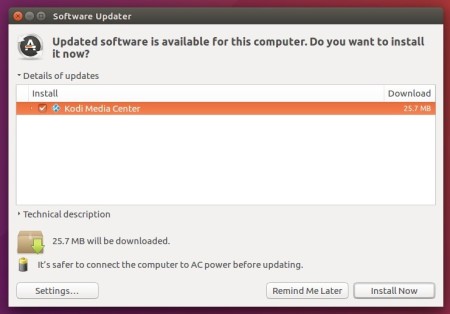
Kodi media center released one more update for the 18.x “Leia” a day ago, with a quick workaround to the third-party HTTP2 and SSL changes that impacted internet access from Kodi by scrapers, streaming addons, etc.
Okay, one more roll of the “Leia” die, although this one is really driven by circumstances beyond our control. Technical changes by Cloudflare caused significant issues with HTTP access to any site using them – metadata sources, for example – and we need to put in a quick workaround before everyone gets too upset; while 19.x “Matrix” is close, it’s not close enough to leave these issues unaddressed. So, as we’re building that new code, we thought that we might as well fix a couple of other regressions while we’re here.
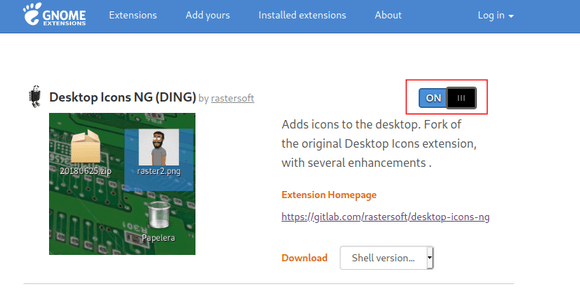
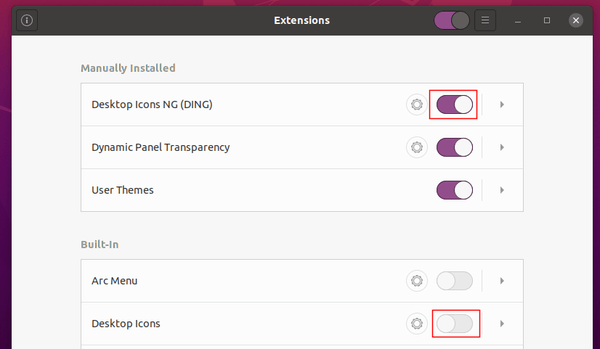
Since the desktop icons are handled by an extension instead of Nautilus file browser, drag’n’drop action between desktop and file browser does no longer work.
Fortunately, a fork of the original Desktop Icons extension now is available with several enhancements, including Drag’n’Drop.
It’s called Desktop Icons NG, and features:
Drag’n’Drop, both inside the desktop, between desktop and applications, and nautilus windows
Allows to use “Open with…” option with several files
When hovering or clicking on an icon with a name too large to fit, it shows the full name
Doesn’t hang the compositor when there is too much activity in the desktop folder
Install Desktop Icons NG extension:
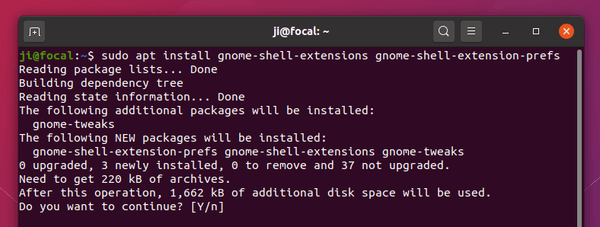
1. If you’re first time installing a Gnome Shell extension, first open terminal (Ctrl+Alt+T) and run command to install recommended packages:
Ubuntu 20.10 Groovy Gorilla was officially released! Here’s how to upgrade from Ubuntu 20.04 LTS.
Ubuntu 20.10 will be supported for 9 months until July 2021. It features Linux Kernel 5.8, desktop images for Raspberry Pi 4, and GNOME 3.38 on Ubuntu Desktop.
Other changes include:
Airtime Queue limits for better WiFi connection quality
USB 4 (Thunderbolt 3 protocol) support added
Intel Gen11 (Ice Lake) and Gen12 (Tiger Lake) graphics support
Initial support for AMD Family 19h (Zen 3)
Initial support for POWER10
Toolchain update: GCC 10, LLVM 11, Python 3.8.6, etc.
nftables is now the default backend for the firewall.
If you want to upgrade to Ubuntu 20.10 Groovy Gorilla from Ubuntu 20.04, do following steps one by one.
1. Back up all your important data. And you may also create a system restore point via TimeShift which is available in Ubuntu Software.
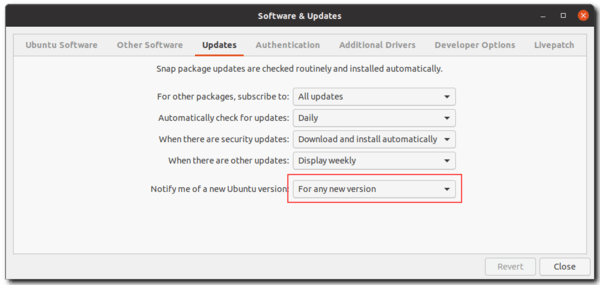
2. Open Software & Updates and do:
select download from Main Server in the first tab.
disable all third-party PPAs in the second tab.
select ‘Notify me of a new Ubuntu version: For any version‘ in the third tab.
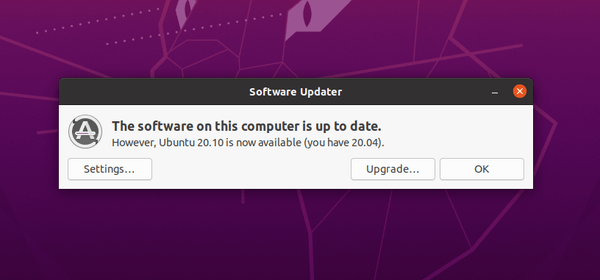
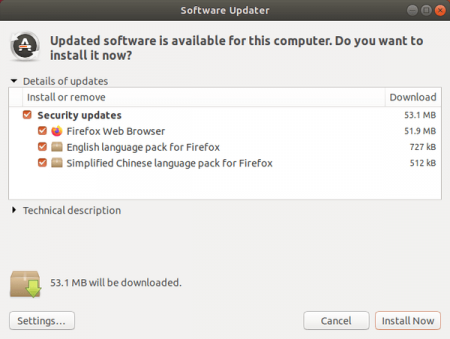
3. Open Software Updater and install all system updates! Restart after installation if it asks.
4. Open Software Updater again, and it should prompt that Ubuntu 20.10 is available to upgrade.
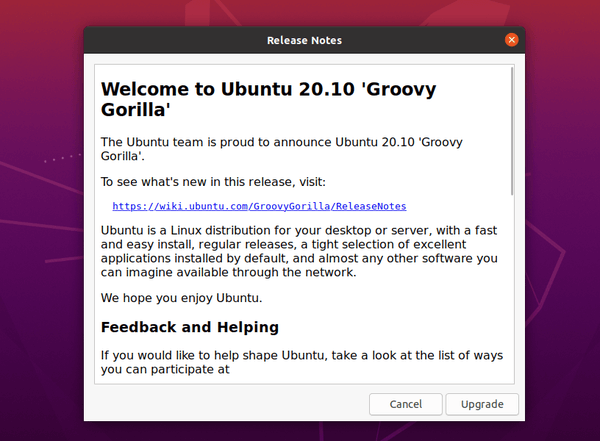
5. Click on the Upgrade… button. Type your password when it prompts. You will be presented with the Release Notes for the release you’re about to upgrade to.
Click on the Upgrade button. It will download the upgrading tool and show you a Distribution Upgrade window allows you to monitor progress. If everything goes OK, you’ll be prompted to restart the system to complete the upgrade.
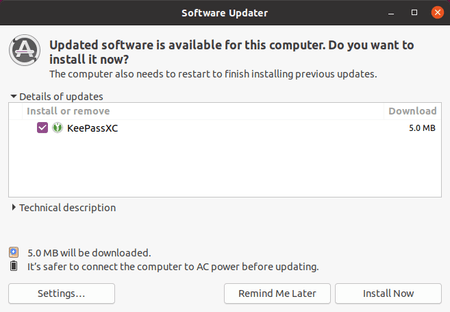
Microsoft Edge web browser finally adds Linux support after more than a year of dev and beta tests. Here’s how to correctly add the Microsoft repository and install Edge browser in Ubuntu 18.04, Ubuntu 20.04, Ubuntu 22.04, Debian 11, and their based systems.
After this tutorial, you should be able to open the latest stable Edge from start menu (activities overview). And, with the Microsoft repository it allows to keep it up-to-date by receiving updates via “Software Updater”.
How to Install Microsoft Edge in Ubuntu:
For those who don’t want to struggle with Linux commands, just download the latest version of .deb package from THIS PAGE, then double-click to install via “Software Install”.
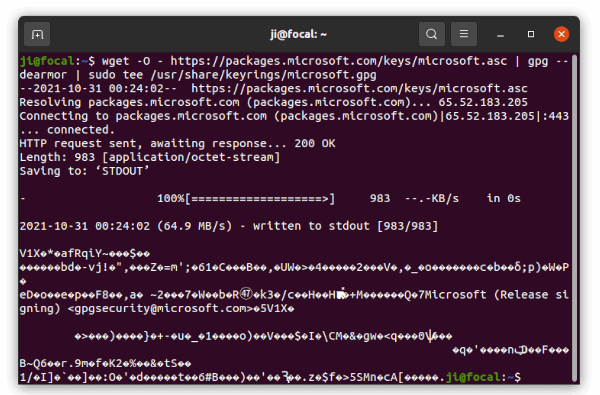
1. Download & install the GPG Key:
Before adding the repository, you need to first download & install the GPG key so system will accept signatures from Microsoft.
Press Ctrl+Alt+T on keyboard to open terminal. When it opens, paste the command below and hit Enter to run:
The command will download the key from Microsoft, then convert it into encrypted GPG, and finally store the file under “/usr/share/keyrings/” directory.
Download, convert, & install the key
IMPORTANT: After downloaded the key, terminal may stuck with blinking cursor! It’s waiting for you to type user password for sudo command, because the “[sudo] password for $USER:” prompt is somehow not displayed. Just type your password (no feedback) and hit Enter.
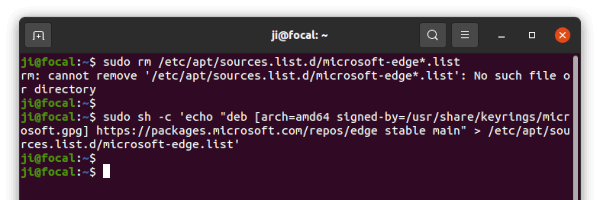
2. Add Microsoft Edge repository:
After installing the GPG key, run the command below one by one to add the repository to your system.
The command will create and write the source line into “/etc/apt/sources.list.d/microsoft-edge.list” file, signed by the key installed via step above.
Add microsoft repo, sign the key
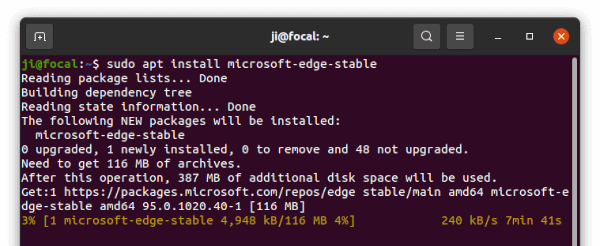
3. Finally refresh package cache and install Edge browser:
After all, update the system package cache via command:
sudo apt update
And install the web browser:
sudo apt install microsoft-edge-stable
Once installed, search for and open it from activities overview screen and enjoy!
How to Remove Edge & its repository:
With the repository, it allows to receive updates for Edge using “Software Updater” utility. If you want to remove it, open terminal and run command to delete the source file: