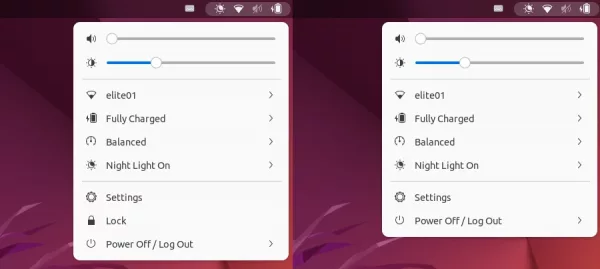
Want to hide the lock screen option from the upper-right corner system menu? Here’s how to do the trick in Ubuntu 22.04 LTS.
For Ubuntu, Fedora and other Linux with GNOME desktop, the screen lock can be disabled either totally or only from the system menu.
Method 1: Single command to disable lock screen
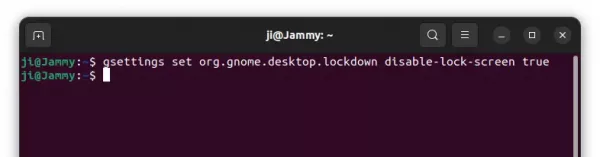
GNOME has a hidden option to disable the lock screen. Simply press “Ctrl+Alt+T” on keyboard to open terminal, then run the command below will do the trick:
gsettings set org.gnome.desktop.lockdown disable-lock-screen true
This command works on all current Ubuntu releases, including Ubuntu 20.04, Ubuntu 22.04, Ubuntu 24.04, and even other Linux with recent GNOME, e.g., Debian 11/12, Fedora, etc.
NOTE: This command not only hide the menu option, but also completely disable the lock screen function. The Super+L shortcut and automatic screen lock when system idle will no longer work!
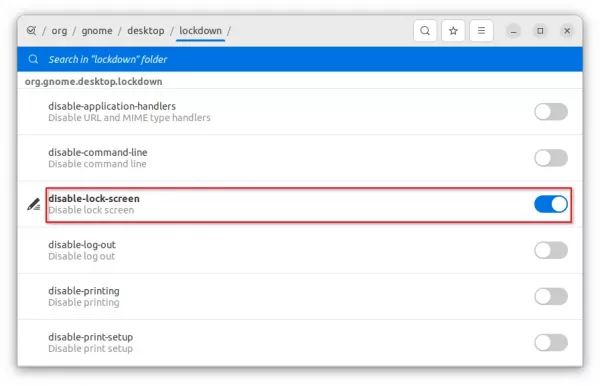
For those prefer a graphical configuration tool, this can also be done via “Dconf Editor” tool which is available to install in Ubuntu Software.
To re-enable this feature, open terminal and run command:
Method 2: Only hide menu option via Gnome Extension
To just hide the option from system menu, but keep all other ways (e.g, Super+L and idle action) to trigger lock screen, there’s an extension for Ubuntu 22.04, Fedora 36, and other Linux with GNOME 42.
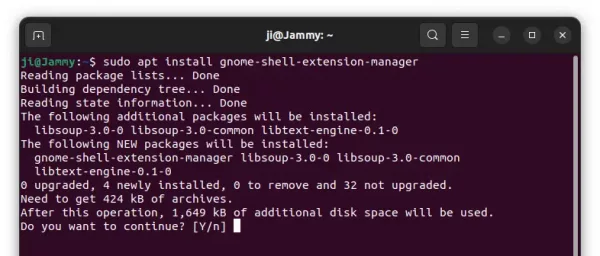
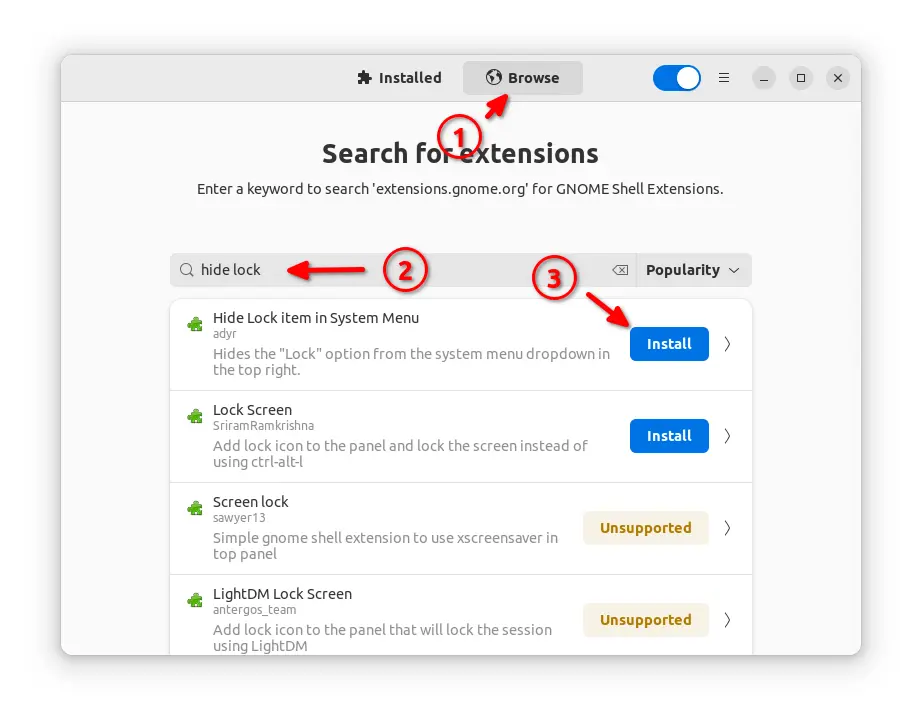
1.) Firstly, press Ctrl+Alt+T on keyboard to open terminal. When it opens, run the command below to install extension manager:
sudo apt install gnome-shell-extension-manager
2.) Next, press Super (Windows) key on keyboard to open “Activities” overview screen, then search for and open the tool:
3.) Finally, search for and install “Hide Lock item in System Menu” extension from Browse tab and done.
For Fedora 36, you may visit the extension web page and turn on the slider icon to install it.
Want to install an app via classic DEB package, but it’s not available in Ubuntu’s own repository? There’s a new command line tool “deb-get“, makes installing apps from 3rd party repositories as easy as single command.
Many applications (e.g., Google Chrome, 1Password, Teamviewer and more) provide DEB packages for Debian/Ubuntu either in their own apt repositories / PPAs or for downloading directly in website.
Besides setup the repositories or find and download .deb packages manually, then install apps via apt (or apt-get), “deb-get” do all the things via a short single command.
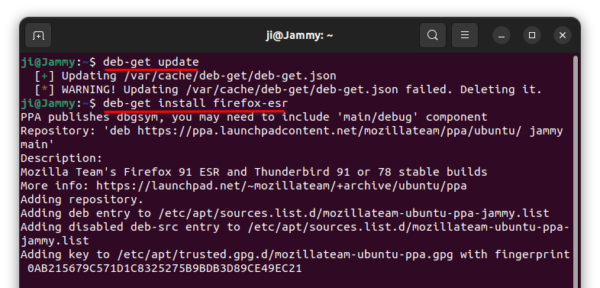
For example, run the command below in terminal will add Mozilla Team PPA and install Firefox ESR automatically:
deb-get install firefox-esr
Install Firefox ESR via Deb-get
It’s a free open-source tool developed by Martin Wimpress (leader of Ubuntu MATE project) and many other contributors.
Install Apps via Deb-get
For those familiar with apt or apt-get, Deb-get is quite easy to use as it has similar command options.
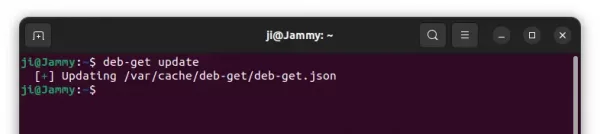
Update package index:
Before installing any package, you may first run the command to update the package index for the latest sources:
deb-get update
sudo seems to be not required, though you may add it in the beginning in case of permission issue.
Install/Remove packages:
The tool so far supports for 107 apps including 1password, brave-browser, cawbird, discord, docker-ce, docker-desktop, expressvpn, keepassxc, mailspring, onlyoffice-desktopeditors, obs-studio, skpyeforlinux, sublime-text, whatsapp-for-linux. And, it keeps adding more and more apps support.
You may firstly, run the command below to get a full list of supported packages:
deb-get list
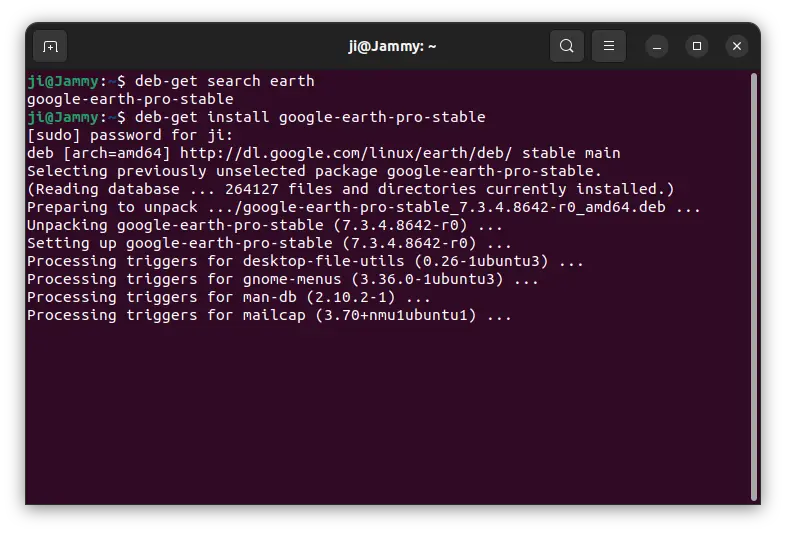
Or use deb-get search KEYWORD to find out if your app is supported.
And, to install an app package (google-earth in the case) use command:
deb-get install google-earth-pro-stable
You’ll see it’s setting up repository and use apt command to install the package. If the package is available via direct download link, it will download via curl and then install it via apt.
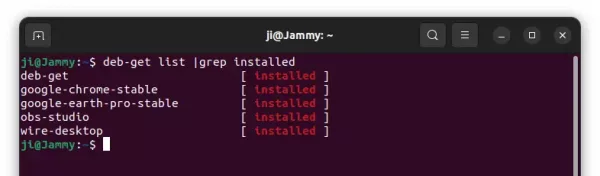
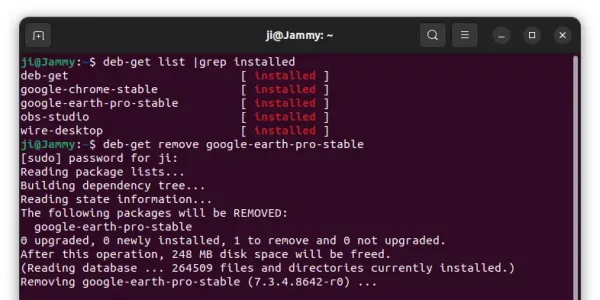
To find out all installed packages, use command:
deb-get list |grep installed
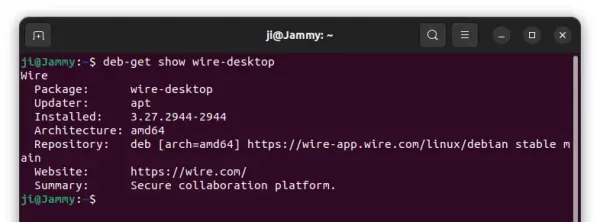
You may get info about an installed app, including package version, source, website and summary via command:
deb-get show PACKAGE_NAME
Like apt, to remove a package use command with either remove or purge (also delete configuration files) flag:
deb-get remove PACKAGE_NAME
The command will also remove the repository (if any) that was added for the package.
There also many other options, including upgrade to install available updates for all installed packages, reinstall to re-install a package, clean to clear out the local repository of retrieved package files. And, you may just run deb-get in terminal to get more about this command line tool.
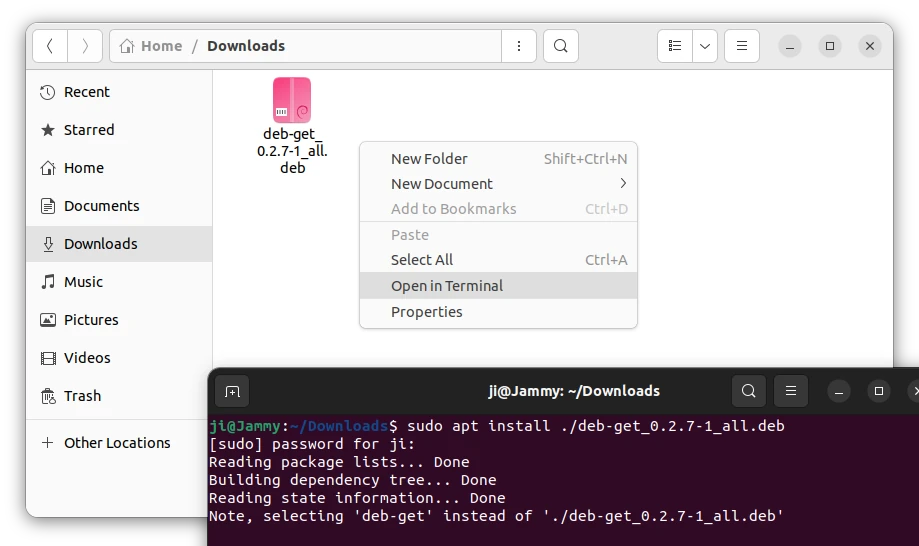
How to install Deb-get in Ubuntu:
The tool is designed specially for Ubuntu and its based systems. The project page provides .deb package that installs in all current Ubuntu releases (Ubuntu 18.04, 20.04, 21.10, and 22.04).
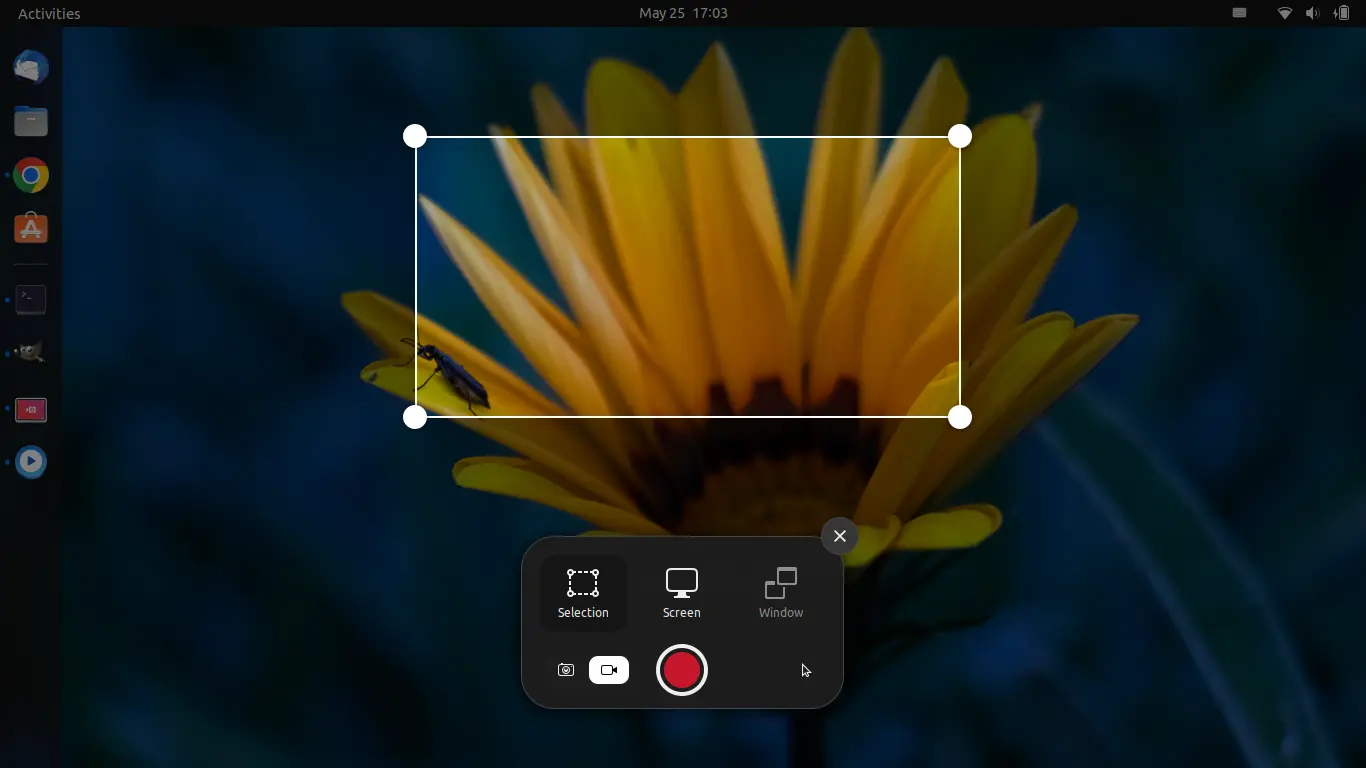
Want to record your screen or app window with sounds? Here’s how to do this in Ubuntu 22.04 LTS.
Ubuntu 22.04 comes with built-in screen recording UI. By pressing Ctrl+Shift+Alt+R key combination on keyboard, you can open it and select recording full-screen or a selection area. However, it does not record audio!
System built-in screen recorder
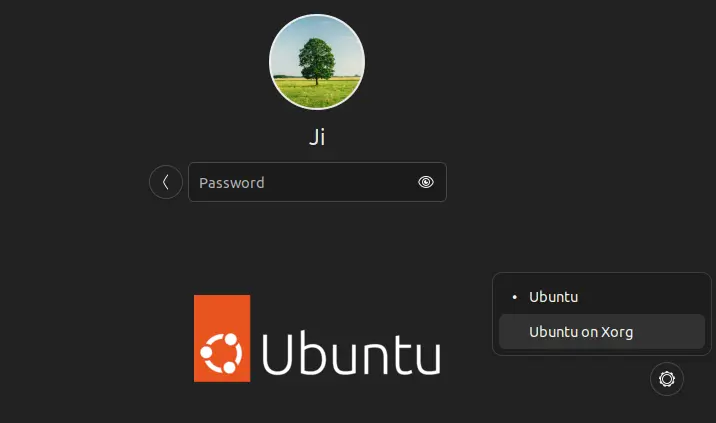
Method 1: Switch to Xorg session:
There are a few other tools available in system repository that record desktop with audio support. However, most of them do not work in the default Wayland session. As a workaround, you may switch back to the classic Xorg session to get your apps work.
1. Firstly, save your work and log out the current session.
2. In the login screen, click your username, then select “Ubuntu on Xorg” using the bottom right gear button menu.
3. Finally, type password to login and start recording via your applications.
In case you don’t know about any screen recording app, here are some that work in Xorg session with audio support.
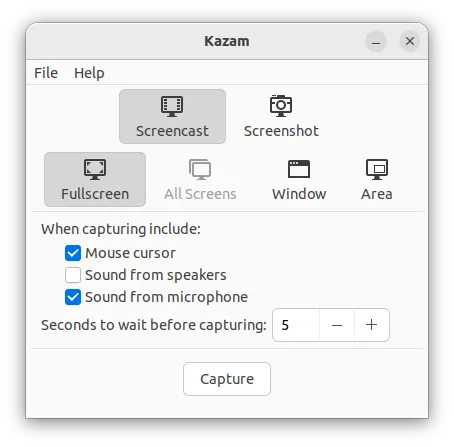
Kazam
SimpleScreenRecorder (ssr)
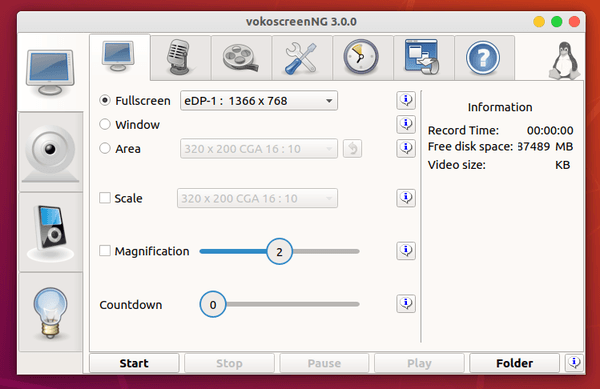
vokoscreen-ng
All the 3 are available to install in Ubuntu Software. You can alternatively press Ctrl+Alt+T to open terminal, run one of the commands below to install the package in case you hate Ubuntu Software (aka Snap store):
sudo apt install kazam
sudo apt install simplescreenrecorder
sudo apt install vokoscreen-ng
Kazam
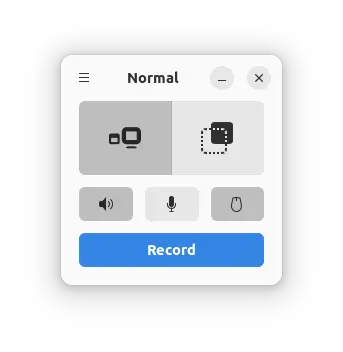
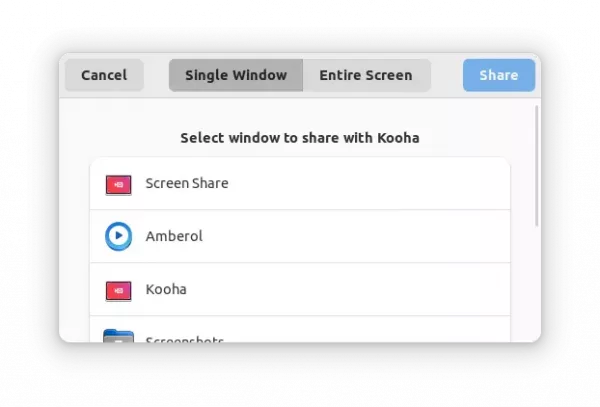
Method 2: Use Kooha
Except OBS Studio, Kooha is the only screen recorder that works great in the Wayland session as far as I know.
It supports recording your selected app window, full-screen, and selection area along with computer sound and/or microphone.
Just select the recording mode, enable audio and/or mouse cursor, and click on “Record” button. It will pop-up a new dialog allows to choose either app window or screen display, and start recording after clicking on “Share” button.
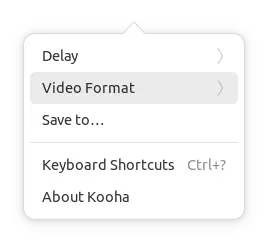
And, it can records video into WebM, MKV, MP4, and GIF file formats via the 3 lines icon menu.
Tip: You may minimize the Kooha counting window during recording process, by clicking the app icon on the dock. Though, you need to first enable ‘click minimize’ function by running command in terminal:
gsettings set org.gnome.shell.extensions.dash-to-dock click-action 'minimize'
How to Install Kooha in Ubuntu & Other Linux
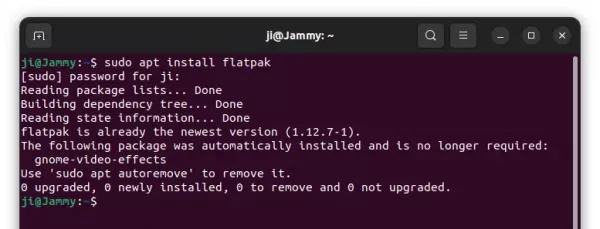
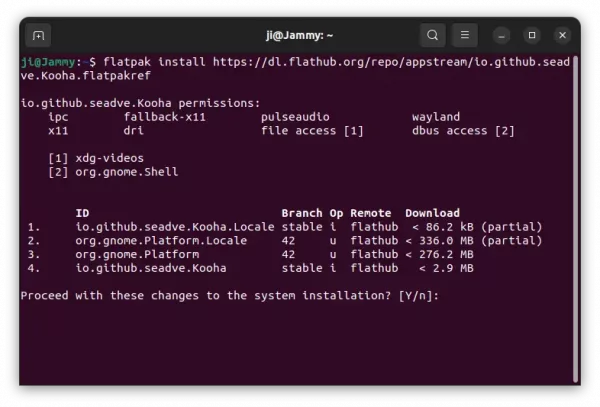
The software so far only provides Linux packages via Flatpak package. If you’re first time installing a Flatpak package, it’ll take a few hundred MB more disk space for run-time libraries.
1.) Firstly, press Ctrl+Alt+T on keyboard to open terminal. When it opens, run the command below to install the flatpak daemon:
sudo apt install flatpak
Other Linux may follow this setup guide to install the daemon.
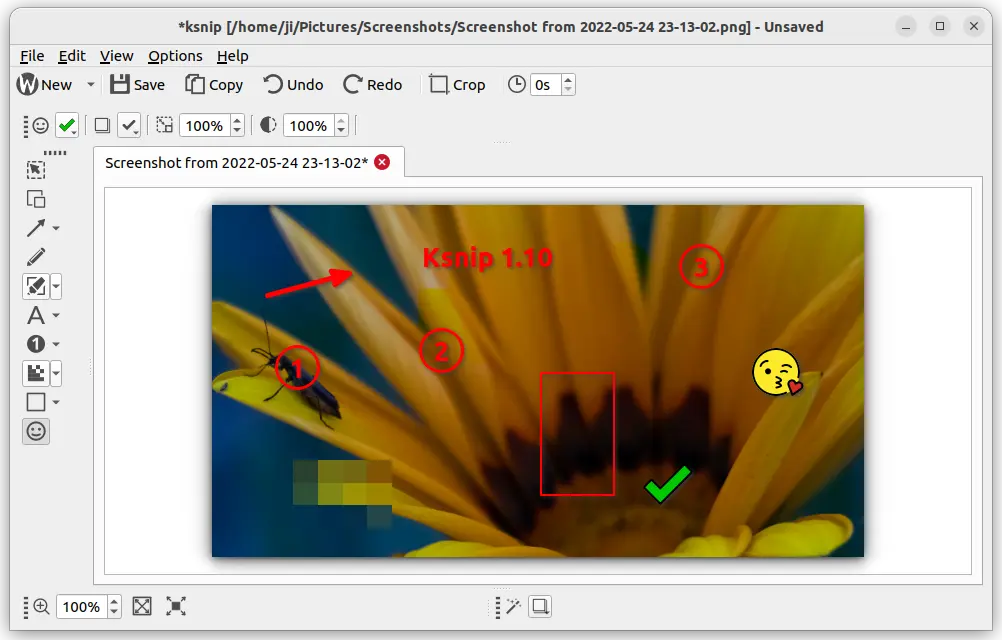
The popular Qt based screenshot tool KSnip 1.10.0 was released few days ago with some cool new features. Here’s how to install it in Ubuntu.
For those never heard of KSnip, it’s a free open-source cross-platform (supports Windows, Linux and MacOS) screenshot tool with some annotation tools, upload options and more.
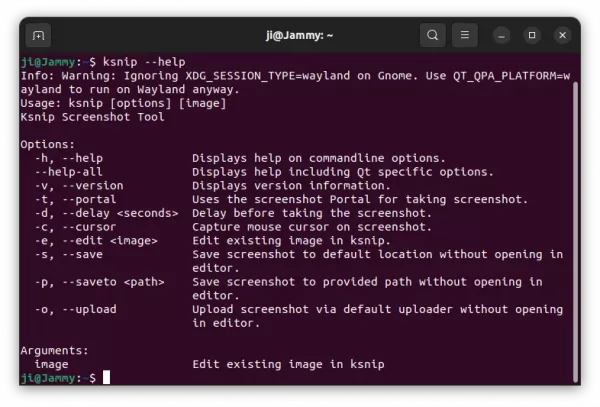
By releasing the new 1.10.0 release, it adds new command line options:
-p or --saveto <path> to specify where to save image.
-o or --upload to upload screenshot via default uploader without opening in editor.
For other command options, simply run ksnip --help in terminal.
With a new OCR plugin, the release now supports for extracting plain text from images. Just open an image, then click on the “Options -> OCR” menu option to use it. Though, it seems to be in very early stage, which is not working in my case.
Other changes in KSnip 1.10.0 include:
Add FTP uploading support.
Add debug logging.
New Save all option.
Search in preference.
Add support for RGBA colors with transparency.
Editing feature improvements.
And various bug-fixes.
How to Install KSnip 1.10
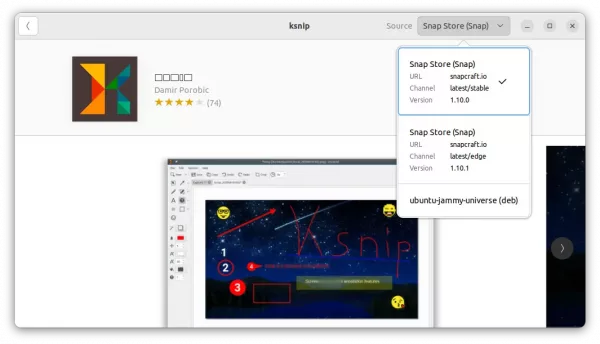
Option 1: Snap package
The easiest way to install the tool in Ubuntu is using the official Snap packages. Simply open Ubuntu Software, then you can search for and install it via few clicks.
Install Ksnip via Ubuntu Software
Option 2: AppImage / Deb
The software project page also provides AppImage and Deb packages, as well as Windows and Mac OS packages for download under ‘Assets’ section:
For most Linux, you may download the non-install AppImage package, make it executable via right-click menu “Properties” dialog -> “Permissions” tab, and finally click run the package to launch it.
For Debian and Ubuntu based system, download the .deb package and install it by running command in terminal (press Ctrl+Alt+T to open terminal):
sudo apt install ~/Downloads/ksnip-*.deb
NOTE for Ubuntu 22.04, double-click installing this local deb via “Software Install” option may not work properly. It refers to the Snap package, rather than installing the local package.
Option 3: Ubuntu PPA (unofficial)
For those prefer Ubuntu PPA, here’s an unofficial repository with Ubuntu 20.04 and Ubuntu 22.04 support.
Simply press Ctrl+Alt+T on keyboard to open terminal, and run the commands below one by one will add the PPA and install the screenshot tool from it.
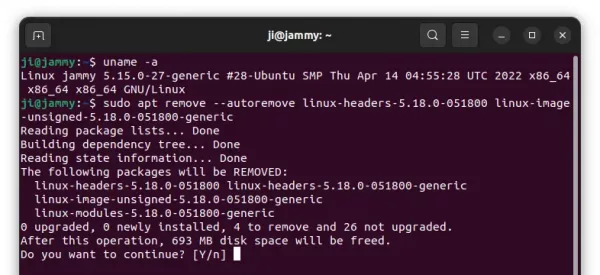
Linux Kernel 5.18 was released on this Sunday. Ubuntu 22.04 user can install this new kernel via the mainline PPA repository.
The new Kernel release comes with many new features, and here are some of them:
Intel Hardware Feedback Interface “HFI” Driver
Intel Software Defined Silicon (SDSi) driver
AMD HSMP driver
Intel Indirect Branch Tracking (IBT)
New Razer Driver & Tablet improvements.
Intel’s Platform Environment Control Interface (PECI)
Intel Alder Lake N graphics and Alder Lake “PS” audio support.
SiGma Micro keyboard control ICs support
How to Install Kernel 5.18 in Ubuntu 22.04:
Ubuntu has build the kernel package in its Kernel Mainline PPA, available to install in Ubuntu 22.04 LTS.
NOTE: The Mainline Kernel package does not include any Ubuntu-provided drivers or patches, which are NOT appropriate for production use. ONLY install when you do require it and use at your own risk!
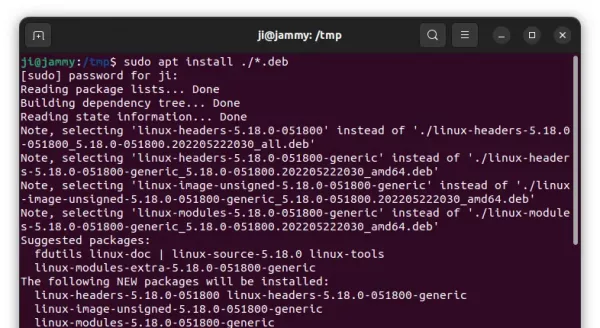
The Kernel 5.18 .deb packages are available to download at the link below:
For Ubuntu 22.04 desktop PC/laptop, press Ctrl+Alt+T on keyboard to open terminal. When it opens, run the commands below one by one to download the packages:
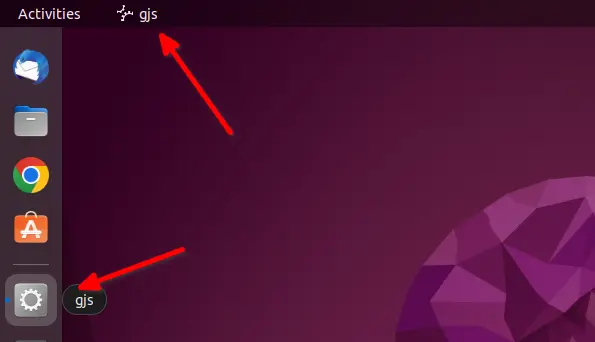
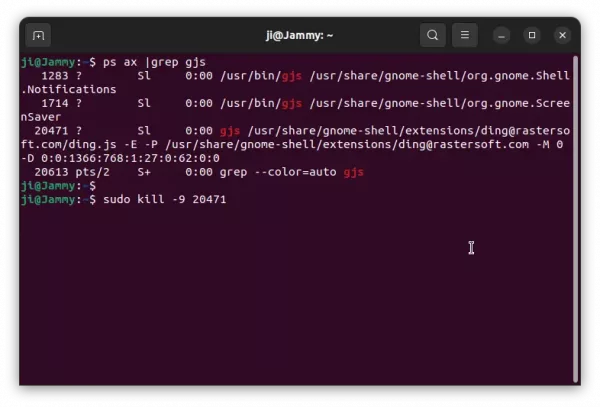
Got an invisible app window called “gjs” in Ubuntu 22.04 desktop? Here’s how to kill it without log out the current session.
GJS, stands for Gnome JavaScript, it’s part of Gnome-shell use as JavaScript programming environment. In Ubuntu, the default Desktop Icons NG (DING) extension use gjs, which could cause the issue sometimes.
When the issue happens, you’ll see an app icon called “gjs” in the dock, but no app window visible. You can not close it by the context menu option. And, it’s annoying that other applications are not reachable via mouse clicks until switch focus via Alt+Tab keyboard shortcut.
Invisible gjs in overview
Until GNOME or maybe the extension developers fixed the issue, user may manually kill the process to get rid of it.
Kill the process via system monitor
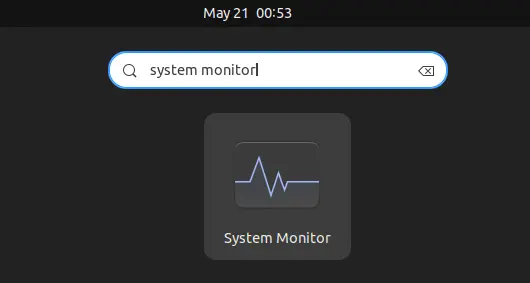
Firstly, press Super / Windows key on keyboard to open ‘Activities’ overview, search for and open “System Monitor” app:
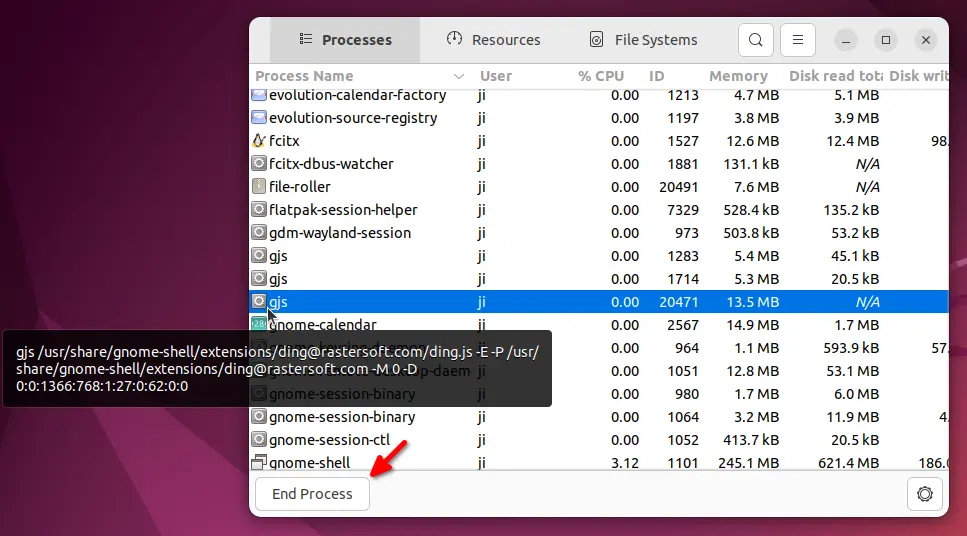
When it opens, scroll down and find out the process. There are usually multiple gjs processes. Move mouse pointer over one of them will display a tooltip about it.
It’s safe to kill the process by clicking to highlight and then hitting “End Process” button. The invisible “gjs” window should disappear immediately if you killed the correct one. And, the process will start again automatically.
Kill the process via Linux command:
For those familiar with Linux command, simply open terminal and run command to find out the process:
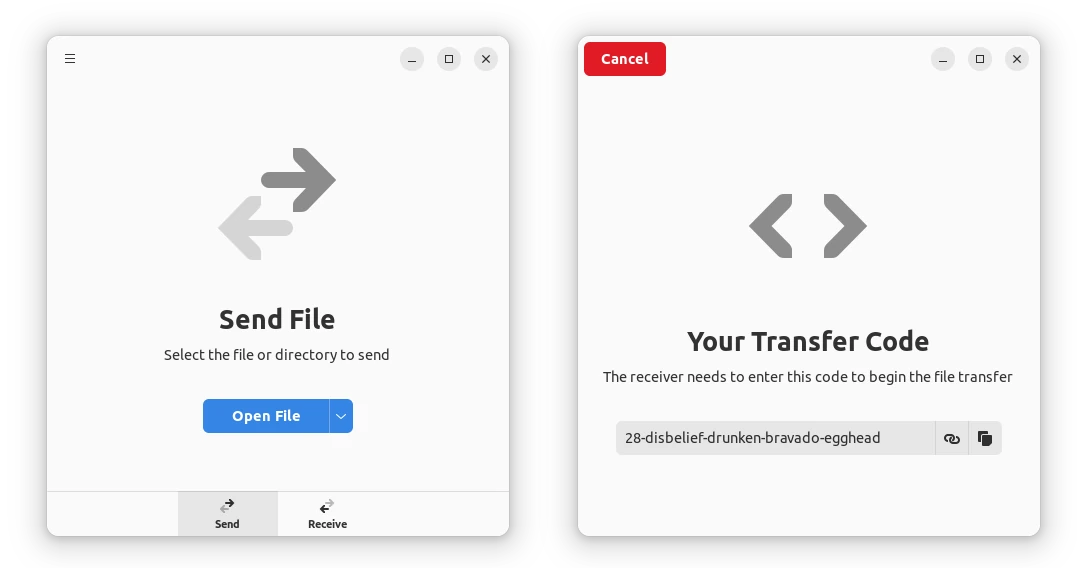
Looking for a peer to peer file transfer app that works outside the local network? Warp is the stupid simple application to do the trick for Linux.
There are a few applications for LAN file transferring, such as Warpinator and Dukto. For sending date all over the world, Warp is a new GTK4 app for transferring any arbitrary-sized files and directories without struggling with Linux command or using a cloud service.
The app provides a stupid simple interface with 2 tabs: Send and Receive. Simply click on the “send file” (or folder) button and select your data, it will generate a transmit code.
On another machine with the app installed, type the code in “Receive” tab and click “Receive File” button will start transferring data.
Every file transfer is encrypted using the Magic Wormhole protocol. And, it will directly transfer files on the local network if possible. Though, an internet connection is required to connect to rendezvous server so sender and receiver can find each other over the internet.
How to Install Warp in Linux:
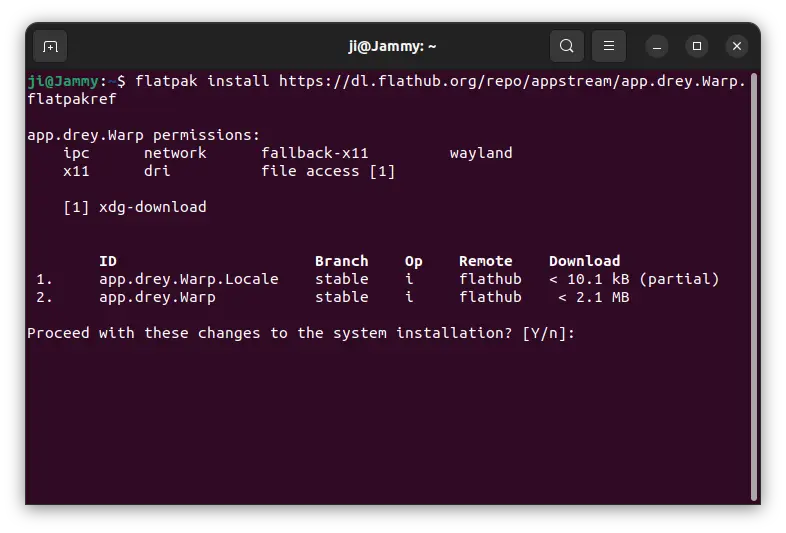
NOTE: The app is in early age that may have bugs. At the moment of writing, it provides binary package for most Linux systems and Chrome OS using Flatpak package.
For Ubuntu, firstly press Ctrl+Alt+T on keyboard to open terminal. When it opens, run the command to install flatpak daemon:
sudo apt install flatpak
Other Linux & Chrome OS may follow this setup guide to install the daemon.
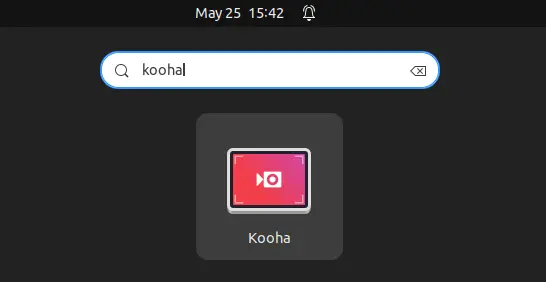
For first time installing Flatpak app on Ubuntu 22.04, you need a system restart to make the app icon available in search result.
Once installed, either press Super/Windows key on keyboard and search for and open the app, or run command flatpak run app.drey.Warp to start it from terminal.
Remove Warp file transfer
To remove the app, run command in a terminal window:
flatpak uninstall --delete-data app.drey.Warp
And clean un-used run time via: flatpak uninstall --unused.
Ubuntu 22.04 desktop looks really good today, but it’s always better to have choices! And, here is the beginner’s guide shows how to install themes and change the desktop panel, icons, app windows appearance.
Change Themes in Ubuntu 22.04
Ubuntu defaults to Yaru theme in light and dark mode, along with 10 different accent colors. There are a few others pre-installed in the system, and we usually use “Gnome Tweaks” to choose among them.
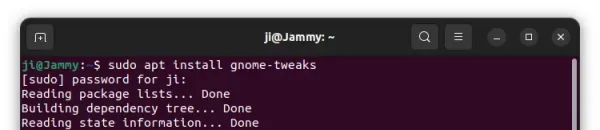
1.) Firstly, press Ctrl+Alt+T on keyboard to open terminal. When it opens, run the command below to install ‘Gnome Tweaks’:
sudo apt install gnome-tweaks
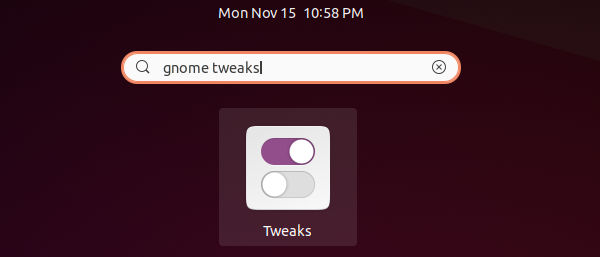
2.) Then, either press Windows/Super on keyboard or click “Activities” on top bar, and then search for and launch the configuration tool.
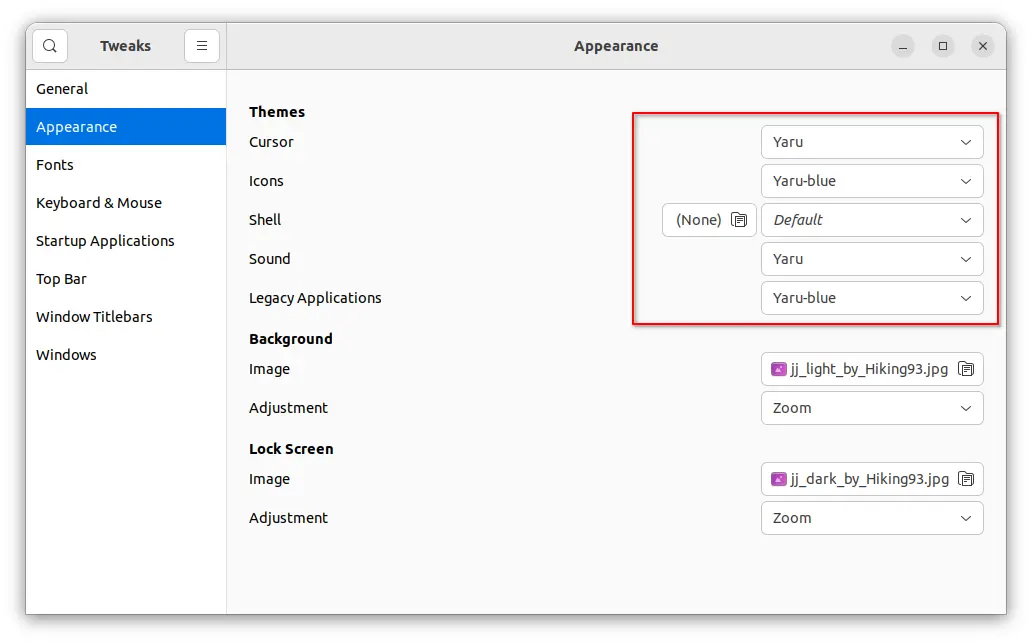
3.) By navigating to “Appearance” tab, you’ll see the options to change the themes for mouse cursor, icons, shell, sound, and legacy applications.
Since GNOME (Ubuntu’s default desktop environment) is preventing custom themes for GTK4 applications via libadwaita, the GTK theme option in Gnome Tweaks becomes “Legacy Applications“. Ubuntu 22.04 ships few GTK4 apps and avoids libadwaita, so the option works good so far.
Enable Shell theme selection box:
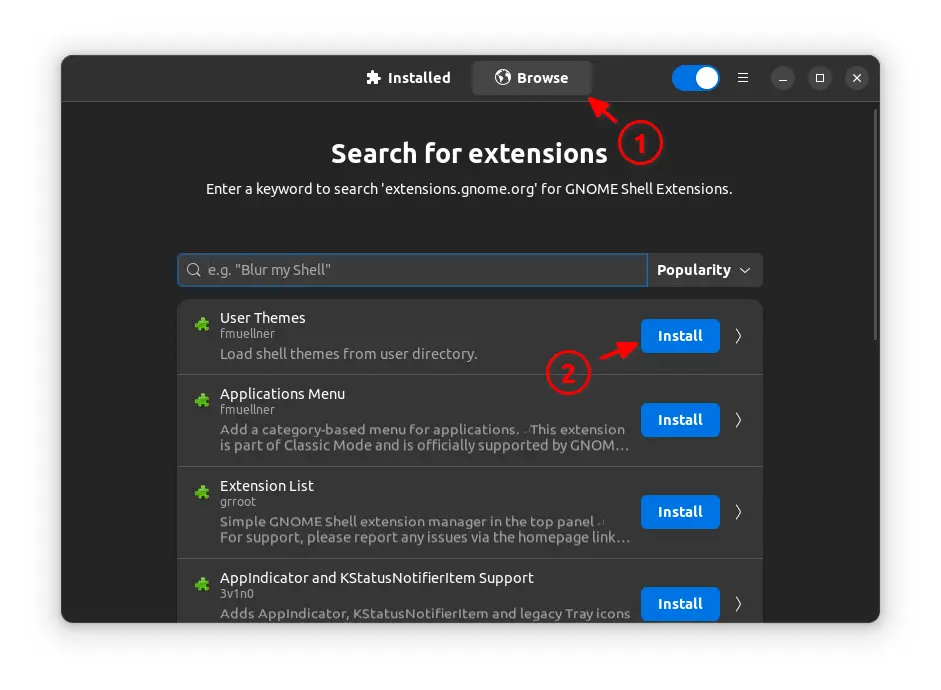
The Shell theme selection box that apply appearance of desktop panel, context menu and notifications, is grayed out by default. To enable it, you have to install “User Themes” extension.
Firstly, press Ctrl+Alt+T on keyboard to open terminal. When it opens, run the command below to install extension manager app:
sudo apt install gnome-shell-extension-manager
Next, click on the “Activities” on top bar, search for and open the tool:
Finally, install “User Themes” extension from the ‘Browser’ tab in Extension manager application:
After that, re-open Gnome Tweaks. It should allows to change “Shell” theme now in Appearance tab.
How to Install Themes in Ubuntu 22.04
There are many other themes available on the web, such as gnome-look.org. Some of them has installation script but some not.
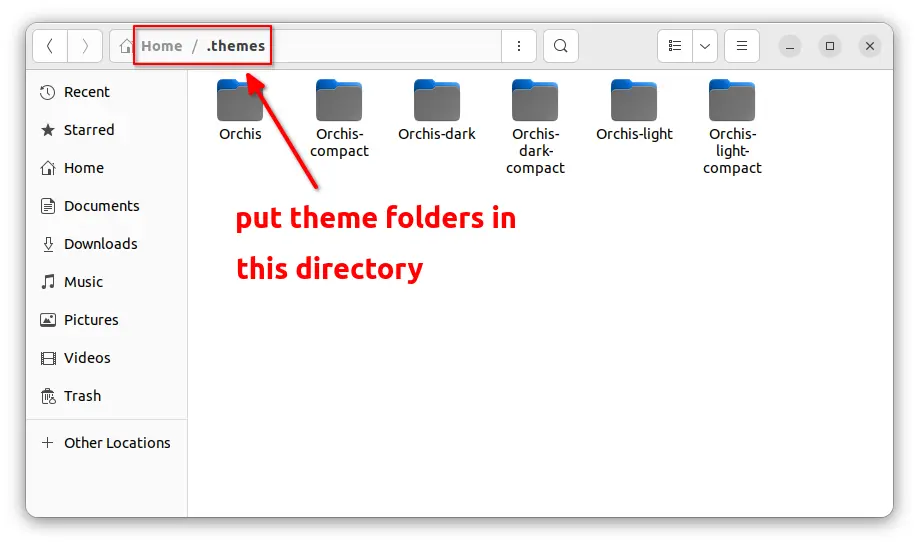
1. To manually install a theme in Ubuntu & most other Linux, firstly open user home folder from the dock:
Firstly open user home folder
2. Press Ctrl+H on keyboard when file manager opens to view/hide hidden folders, and create the .themes and .icons folders if they are not exist:
.themes – use for GTK app themes and shell/desktop themes.
.icons – use for icon set.
3. Next, put your downloaded GTK themes and Gnome Shell themes into “.themes” folder. And, put icon themes into “.icons” folder.
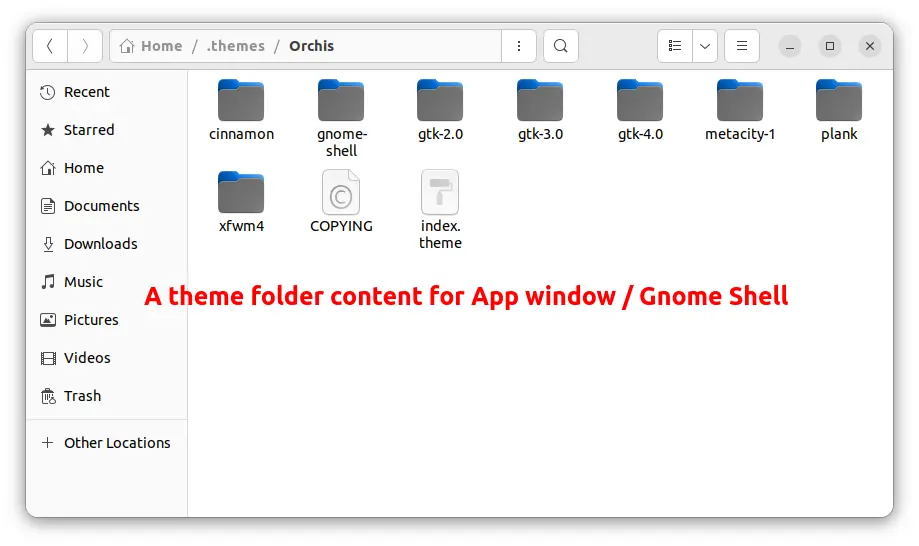
A theme folder usually contents a few sub-folders as well as a ‘index.theme’ file. By putting it into the right location, Gnome Tweak will find it automatically and display as choice in selection box.
To install themes for all system user use, put these folders into “/usr/share/themes” and/or “/usr/share/icons“, though you need sudo user privilege to do the copy & paste things.
Like Firefox, the Chromium web browser package in recent Ubuntu repository is just empty package that links to Snap version.
If you would like to install the classic .Deb version instead, here are 2 choices that work on Ubuntu 22.04 LTS.
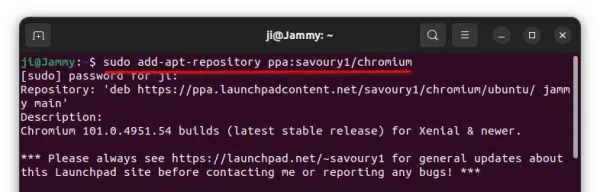
Option 1: Use Rob Savoury’s PPA
Rob Savoury is maintaining a collections of software packages in PPAs including Chromium browser. With this unofficial PPA, you may get the the latest Chromium packages in Ubuntu 22.04 and Ubuntu 20.04.
This could be the easiest way, however, only 64-bit modern PC/laptop is supported!
1.) Add the PPA
Firstly, press Ctrl+Alt+T on keyboard to open a terminal window. When it opens, run the command below to add the PPA:
sudo add-apt-repository ppa:savoury1/chromium
Type user password (no asterisk feedback) when it asks and hit Enter to continue.
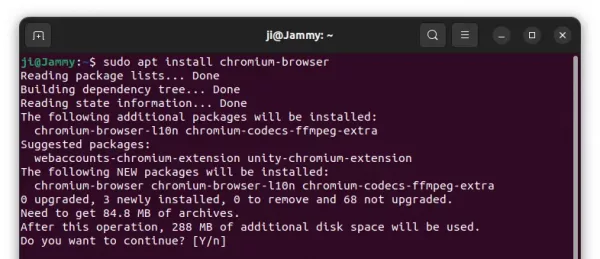
2.) Install the browser package
After adding the PPA, you can install the browser package via commands:
sudo apt update
sudo apt install chromium-browser
How to Uninstall:
To remove the browser package, open terminal (Ctrl+Alt+T) and run command:
sudo apt remove --autoremove chromium-browser
And remove the Ubuntu PPA by launching “Software & Updates” and remove the source line from “Other Software” tab.
Remove Rob Savoury’s Chromium PPA
Option 2: Install Chromium from Ubuntu 18.04 Repository
Ubuntu 18.04 still provides the most recent Chromium .Deb package and keeps updating in its repository.
Until April 2023 (end of life date of Ubuntu 18.04), you may install the package from that repository in 64-bit and ARM64/ARMhf machines running Ubuntu 22.04.
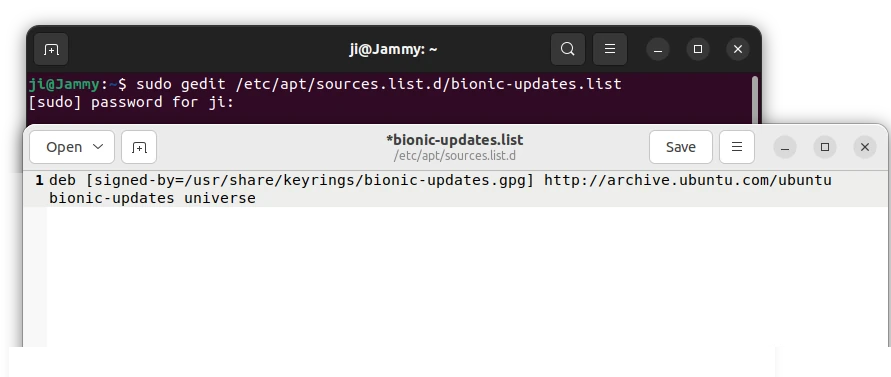
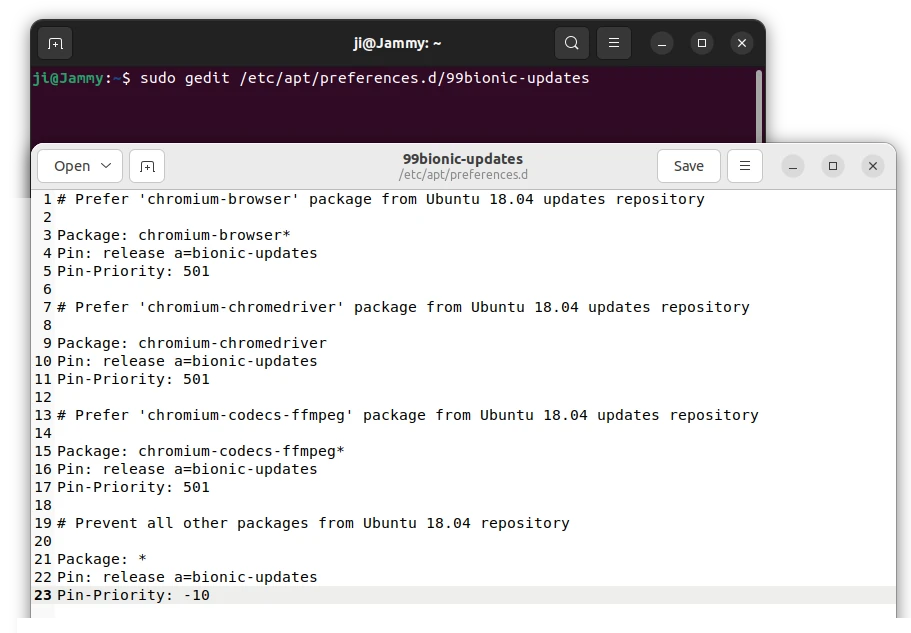
However, the process is a little bit complicated due to change of the apt key policy. For choice, there’s a third-party PPA keeps a copy the packages for Ubuntu 20.04 and Ubuntu 22.04.
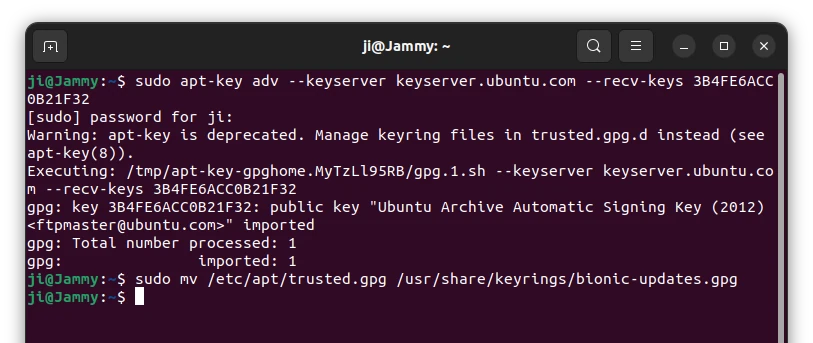
1.) Install Ubuntu 18.04 repository key:
Firstly, press Ctrl+Alt+T on keyboard to open terminal. When it opens, run the command below get the bionic-updates repository key:
Finally, refresh system package cache to apply changes:
sudo apt update
Summary:
There are quite a few software sources to get the Chromium package in .Deb version. Here, the third-party Rob Savoury’s PPA could be the easiest way which however contains only 64-bit package. The old Ubuntu 18.04 repository is good choice for those need arm64/armhf package, though the support will end in April 2023.
DeaDBeeF music player released new 1.9.0 version a day ago. Here’s what’s new and how to install the application in Ubuntu.
DeaDBeeF is one of my favorite music players, especially for its design mode. Glory to Ukraine! In this release you’ll see two little hearts (in blue and yellow) in the title bar of app window.
The 1.9.0 release added some new features including:
Long file seeking support for Opus and FFMPEG
HTTPS support for vfs_curl in portable builds, via libmbedtls
Design mode for CocoaUI
New Scope and Spectrum Analyzer visualizations
Visualization appearance preferences pane
New album art loader
Title formatting $year(time) function
GTK UI for editing a chosen field of multiple selected tracks, in a table interface
Creating new playlist via clicking the “+” button in the playlist tab strip
Improved DSP preferences GTK UI
Improved handling of invalid MP3 files
Last.fm scrobbler will use HTTPS by default
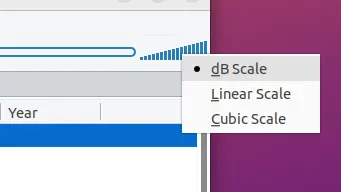
And, you can now easily get the menu to set dB scale, Linear scale, or Cubic scale by simply right-clicking on volume slider. There are as well various bug fixes, see HERE for more.
How to Install DeaDBeeF 1.9.0 in Ubuntu:
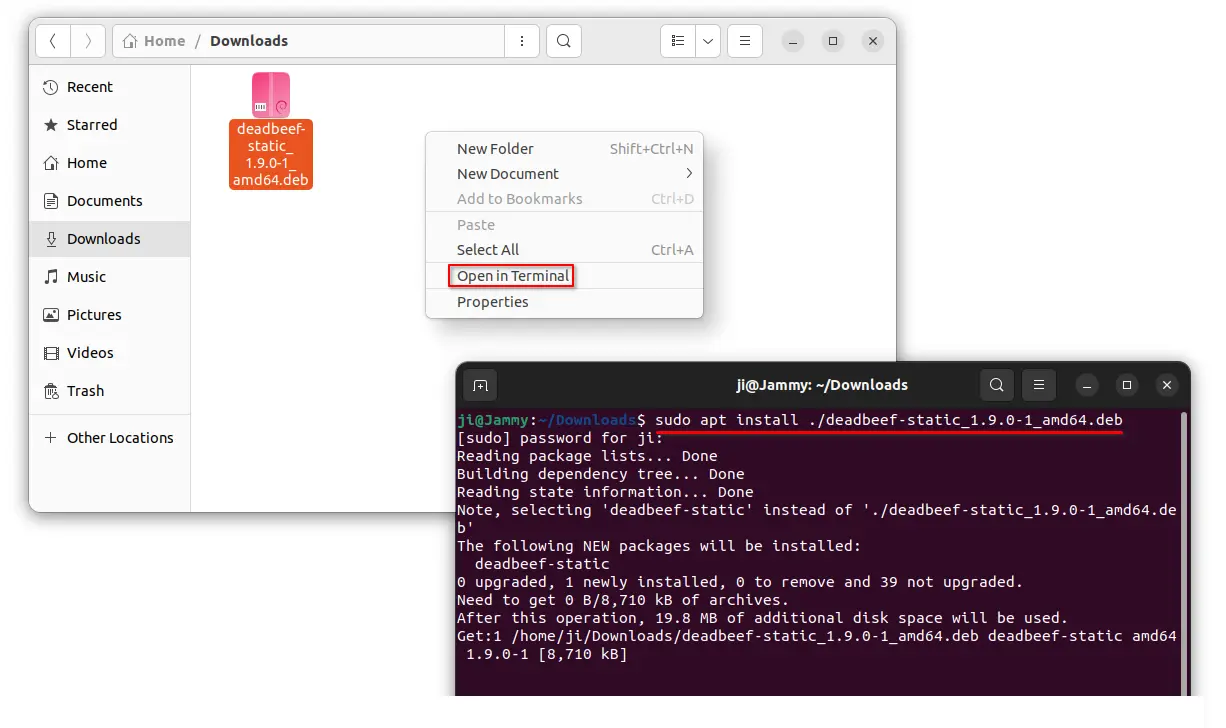
The software project provides official packages for 64-bit modern PC/laptop. For Debian, Ubuntu, Linux Mint based systems, simply download the “deadbeef-static_1.9.0-1_amd64.deb” from the link page below:
After downloaded the package, open your Downloads folder, right-click blank area and select “Open in Terminal”. Finally, install the package by running the command below in pop-up terminal:
sudo apt install ./deadbeef-static*amd64.deb
It works in all current Ubuntu releases, including Ubuntu 18.04, Ubuntu 20.04, Ubuntu 21.10 and Ubuntu 22.04.
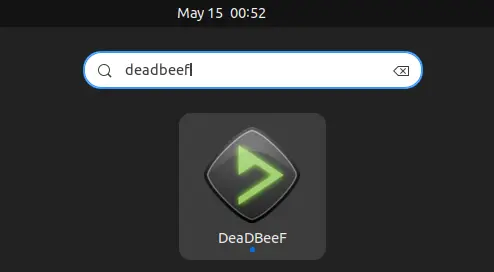
Once installed, press Windows (Super) key on keyboard. Then search for and open the player to enjoy your music!
In addition for those prefer Ubuntu PPA, here’s one that built with Qt5 interface and MPRISv2 plugin support.
It should be trustworthy as the maintainer is the guy behind Debian and Ubuntu’s official Tesseract OCR package. However, the package version there at the moment of writing is still the last v1.8.8. And, it’s better to remove “deadbeef-static” first before installing the music player from this PPA.
How to Remove DeaDBeeF:
The package is installed as deadbeef-static. To remove it, open terminal by pressing Ctrl+Alt+T on keyboard. Then run command: