HPLIP, an open-source HP developed Linux drivers for HP printers, has reached the 3.17.9 release hours ago with many new printers support and new Distro’s support.
New Linux Distro’s supported in HPLIP 3.17.9:
- openSuse 42.3 (64-bit)
- LinuxMint-18.2 (32-bit and 64-bit)
- Fedora-26 (32-bit and 64-bit)
- RHEL -7.3 (64-bit)
New printers supported in the release:
- HP OfficeJet Pro 7720 Wide Format All-in-One
- HP DeskJet AMP All-in-One Printer
- HP OfficeJet 5220, 5230, 5232 All-in-One Printer
- HP ENVY Photo 6220, 6230, 6232, 6234, 7120, 7130, 7134, 7155, 7164, 7800, 7820,7855 All-in-One Printer
- HP ENVY 5020, 5032 All-in-One Printer
- HP DeskJet Ink Advantage 3735 All-in-One
- HP AMP 130 All-in-One Printer
- HP OfficeJet Pro 7730 Wide Format All-in-One
- HP DeskJet Ink Advantage 5075 All-in-One Printer
- HP PageWide Enterprise Color 765dn
- HP PageWide Managed Color E75160dn
- HP PageWide Enterprise Color MFP 780dn
- HP PageWide Enterprise Color Flow MFP 785f, 785zs, 785z+
- HP PageWide Managed Color MFP E77650dn, E77650dns, E77660dn
- HP PageWide Managed Color Flow MFP E77650z, E77650zs, E77650z+, E77660z, E77660zs, E77660z+
- HP ENVY Photo 5030 All-in-One Printer
Download / Install HPLIP 3.17.9:
To install the software, download the package “hplip-3.17.9.run” from the link below:
Then open terminal via Ctrl+Alt+T or search for “terminal” from app launcher. When it opens, run command:
cd ~/Downloads/ && chmod +x hplip-3.17.9.run && ./hplip-3.17.9.run
Input your password (no visual feedback while typing) when it prompts and hit Enter.
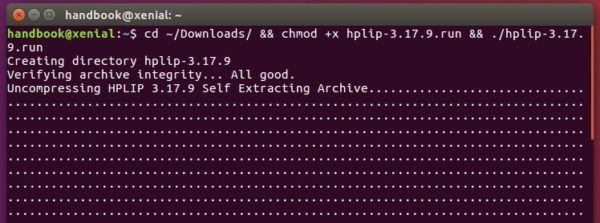

Then follow terminal outputs, answer some questions to build and install HPLIP on your system. When everything is done, plug/re-plug your printers and enjoy!