![]()
MakeMKV is tool converts video clips from DVD / Blu-ray disc into a set of MKV files, preserving most information, so that it can be played on your favorite OS with VLC or MPlayer.
MakeMKV is proprietary software with a free 30-day trial. It’s free to use while in beta, and it’s been in beta for a few years. The software features:
- Reads DVD and Blu-ray discs
- Reads Blu-ray discs protected with latest versions of AACS and BD+
- Preserves all video and audio tracks, including HD audio
- Preserves chapters information
- Preserves all meta-information (track language, audio type)
- Fast conversion – converts as fast as your drive can read data.
- No additional software is required for conversion or decryption.
- Available for Windows, Mac OS X and Linux
- Functionality to open DVD discs is free and will always stay free.
- All features (including Blu-ray decryption and processing) are free during BETA.
How to Install MakeMKV (Beta) in Ubuntu via PPA:
Besides building MakeMKV from source, an Ubuntu PPA for Ubuntu 16.04, Ubuntu 15.10, Ubuntu 14.04, and Ubuntu 12.04 is available to make it much easier to install.
1. Add PPA
Launch terminal (Ctrl+Alt+T) and paste below command and run to add PPA:
sudo add-apt-repository ppa:heyarje/makemkv-beta
Type in your password (no visual feedback when typing) when it asks and hit Enter to continue.

2. Update and install the tool via:
sudo apt-get update

sudo apt-get install makemkv-oss makemkv-bin
For those who don’t want to add PPA, grab the .deb packages for both makemkv-bin and makemkv-oss from THIS PAGE.
Once installed, launch it and register the software by going to Help -> Register. Get the Beta key from this forum post.
You can now select your Blu-ray disc drive in MakeMKV window, and click the Steam icon on the toolbar.

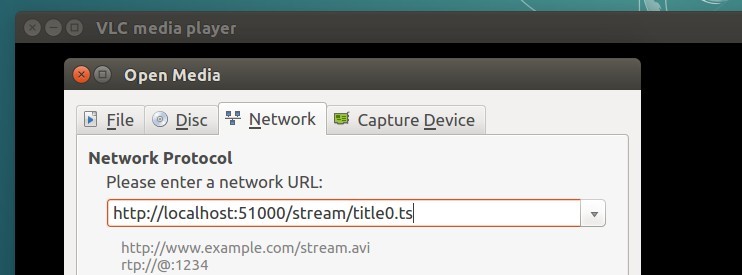
Wait the converting process to be finished, or play the given url (looks like below) while it’s being decoded in background using VLC or MPlayer:
http://localhost:51000/stream/title0.ts