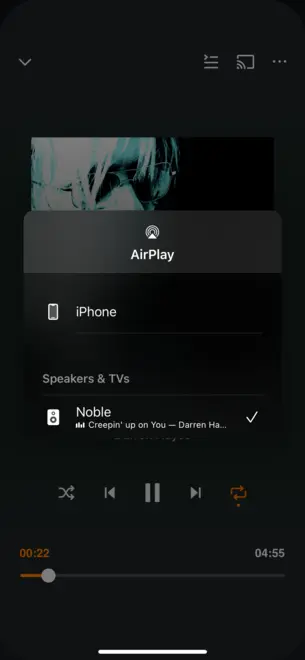
Archives For November 30, 1999

PyCharm Python IDE 2022.3 was finally released a few days ago. Here are the new features and how to guide for installing it in Ubuntu Linux.

Changes in PyCharm 2022.3 include:

  • Ability to search, install, and delete Conda packages through the Python Packages tool window
  • New Settings Sync plugin
  • export DataFrames in various formats (for professional only)
  • The Quick Documentation popup now displays the Attributes section of the class docstrings
  • Support await keyword in the built-in Python Console.
  • Experimental asyncio support for the debugger.
  • Vitest support (for professional only)
  • New project templates for Next.js and Vite (for professional only)
  • Redis support (for professional only)

How to Install PyCharm 2022.3 in Ubuntu Linux

There are 3 ways to install the Python IDE in Ubuntu and other Linux: Snap, Flatpak, and portable tarball. Just choose the one that you prefer.

Option 1: PyCharm Snap package

The easiest way to get the IDE is using the official Snap package. It is a containerized software package that run in sandbox, and updates automatically.

For Ubuntu 20.04, Ubuntu 22.04 and higher, simply search for ‘PyCharm’ then install either community or professional edition from Ubuntu Software.

Or, run command in terminal to install the Snap package:

sudo snap install pycharm-community --classic

Replace pycharm-community with pycharm-professional for the professional edition.

Option 2: PyCharm Portable package (tar.gz)

The website also provides official tar.gz package for downloading at the link below:

Then open the folder that stores the tarball (usually Downloads folder), right-click on blank area and select ‘Open in Terminal‘.

When terminal opens, run the commands below one by one to install it for all system users (replace community with professional accordingly):

  • First, create a folder under ‘/opt’ to store the source:
    sudo mkdir -p /opt/pycharm-community
  • Then extract the tarball into that folder:
    sudo tar -zxf pycharm-community-2022.3.tar.gz --strip-components=1 -C /opt/pycharm-community/
  • Finally, create & edit shortcut icon file for the IDE package:
    sudo gedit /usr/share/applications/pycharm-community.desktop

    Replace gedit with nano for Ubuntu 22.10.

The last command should open an empty text editor window. There paste the lines below and save it.

[Desktop Entry]
Name=PyCharm Community Edition
Comment=Lightweight IDE for Python & Scientific development
Exec=/opt/pycharm-community/bin/pycharm.sh
Icon=/opt/pycharm-community/bin/pycharm.svg
Terminal=false
Type=Application
Categories=Development;IDE;
StartupWMClass=jetbrains-pycharm

After saving the file, you should be able to search for and launch PyCharm IDE from start menu or ‘Activities’ overview, depends on your desktop environment.

Option 3: PyCharm Flatpak

The open-source community also maintains the PyCharm packages as Flatpak package, which is also containerized package runs in sandbox.

First, open terminal by pressing Ctrl+Alt+T keys on keyboard. When it opens, run command to install the daemon package:

sudo apt install flatpak

Next, run command to install PyCharm Community as Flatpak:

flatpak install https://dl.flathub.org/repo/appstream/com.jetbrains.PyCharm-Community.flatpakref

Or, install the professional version as Flatpak via command:

flatpak install https://dl.flathub.org/repo/appstream/com.jetbrains.PyCharm-Professional.flatpakref

Uninstall PyCharm

For the Snap package, remove it either via Ubuntu Software or by running command in terminal:

sudo snap remove pycharm-community --classic

For the portable package, remove the source as well as shortcut file via command:

sudo rm -R /opt/pycharm-community
sudo rm /usr/share/applications/pycharm-community.desktop

And, remove the Flatpak package via command:

flatpak uninstall --delete-data com.jetbrains.PyCharm-Community

For the professional edition, remove pycharm-community in the commands above with pycharm-professional.

Remember Midori? The lightweight web browser that was default in Elementary OS and Bodhi Linux revived!

Midori was a popular lightweight web browser used the WebKitGTK rendering engine and GTK UI toolkit. The development of the project was however discontinued more than 3 years ago. And, Ubuntu even removed it from system repository since Ubuntu 22.04 LTS.

According to the Wikipedia, the Midori project has been merged with the Astian Foundation in 2019. And, Astian announced a week ago that Midori browser is still alive!

It’s now Chromium based web browser that using Electron and React with both desktop edition for Linux, macOS, and Windows, and mobile edition for Android.

The browser still aims to be lightweight, fast and free. It’s still an open-source app, with the source code host in gitlab project page. (update: the project page does no longer exist! If you know where Astian hosts the source code, please leave comment below.)

Midori web browser next generation

The new Midori browser so far features:

  • New logo.
  • Adblock integration, block ads out-of-the-box.
  • Incognito mode support.
  • Chromium based, without Google services and low resources usage
  • Fast and highly customizable UI.
  • Partial Chrome extensions support.
  • To use its own open-source AstianGO search engine. Though, it so far uses DuckDuckGo as default. While Google, Bing, and Ecosia available for choice.

How to Install New Midori web browser in Ubuntu & other Linux

Astian offers official Midori packages for Linux through AppImage and .deb package.

Option 1: AppImage

AppImage is a portable package format without installation required. Just select download it from its website:

Then, right-click on AppImage in file manager. Open ‘Properties’ dialog and grant ‘execute as program’ permission. Finally, click run the package to launch the web browser.

Option 2: Deb package

It also provides official .deb packages for modern 64-bit computers, available to download via the link button below:

NOTE: The Debian (.deb) package seems broken at the moment of writing. It won’t install in my case in Ubuntu 22.04, Debian 11 either via double-clicking or using apt install command. So please try AppImage until Astian fixed the issue.

This tutorial shows how to install the latest version of RawTherapee (5.11 so far) in all current Ubuntu releases!

RawTherapee, the free open-source raw image converter and digital photo processor, released version 5.11 recently on August 25. See

RawTherapee 5.9 features new “Spot Removing Tool” under Details tab for removing dust specks and small objects; Local Adjustments tool under Local tab for performing a wide range of operations on an area of the image determined by its geometry or color; Preprocess White Balance tool under Raw tab to specify whether channels should be balanced automatically or whether the white balance values recorded by the camera should be used instead; and a new Perspective Correction tool which includes an automated perspective correction feature.

Other changes include:

  • include CAM16 in Color Appearance & Lighting tool
  • new automatic white balance method “temperature correlation” for White Balance tool.
  • new waveform, vectorscope and RGB parade modes for the Main Histogram.
  • new dual-demosaicing methods in the Demosaicing tool
  • add saturation adjuster for Haze Removal tool

RawTherapee 5.9

There are as well many new and improved Cameras support, including Canon EOS 100D / Rebel SL1 / Kiss X7, Canon EOS 2000D / Rebel T7 / Kiss X90, Nikon D6, Nikon Z 6II, Nikon Z 7II, and more. See the release note for details.

How to Install RawTherapee (5.11 Updated):

Option 1: AppImage

The software provides official Linux package via AppImage, which is available for downloading at the link below:

Once you got the package, right-click on it to open file ‘Properties’ dialog and add ‘executable as program’ permission. Finally, click the file to launch the photography processor.

NOTE: Ubuntu 22.04+ does not support AppImage out-of-the-box. In case it doesn’t work for you, press Ctrl+Alt+T on keyboard to open terminal and run command sudo apt install libfuse2 to enable it.

Option 2: Flatpak

RawTherapee is also available as Flatpak package that runs in sandbox environment. The package works in most Linux on amd64 and arm64 CPU platforms.

1. First, open terminal (Ctrl+Alt+T) and make sure the daemon package is installed by running command in Ubuntu 20.04, Ubuntu 22.04 and higher:

sudo apt install flatpak

Ubuntu 18.04 and Ubuntu 16.04 user can get the package from this PPA.

2. Then, install Rawtherapee as Flatpak by running command:

flatpak install https://dl.flathub.org/repo/appstream/com.rawtherapee.RawTherapee.flatpakref

Like normal package, you can search for and launch the flatpak app from either ‘Activities’ overview or system start menu depends on desktop environment.


Option 3: Ubuntu PPA

For those who prefer the native .deb packages, there’s also an unofficial PPA contains the packages for Ubuntu 22.04, and Ubuntu 24.04. Also, the package support amd64, arm64 and armhf CPU architecture types.

NOTE: due to outdated system library, librsvg-2.0 in the case, the Ubuntu 20.04 build is stuck at version 5.10.

1. First, press Ctrl+Alt+T on keyboard to open terminal. When it opens, run command to add the PPA:

sudo add-apt-repository ppa:ubuntuhandbook1/rawtherapee

2. Linux Mint users need to manually refresh system package cache after adding PPA, though it’s done automatically in Ubuntu now.

sudo apt update

3. Finally, install the RAW developer software by running command:

sudo apt install rawtherapee

Uninstall RawTherapee

Depends on which package you installed, open terminal (Ctrl+Alt+T) and run command to uninstall the Flatpak:

flatpak uninstall --delete-data com.rawtherapee.RawTherapee

Also run flatpak uninstall --unused to clear useless runtime libraries.

For the .deb package, remove it by running command:

sudo apt remove --autoremove rawtherapee rawtherapee-data

Also remove PPA, either by removing source line via “Software & Updates” tool under Other Software tab, or by running command in terminal:

sudo add-apt-repository --remove ppa:ubuntuhandbook1/rawtherapee

And, for the AppImage, just delete the file in your folder.

Want to measure your application launch time in Linux? There’s an extension can do the job for GNOME desktop.

Meaning Ubuntu, Fedora workstation, and other Linux with GNOME desktop can easily tell how much time it takes for launching an application, which is useful for benchmark and/or software developing purpose.

With the extension enabled, every time you launching an application, an on-screen display pops up shows the loading time in millisecond. Not only for native .deb/.rpm, but also for Snap and Flatpak applications.

How to Install the App Start Time Measure extension

For Ubuntu 22.04, first search for and install “Extension Manager” from Ubuntu Software.

Install Extension Manager in Ubuntu 22.04+

Then launch “Extension Manager” and use it to search & install ‘application start time measure’:

For Ubuntu 20.04, first press Ctrl+Alt+T on keyboard to open terminal. When it opens, run command to install the agent package:

sudo apt install chrome-gnome-shell

Then, go to extension page in the link below and use ON/OFF switch to install it:

Install the browser extension if prompted via link in that page and refresh if you don’t see the ON/OFF switch.

After installing the extension, it should be enable automatically (verify via ‘Gnome Extensions’ or ‘Extension Manager’). You can then launch something and see the magic!

qBittorrent got a new major release this weekend. Here’s the new features and how to install guide for Ubuntu 22.04

qBittorrent 4.5.0 features new icon theme, new color theme, better startup time, and export torrent support. And, it now uses libtorrent 2.0.x in the default binary packages.

Other changes include:

  • Add ‘View’ menu option to show/hide filter sidebar.
  • Add Auto resize columns functionality
  • Allow to use Category paths in Manual mode
  • Allow to disable Automatic mode when default “temp” path changed
  • Add right click menu for status filters
  • Allow setting the number of maximum active checking torrents
  • Allow to set working set limit on non-Windows OS
  • Allow to use POSIX-compliant disk IO type
  • Add Filter files field in new torrent dialog
  • Add file name filter/blacklist
  • Add support for custom SMTP ports
  • Add ability to run external program on torrent added
  • Add infohash and download path columns
  • Allow to set torrent stop condition
  • Add a Moving status filter
  • Add a Use proxy for hostname lookup option
  • Introduce a change listen port cmd option
  • Implement Peer ID Client column for Peers tab
  • Add port forwarding option for embedded tracker

As well, there are various bug-fixes in the release. See more in the news page.

How to install qBittorrent 4.5.0 in Ubuntu 22.04

The software has an official Ubuntu PPA which however updates the latest package so far only for Ubuntu 22.04, Ubuntu 23.10, Linux Mint 21 and their based systems.

1. First, press Ctrl+Alt+T on keyboard to open a terminal window. When it opens, run command to add the PPA:

sudo add-apt-repository ppa:qbittorrent-team/qbittorrent-stable

Type user password when it asks (no asterisk feedback) and hit Enter to continue.

2. Then, either run software updater (Update Manager) to update the bittorrent client if an old version was installed.

Or install it using command:

sudo apt install qbittorrent

For Linux Mint, either use Software Manager after refreshing package cache, or run sudo apt update before running the command above.

Uninstall/Restore:

Option 1: If you want to downgrade qBittorrent package to stock version in system repository, install ppa-purge tool and purge the PPA by running command in terminal:

sudo apt install ppa-purge && sudo ppa-purge ppa:qbittorrent-team/qbittorrent-stable

Option 2: Or, remove the client package either via Ubuntu Software or by running command:

sudo apt remove --autoremove qbittorrent

And, remove the PPA either via ‘Software & Updates‘ utility under ‘Other Software’ tab or by running command:

sudo add-apt-repository --remove ppa:qbittorrent-team/qbittorrent-stable

Got an application, but you want to make it in-visible from start menu, app grid, app launcher and dock? Here’s how to do the trick in Ubuntu 24.04, Ubuntu 22.04, Ubuntu 20.04, though it should also work in most other Linux.

It’s easy to do the trick by adding a rule into the ‘.desktop’ file for that application. It’s:

  • NoDisplay=true – hide app icon from app launcher, but still visible from associated files’ “Open With” dialog.
  • Hidden=true – complete hide the app, unless launching from command line.

For GNOME, the default desktop environment for Ubuntu, there’s also an extension can do the job by adding option to app icon’s right-click menu.

Method 1: Hide App Icon by Configuring the .desktop Shortcut file

1. Locate the .desktop shortcut file

First, you have to find out where and the file-name of the shortcut file for your application.

  • To do so, press Ctrl+Alt+T on keyboard to open terminal. When terminal opens, run command to install plocate (or mlocate for Ubuntu 20.04):
    sudo apt install plocate && sudo updatedb
  • Then, run command to locate the shortcut file for your app (mpv for example):
    locate "*mpv*desktop"

    In this command, it will output any file-name that contains “mpv” (change the keyword depends on your app name) in between, and ends with ‘desktop’.

The command may output multiple files, choose one according to file PATH:

  • for native .deb apps, the shortcut files are usually installed to:
    • /usr/share/applications
    • /usr/local/share/applications
    • or .local/share/applications
  • for Snap apps, looking for /var/lib/snapd/desktop/applications directory.
  • for Flatpak apps, they are usually installed to:
    • /var/lib/flatpak/exports/share/applications/
    • or .local/share/flatpak/exports/share/applications/

2. One command to hide the app icon

Once you found out the app shortcut file, hide it simply by running command:

sudo desktop-file-edit --set-key=NoDisplay --set-value=true /usr/share/applications/mpv.desktop

In last command:

  • replace NoDisplay with Hidden to also hide it from ‘Open With’ dialog.
  • replace “/usr/share/applications/mpv.desktop” according to last step.
  • skip sudo for the shortcut located in .local/ sub-directories.

Besides using desktop-file-edit command, you may edit the shortcut file using your favorite text editor, for example, run:

sudo gedit /usr/share/applications/mpv.desktop

Replace gedit with gnome-text-editor for 24.04. Then, add either NoDisplay=true or Hidden=true under “[Desktop Entry]”.

The app icon should disappear a few seconds later. If NOT, try refreshing the database by running command sudo update-desktop-database.

Step 2: Use Extension to Hide App Icon (GNOME Only)

For Ubuntu 22.04, Ubuntu 24.04, and other Linux with GNOME 42 and higher, there’s an extension to make the process easier.

1. First, search for and install “Extension Manager” from either Ubuntu Software or App Center.

Install Extension Manager in Ubuntu Software/App Center

2. Then, launch “Extension Manager”. Navigate to “Browse” tab, then search & install “App Hider” extension.

Other Linux can go to extension web page, and use ON/OFF switch to install it.

3. After installation, right-click on desired app icon in the “Show Applications” screen and select “hide”.

Right-click app icon to hide

For choice, user can launch “Gnome Extensions” or “Extensions Manager” to open the Preferences dialog. There, it lists all hidden apps as well as un-hide options.

Hugin, the popular free and open-source panorama photo stitcher application, now is in beta stage for the upcoming 2022 version.

Changes in this release according to the launchpad milestone include:

  • Add simple edge fill option to fill black edges in panorama with homogenous color.
  • Simplified the assistant page with only the necessary GUI controls to make it more clear for beginners and casual users.
  • Several improvements to control points tab (e.g. magnifier displays now warped image for better judgement of wide angle/fisheye images).
  • Improved handling of duplicate control points when running cpfind.
  • Extended command line tools pto_mask (--delete-mask) and pano_modify (allow specifying crop relative to canvas size).

There are as well some bug-fixes in the release, including fulla flatfield extremely dark, and high DPI display support for Windows.

How to install Hugin 2022 in Ubuntu:

For the source tarball as well as Windows msi packages, go the sourceforge download page.

For all current Ubuntu releases, including Ubuntu 18.04, Ubuntu 20.04, Ubuntu 22.04, Ubuntu 22.10, and their based systems, I’ve made the unofficial package into this PPA repository.

I’ll continue updating this PPA when the stable release is out! And sync the package (stable) with may apps ppa.

1. First, press Ctrl+Alt+T on keyboard to open terminal. When it opens, run command to add the PPA:

sudo add-apt-repository ppa:ubuntuhandbook1/hugin

Type user password (no asterisk feedback) when it asks and hit Enter to continue.

2. Update system package cache for Ubuntu 18.04 and Linux Mint, though it’s done automatically while adding PPA in Ubuntu 20.04+:

sudo apt update

3. Finally, either run the command below in terminal to install the panorama photo stitcher:

sudo apt install hugin

Or, upgrade the software (if an old version was installed) via Software Updater (Update Manager) app:

Uninstall hugin:

To remove the software package, simply run command:

sudo apt remove --autoremove hugin hugin-data

And, remove the PPA either by running command in terminal:

sudo add-apt-repository --remove ppa:ubuntuhandbook1/hugin

Or remove the source line from ‘Software & Updates‘ utility under Other Software tab.

Use Gnome Tweak tool and/or Extensions app frequently? You can add them into top-right corner system menu in Ubuntu 20.04, Ubuntu 22.04, and Ubuntu 24.04.

Meaning you don’t have to search for and launch it every time from ‘Activities’ overview or ‘Show Applications’ screen. Like the built-in ‘Settings’ (Gnome Control Center), just click on top-right corner menu to launch your desired configuration tool.

This is implemented by an extension called “Tweaks & Extensions in System Menu”, which support GNOME version so far up to v46. Sadly, not updated at the moment for GNOME 43 which is default in Ubuntu 22.10 & Fedora 37.

Install the Extension to add system menu options

For Ubuntu 22.04 and higher, first search for and install ‘Extension Manager’ from Ubuntu Software or App Center.

Install Extension Manager in Ubuntu 22.04+

Then launch “Extension Manager” and use it to install the ‘Tweaks in system menu’ extension under ‘Browse’ tab.

Finally, switch back to ‘Installed’ tab, and click on gear button for that extension to open the configuration dialog. Where you can TURN ON/OFF either option and set its position.

For Ubuntu 20.04 and old Ubuntu 18.04 (not tested), first open terminal by press Ctrl+Alt+T shortcut key on keyboard. And, run command:

sudo apt install chrome-gnome-shell

Then, use the ON/OFF switch to install it via the link page below:

Of course, you must have Gnome Tweak tool and Extensions app installed from Ubuntu Software, to make them visible in the system menu.

For Ubuntu 24.04 and Fedora Workstation with default GNOME 43 ~ 46, there’s now an extension to add user’s icon or figure (aka avatar) to the top-right corner system tray menu, which is also known as quick settings.

With it, the ‘Quick Settings’ menu will look like the screenshot below shows you. The avatar can be either in left or right. By clicking on it, will launch System Settings (Gnome Control Center) and automatically navigate to user settings page.


Continue Reading…

After installing Ubuntu since 22.10 and higher, the dual-boot Windows 10 and other OSes may be disappeared from the startup boot menu. If you run into that issue, here’s the quick tip to fix it.

This is definitely not bug, but a policy change since GNU Grub 2.06. The default boot-loader uses external os-prober tool to discover other operating systems on the same machine. However, the feature is disabled now for security reason due to the manual:

It is disabled by default since automatic and silent execution of os-prober, and creating boot entries based on that data, is a potential attack vector. Set this option to ‘false’ to enable this feature in the grub-mkconfig command.

By reloading the config will prompt your that “Warning: os-prober will not be executed to detect other bootable pertitions“.

Ubuntu 22.04 is the first release uses GRUB 2.06, which however not affected in my case. So I didn’t encounter this issue until trying Ubuntu 22.10 today on dual-boot machine. And, here’s how to fix the the ‘issue’ in 2 ways.

Option 1: Manually re-enable OS-PROBER

As mentioned in the manual, just set the ‘GRUB_DISABLE_OS_PROBER’ option to ‘false’ in Grub configuration will do the trick.

1. First, press Ctrl+Alt+T on keyboard to open a terminal window. When it opens, run command to edit the Grub config file:

sudo nano /etc/default/grub

Ubuntu 22.10 and higher switched to gnome-text-editor which however does not work along-with sudo from command line. So here I use nano command line text editor instead.

2. When the file opens in terminal window, scroll down and add the new line (or change the value if the line already exists):

GRUB_DISABLE_OS_PROBER=false

After that, save changes by pressing Ctrl+X, type y and hit Enter.

3. Finally, run sudo update-grub to reload the change.

Don’t know why, but Windows OS appears in boot-menu again after I did restart computer twice in my case.

Option 2: Use Grub-Customizer (graphical tool)

For those who prefer using a graphical configuration tool, there’s a third-party Grub-Customizer app available for choice.

1. First, you still need to open terminal (Ctrl+Alt+T) and run 3 commands one by one to install the tool from developer’s PPA:

sudo add-apt-repository ppa:danielrichter2007/grub-customizer
sudo apt update
sudo apt install grub-customizer

2. Search for and launch grub customizer from system start menu or ‘Activities’ overview.

3. When the app opens, navigate to ‘General Settings‘ page, then do:

  • click on bottom right advanced settings option.
  • in next pop-up dialog, click “Add” (or edit if exists) and type:
    • name: GRUB_DISABLE_OS_PROBER
    • value: false

Close advanced settings dialog, and finally click “Save” button in the app to apply change.