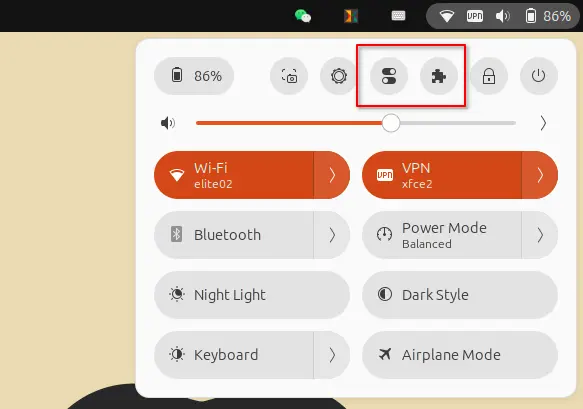
Use Gnome Tweak tool and/or Extensions app frequently? You can add them into top-right corner system menu in Ubuntu 20.04, Ubuntu 22.04, and Ubuntu 24.04.
Meaning you don’t have to search for and launch it every time from ‘Activities’ overview or ‘Show Applications’ screen. Like the built-in ‘Settings’ (Gnome Control Center), just click on top-right corner menu to launch your desired configuration tool.
This is implemented by an extension called “Tweaks & Extensions in System Menu”, which support GNOME version so far up to v46. Sadly, not updated at the moment for GNOME 43 which is default in Ubuntu 22.10 & Fedora 37.
Install the Extension to add system menu options
For Ubuntu 22.04 and higher, first search for and install ‘Extension Manager’ from Ubuntu Software or App Center.
Install Extension Manager in Ubuntu 22.04+
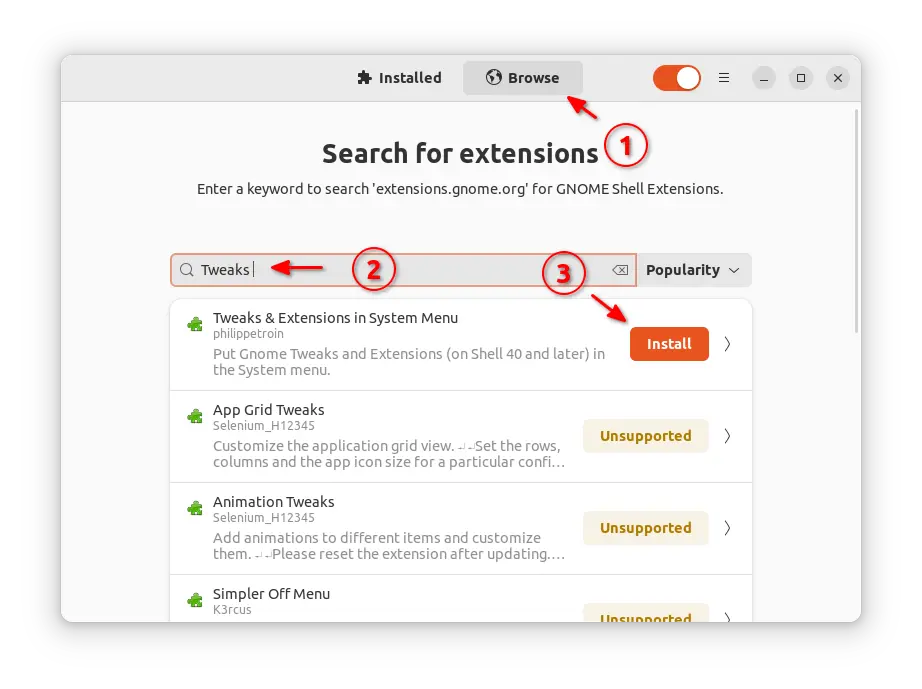
Then launch “Extension Manager” and use it to install the ‘Tweaks in system menu’ extension under ‘Browse’ tab.
Finally, switch back to ‘Installed’ tab, and click on gear button for that extension to open the configuration dialog. Where you can TURN ON/OFF either option and set its position.
For Ubuntu 20.04 and old Ubuntu 18.04 (not tested), first open terminal by press Ctrl+Alt+T shortcut key on keyboard. And, run command:
sudo apt install chrome-gnome-shell
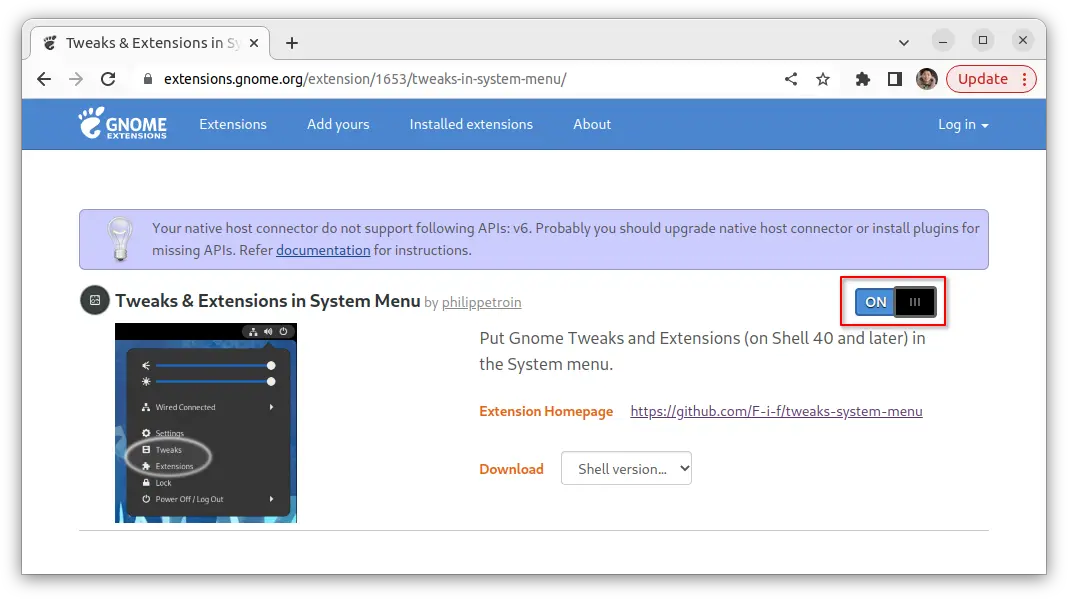
Then, use the ON/OFF switch to install it via the link page below:
Of course, you must have Gnome Tweak tool and Extensions app installed from Ubuntu Software, to make them visible in the system menu.
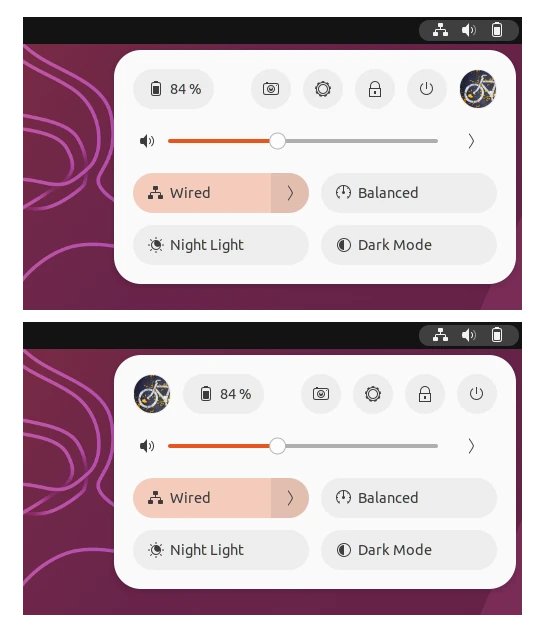
For Ubuntu 24.04 and Fedora Workstation with default GNOME 43 ~ 46, there’s now an extension to add user’s icon or figure (aka avatar) to the top-right corner system tray menu, which is also known as quick settings.
With it, the ‘Quick Settings’ menu will look like the screenshot below shows you. The avatar can be either in left or right. By clicking on it, will launch System Settings (Gnome Control Center) and automatically navigate to user settings page.
After installing Ubuntu since 22.10 and higher, the dual-boot Windows 10 and other OSes may be disappeared from the startup boot menu. If you run into that issue, here’s the quick tip to fix it.
This is definitely not bug, but a policy change since GNU Grub 2.06. The default boot-loader uses external os-prober tool to discover other operating systems on the same machine. However, the feature is disabled now for security reason due to the manual:
It is disabled by default since automatic and silent execution of os-prober, and creating boot entries based on that data, is a potential attack vector. Set this option to ‘false’ to enable this feature in the grub-mkconfig command.
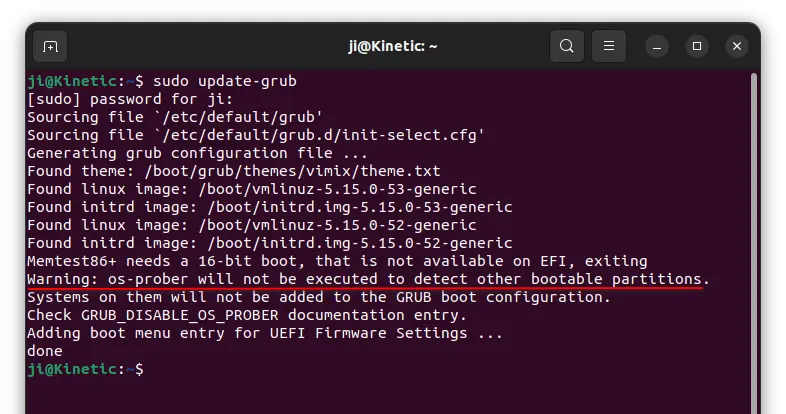
By reloading the config will prompt your that “Warning: os-prober will not be executed to detect other bootable pertitions“.
Ubuntu 22.04 is the first release uses GRUB 2.06, which however not affected in my case. So I didn’t encounter this issue until trying Ubuntu 22.10 today on dual-boot machine. And, here’s how to fix the the ‘issue’ in 2 ways.
Option 1: Manually re-enable OS-PROBER
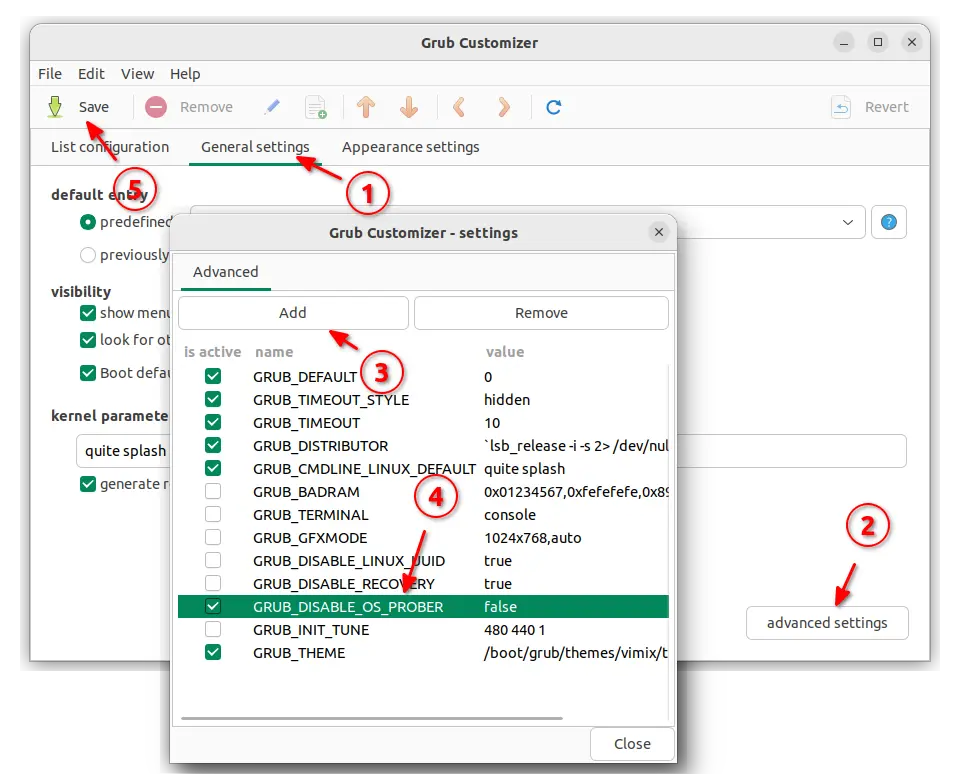
As mentioned in the manual, just set the ‘GRUB_DISABLE_OS_PROBER’ option to ‘false’ in Grub configuration will do the trick.
1. First, press Ctrl+Alt+T on keyboard to open a terminal window. When it opens, run command to edit the Grub config file:
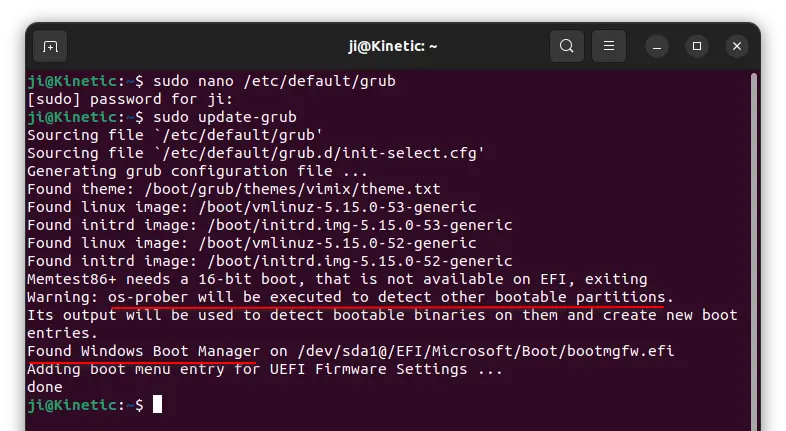
sudo nano /etc/default/grub
Ubuntu 22.10 and higher switched to gnome-text-editor which however does not work along-with sudo from command line. So here I use nano command line text editor instead.
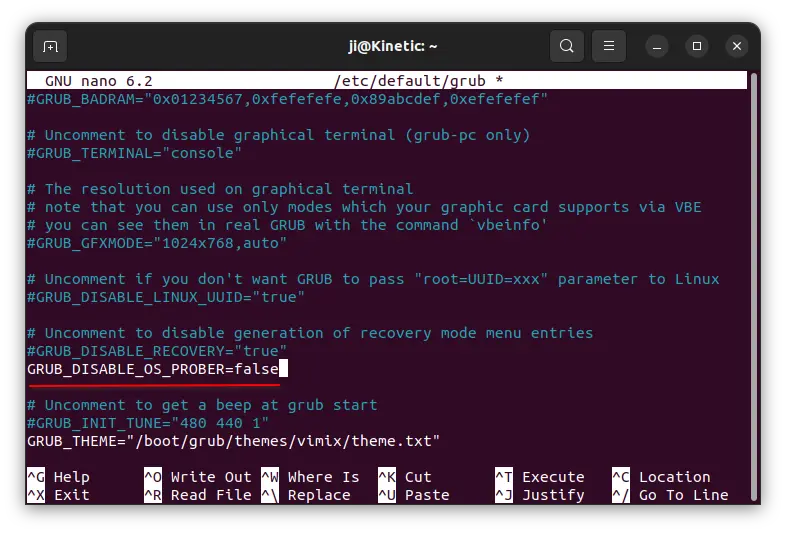
2. When the file opens in terminal window, scroll down and add the new line (or change the value if the line already exists):
GRUB_DISABLE_OS_PROBER=false
After that, save changes by pressing Ctrl+X, type y and hit Enter.
3. Finally, run sudo update-grub to reload the change.
Don’t know why, but Windows OS appears in boot-menu again after I did restart computer twice in my case.
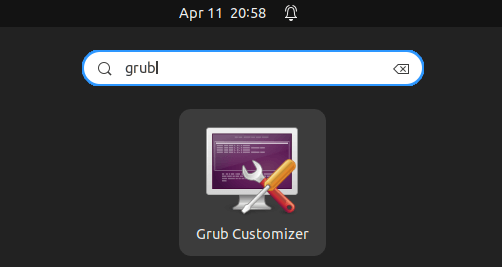
Option 2: Use Grub-Customizer (graphical tool)
For those who prefer using a graphical configuration tool, there’s a third-party Grub-Customizer app available for choice.
1. First, you still need to open terminal (Ctrl+Alt+T) and run 3 commands one by one to install the tool from developer’s PPA:
This simple tutorial shows how to reboot your machine into another OS or grub boot menu entry directly from Ubuntu.
Say you have Ubuntu dual- or multi-boot with other operating systems, and want to reboot directly into a specific OS when working done in current Ubuntu. Or you want to reboot with another Kernel or maybe recovery mode without any keyboard press while booting. This tutorial may help.
Method 1: Single command to reboot into another OS
Grub, the default boot-loader for many Linux, has a command line tool grub-reboot, which allows to set the default boot-entry for ONLY next boot.
Along with reboot command, it allows to reboot directly into another entry. For example, reboot into the third menu try with command:
sudo grub-reboot 2 && reboot
NOTE: Grub menu entry counts from 0. Number 2 means the 3rd entry.
Preview Boot Menu without Reboot
You don’t have to reboot and count in the boot-menu for your desired number. There are 2 ways to preview the menu from in Ubuntu.
Option 1. Preview Grub Menu via Grub-Emu
Press Ctrl+Alt+T on keyboard to open terminal, and run command to install grub-emu:
sudo apt install grub-emu
Then, run grub-emu command in terminal will open up a window for previewing your boot-loader. And, close the terminal will also close the preview window.
The tool works good in Ubuntu 22.04, but NOT for Ubuntu 24.04 in my case somehow.
Option 2. Use Grub-Customizer
Grub-Customizer is a good alternative, as the preview tool does not work good in my case. To install it, open terminal (Ctrl+Alt+T) and run 3 commands below one by one.
The commands will add the software developer’s PPA repository, update cache and finally install it into your system.
After that, search for and open it from either system start menu or ‘Activities’ overview depends on your DE.
As the screenshot shows you, number 2 is for Windows in my case. 1>1 means recovery mode, and 1>2 means the previous kernel entry.
So, run the command below will reboot directly into Windows in my case:
sudo grub-reboot 2 && reboot
To reboot into recovery mode in sub-menu entry (quotation marks required), use:
sudo grub-reboot "1>1" && reboot
And, if you want to use the command in script or bind with a keyboard shortcut, use command:
pkexec grub-reboot 2 && reboot
So, it will pop-up an authentication dialog asks you to type user password, before performing the action.
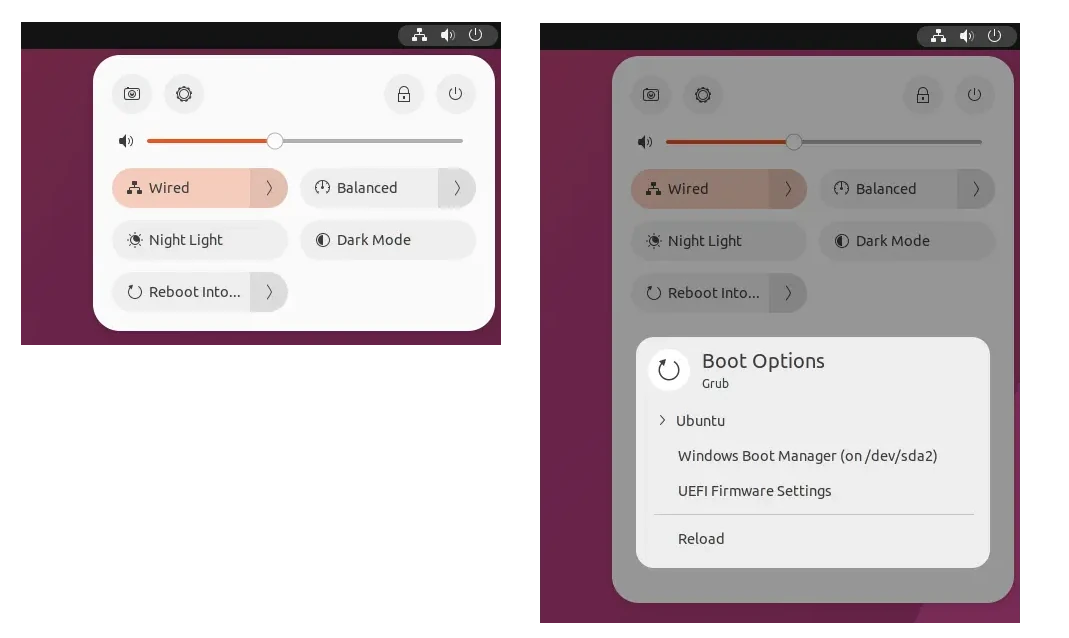
Method 2: Add Reboot option in top-right system menu
For GNOME 43/44, meaning users of Ubuntu 22.10, 23.04, Fedora 37/38, Arch and Manjaro Linux, there’s an extension to do the job by adding menu entries into system status menu.
By clicking on an entry in the menu, will pop-up password authentication dialog, and then shows you the reboot dialog. When typing correct password and click restart in pop-up dialog, it reboot directly with that entry you just clicked!
How to Install the Extension
For Ubuntu 22.10, first search for and install “Extension Manager” from Ubuntu Software.
Install Extension Manager in Ubuntu 22.04+
Then press Super (the Windows Logo) key to activate overview, search for and open “Extension Manager”. Finally, use the tool to install the “Custom Reboot” extension:
For Fedora 37/38 and other Linux with GNOME 43/44, you may go directly to the extension website and use ON/OFF switch to install it.
GIMP image editor got a new update for its 2.99 development release this Friday. Here’s the new features as well as how to install guide for Ubuntu users.
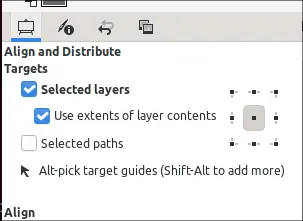
GIMP 2.99.14 is the 7th development release for the next major 3.0 release. It reworked the Align and Distribute tool to make it easy to use. Target items to align or distribute are now the selected layers and/or paths. For layers in particular, a new option “Use extents of layer contents” is available to align or distribute target layers based on their pixel contents.
The Text tool now has new “outline” and “fill” options, to insert text in different styles. For me, it’s no longer required to use ‘Grow…’ and then ‘Stroke Selection’ to do similar job.
This release also introduced a new ‘Gray‘ theme, as well as “Override icon sizes set by the theme” option to resize icons among small, medium, large and huge.
XCF file support is greatly improved with multi-threading support. Saving with default RLE and zlib is now much faster! And, this release introduced initial Apple Silicon package support for macOS users.
New “Paste as Single Layer” and “Paste as Single Layer in Place” options in the Edit > Paste as submenu.
Moving to GApplication and GtkApplication
Add ‘Root layers only’ option on PDF export.
export PSD images as CMYK(A) support.
Metadata import and export for JPEG-XL support.
Initial support for Apple’s ICNS files.
Add “Show reduced images” option when importing TIFF.
How to Install GIMP 2.99.14:
The image editor has an official download page for the development releases. It offers the official package for Linux as Flatpak, though there’s also an unofficial PPA for Ubuntu users.
Option 1: Install GIMP 2.99.14 as Flatpak
Ubuntu and most other Linux can install the editor as Flatpak that runs in sandbox. For Ubuntu users, they are generally 3 commands for installing it:
Press Ctrl+Alt+T on keyboard to open terminal. Run command to install the daemon package in case you don’t have it.
sudo apt install flatpak
Then, add the flathub beta repository by running command:flatpak remote-add –user flathub-beta https://flathub.org/beta-repo/flathub-beta.flatpakrepo
Finally, install GIMP beta release via command:
flatpak install --user flathub-beta org.gimp.GIMP
If you already installed the previous GIMP 2.99.12, use flatpak update --user org.gimp.GIMP beta command to update it.
And, if you also have GIMP 2.10 stable release installed as Flatpak, only one of them can be visible in system app launcher. Use either command below to switch between them:
flatpak make-current --user org.gimp.GIMP beta
flatpak make-current --user org.gimp.GIMP stable
NOTE: skip --user flag if you installed the package system wide without this parameter.
Option 2: install GIMP 2.99.14 from PPA
For those who prefer the classic .deb package format, there’s an unofficial PPA contains the package for Ubuntu 20.04, Ubuntu 22.04, and Ubuntu 22.10.
Simply, open terminal from start menu or by pressing Ctrl+Alt+T on keyboard, then run the commands below one by one to add the PPA, update, and install GIMP 2.99.x:
sudo add-apt-repository ppa:mati75/gimp30
sudo apt update
sudo apt install gimp
NOTE: If you have GIMP 2.10 stable installed as .deb package, the commands above will upgrade it to the latest development release.
To restore the stock GIMP package in system repository, run command to purge the Ubuntu PPA which also downgrade all installed packages:
UPDATE: This Extension has NOT been updated for almost 1 year! Support ends at GNOME 43. Meaning you can still try it in Debian 12 GNOME.
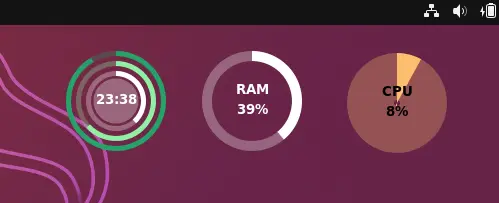
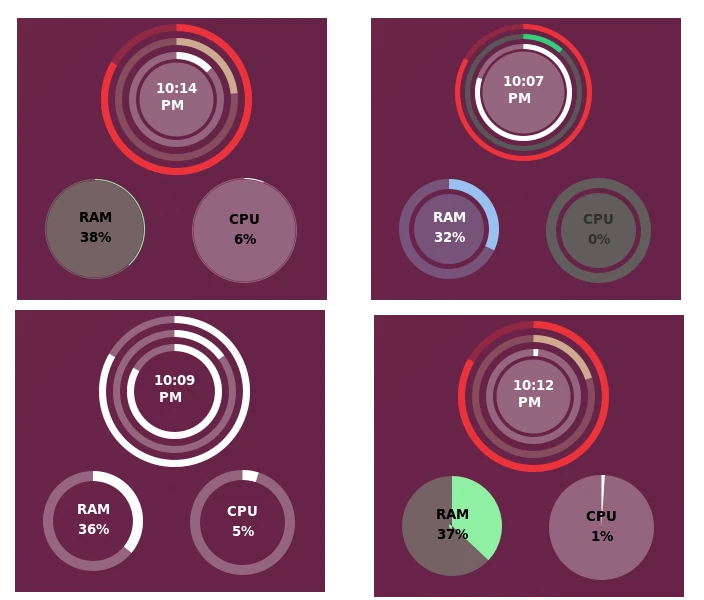
Want to display digital clock, system memory and CPU load in your Desktop? There’s new circular widget for Ubuntu 22.10, Fedora 37, and other Linux with GNOME 43.
There are quite a few tools to display system load widget in desktop. Here I’m going to introduce the one that has a Conky look alike circular widget for GNOME desktop.
It displays local time, RAM usage and CPU load in 3 separated circular widget. Meaning you can drag moving any one of them to anywhere in your screen. And, it allows to resize the circle, change its color, line width, as well as text color and background, etc to get different look and feel.
Cool, isn’t it? Let me show you how to install it.
Step 1: Install Extension Manager
First, search for and install the “Extension Manager” app from Ubuntu Software, for installing Gnome extensions.
Install Extension Manager in Ubuntu 22.04+
Once installed, search for and launch the tool from ‘Activities’ overview screen.
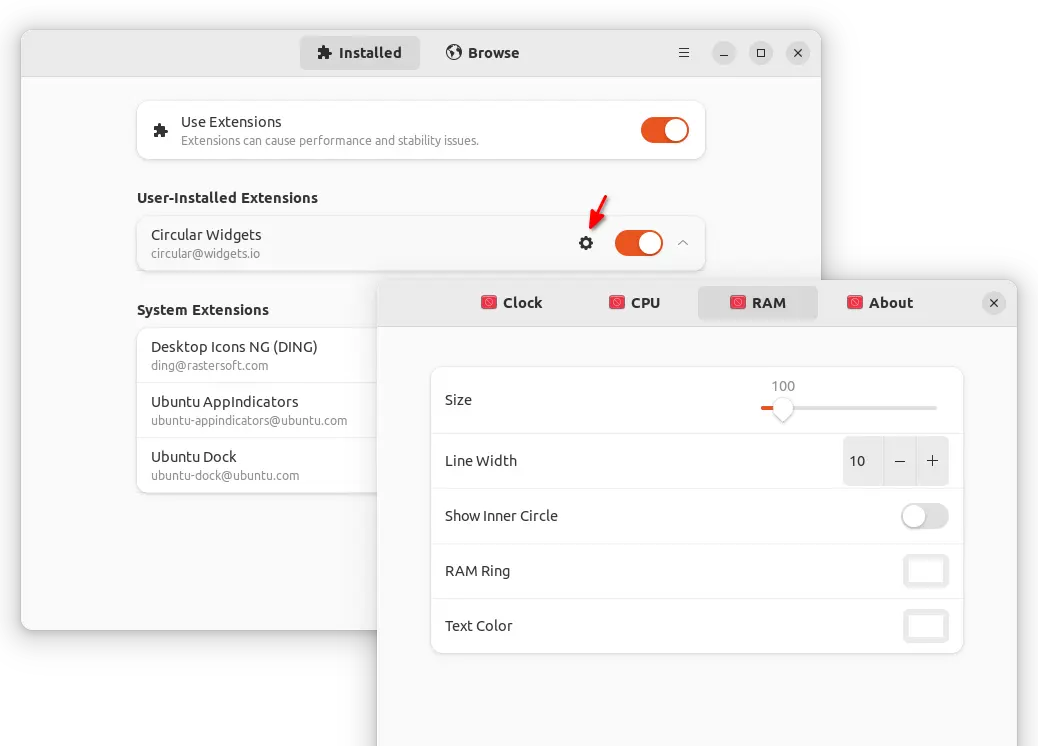
Step 2: Install the Circular Widgets via Extension Manager
When Extension Manager opens, navigate to ‘Browse’ tab, then search for and install the Circular Widgets extension.
For Fedora 37 user, simply go to this web page and use ON/OFF switch to install it.
Step 3: Configure the widget
After installed the extension, go back to ‘Installed‘ tab in Extension Manager, or install and open ‘Gnome Extensions’ app from GNOME Software for Fedora. There you can open the configuration dialog for each circle widget.
NOTE: For Ubuntu & other Linux using “Desktop Icons NG (DING)” extension, you have to disable it temporarily until being able to drag moving the system load widget.
This simple tutorial shows how to add world clock in top panel, so you can have a glance at what time is it now for different countries and locations.
Say you have business world-wide or family members or good friends live in different countries, a world clock can be quite useful to know the time in their locations.
If you’re working on Ubuntu, Fedora Workstation, or other Linux with GNOME desktop, then there’s an extension to display the time for your specified locations in top panel to make life easier.
As you see in the screenshot above, it also shows the sunrise and sunset time for the selected location.
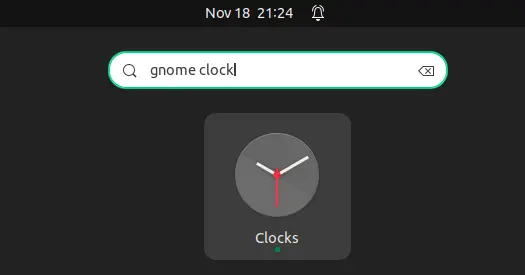
Step 1: Install GNOME Clock
The extension uses GNOME Clock for the date and time information. You need to first install it either from Ubuntu Software (or App Center for 24.04):
Install GNOME Clock
Pay attention that you need to install the package in native .deb format, meaning from ‘ubuntu-xxx-universe’. Check the source drop-down box in header bar of Ubuntu Software. Or, press Ctrl+Alt+T to open terminal and run command to install it:
sudo apt install gnome-clocks
Step 2: Add different locations
After installing the app, press Super (Windows logo) key, then search for and open it from ‘Activities’ overview screen.
When it opens, click on the top-left corner ‘+’ button to add locations for your business partners or family members.
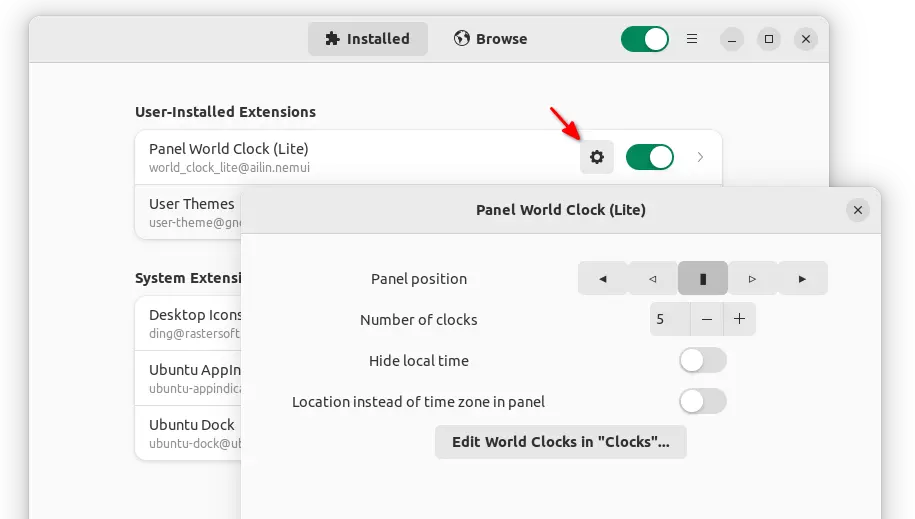
Step 3: Install Extension to make World Clock display on Panel
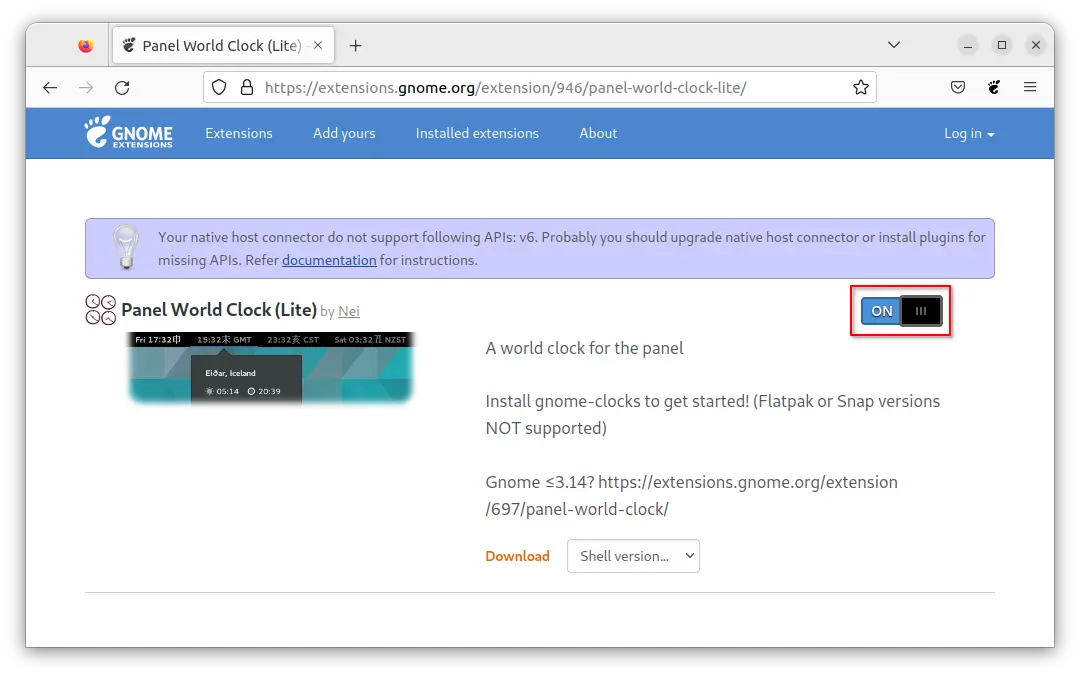
For Ubuntu 22.04 & Ubuntu 24.04, do the steps below one by one to install the extension:
Search for and install ‘Extension Manager’ from Ubuntu Software or App Center.
Click top-left edge ‘Activities’ to open overview, then search for and launch ‘Extension Manager’.
Finally, use the tool to search and install ‘Panel World Clock (Lite)’ extension under ‘Browse’ tab.
For Ubuntu 18.04 and Ubuntu 20.04, use web browser instead to install it:
First, press Ctrl+Alt+T on keyboard to open a terminal windows. When it opens, run command to install the agent package and manager app:
Click install browser extension if prompted via the link in that page. Finally, refresh and use the ON/OFF switch to install it.
After installing the extension, it should display world clock in top panel alongside local date and time. If not, try log out and back in to reload it.
In case you don’t like the default display location, you can open the configuration page in either Extension Manager or Gnome Extensions app. Then configure to:
Canonical, the company behind Ubuntu, is building the popular Steam game platform as Snap package!
The Ubuntu developer team is going to improve gaming experience on this popular Linux distribution. The first step is to simplify the process of setting up gaming environment. As the number 1 game platform, Steam to be first one they focus on.
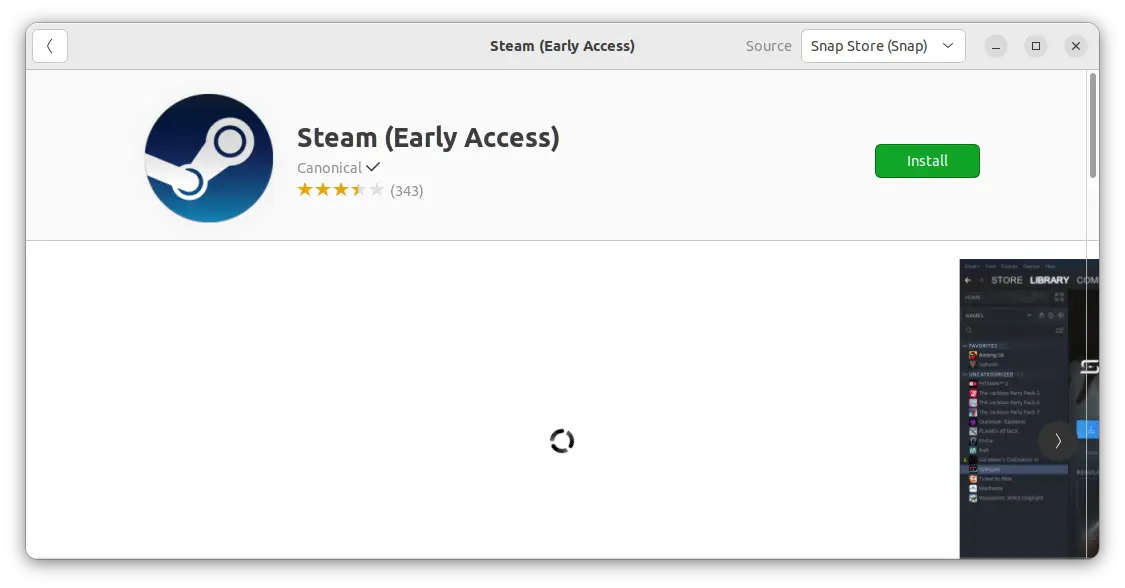
Meaning Ubuntu 20.04, Ubuntu 22.04, and Ubuntu 22.10 can easily search for and install Steam as snap package from Ubuntu Software:
Steam in Ubuntu Software as Snap package
Or, user can press Ctrl+Alt+T on keyboard to open terminal and run the single command to get it:
snap install steam --beta
The command also work in Ubuntu 18.04, though --beta flag is required at the moment, because the package so far is in earlier stage for testing purpose.
After installed the package, just search for and launch it from ‘Activities’ overview screen:
It automatically install updates and setup runtime, and finally launch the client app for you.
Other Choices
As some users do not like Snap package, there are a few other ways to install Steam app in Ubuntu.
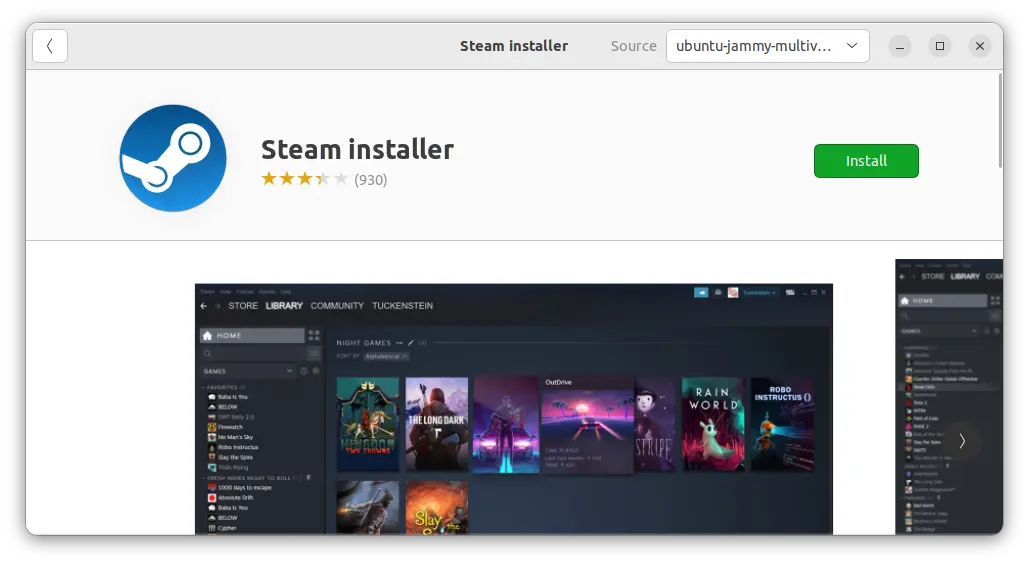
Option 1: Steam Installer
By searching in Ubuntu Software, you’ll see a “Steam Installer” package. Which is an empty package that automatically download steam package from its server and set it up in Ubuntu.
Steam Installer in Ubuntu Software
The package however is a 32-bit package which will also install a list of 32-bit libraries as dependencies.
Option 2: Steam’s official .deb package
Steam website offers official .deb package available for Debian/Ubuntu based systems.
Ubuntu starts working on its official Steam package as Snap. Meaning user can now directly search for and install the game platform from Ubuntu Software. Besides that, there are also an installer script in Ubuntu Software, official .deb package from steam website, and Flatpak package available for choices.
Ubuntu finally added support for disabling automatic updates for snap applications, though it’s currently considered experimental at the moment of writing.
As you may know, Snap is an universal package format runs in sandbox. It’s developed by Canonical, the company behind Ubuntu, as a competitor to Flatpak.
The pre-installed Firefox in Ubuntu 22.04+, and Ubuntu Software (or AppCenter) in Ubuntu 20.04+ are Snap applications. And there are lots of apps in Ubuntu Software available as Snap, including Chromium browser, Skype, and more.
By default, Snap apps automatically update to the newest version. Though, user can delay or specify when to perform updates. It was impossible to completely disable automatic updates due to security issue.
But as the snap update mechanism has been continuously refined, and to give IT teams more control they expect for Linux systems, this long-awaited feature is finally released for preview.
Hold or completely disable Snap updates
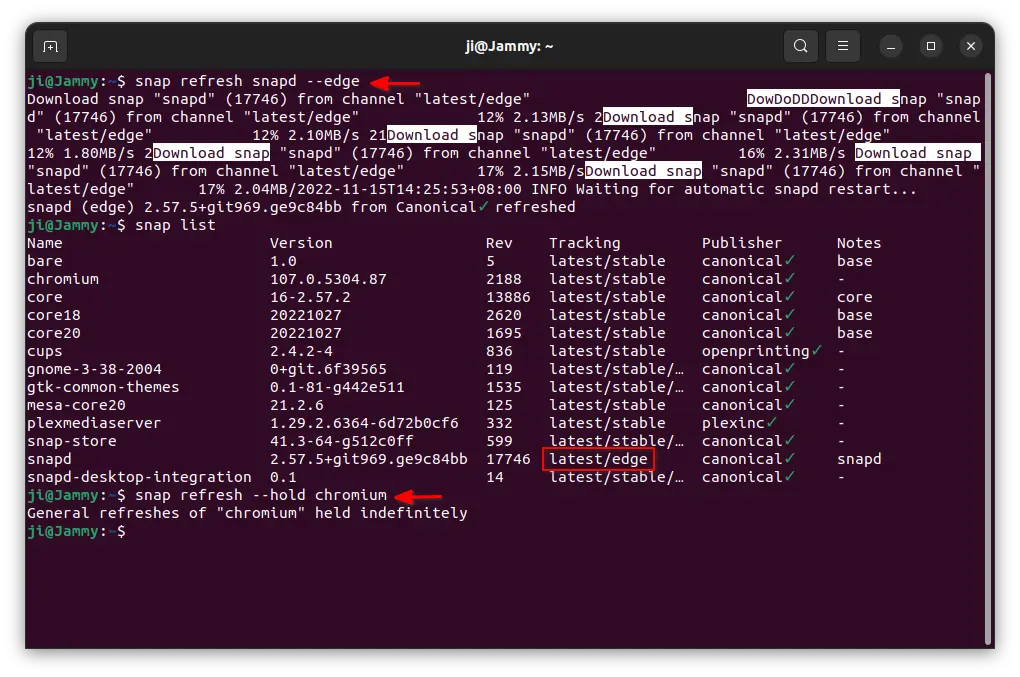
The function is done via a new --hold parameter using snap refresh command.
For example, completely disable automatic updates for Firefox via command:
snap refresh --hold firefox
It will output something like “General refreshes of “firefox” held indefinitely”.
Or, hold automatic updates, for give time period (24 hours example), for multiple apps (e.g., firefox and snap-store) via command:
snap refresh --hold=24h firefox snap-store
For all the Snap apps, just skip package name in the command. So, disable automatic updates for all apps by running command:
snap refresh --hold
NOTE: snap refresh --hold only disable automatic updates. User can manually update snap apps by using snap refresh app-name command.
Oppositely, re-enable automatically updates via --unhold parameter.
To re-enable updates for all apps, use command:
snap refresh --unhold
To re-enable certain apps, such as Firefox, use command:
snap refresh --unhold firefox
Switch Snapd to edge channel (No Longer Required)
UPDATE: This feature is NOW available in stable release. You don’t have to switch to edge channel any more!
As mentioned, the feature is not in edge channel for preview. If you found the commands above do not work, but you really want to try it out, switch Snapd daemon to edge channel via command:
snap refresh snapd --edge
And verify by running snap list |grep snapd command.
To switch back the daemon package to stable channel, use command:
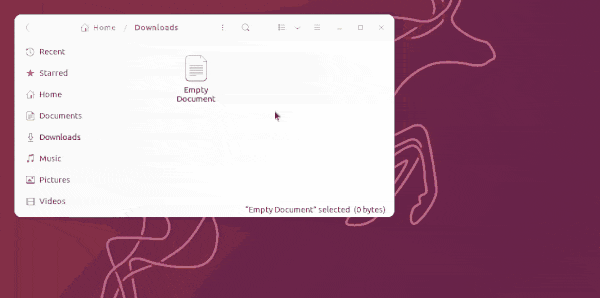
As you may know, icons on Ubuntu desktop is handled by an extension called “Desktop Icons NG”. While GNOME has been moving to GTK4, the extension so far still uses GTK3 toolkit to implement all the functions.
A GTK4 port of this extension now is in development, with all previous functions, bug-fixes, as well new features.
The new version works as another extension as it’s not been merged upstream. It comes with GSconnect integration, and features drag and drop app icons from Ubuntu Dock (Dash-to-Dock) to the desktop.
Drag and drop from left dock panel to desktop will REMOVE app icon from favorites.
Hold Ctrl + drag and drop will REMOVE from favorites, and ADD onto desktop.
Hold Shift + drag and drop will ADD icon to desktop without removing it from favorites.
Also, it adds more functions to drag and drop files from file manager (Nautilus) to the desktop. By default, drag and drop between desktop and Nautilus will MOVE the files from one to another directory. With the new extension, you can also:
Press and hold Ctrl + drag’n’drop to COPY files.
Press and hold Alt + drag and drop to select between ‘MOVE’, ‘COPY’, ‘LINK’ actions.
As well, it has a GNOME 43 style file context menu when you right-clicking on desktop. When looks more native in Ubuntu 22.04, except for the arrow …
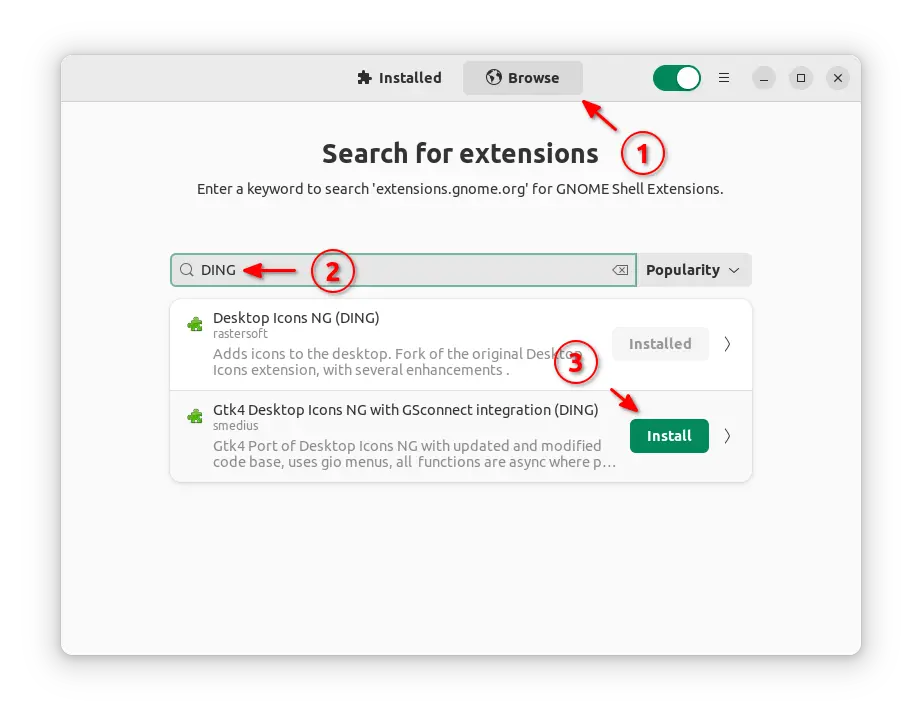
Install GTK4 port of Desktop Icons NG:
1. Ubuntu 22.04+ users can first search for and install ‘Extension Manager’ app from Ubuntu Software.
Install Extension Manager in Ubuntu 22.04+
2. Then press Super (‘Windows’ logo) key on keyboard to open overview, search and open the tool.
3. Finally, search ‘DING’ and install the new extension under ‘Browse’ tab.
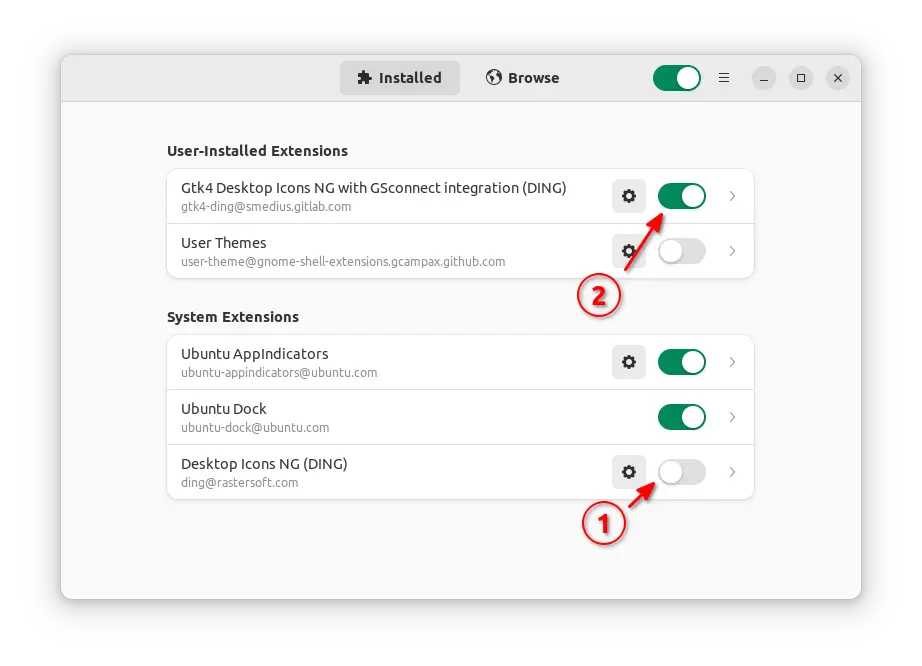
4. To use the extension, user has to disable the system built-in ‘Desktop Icons NG’ extension, and enable the new GTK4 version.
To restore, just re-enable ‘Desktop Icons NG’, disable or remove the GTK4 version via Extension Manager.