![]()
After more than 2 years of development, the new major Battle for Wesnoth 1.16.0 was finally available to download.
With Wesnoth 1.15.x development releases, it introduced new campaign: Wings of Victory, an Intermediate level Drake campaign with 11 scenarios. A new new single player or coop survival scenario, Isle of Mists is added.
The add-on World Conquest II (now called World Conquest) has translations support. And users now has ability to add translated titles and descriptions to add-ons.
It has overhauled the Dunefolk to improve balance against the six Default factions. Most of the Dunefolk faction’s units have new and-or updated animations. There is also a new unit called falconer, which is a branch in the skirmisher line.
For multiplayer, it added roll N chat command, new Information button in the lobby to show server related information and ongoing tournaments being held. It’s possible to press F1 to view in-game help in the multiplayer lobby. And, the Private Replay checkbox is available in the game create screen.
It also merged several experimental AI candidate actions (CAs). The campaign AI Controller feature is now deprecated, and has been removed from mainline campaigns.
Other changes in Battle for Wesnoth 1.16.0 include:
- Many changes to unit stats across the board
- Several new fauna units added.
- Many new zombified sprites, monsters, animations, and so forth.
- Campaign changes and fixes.
- WML and lua API changes.
- Require system higher than Windows 7 / macOS 10.11
How to Install Battle for Wesnoth 1.16.0 in Ubuntu Linux:
The Windows EXE, macOS dmg and source tarball are available to download at the link below:
Linux user may play the game via Steam or itch.io. It’s also available to install separately via the universal Flatpak package in Ubuntu 20.04, Ubuntu 21.10, Ubuntu 18.04 and even older releases. And below will tell you how:
1.) Setup Flatpak daemon.
Firstly, search for and open terminal from start menu (activities overview). When it opens, run command to install the daemon:
sudo apt install flatpak
For old Ubuntu releases, e.g., Ubuntu 16.04 and Ubuntu 18.04, you need to add this PPA first.

Next, add the Flathub repository that hosts the software packages via command:
flatpak remote-add --if-not-exists flathub https://flathub.org/repo/flathub.flatpakrepo

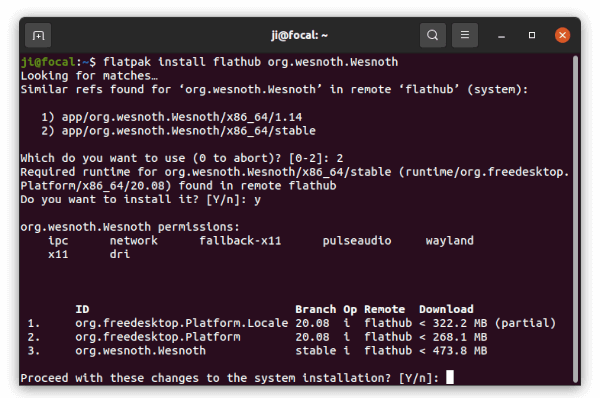
2.) Install Battle for Wesnoth as Flatpak.
After setting up the daemon, run the command below in terminal:
flatpak install flathub org.wesnoth.Wesnoth
Both Wesnoth 1.14.x and 1.16 are available in the repository. You need to type number to choose which to install, and type y to confirm.
When everything’s done successfully, launch the game from start menu (searching from activities overview) and enjoy!
Uninstall Wesnoth Flatpak:
For any reason, you may run command in terminal to remove the package:
flatpak uninstall --delete-data org.wesnoth.Wesnoth
And clear unused runtime via flatpak uninstall --unused command.