Archives For November 30, 1999

As you may know, when you’re running commands in terminal with sudo at beginning, you have to enter user password to get past. Within a certain time, you don’t need to enter the password again to run another sudo command.

The default timeout is about 5 minutes, here’s how to change it in Ubuntu 13.10, Ubuntu 13.04, Linux Mint and Elementary OS.

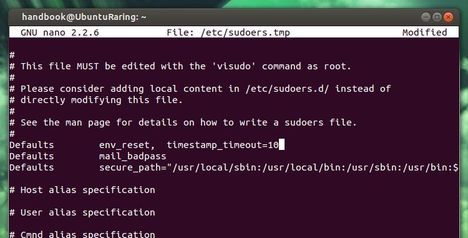
To get started, press Ctrl+Alt+T on your keyboard to open terminal. When it opens, run below command to edit the config file:

sudo visudo

Use the arrow keys to scroll down and find out below line:

Defaults env_reset

Change it into:

Defaults env_reset, timestamp_timeout=10

Replace 10 with other number of minutes as you want.

change sudo password timeout

After that, press Ctrl+X and followed by Y to save the changes.

That’s it. Enjoy!

If you’ve using Ubuntu for a period of time, you may have old kernels that are no longer useful on your system. It may be annoying to have these kernel entries in Grub boot menu. So here’s how to remove the old kernels in Ubuntu 13.10 Saucy, Ubuntu 13.04 Raring.

The efficient way to do the job is using the Ubuntu Tweak, which lists all un-used kernels and gives an option at right-bottom corner to clean them up.

To install Ubuntu Tweak, download the DEB package in the right sidebar of this page. Then double-click to install via Ubuntu Software Center.

At the moment, Ubuntu Tweak is not ready for Ubuntu 13.10 Saucy. So below is the command line way:

1.) Press Ctrl+Alt+T to open terminal for running commands. Check current running kernel version.

uname -r

Don’t remove this kernel!

2.) Copy and paste below command and hit run to check list of installed Kernels on your system:

dpkg --list | grep linux-image

3.) Find out the kernels you want to remove, and run below command to accomplish it: Change x.x.x.x to the kernel version

sudo apt-get purge linux-image-x.x.x.x-generic

Want to configure swappiness in Ubuntu? Well, there’s a simple graphical tool to change swappiness to improve Ubuntu performance.

Swappiness controls how often the swap file is used. A swappiness setting of 0 means that the disk will be avoided unless absolutely necessary (run out of memory), while a swappiness setting of 100 means that programs will be swapped to disk almost instantly.

The default value of swappiness is 60, which means the swap file will be used fairly often if the memory usage is around half of RAM.

If you have a large memory of RAM, you can reduce the swappiness to improve Ubuntu performance. For example, turn the vaule down to 10 or 15. The swap file will then only be used when the RAM usage is around 80 or 90 percent.

The command to check the value of swappiness is:

cat /proc/sys/vm/swappiness

You can change it by editing /etc/sysctl.conf and changing the line vm.swappiness = 60

To install Virtual Memory Modifier (VMM), the GUI tool

For Ubuntu 13.04 and its derivatives, download and double-click to install the Deb:

vmm_0.0.5.0-1ubuntu1_all.deb

For Ubuntu 12.10, Ubuntu 12.04, and their derivatives. Run below commands one by one to install vmm from PPA:

sudo add-apt-repository ppa:atareao/atareao 

sudo apt-get update; sudo apt-get install vmm

Canon Drivers for Ubuntu and Linux Mint

Last updated: December 8, 2014

In this tutorial I’ll show you how to install official drivers of commonly used Canon Printers on Ubuntu 13.04, 12.10, 12.04, and Linux Mint.

There’s a ppa repository that provides the official drivers of Canon printers and multifunction devices which are not available on Canon’s website.

The supported Canon printers include:

  • bjf9000, bjf900, bjs300, bjs500, bjs700 series
  • e500, e510, e600, e610 series
  • i250, i255, i550, i560, i850, i860, i950, i990 series
  • ip100, ip1800, ip1900, ip2200, ip2500, ip2600, ip2700, ip3000, ip3300, ip3500, ip3600, ip4000, ip4200, ip4300, ip4500, ip4600, ip4700, ip4800, ip4900, ip5000, ip5200, ip6600, ip7200, ip7500, ip8500, ip90 series
    ix6500 series
  • mg2100, mg2200, mg3100, mg3200, mg4100, mg4200, mg5100, mg5200, mg5300, mg5400, mg6100, mg6200, mg6300, mg8100, mg8200 series.
  • mp140, mp160, mp190, mp210, mp230, mp240, mp250, mp270, mp280, mp490, mp495, mp500, mp510, mp520, mp540, mp550, mp560, mp600, mp610, mp620, mp630, mp640, mp750, mp780 series.
  • mx320, mx330, mx340, mx350, mx360, mx370, mx390, mx410, mx420, mx430, mx450, mx510, mx520, mx710, mx720, mx860, mx870, mx880, mx890, mx920 series.
  • pixmaip1000, pixmaip1500 series.
  • pixus250, pixus255, pixus550, pixus560, pixus850, pixus860, pixus950, pixus990 series
  • pixusip3100, pixusip4100, pixusip8600 series

To install the drivers:

Make sure to disconnect the Canon printer from your computer first. Press Ctrl+Alt+T to open terminal, copy and paste this command and run to add the ppa:

sudo add-apt-repository ppa:michael-gruz/canon-stable

update: For Ubuntu 14.04 and Ubuntu 13.10, please use the daily PPA (only cnijfilter-xxxseries packages available):

update 2: For Ubuntu 14.04 users, below PPA miss the packages for ScanGear MP, see this guide.

sudo add-apt-repository ppa:michael-gruz/canon-trunk

Then update:

sudo apt-get update

Install Synaptic Package Manager from Ubuntu Software Center, then open it.

Then search for and install cndrvcups-common to install Common Modules, search cnijfilter and find your driver to install. Also search and install scangearmp to install ScanGear MP.

Once installed, connect your printer to the computer. Your printer will be automatically detected by Ubuntu.