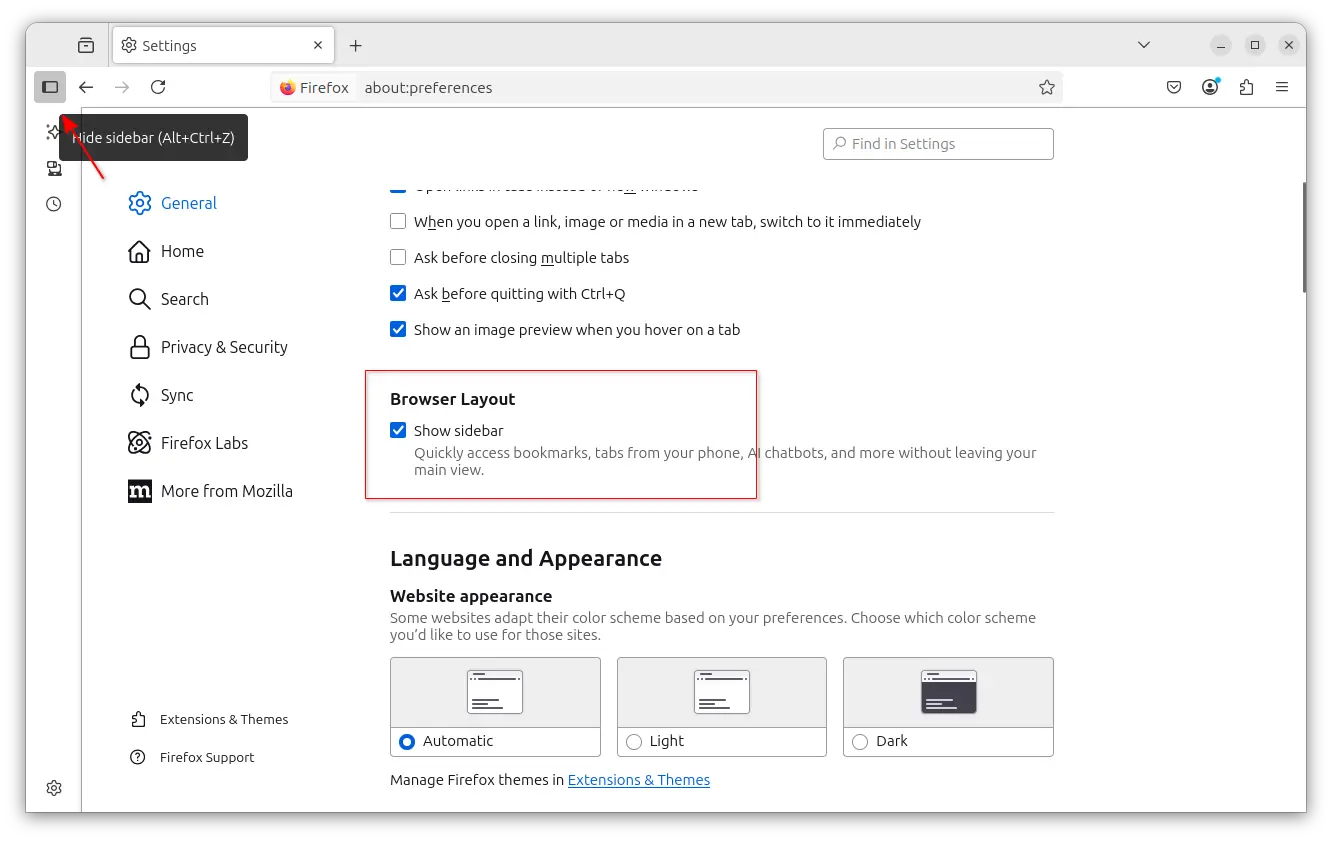
Archives For News

Free open-source software updates and Linux news

Shotwell photo viewer and organizer released new version 0.32.4 a few days ago.

The new release added basic .mpo file support, which is a stereoscopic image consisting of two overlapping 2D images in JPG format.

Besides that, the release also has improved slideshow support. It now supports for shuffled slideshows, allow setting wallpaper slideshows even if videos are selected, though videos are automatically excluded in slideshow in my case. And, fixes left/right navigation and not start issue in slideshow, when video is the first selected item.

shotwell MPO file support

Other changes in Shotwell 0.32.4 include:

  • Make Ctrl-Enter close the description editor
  • Add missing name for filter in Save As dialog
  • Add Shift-Drop for export of original file
  • Remove app shortcut for “Shotwell Profile Browser”. Add it as an action instead, though also available in ‘Preference’.
  • Simplified export conflict resolution dialog
  • New video meta-data handler.
  • Add dump of available image codecs and meta-data support
  • Fix showing the original photo with shift if photo was modified externally
  • Fix crop area jumping on scaled displays
  • Some crash fixes.

How to Install Shotwell 0.32.4 in Ubuntu:

Shotwell is available to install as Flatpak package, which is however not updated to the latest release at the moment of writing.

For those who prefer the classic .deb package format, I’ve upload the package into this unofficial PPA for Ubuntu 22.04, Ubuntu 23.04, Ubuntu 23.10 on amd64, arm64/armhf CPU architecture types.

1. First, search for and open terminal from your system application menu, or by pressing Ctrl+Alt+T on keyboard. When it opens, run command to add the PPA:

sudo add-apt-repository ppa:ubuntuhandbook1/shotwell

Type user password (no asterisk feedback) when it asks and hit Enter to continue.

2. Next, launch Software Updater (Update Manager), then install the updates for the software package.

Or, run command in terminal to install/upgrade the Shotwell package:

sudo apt install shotwell heif-gdk-pixbuf

NOTE: Linux Mint user may need to run sudo apt update first to refresh package cache.

Finally, either right-click on your photo images to select open with the photo manager, or search for and launch shotwell from ‘Activities’ overview and enjoy!

Uninstall Shotwell 0.32.4

For any issue, it’s recommended to purge the Ubuntu PPA. Which, will remove PPA and downgrade shotwell to the pre-installed version.

To do so, open terminal (Ctrl+Alt+T) and run command:

sudo apt install ppa-purge && sudo ppa-purge ppa:ubuntuhandbook1/shotwell


Parole, the lightweight media player for XFCE Desktop, released version 4.18.1 few days ago.

The new release updates the app icons with 32px, 64px, 96px sizes support, so it should have a cleaner look in system menus like App Finder, Whisker Menu.

The extensions icons have been updated using newer Xfce palette, and semi-transparent borders giving it a sharper look in dark themes.

The system tray icon now is disabled outside X11. And, it now supports middle click actions to control video playback:

  • middle click to pause/resume playback.
  • middle wheel scrolling over tray icon to volume up/down.

Other changes in the release include:

  • Allow to built without X11 support and therefore whithout XfceSMClient.
  • Fix critical warning and memory leak
  • mpris2: Properly disconnect signal handlers
  • honor gtk-dialogs-use-header as Xfce 4.18 is CSD opt-in.
  • Small UI Improvements and many translation updates

How to Install Parole 4.18.1:

At the moment of writing, there’s no binary package of Parole 4.18.1 for Ubuntu.

But it’s not hard to compile the package from the source (tested in XUbuntu 22.04):

  • First, open terminal and run command to install the build dependency packages:
    sudo apt install debhelper-compat gtk-doc-tools intltool libclutter-1.0-dev libclutter-gtk-1.0-dev libdbus-1-dev libdbus-glib-1-dev libgstreamer-plugins-base1.0-dev libgstreamer1.0-dev libgtk-3-dev libnotify-dev libtagc0-dev libxfce4ui-2-dev libxfconf-0-dev pkg-config xfce4-dev-tools
  • Then, download the source tarball by going to XFCE website via the link below:
  • Extract the source tarball, then right-click on the new generated folder, and select “Open in Terminal”. Finally, run the 3 commands below one by one to compile it from source:
    ./configure
    make -j4
    sudo make install

NOTE: It by default installs the parole executable to /usr/local/bin without overriding the pre-installed one. Meaning you’ll have 2 versions of the media player installed in your system, while the app icon in menu will launch the newer 4.18.1 version.

(Uninstall) By opening the source folder in terminal, you may also uninstall the media player by running command:

sudo make uninstall


digiKam, KDE’s photo management software, released version 8.2.0 this Sunday.

The new release includes most recent Libraw library, updates runtime libraries to Qt 5.15.11, KDE frameworks 5.110, Exiftool 12.70, and Exiv2 28.1.

For Windows user, digiKam now has new Windows installer compiled under Windows with VCPKG tool-chain and based on Qt6 and KF6 frameworks.

Besides toolkit updates, digiKam 8.2.0 also has about 250 bug-fixes. They include slow Geolocate, tags not saving on exit, failed to database creation on MariaDB, slideshow does not prevent monitor turning off, various crashes, and other bugs. See NEWS file for more details.

Get digiKam 8.2.0

The software provides official packages for Linux, Windows, and MacOS, available to download at the link below:

For Linux, it’ non-install AppImage. Just download it, add executable permission, and run it to launch the photo manager.

digiKam is also available to install as Flatpak package. Linux Mint 21 can directly search for & install it from Software Manager.

While, Debian/Ubuntu users can install it via:

  • First, press Ctrl+Alt+T on keyboard to open terminal. When it opens, run command to install the daemon package:
    sudo apt install flatpak
  • Then, install digiKam as Flatpak by running command:
    flatpak install https://dl.flathub.org/repo/appstream/org.kde.digikam.flatpakref

Uninstall:

To uninstall the Flatpak package, open terminal and run command:

flatpak uninstall --delete-data org.kde.digikam

Also run flatpak uninstall --unused to remove useless run-time libraries.


HPLIP, free open-source Linux driver for HP’s inkjet and laser printers, released version 3.23.12 few days ago.

The new release add some new HP devices support. They include:

  • HP OfficeJet Pro 9130b series
  • HP OfficeJet Pro 9120b series
  • HP OfficeJet Pro 9110b series
  • HP Color LaserJet Enterprise Flow MFP X58045z
  • HP Color LaserJet Enterprise Flow MFP X58045zs
  • HP Color LaserJet Enterprise MFP X58045dn
  • HP Color LaserJet Enterprise MFP X58045
  • HP LaserJet Pro P1106 plus
  • HP LaserJet Pro P1108 plus

Nothing else!

If you happen to have a HP printer in the list above, then below is going to show you how to install the driver for it in Ubuntu Linux.

Download & Install HPLIP 3.23.12

HPLIP offers official .run installer available to download at the link below:

It’s “hplip-3.23.12.run“. Once you downloaded the file, right-click on blank area in the ‘Downloads’ folder and select “Open in Terminal“.

When terminal opens, run the commands below one by one will start the installing process for the new driver package:

  • Add executable permission for the file:
    chmod u+x hplip-3.23.12.run
  • Run the file, follow the on-screen prompt and answer some questions:
    ./hplip-3.23.12.run

In the terminal output, answer questions by typing ‘y’, ‘n’, etc. Until the command’s done without error, you can plug or re-plug your HP printer for the new driver to work.

Install HPLIP 3.23.12 in Ubuntu 23.10

The .run installer so far does not support Ubuntu 23.10! However, running the commands above will generate the source folder in your ‘Downloads’ folder. Right-click on that folder and select ‘Open in Terminal’, then 23.10 user can try running the commands below one by one to build from source:

1. Firstly, in the terminal window run single command to install the build dependency packages:

sudo apt install --assume-yes libcups2-dev libdbus-1-dev build-essential ghostscript openssl libjpeg-dev libsnmp-dev libtool-bin libusb-1.0-0-dev wget python3-pil policykit-1 policykit-1-gnome python3-pyqt5 python3-dbus.mainloop.pyqt5 python-gi-dev python3-dev python3-notify2 python3 python3-reportlab libsane-dev xsane libavahi-client-dev libavahi-core-dev avahi-utils

2. Then, configure the source by running command:

./configure --prefix=/usr --enable-qt5 --disable-qt4

3. Finally, make and install by running the 2 commands below one by one:

make -j4
sudo make install

NOTE: in command -j4 will start 4 threads in parallel to speed up the process. You can skip it, or change number 4 depends on how many CPU cores you have.

After installed HPLIP 3.23.12, plug or re-plug your HP printer, then you can either refresh the driver in system ‘Printer’ settings page, or launch “HP Device Manager” to set up your printer.

Uninstall HPLIP 3.23.12

As mentioned above, running the installer will create a source folder in user ‘Downloads’ folder.

Right-click on that source folder and select “Open in Terminal”. Then run the uninstall script in pop-up terminal window to remove HPLIP:

sudo ./uninstall.py

MPV media player released version 0.37.0 yesterday! Here are the new features and Ubuntu PPA for installing the .deb package in Ubuntu, Linux Mint.

MPV 0.37.0 has big improvements for Apple users. It added Vulkan support in vo_gpu and vo_gnu_next. And, it now supports VideoToolbox hardware decoding, a low-level framework that provides direct access to hardware encoders and decoders.

The release also added support for delivery system ISDB-T for dvb streaming, support SPDIF passthrough for OSS audio, and can play up to 64 channels.

For libmpv library, the release added new mpv_time_ns() to allow more precise time based on nanoseconds.

For command line, MPV 0.37.0 added new options, they include:

  • --hdr-peak-percentile and --libplacebo-opts for vo_gpu_next.
  • --term-remaining-playtime for player.
  • --x11-wid-title for x11.
  • --subs-match-os-language to replace ‘auto’ option for player.
  • --video-crop for vo.
  • --window-corners, --window-affinity, --title-bar, --backdrop-type for win32.
  • and --sub-stretch-durations for sub.

See the official manual about the new command options. And, see the github release page for more changes about MPV 0.37.0.

How to Install MPV 0.37 in Ubuntu

The new release will be available in Ubuntu Software (App Center) in next few days as Snap package.

For those who prefer the classic .deb package format, here’s the PPA for Ubuntu 22.04, Ubuntu 23.04, and Ubuntu 23.10.

1. Firstly, press Ctrl+Alt+T on keyboard to open a terminal window. When it opens, paste the command below and hit run:

sudo add-apt-repository ppa:ubuntuhandbook1/mpv

Type user password (no asterisk feedback) when it asks and hit Enter to continue.

2. Linux Mint 21 user needs to run command in terminal to manually refresh the package cache:

sudo apt update

3. Finally, install mpv media player v0.37.0 by running command:

sudo apt install mpv

To verify, run mpv --version command in terminal.


Tips: for hardware video acceleration, first make sure your graphics driver support it, then edit ‘/etc/mpv/mpv.conf‘ file and add hwdec=auto. For the missing header-bar, use gpu-context=x11egl.

Uninstall:

You can choose to purge the PPA repository, which will also downgrade mpv to the stock version in system repository. To do so, open terminal and run command:

sudo apt install ppa-purge && sudo ppa-purge ppa:ubuntuhandbook1/mpv

Or, remove PPA by running command:

sudo add-apt-repository --remove ppa:ubuntuhandbook1/mpv

To remove the mpv media player, use command:

sudo apt remove --autoremove mpv

Shotwell updated to 0.32.3 with Some Fixes

Last updated: November 18, 2023 — 1 Comment

Shotwell photo viewer and organizer released new 0.32.3 version a day ago with minor updates.

The release came with some bug-fixes and minor changes, they include:

  • Fix asking twice on closing viewer with modified image
  • Do not try to reload photo on shutdown
  • Do not abort if new thumbnail size does not exist
  • Open fullscreen windows on correct monitor
  • Do not show toolbar if mouse is on another monitor
  • Do not leak zoom buffers
  • Remove length limit for GPhoto import
  • Be more robust against invalid UTF-8 filenames
  • Drop some old work-arounds

As well, there’s new/updated translations included in this release. They include: id.po, courtesy of Andika Triwidada; eu.po, courtesy of Asier Sarasua Garmendia; hu.po, courtesy of Balázs Úr; sl.po, courtesy of Martin Srebotnjak.

How to Install Shotwell 0.32.3 in Ubuntu

Shotwell is available to install in Ubuntu via a few different ways.

Snap package

Canonical (the company behind Ubuntu) maintains Shotwell as Snap package, which runs in sandbox. However, it’s stuck at 0.32.1 at the moment of writing.

The snap package is available to install in Ubuntu Software (or App Center for 23.10).

Flatpak package

Shotwell is also available to install as Flatpak package, another universal Linux package format runs in sandbox. It’s marked as maintained by the Shotwell developers, but NOT verified.

The Flatpak is at version of 0.32.2 at the moment of writing (check HERE). Ubuntu user can press Ctrl+Alt+T on keyboard to open terminal, and run 2 commands one by one to install it:

  • First, make sure the flatpak daemon is installed:
    sudo apt install flatpak
  • Then, install shotwell as flatpak:
    flatpak install https://dl.flathub.org/repo/appstream/org.gnome.Shotwell.flatpakref

Ubuntu PPA

For those who prefer the classic native .deb package format, I’ve upload the package into this unofficial PPA for Ubuntu 22.04, 23.04, and 23.10.

1. First, search for and open terminal from your system application menu, or press Ctrl+Alt+T on keyboard. When it opens, run command to add the PPA:

sudo add-apt-repository ppa:ubuntuhandbook1/shotwell

Type user password (no asterisk feedback) when it asks and hit Enter to continue.

2. Next, launch Software Updater (Update Manager), then install the updates for the software package.

Or, run command in terminal to install/upgrade the Shotwell package:

sudo apt install shotwell

NOTE: Linux Mint user may need to run sudo apt update first to refresh package cache.

Finally, either right-click on your photo images to select open with the photo manager, or search for and launch shotwell from ‘Activities’ overview and enjoy!

Uninstall Shotwell 0.32.3

For any issue, it’s recommended to purge the Ubuntu PPA. Which, will remove PPA and downgrade shotwell to the pre-installed version.

To do so, open terminal (Ctrl+Alt+T) and run command:

sudo apt install ppa-purge && sudo ppa-purge ppa:ubuntuhandbook1/shotwell

For the Snap package, just remove it from Ubuntu Software or App Center. While, Flatpak package can be removed by running the command below in a terminal window:

flatpak uninstall --delete-data org.gnome.Shotwell

For users of Audacity 3.4.x, the popular audio editor and recorder app just announced the second update for this release series.

It’s Audacity 3.4.2 that includes following bug-fixes:

  • Fix crash when opening projects with zero-length clips.
  • Fix a crash when clearing loops.
  • Fix Nyquist-related crashes.
  • Fix a crash when closing Audacity.
  • When exporting a file, the sample rate of the tracks is now considered, and last-used sample rate is remembered.
  • Copy-pasting now pastes into audio again by default. Though, there’s an option to change in Preferences.
  • Mix and render now also resets the gain for the resulting track.
  • Fix clips shifting to the right when effects are applied to them.
  • Fix clicks occurring when overdubbing a project with muted tracks.
  • Fix files being exported without a file extension in rare cases.
  • Show all sample rates possible for MP2 exports.
  • Fix pasting into labels.
  • Fix copying when “select all audio if selection required” is enabled.
  • Fix GTK detection and compilation for wxWidgets 3.2.4.
  • Fix EQs in macros.
  • Fix builds on armhf.

How to Install Audacity 3.4.2

Audacity is available to install Ubuntu Linux through a few different ways. They include AppImage, Ubuntu PPA, and Flatpak. Just choose either one that you prefer.

Option 1: AppImage (official)
It provides official macOS .dmg, Windows .exe, and Linux .AppImage packages available to download at the link below:

For Linux, click expand the “Assets” section and choose download the .AppImage package.

Then, right-click on the .AppImage file and go to its ‘Properties’ dialog. Add executable permission by enable ‘allow executing file as program‘. Finally, right-click on it and select “Run” to launch Audacity.

Option 2: Ubuntu PPA

For choice, I’ve uploaded the new release package into unofficial PPA for Ubuntu 22.04, 23.04, and Ubuntu 23.10 with amd64, arm64, and armhf support.

1. First, press Ctrl+Alt+T on keyboard to open terminal. When terminal opens, run command to add the PPA:

sudo add-apt-repository ppa:ubuntuhandbook1/audacity

Type user password (no asterisk feedback) when it asks and hit Enter to continue.

2. For Linux Mint users, you may manually update system package cache by running command:

sudo apt update

3. Finally, install Audacity 3.4.2 either by running the  command below in terminal:

sudo apt install audacity audacity-data

Or, launch ‘Software Updater’ to update from an existing version:

Option 3: Flatpak

Audacity is also available to install as universal Flatpak package, that run in sandbox.

First, press Ctrl+Alt+T on keyboard to open terminal. Then, Ubuntu users can install Audacity as Flatpak by running the 2 commands below one by one:

sudo apt install flatpak
flatpak install https://dl.flathub.org/repo/appstream/org.audacityteam.Audacity.flatpakref

Uninstall:

To uninstall Audacity 3.4.2 PPA package, you have 2 choices:

  • Purge the Ubuntu PPA, which also downgrade the installed packages to the stock versions in your system:
    sudo apt install ppa-purge && sudo ppa-purge ppa:ubuntuhandbook1/audacity
  • Or, remove Audacity package by running command:
    sudo apt remove --autoremove audacity audacity-data

    Then, remove the Ubuntu PPA via command:

    sudo add-apt-repository --remove ppa:ubuntuhandbook1/audacity

To uninstall the Flatpak package, use command:

flatpak uninstall --delete-data org.audacityteam.Audacity

Also run flatpak uninstall --unused to remove useless runtimes.

For LUbuntu 22.04 users, the latest LXQt desktop 1.4.0 is available to upgrade now through the official PPA.

LXQt, the lightweight Qt desktop environment, announced the release of 1.4.0 more than a week ago. Changes in the new desktop release include:

  • lxqt-menu-data is released to replace lxmenu-data anywhere needed.
  • In file manager, user can add the command for the default terminal
  • Restore last window also restores state of split view
  • Remember password and anonymity settings of the mount dialog
  • QTerminal supports audible bell as an option
  • Image viewer has a minimal support for color spaces now.

How to Upgrade to LXQt 1.4.0 in LUbuntu 22.04

LUbuntu Team has made the new release package into this official Ubuntu PPA for current 22.04 LTS.

1. Add PPA

First, press Ctrl+Alt+T on keyboard to open terminal. When it opens, run the command below to add the official PPA:

sudo add-apt-repository ppa:lubuntu-dev/backports

Type user password (no asterisk feedback) when it asks and hit Enter to continue.

2. Update LXQt Desktop:

While adding the PPA, it should automatically refresh system package cache. So, your can then run the command below to update LXQt to v1.4.0:

sudo apt full-upgrade

NOTE: apt full-upgrade is required rather than apt upgrade, or some core libraries will be kept back.

For non-LUbuntu but Ubuntu 22.04 based systems, user can use the command below to install LXQt 1.4.0:

sudo apt install lubuntu-desktop

In case you want to restore your system later, it’s better to written down what packages it’s going to install via terminal output.

When done, restart your computer and launch “About LXQt” dialog to verify.

Uninstall LXQt 1.4.0 in LUbuntu 22.04

To restore your LUbuntu desktop, run the command below in terminal to install ppa-purge and use the tool to purge the PPA repository:

sudo apt install ppa-purge && sudo ppa-purge ppa:lubuntu-dev/backports

It will downgrade all the installed packages from the PPA to the stock versions in system repository. When done, restart your system.

OBS Studio, the popular live streaming software, announced new 30.0 release yesterday. Here are the new features and how to install guide for Ubuntu 22.04, Ubuntu 23.04/23.10, and Linux Mint 21.

OBS-Studio 30.0 is a big release with many new features. They include WHIP/WebRTC output, support for Intel QSV H264, HEVC, AV1 on Linux, “Safe Mode” that runs without scripting, and websockets, 10-bit capture and HDR playback support for Decklink devices.

Other changes include:

  • Redesigned the status bar
  • Full-Height docks option in the “Docks” menu
  • Add shader cache to improve startup time on Windows
  • Add application audio capture on macOS
  • Rework the virtual camera on macOS
  • Add YouTube Live Control Room Panel when streaming to YouTube
  • Option to hide OBS windows from macOS Screen Capture’s “Display Capture”
  • Arrange filters via drag & drop
  • Ability to set FFmpeg Options for VAAPI

And, there are tons of other changes and bug-fixes, see the release page for details.

How to Install OBS Studio 30.0 in Ubuntu

The release page (see the link above) provides Windows .exe, Mac OS .dmg, and Ubuntu .deb packages for downloading under ‘Assets’ section.

For Ubuntu and Linux Mint, there’s also an official PPA available to make it easy to keep the software up-to-date.

The PPA supports the new release for Ubuntu 22.04, Ubuntu 23.04, Ubuntu 23.10, and their based systems. While, Ubuntu 20.04 does not longer supported due to FFmpeg version mis-match.

1. Firstly, press Ctrl+Alt+T on keyboard to open a terminal window. When it opens, run command to add the PPA:

sudo add-apt-repository ppa:obsproject/obs-studio

Type user password (no asterisk feedback) when it asks and hit Enter to continue.

2. Then, either use Software Updater to update the software package (if an old version was installed).

Or, use apt command to install/upgrade the software package:

sudo apt install obs-studio

NOTE: Linux Mint may need to run sudo apt update first to update package cache.

Once installed, search for and launch OBS Studio from ‘Activities’ overview or start menu depends on your desktop environment and enjoy!

NOTE: OBS Studio in Ubuntu 22.04 and higher with Wayland, looks kinda borderless, due to Qt theming issue. If you prefer the classic header-bar and window border, see this tutorial to enable xcb plugin

Uninstall OBS Studio

To downgrade the software to the stock version that your system repository provides, run command:

sudo apt install ppa-purge && sudo ppa-purge ppa:obsproject/obs-studio

Or, either open Software & Updates and remove the PPA source line under ‘Other Software’ tab:

or run command in terminal to remove the PPA repository:

sudo add-apt-repository --remove ppa:obsproject/obs-studio

Also, remove the OBS Studio if you want by running command in terminal:

sudo apt remove --autoremove obs-studio

Hugin, the free open-source panorama photo stitching and HDR merging software, finally released the new stable 2023 release!

Changes in the new release include:

  • PTBatcherGUI can now also queue user defined assistant and user defined output sequences.
  • PTBatcherGUI: Added option to generate panorama sequences from an existing pto template.
  • Assistant: Added option to select different output options like projection, FOV or canvas size depending on different variables (e.g. image count, field of view, lens type).
  • Allow building with epoxy instead of GLEW for OpenGL pointer management.
  • Several improvements to crop tool (outside crop, aspect ratio, …).

How to install Hugin 2023.0.0 in Ubuntu:

For the source tarball as well as Windows msi packages, go the sourceforge download page.

For all current Ubuntu releases, including Ubuntu 18.04, Ubuntu 20.04, Ubuntu 22.04, Ubuntu 23.10, and their based systems, I’ve made the unofficial package into this PPA repository, not only for x86_64 but also 32-bit/64-bit ARM support!

I also sync the packages into the apps PPA, use either one as you prefer.

1. First, press Ctrl+Alt+T on keyboard to open terminal. When it opens, run command to add the PPA:

sudo add-apt-repository ppa:ubuntuhandbook1/hugin

Type user password (no asterisk feedback) when it asks and hit Enter to continue.

2. Update system package cache for Ubuntu 18.04 and Linux Mint, though it’s done automatically while adding PPA in Ubuntu 20.04+:

sudo apt update

3. Finally, either run the command below in terminal to install the panorama photo stitcher:

sudo apt install hugin

Or, upgrade the software (if an old version was installed) via Software Updater (Update Manager) app:

Uninstall hugin:

To remove the software package, simply run command:

sudo apt remove --autoremove hugin hugin-data

And, remove the PPA either by running command in terminal:

sudo add-apt-repository --remove ppa:ubuntuhandbook1/hugin

Or remove the source line from ‘Software & Updates‘ utility under Other Software tab.