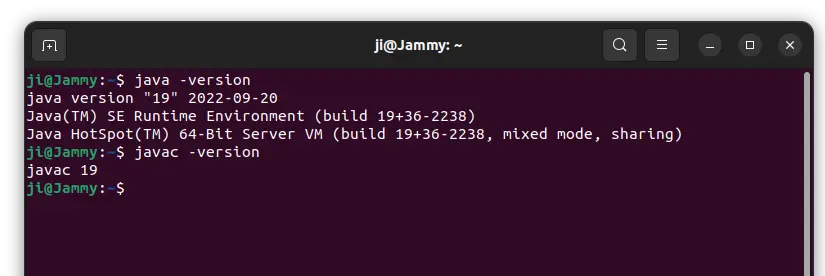
Oracle Java JDK 19 is out! Here are the new features and how to install instructions for Ubuntu users.
First, for Linux users the release now ported to support the RV64GV configuration of RISC-V, a general-purpose 64-bit ISA.
The release also introduced record patterns to deconstruct record values. Record patterns and type patterns can be nested to enable a powerful, declarative, and composable form of data navigation and processing. Though it’s a preview feature so far.
There are also 2 other preview features: a foreign function & memory API can interoperate with code and data outside of the Java runtime; a lightweight virtual threads that dramatically reduce the effort of writing, maintaining, and observing high-throughput concurrent applications; pattern matching for switch expressions and statements.
JDK 19 also introduced an API to express vector computations that reliably compile at runtime to optimal vector instructions, and an API for structured concurrency.
Other changes include:
New system properties for System.out and System.err.
upgrade Unicode support to 14.0
HTTPS channel binding support for Java GSS/Kerberos.
Support for PAC-RET protection on Linux/AArch64
Add a -providerPath option to jarsigner
New options for ktab to provide Non-Default salt
As well, there are removed and deprecated APIs and features. See release note details.
How to Install Java JDK 19 in Ubuntu Linux:
Oracle website provides the 64-bit DEB/RPM packages for Debian, Ubuntu, Fedora based systems. Just go download the package for your system from the link below:
In recent Linux systems, you can simply double-click on the package to install via system Software App. To set the Java home variable and use JDK 19 as default, see this step by step how to tutorial.
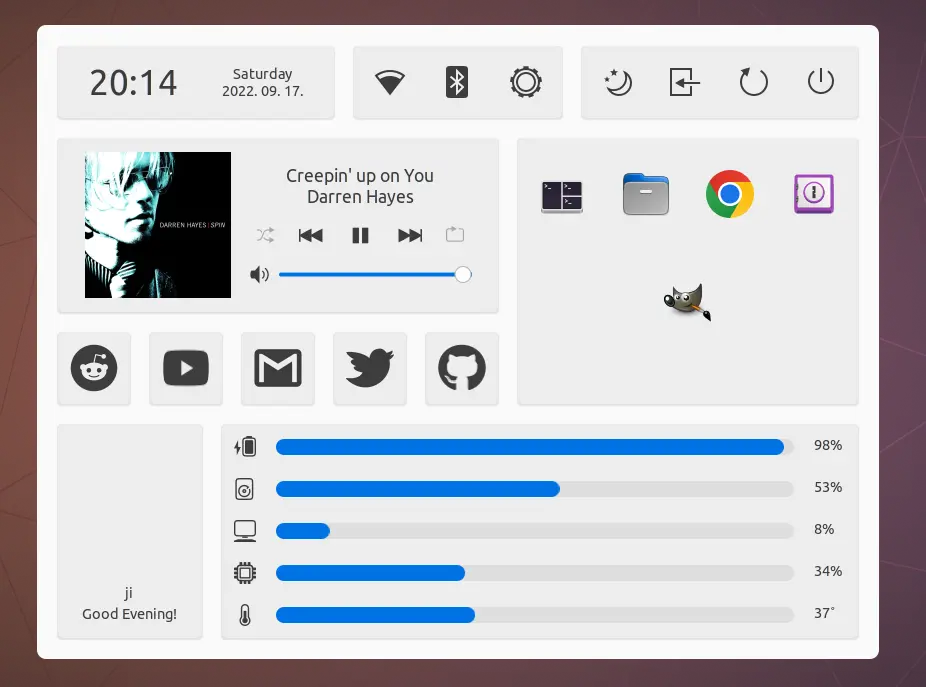
For Ubuntu 22.04, Ubuntu 22.10, Fedora 36/37 & other Linux with GNOME 42/43, there’s a new extension to enable more useful gadgets into top panel.
It’s “Aylur’s Widgets” extension that adds Dash, Workspace dots, Media playback control, Battery bar, Power menu in top-bar. All of them have ON/OFF switches, position option (left, center, right) as well as other settings.
Dash is a trigger to quickly access frequently used system settings, including Wi-Fi, Bluetooth, Settings, Shutdown Menu, Favorite Apps, Playback Control, Social Media websites, and have a glance at time & date, battery status, CPU usage, core temperature.
The button has configurable text and icon, and allows to replace the “Activities” button. With it enabled, user may also press Super + D on keyboard to trigger the menu. In case you use the shortcut key to show/hide desktop, you may assign another shortcut via Dconf Editor.
It also displays round dots on panel indicates all available desktop workspaces, and allows to quickly switch between them by clicking a single click. As well, there are music playback control, customizable date time format, battery bar and power button for choice.
How to Install Aylur’s Widget Extension
NOTE: the extension so far supports GNOME 42/43, which means you need Ubuntu 22.04|22.10, Fedora 36/37, Manjaro or Arch Linux with GNOME.
For Ubuntu, first search for and install “Extension Manager” from Ubuntu Software.
Install Extension Manager in Ubuntu 22.04
Then, search for and open the tool from ‘Activities’ Overview:
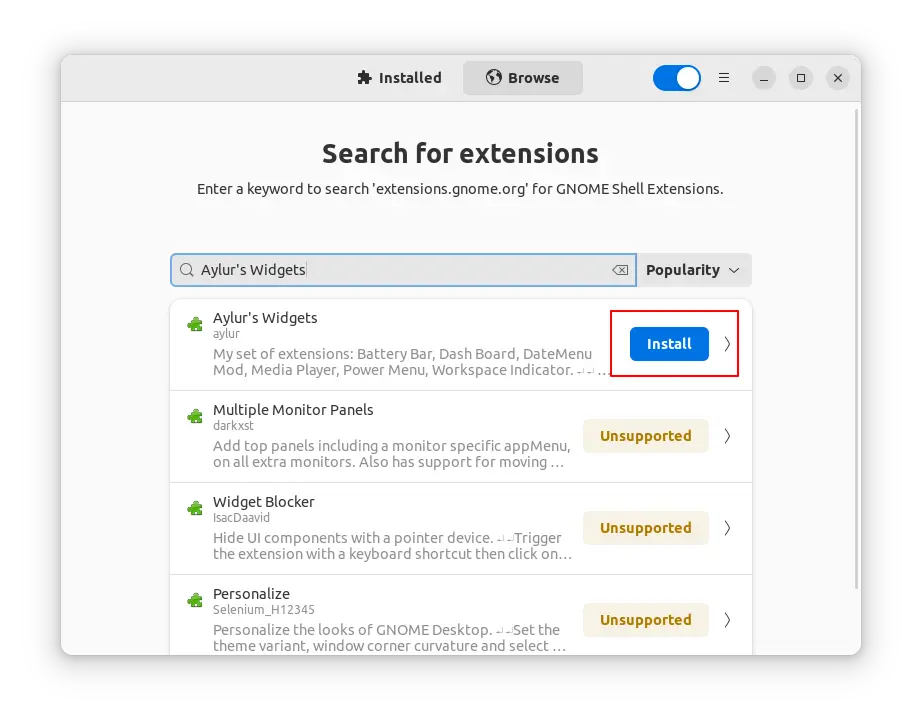
When it opens, navigate to ‘Browse’ tab, search for and install the ‘Aylur’s Widget’ extension:
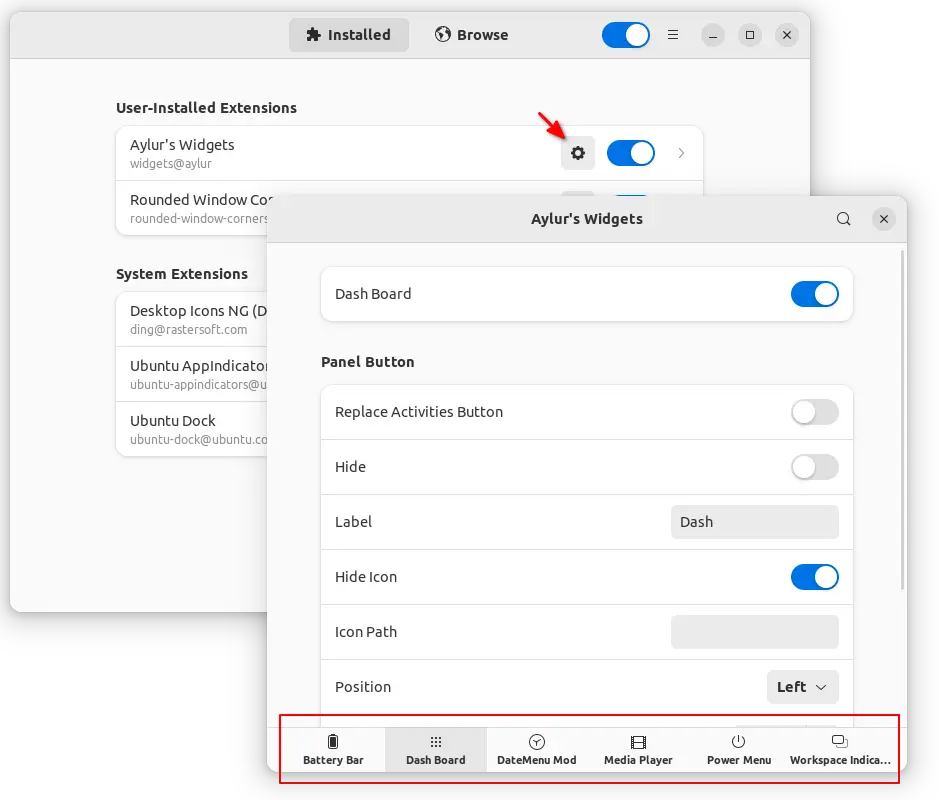
After installation, go back ‘Installed’ tab, and click on gear button to configure the extension:
For other Linux, go to the extension page below and use the ON/OFF switch to install it:
The office suite offers official Flatpak, Snap, and Deb packages for downloading in its website. However, all of them will install another copy, which causes duplicated shortcut icons in Ubuntu.
For all current Ubuntu releases (Ubuntu 22.04, Ubuntu 20.04, Ubuntu 18.04) and their based systems, the LibreOffice PPA is highly recommended. Since the PPA is maintained by Ubuntu community members, and it will upgrade the system built office packages instead of installing another ones.
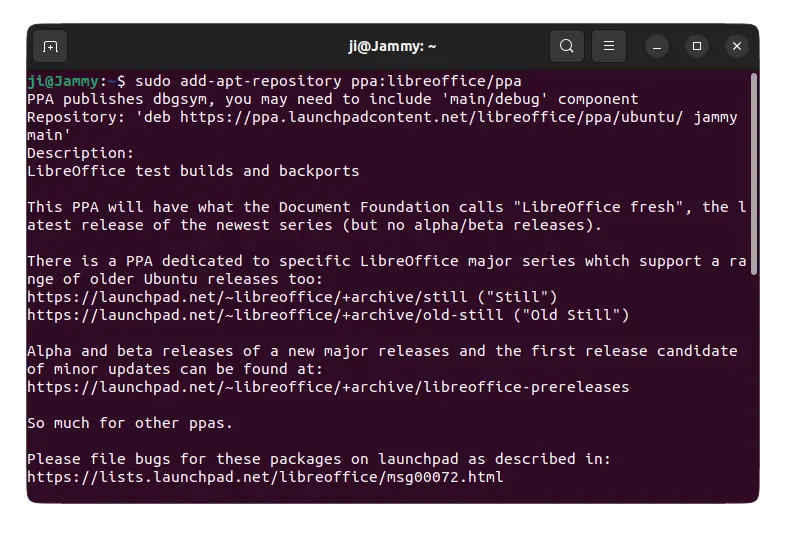
1. Add the PPA
Firstly, press Ctrl+Alt+T on keyboard to open terminal. When it opens, run the command below to add the PPA:
sudo add-apt-repository ppa:libreoffice/ppa
Type user password (no asterisk feedback) when it asks and hit Enter to continue.
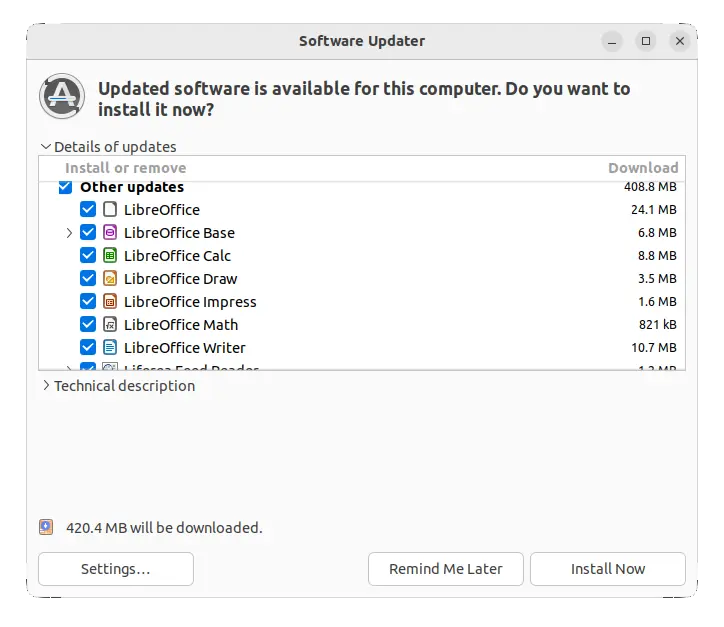
2. Upgrade LibreOffice
After adding the PPA, search for and launch “Software Updater” from Activities overview. Or, open ‘Update Manager’ (and refresh) depends on your system.
There you should see LibreOffice packages available to update. Just click install and wait until done.
For choice, you may run the command below in terminal to install or update to Libreoffice 7.4:
sudo apt update && sudo apt install libreoffice
How to Restore:
For any issue, you may restore the packages to stock version in system repository. To do so, press Ctrl+Alt+T on keyboard to open terminal, and run command:
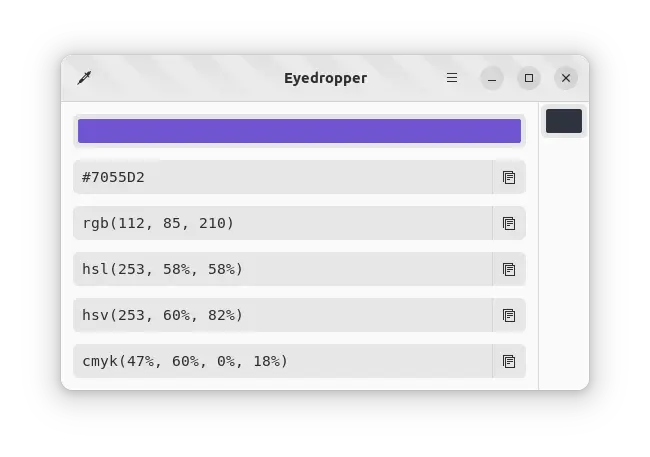
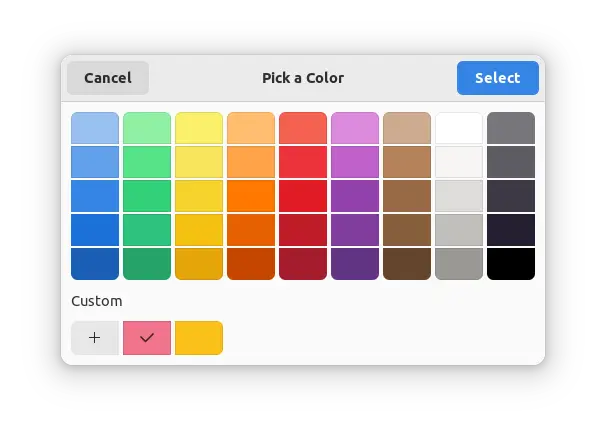
Looking for a color picker tool for Linux? Try Eyedropper, a new GTK4 application that looks native in modern GNOME desktop.
It’s a free and open-source tool written in Rust programming language. Which, provides an easy to use interface to pick a color and display in HEX, RGB, HSV, HSL, CMYK, XYZ and CIE-Lab formats, as well as handy “Copy to clipboard” icons to quickly copy the values.
User can either use the header-bar picker icon, or click on color bar to open the template for choosing colors. And, edit color by changing the HEX value.
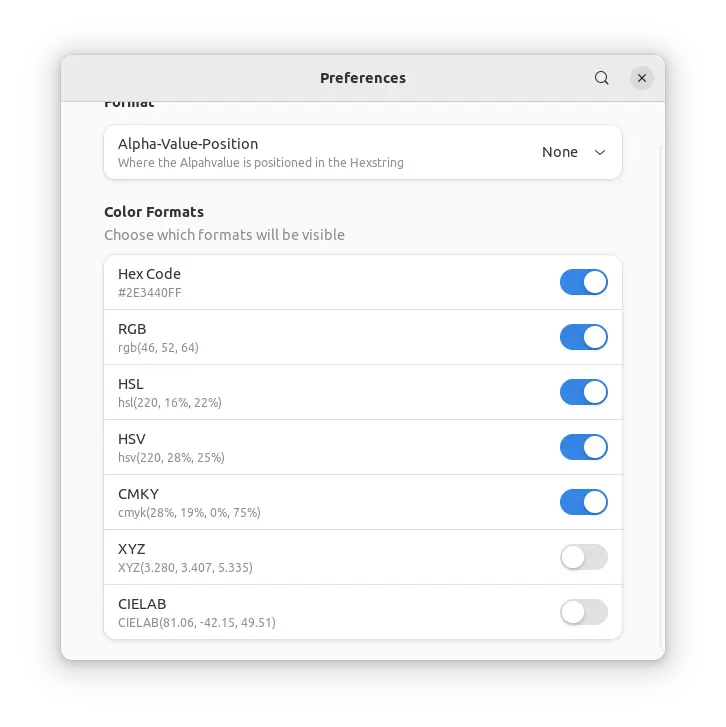
The preferences dialog has options to toggle which color values to display. By setting “Alpha-Value-Position”, it can enable the alpha channel (opacity of a color). However, it’s only available by editing the HEX value so far.
Depends on Alpha-Value-Position option you set, either the first 2 or last 2 values in HEX code applies the color opacity. Though, the alpha channel so far does not work for other color formats!
How to install Eyedropper
The app is available to install in most Linux via universal Flatpak package.
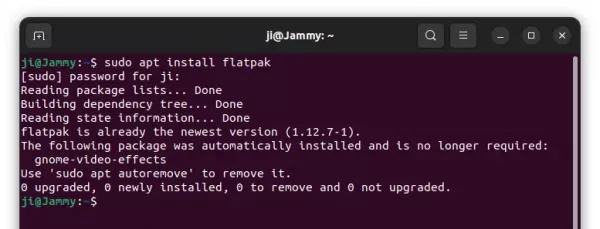
1. First, follow the setup guide to enable Flatpak support. Ubuntu 20.04 | 22.04 can simply press Ctrl+Alt+T to open terminal and run command to enable it:
sudo apt install flatpak
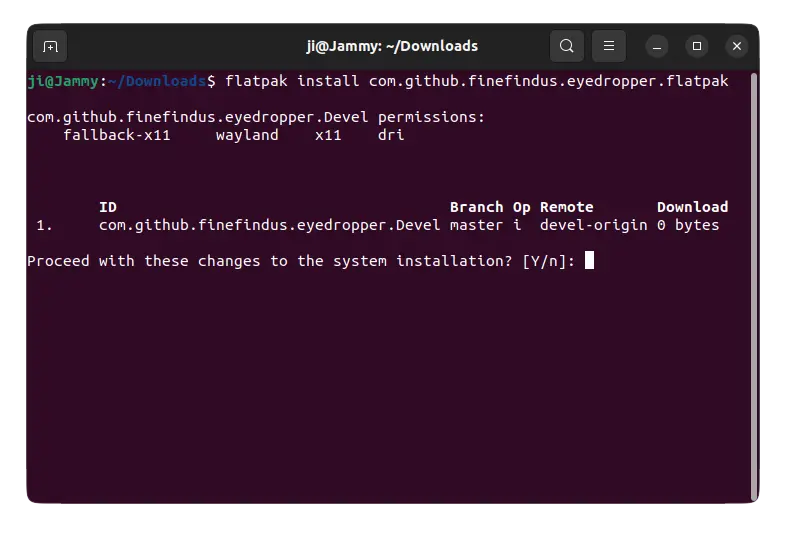
2. Then, go to the Github releases page. Click expand “Assets” section of the latest release and select download the .flatpak package.
KeePass2 password manager released version 2.52 a day ago. Here’s how to install it in Ubuntu 22.04, Ubuntu 20.04, & Ubuntu 18.04 via PPA.
The new release now allows importing 1Password 8.7 1PUX, and Key Folder 1.22 XML files, as well as groups and expiry dates when importing Sticky Password XML.
There are also other password manager files compatibility, such as support for the new encoding of double quotes when importing Steganos Password Manager CSV, and automatically convert time-based one-time password generator settings on Bitwarden JSON import.
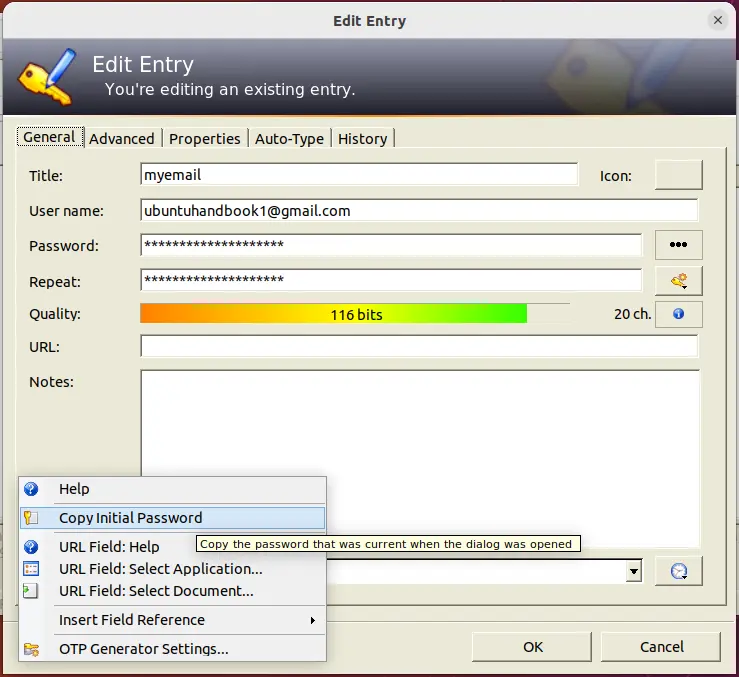
KeePass2 2.52 also has some UI improvements, including ‘Copy Initial Password’ option in the tool menu of entry dialog; ‘Alt. item background color’ option that combines the previous ‘Use alternating item background colors’ and ‘Custom alt. item color’.
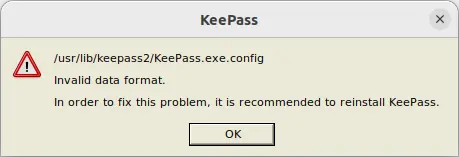
It now checks the ‘KeePass.exe.config’ file and shows a warning message when finding a problem. Which, causes the following pop-up on every start in my case. Though, it seems working without any issue.
I’m not user of KeePass, and don’t know what’s wrong with the default config file build from source tarball. If you know how to correct it, please leave comment below so I can fix it in the PPA package.
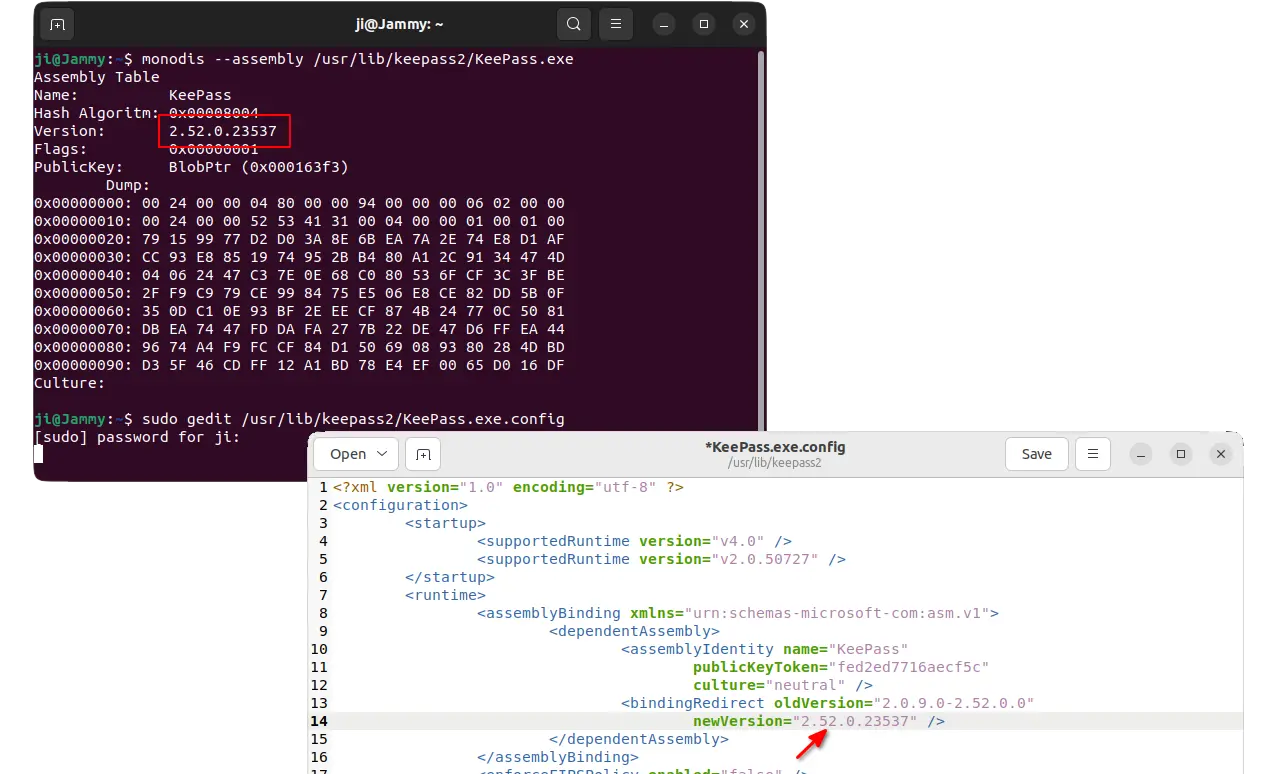
UPDATE for the “/usr/lib/keepass2/KeePass.exe.config”:
Thanks to Ivan K and gilles, you may manually correct the version number to workaround the issue:
1. Open terminal (Ctrl+Alt+T) and run command to get the version number:
monodis --assembly /usr/lib/keepass2/KeePass.exe
2. Next, edit the config file via command:
sudo gedit /usr/lib/keepass2/KeePass.exe.config
Finally, change the “NewVersion” number to match the one you got in last command.
Install KeePass2 2.52 via PPA:
Though there are good native password managers such as KeePassXC for Linux, you can use KeePass2 for your choice. And, I uploaded the package into this unofficial PPA for easy installation.
1. First, press Ctrl+Alt+T on keyboard to open terminal. Then run the command below to add the PPA:
Running Ubuntu 22.04 with the default Wayland session? You can switch your web browser’s backend to get even faster and smoother experience.
Firefox, Google Chrome and Chromium based web browsers do have native Wayland support, but they still use X11 as backend in Ubuntu desktop.
Since Ubuntu 22.04 by default logs into Wayland session, user can also change the web browser’s backend to get faster and smoother browsing experiences. I didn’t run any benchmark. But after switching to Wayland, my browser now has:
obviously better touchpad scrolling
2-finger spread/pinch gestures to zoom in/out
Enable Wayland for Chrome/Chromium
For Google Chrome, Chromium and their based web browsers, e.g., Edge, Vivaldi, just type chrome://flags/ in address bar and hit Enter.
When the page opens, search for Preferred Ozone platform and use the dropdown menu to set it value to “Wayland“. Finally, click “Relaunch” button to apply change by restarting the web browser.
Chrome enable wayland
Native Wayland for Firefox
Since Firefox 121.0, it uses Wayland by default if available, but NOT for pre-installed Firefox Snap package in my case.
To enable it for Snap package, either open terminal and start Firefox with Wayland from terminal:
env MOZ_ENABLE_WAYLAND=1 /snap/bin/firefox
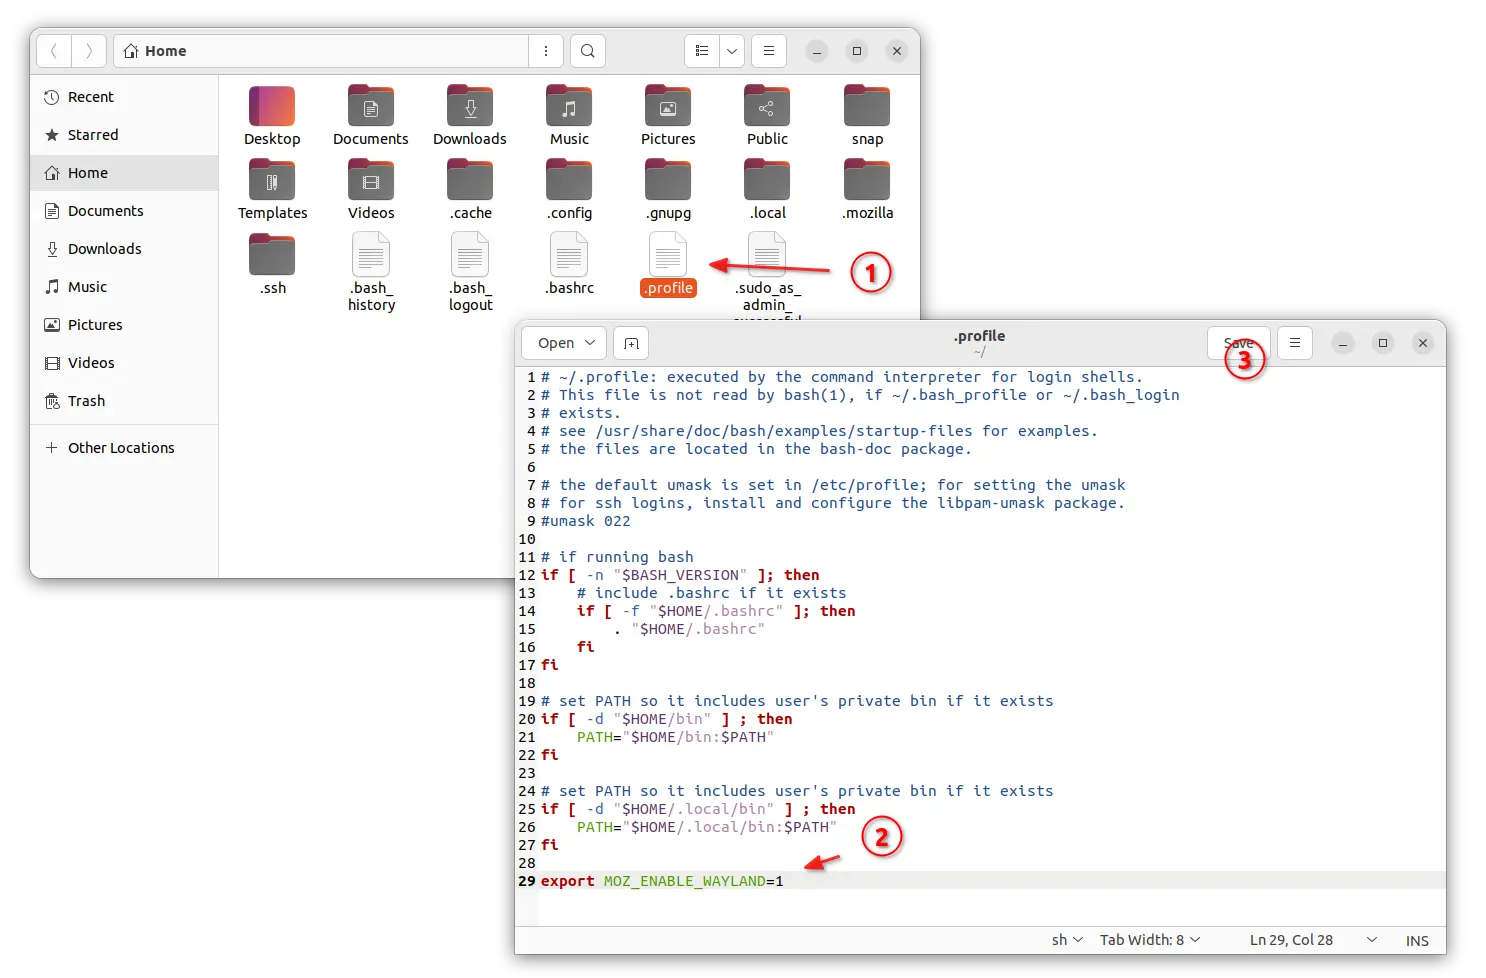
Or, open “Files” (Nautilus file browser), press Ctrl+H then find out and edit the .profile file.
When the file opens in text editor, add the line below in the end and save it.
export MOZ_ENABLE_WAYLAND=1
To apply the change, you need to log out and back in.
This simple tutorial shows how to install the latest LXQt desktop 1.4.0 in (L)Ubuntu 22.04 via its official PPA.
The light LXQt desktop environment released 1.4.0 for few weeks ago. While, LUbuntu 22.04 ships with 0.17 version by default, you can now upgrade to the latest through PPA.
Changes in LXQt 1.4.0 include:
use lxqt-menu-data to replace lxmenu-data anywhere needed.
The file manager now allow users to add terminal commands.
QTerminal supports audible bell as an option
Image viewer has a minimal support for color spaces now.
Add option to the custom command plugin for showing the output as an image.
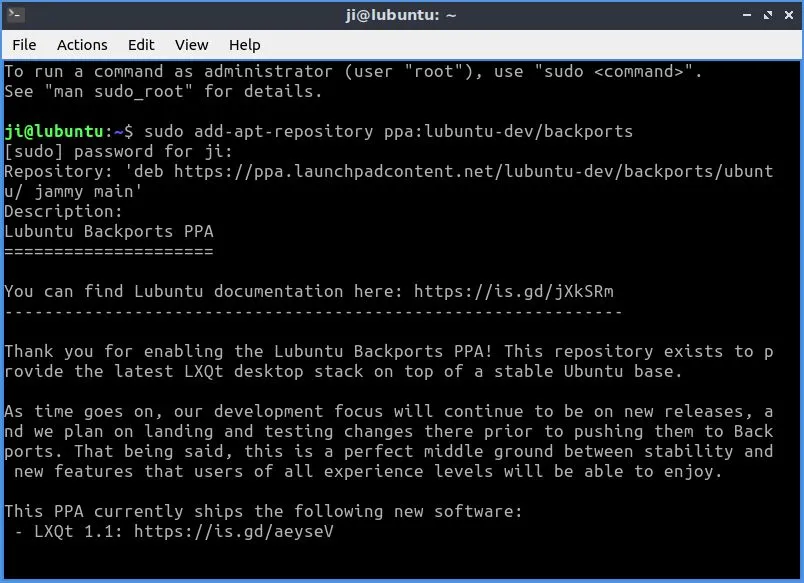
LUbuntu announced the official backports PPA last year, to provide the latest LXQt desktop stack. It now contains the new LXQt 1.4.0 packages for (L)Ubuntu 22.04 LTS.
1. Add LUbuntu backports PPA
Open terminal (Ctrl+Alt+T), and run the command below in terminal to add the official PPA instead:
sudo add-apt-repository ppa:lubuntu-dev/backports
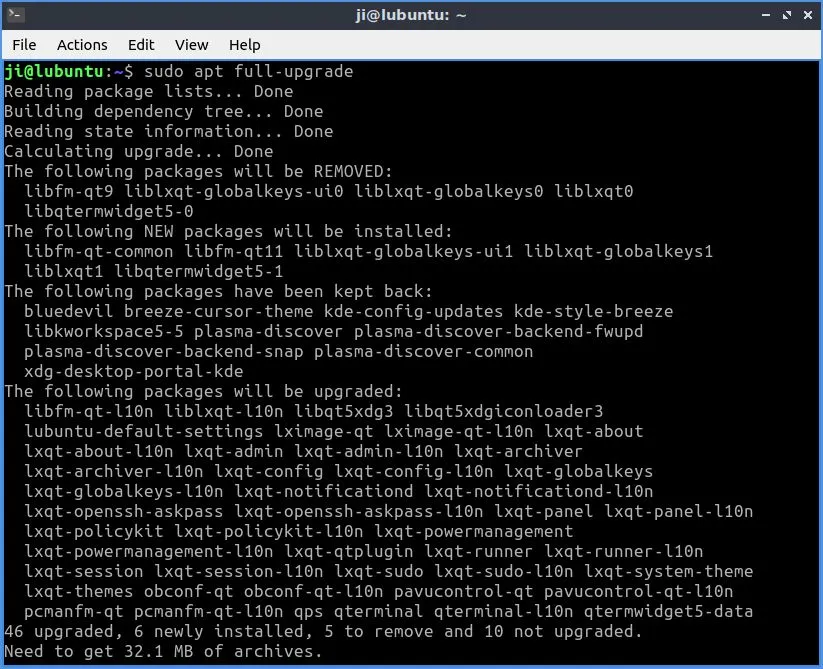
2. Update LXQt Desktop:
Finally, use the command below to update LXQt to v1.4.0:
sudo apt full-upgrade
NOTE: apt full-upgrade is required rather than apt upgrade, or some core libraries will be kept back.
For non-LUbuntu but Ubuntu 22.04 based systems, user can use the command below to install LXQt 1.4.0:
sudo apt install lubuntu-desktop
In case you want to restore your system later, it’s better to written down what packages it’s going to install via terminal output
Uninstall LXQt 1.4.0 in LUbuntu 22.04
To restore your LUbuntu desktop, run the command below in terminal to install ppa-purge and use the tool to purge the PPA repository:
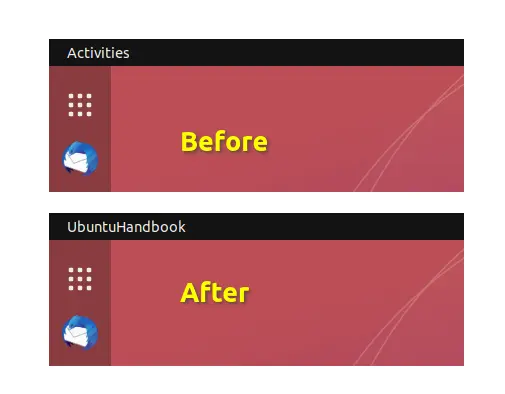
This simple tutorial shows how to set custom names for your desktop workspaces, and replace “Activities” in the top-left with the current workspace name you specified.
Today’s desktop operating systems mostly have multiple desktops to group app windows in different screen. These virtual desktops in GNOME (default desktop environment in Ubuntu/Fedora Workstation) are called workspaces. And, each workspace can have its own name.
Step 1: Set custom names for your workspaces
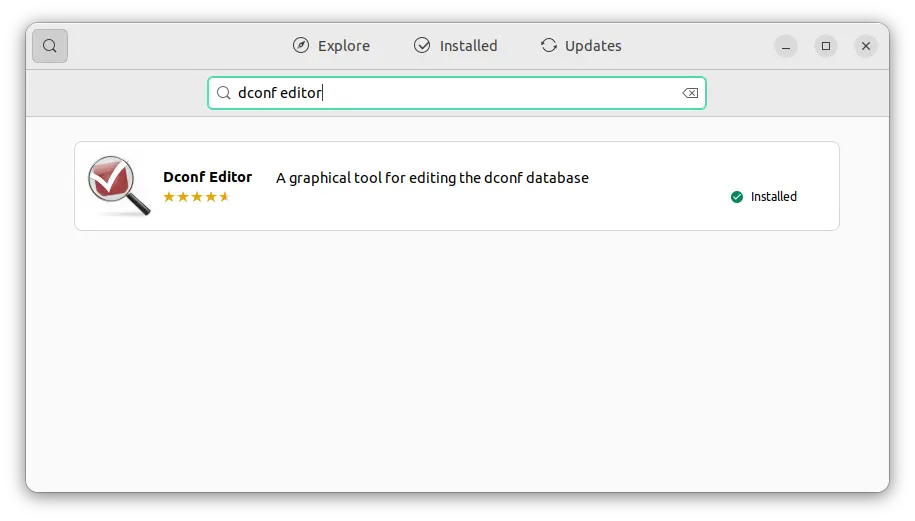
1. First, search for and install “Dconf Editor” if you don’t have it from Ubuntu Software (or GNOME Software).
2. Next, search for and open the Dconf Editor tool from ‘Activities’ overview screen.
When it opens, navigate to “org/gnome/desktop/vm/preferences“. Scroll down and click on “workspace-names” to get into the setting page.
Finally, turn off the default value, and type your desired named in ‘custom value’ box.
NOTE: GNOME by default has 2 workspaces. It adds/removes workspaces automatically to keep only one extra empty workspace. To set fixed number of workspaces, open “Settings” and navigate to “Multi-tasking > Workspaces”
For those familiar with Linux commands, this can be done simply by running the command below in terminal:
gsettings set org.gnome.desktop.wm.preferences workspace-names "['name1', 'name2', 'name3', 'name4']"
Step 2: Replace “Activities” with current workspace name
By replacing “Activities”, you can take a glance at top-left to make sure which workspace you’re working on. Though the name changes, it’s still working like before. By clicking on it will open the overview screen.
1.) First, search for and install “Extension Manager” from Ubuntu Software.
Install Extension Manager in Ubuntu 22.04
2.) Then, search for and launch the tool you just installed from overview screen:
3.) Finally, navigate to “Browse” tab, search for and install the “Activities Workspace Name” extension.
For Fedora 36 user, just go to the extension web page and use the ON/OFF switch to install it:
NOTE: If you set workspace names after installed the extension, restart GNOME Shell it required to make it work. To do so, press Alt+F2, type ‘r’ and hit Enter on Xorg session, or log out and back in on default Wayland.
Ubuntu 20.04 LTS just got a new point release with hardware enablement stacks for use on newer hardware.
The new Ubuntu 20.04.5 features Kernel 5.15 backported from Ubuntu 22.04 LTS, which enables newer hardware support.
It also updates the NVIDIA 390, 470, 510 driver series, as well adds initial support of NVIDIA 515 driver. For HP machines, it adds mic mute key support for HP Elite x360 series, and adds more hp dmi to unblock intel-hid event. Also, add HP EliteBook 630/830 13 inch dmi string to intel-hid allowlist.
The system hangs and display mode switching issues when external HDMI is plugged have been fixed. Firefox should be possible to open downloads folder when AppArmor enabled. And, many OEM meta packages have been added for Lenovo Thinkpad laptops.
For more changes about Ubuntu 20.04.5, see the change summary in this page.
How to Get Ubuntu 20.04.5:
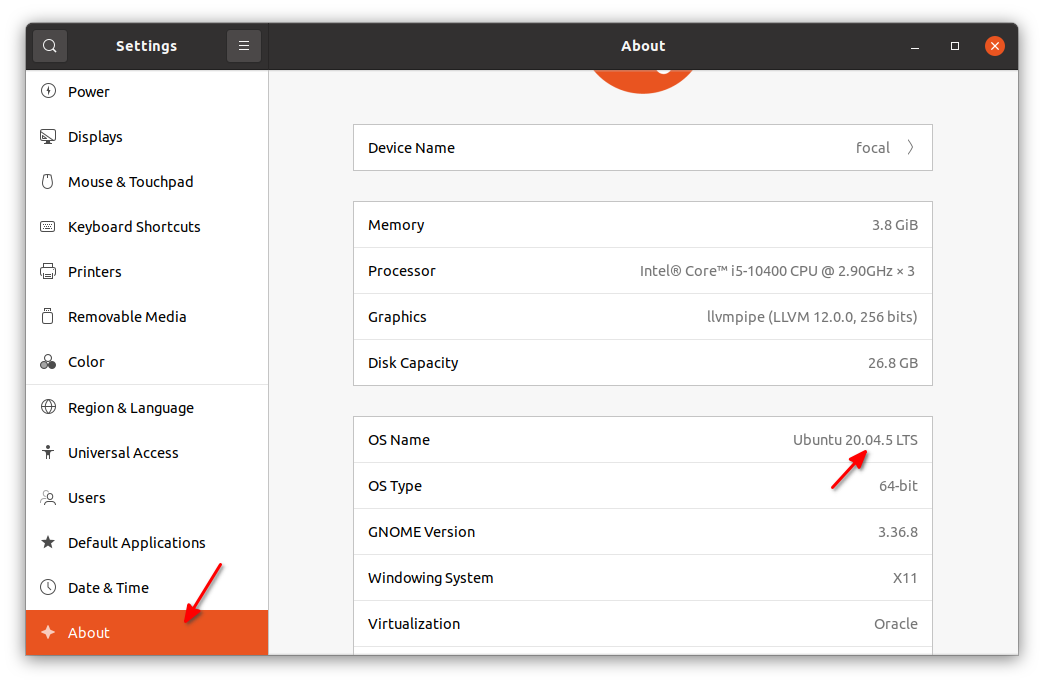
If you’re already running Ubuntu 20.04 in your machine, just check out the “About” page in System Settings, as you should have the new point release.
Or, run the single command in terminal to verify:
cat /etc/issue
To download Ubuntu 20.04.5 (though 22.04.1 is recommended now), go to:
Free open-source video capturing, recording and live streaming software, OBS Studio, just got a big update with exciting new features!
It’s the 10th anniversary release that features 10-bit & HDR video encoding support! Thought, the new feature so far works only with AV1 and HEVC encoders, and 10-bit HEVC encoding requires NVIDIA 10-series, AMD 5000 series, or newer GPU.
OBS Studio 28.0 also adds native Apple Silicon support, many third-party plugins may not yet be ready for the native build.
The release is also porting to Qt6. Except for Ubuntu 20.04 PPA package, all others are now based on Qt6. Meaning many plugins may not work until the developers updated with Qt6 support. See most common plugins, that works with OBS Studio 28.0.
Ubuntu 18.04 is no longer officially supported though user may try the Flatpak package that run in sandbox.
OBS Studio HDR
Other changes in OBS Studio 28.0 include:
New, optimal AMD encoder for Windows.
Add support for CBR, CRF, and Simple Mode to Apple VT encoder
For Linux users, it offers the official packages via both Flatpak and Ubuntu PPA.
Option 1: Install OBS Studio Flatpak in most Linux
Flatpak is an universal Linux package runs in sandbox. In case you want to install the new release in Ubuntu 18.04, try the steps below.
1.) Setup Flatpak daemon
Some Linux, such as Linux Mint, Fedora, Pop! OS has Flatpak support out-of-the-box. But, most other does not, so you may first follow this setup guide to enable it for your Linux.
For Ubuntu 18.04, press Ctrl+Alt+T on keyboard to open terminal and run command to add the Flatpak PPA
sudo add-apt-repository ppa:flatpak/stable
Then update system package cache via:
sudo apt update
Finally, run the apt command to install the daemon package:
sudo apt install flatpak
2.) Install OBS Studio as Flatpak
After setup the daemon, run the single command below will install this live streaming software:
As a containerized software packages, it may also install the run-time libraries that takes more disk spaces.
Finally, launch it either by searching from “Show Applications” screen or via command below:
flatpak run com.obsproject.Studio
Option 2: Install OBS Studio via Ubuntu PPA
The official PPA has updated the packages for Ubuntu 20.04, Ubuntu 22.04, Linux Mint 20/21 based systems.
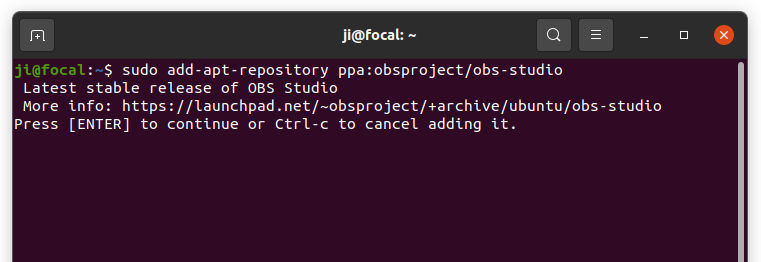
1.) First open terminal by pressing Ctrl+Alt+T on keyboard and run command to add the PPA:
sudo add-apt-repository ppa:obsproject/obs-studio
Type password (no asterisk feedback) when it asks and hit Enter to continue.
2.) Linux Mint and maybe some other Linux do not update the package cache automatically while adding PPA. So, you need to run the command below instead to do it manually:
sudo apt update
3.) Finally, either update the package via “Software Updater” (Update Manager), or run the command below to install it:
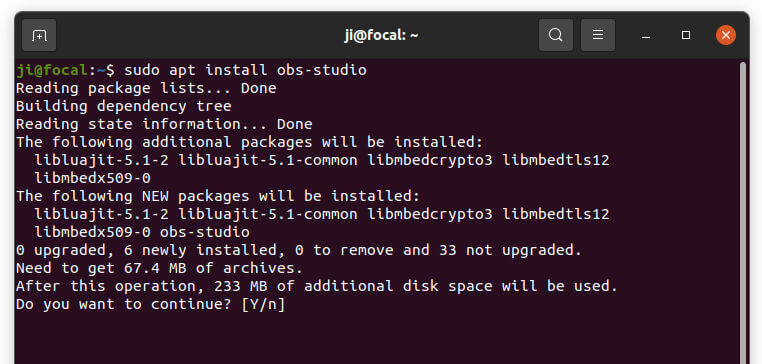
sudo apt install obs-studio
Uninstall OBS Studio:
For the Flatpak package, open terminal (press Ctrl+Alt+T on keyboard) and run command to uninstall the package: