This simple tutorial shows how to install the latest version of Kodi media center in Ubuntu 18.04, Ubuntu 20.04, Ubuntu 21.04, and their based systems, e.g., Linux Mint 20, Elementary OS 6 and Zorin OS 16.
Kodi, formerly XBMC, is now at version 19.2 “Matrix”. It fixed some possible crashes caused by missing timer type, missing channel icons, accessing invalid PVR channel, or switching monitors, toggling on/off HDR from Windows 10 display settings.
The big one in the release it that Kodi 19.x now is available on the Xbox, along with swap chain and HEVC DXVA2 decoder performance improvements, and 4k resolution and HDR video playback fixes. For more, see the release note.
How to Install Kodi 19.2 in Ubuntu:
Kodi has an official Ubuntu PPA. It usually contains the latest packages for all current Ubuntu releases.
1. Add Kodi PPA.
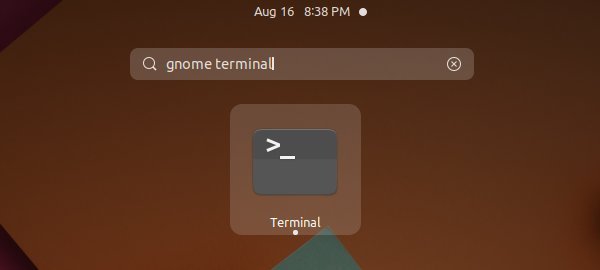
Firstly, open terminal either by searching from the activities overview screen or by pressing Ctrl+Alt+T on keyboard.
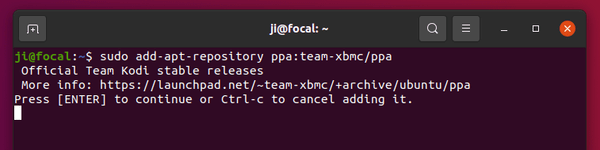
When terminal opens, paste the command below into it and hit Enter to add the PPA:
sudo add-apt-repository ppa:team-xbmc/ppa
Type user password when it asks, while no asterisk feedback, and hit Enter to continue.
2. Install / Upgrade Kodi.
If you’re now running the stock version of Kodi package in Ubuntu, the Software Updater may refuse to update it. So it’s recommended to use the command below to install or update the media player.
Firstly refresh system package cache for old Linux, e.g., Ubuntu 18.04, by running command:
sudo apt update
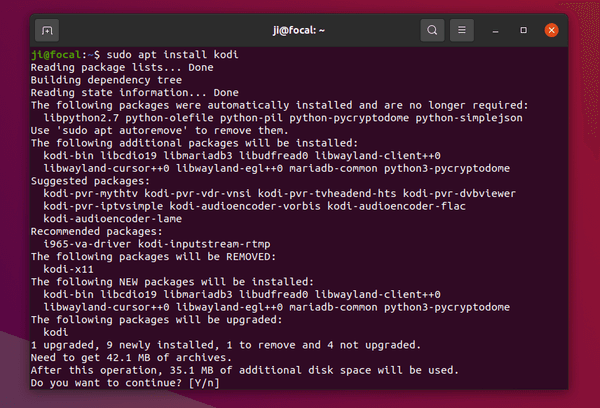
Next, install or upgrade Kodi via command:
sudo apt install kodi
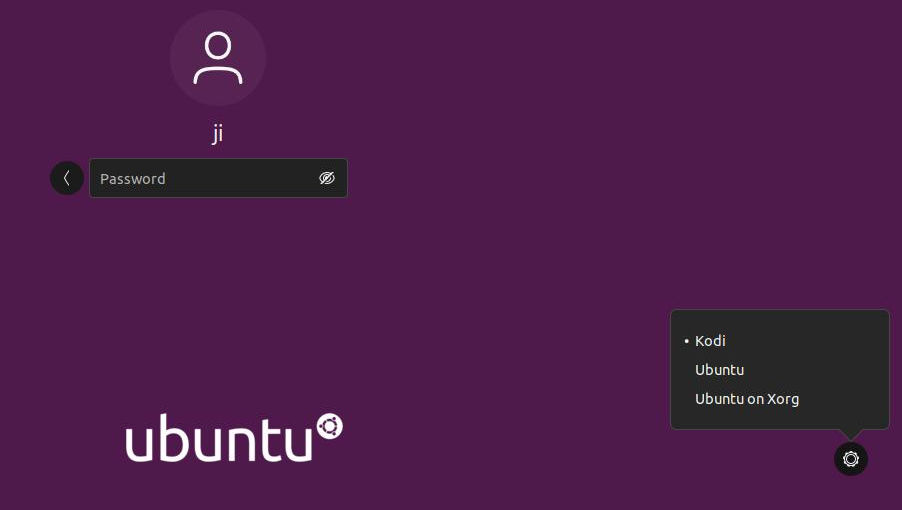
Once installed, you may open Kodi like normal apps by searching from the overview screen. Or log out and select login via Kodi session.
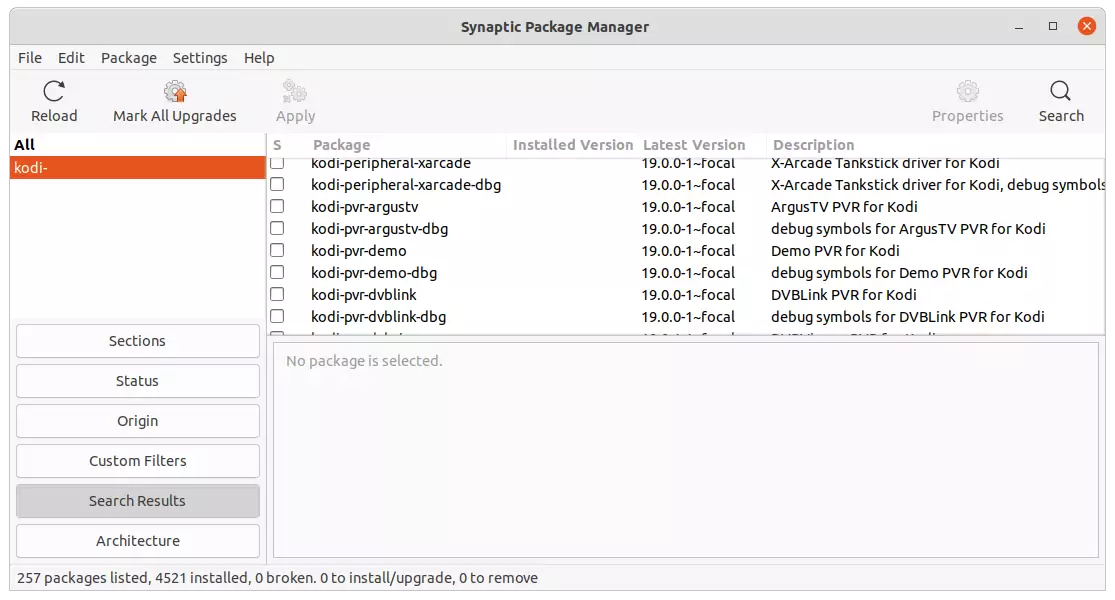
The PPA also provides more audio encoder and PVR add-ons packages. Install them as you need via either apt command or synaptic package manager.
How to Downgrade:
You can purge the Ubuntu PPA as well as downgrade Kodi to the stock version available in Ubuntu main repositories. To do so, run command:
This simple tutorial shows how to compile and install Python 3.11, Python 3.10, or other certain Python version in Ubuntu.
For Ubuntu 18.04, Ubuntu 20.04 and Ubuntu 22.04 LTS, there’s well trusted “deadsnakes” team PPA that maintains all the Python packages. For non-LTS releases, you may build the programming language package manually from the source tarball.
NOTE: This tutorial is tested and works in Ubuntu 20.04, Ubuntu 22.04, and Ubuntu 23.04 in my case.
1. Preparation:
Before getting started, you need to install some essential packages for building the computer language package.
Open terminal either by pressing Ctrl+Alt+T on keyboard or by searching from start menu. When it opens, run the command below to install the dependencies:
For other Python version, go and download via web browser in this page. And, change the version number in command accordingly.
And uncompress the tarball either by right-click and selecting ‘Extract Here‘ in file manager, or by running command in terminal:
tar -Jxf Python-3.11.0.tar.xz
3. Configure the source:
Depends on how you grab the source tarball, either right-click on it in file manager, extract, and open the source folder in terminal via context menu option:
Open Python 3.11 source folder in terminal
If you just did the tar command above, then you may navigate to source folder via:
cd Python-3.11.0/
The command varies depends on which Python version you downloaded.
When you’re in source directory, run command to configure the source with expensive, stable optimizations (PGO, etc.):
./configure --enable-optimizations
4. Build and install Python:
Finally compile and install it into “/usr/local/bin” by running command:
sudo make -j4 && sudo make altinstall
Here -j4 will start 4 threads to speed up the job. Depends on your CPU, you may increase the number or just skip it. And, when make command done, it will ask you to type password for running make install with sudo privilege.
5. Verify
If everything’s done successfully without error, you may verify by running command:
python3.11 --version
python3.11 -m pip --version
It should output the language version as well as the pip package manager version for you
5. Make Python 3.11 default
IMPORTANT: Change default Python3 in Ubuntu MAY cause issues!!! Do it at your own risk.
After installation, you may set it as default by creating symbolic links to /usr/bin/python3:
In the first command change system default python3.10 to python3.8 if you’re on Ubuntu 20.04. Finally, run command below at any time to select which Python to use as default:
sudo update-alternatives --config python3
Uninstall Python 3.11:
Until you removed the source directory, you may first either navigate to that folder in terminal or right-click and select open folder in terminal, finally run make uninstall command to remove Python 3.11:
sudo make uninstall
If you’ve already removed the source, or the previous command does not work for you, try removing all the installed libraries manually via:
This tutorial shows all the ways to install the 3D creation software Blender in Ubuntu, including Snap, Flatpak, native Deb packages, and compile from source tarball.
Blender is a free open-source software for creating animated films, visual effects, computer games. It’s available to install in Ubuntu via a few different package formats. Here you may choose the one that you prefer.
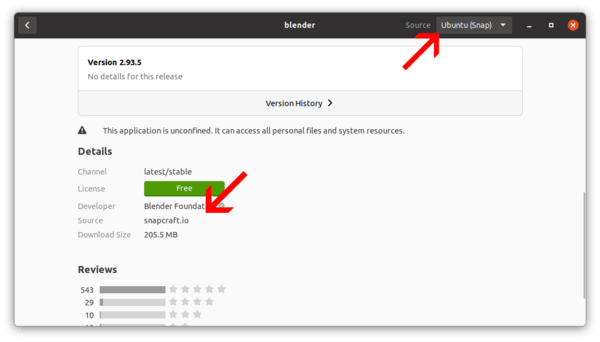
1. Blender Snap package:
The software developer team offers official snap package that works on Ubuntu and most other Linux distributions. Snap is an universal Linux package format developed by Canonical, the company behind Ubuntu.
The Snap package features:
Easy to install.
Auto update.
Maintained by Blender Foundation.
Works on 64-bit modern PC only.
Run in box with snapd daemon, though pre-installed out-of-the-box.
Take more disk space than native deb package.
Install Blender Snap package:
The package is easy to install as mentioned. Simply open Ubuntu Software, search for and install Blender. From both package details and header bar, it’s marked as Snap package.
2. Blender in Ubuntu Universe repository:
Ubuntu has the 3D creation software in its official repositories. Though it’s always old, it has multi-arch support!
stock Blender package features:
Easy to install.
Official package by Ubuntu, but no update anymore.
Works on 64-bit PC, arm64 (Apple Silicon, Raspberry Pi), armhf, ppc64el, and s390x processors.
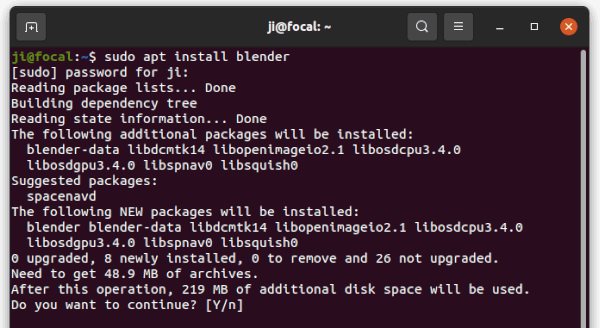
The stock deb package is also available to install in Ubuntu Software, though it sucks and may not work! Instead, users may open terminal by pressing Ctrl+Alt+T on keyboard, and run apt command instead:
sudo apt update && sudo apt install blender
And to uninstall the package, use sudo apt remove --autoremove blender command in terminal.
3. Blender Flatpak package:
Flatpak is another universal Linux package format that was developed as part of the freedesktop.org project. Blender is available as Flatpak package in the flathub repository.
The Flatpak package features:
Auto update.
Maintained by the community.
64-bit modern PC only.
Run in box with flatpak daemon.
Take more disk space than native deb package.
Install Blender Flatpak package:
To install the package, open terminal either by searching from activities overview screen or by pressing Ctrl+Alt+T on keyboard. When terminal opens, run following commands one by one.
And it can be easily removed via flatpak uninstall org.blender.Blender command.
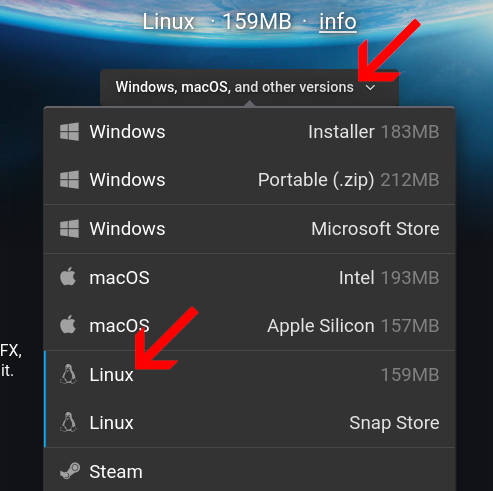
4. Blender Portable Linux Tarball:
The Blender website provides Linux Tarball in its download page. Just grab the package, extract in your file manager, and right-click run the executable file from generated folder will launch the program.
No installation required, but only works for Linux on 64-bit modern desktop PC and laptop.
5. Install Blender from Ubuntu PPA:
Some Ubuntu users do NOT like the Snap and Flatpak packages. Besides portable Linux tarball, third-party PPAs is one of the choices.
The PPA package features:
Native deb packges.
Able to upgrade through “Software Updater”.
Maintained by unofficial third-parties.
Blender PPAs:
There are quite a few Ubuntu PPAs contains the 3D creation software package. You can find them in THIS PAGE.
So far, the Rob Savoury’s PPA contains the most recent Blender 2.93.4 (check the link) packages for Ubuntu 16.04, Ubuntu 18.04, Ubuntu 20.04 and higher for 64-bit PC. However, it was built with updated FFmpeg libraries that might break other package dependencies in your system.
To install Blender from the PPA, open terminal and run the commands below one by one:
sudo add-apt-repository ppa:savoury1/ffmpeg4
sudo add-apt-repository ppa:savoury1/blender
sudo apt-get update
sudo apt-get upgrade && sudo apt-get dist-upgrade
sudo apt-get install blender
And to remove the PPA packages, run following commands one by one in terminal to purge the PPA repositories which will also downgrade the installed packages:
The software is also available as single Appimage binary package, though it seems not being updated regularly.
The Appimage is a non-install package works on most Linux systems. Users just have to add executable permission in file’s Properties dialog, then right-click and select run to launch the program.
The Appimage package features:
64-bit PC only.
no installation required.
Runs in most Linux, like Snap and Flatpak.
Unofficial.
The Blender Appimage is available to download at THIS PAGE and it’s v2.90 at the moment.
7. Compile Blender from the Source:
If none of the previous methods meet your need, you can build the software package from source code, though it’s not recommended for beginners.
Build from the source features:
Not beginner friendly.
Works on all processor architecture, though Blender 2.8+ need GPU with OpenGL 3.3+ support
Build whatever version with optional functions as user prefer.
Build process may fail due to “unknown” reason, and need technical support.
How to Compile Blender from source tarball.
Firstly, download the source tarball from the link page below:
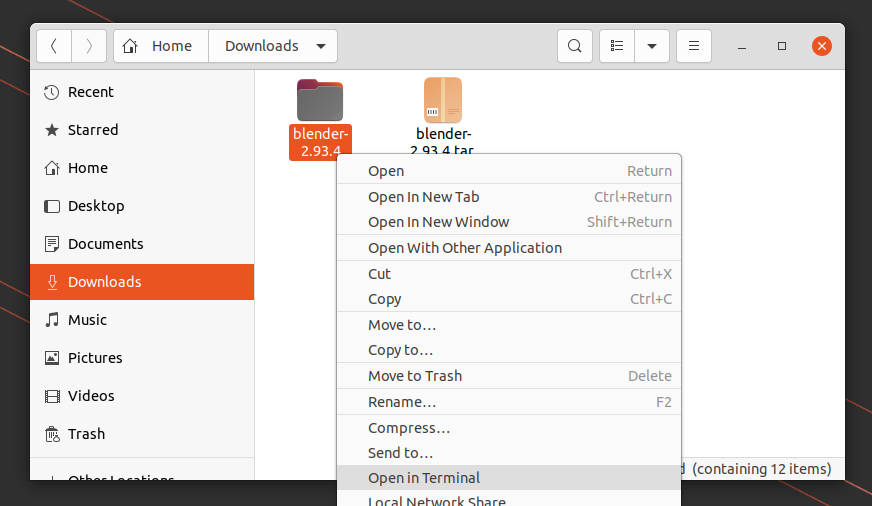
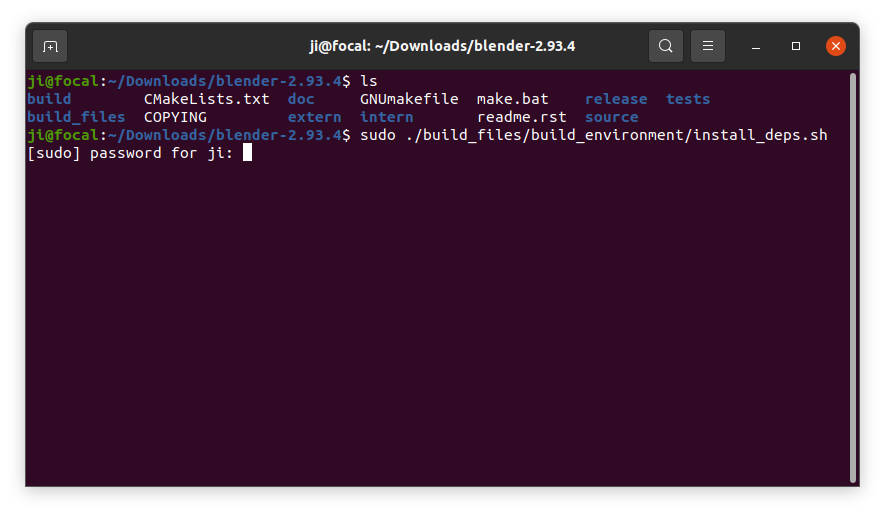
1.) After downloaded the source tarball, extract it in the file manager. Then right-click on source folder and select ‘Open in Terminal‘
Blender 2.9x has an ‘install-deps.sh’ script that automatically install the build depends both from system repositories and by download and building others from source.
2.) When terminal opens after clicking the previous menu option, first run command to install essential packages:
NOTE: the script may fail building dependencies from source tarballs. You may skip and/or specifies what to build via flags. And, find out the command options via:
The command will generate “CMakeCache.txt” in “build” folder under source. You can edit the file to change build options.
5.) Finally build Blender if everything goes OK. Depends on how many CPU core that you have, you may change -j4 (4 threads) to -j8 to speed up the process.
make -j4
And finally install Blender via sudo make install if make succeed.
Summary:
For Ubuntu users, there are quite a few ways to get Blender running. The easiest and official way is search for and installing the SNAP package from Ubuntu Software. However, the old .deb package in universe repository support more processors, e.g., Apple Silicon, Raspberry Pi and other Mobile devices. To test without installing, there’s Linux portable tarball present in official download page. And third-party Ubuntu PPAs maintains most recent packages in native .deb format. Also, advanced users may build it from source with free options.
The well trusted “deadsnakes” team PPA has made the packages for Ubuntu 20.04, Ubuntu 18.04, and derivatives, e.g., Linux Mint 20, Elementary OS 6 and Zorin OS 16.
1.) Firstly, open terminal by either searching from overview screen or pressing Ctrl+Alt+T on keyboard. When it opens, run command to add the PPA:
sudo add-apt-repository ppa:deadsnakes/ppa
2.) Then refresh system cache and install the language via command:
sudo apt update && sudo apt install python3.10
Use Python 3.10 as default Python3:
It’s possible to make Python3 in Ubuntu to be Python3.10 via following commands. However, it causes issues, such as Gnome Terminal refuses to launch. Do it at your own risk!
Check current Python3 version:
python3 --version
Use update-alternatives to create symbolic links to python3 (replace python3.8 in Ubuntu 16.04 with ):
Mozilla Firefox 93.0 was officially released today. The release features AVIF image support and further security improvements.
The AV1 image format (AVIF) is an image file format for storing images or image sequences compressed with AV1 in the HEIF file format. It offers significant file size reduction compare to JPEG, PNG and WebP. Google Chrome added it support since version 85. By releasing v93.0, Firefox now has AVIF image support.
Some PDF files have interactive fields to fill in data. Since Firefox 83, the built-in PDF viewer supports filling fields such as text, check boxes, and radio buttons. In the new release, it adds more forms (XFA-based forms, used by multiple governments and banks) support.
Firefox PDF viewer filling forms
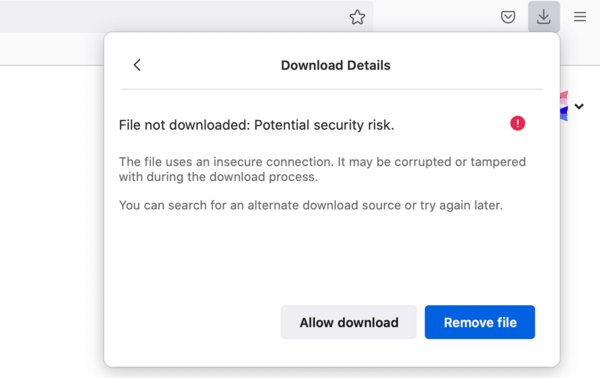
To protect against potentially malicious or unsafe downloads, Firefox now blocks insecure HTTP downloads on a secure HTTPs web page, and blocks downloads in sandboxed iframes, unless the iframe is explicitly annotated with the allow-downloads attribute. Though, an option is available to select download anyway.
Other changes in Firefox 93 include:
Automatically unload tabs on Windows, when system is running out of memory.
Prompt to finish installation for macOS users first time running Firefox from a mounted .dmg file.
Improved SmartBlock and new Referrer Tracking Protections.
Fixed working with Orca screen reader.
And various security fixes.
How to Get Firefox 93.0:
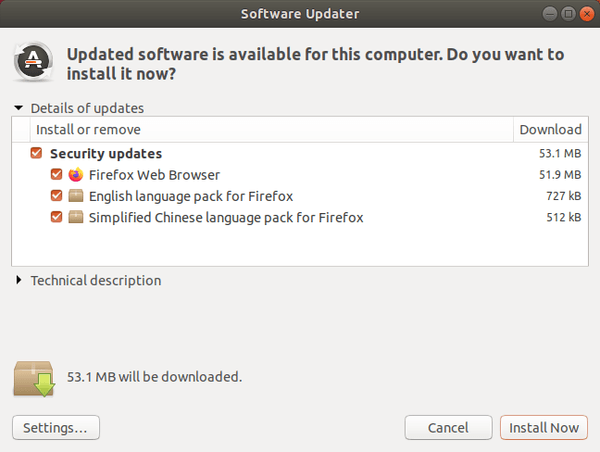
Ubuntu will build and publish the latest Firefox packages through the security & updates (main) repository in next few days (check the launchpad build page). The best choice is just wait and upgrade Firefox using “Software Updater” once available.
For the release note, as well as download link for the portable tarball that contains non-install executable file to launch Firefox, go to:
The graphical auto shutdown app KShutdown released version 5.90 with feature to reboot from Linux into another OS automatically.
KShutdown is a free open-source app that provides a simple Qt based user interface. It allows users to automatically shutdown, restart, hibernate, sleep, log-out, or run a command on certain time, after a period of time, on user inactivity or other event.
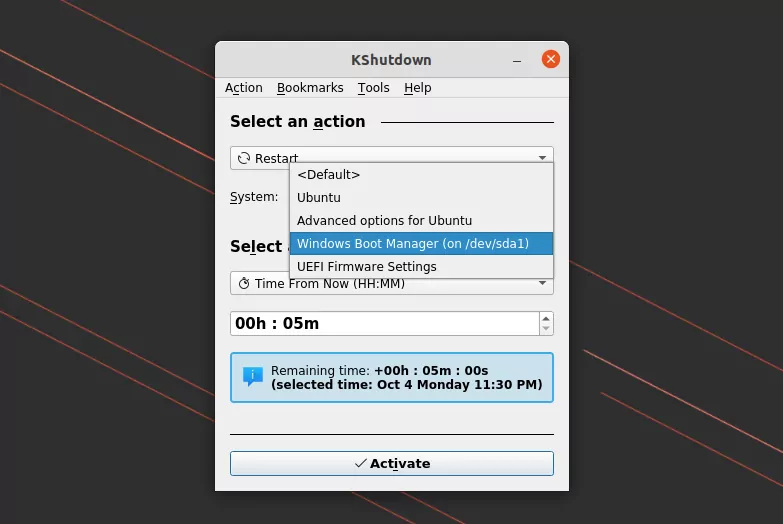
The app is getting more and more powerful. The latest 5.90, beta for next 6.0 release, introduced experimental multi-booting support. User can now automatically reboot from Linux into another OS, such as Windows, from Grub menu entries.
KShutdown reboot into another OS
The new feature needs administrator user privilege to get access ‘/boot/grub/grubenv’. The app however does not apply it properly so far, and user need to start it manually via sudo kshutdown from command line.
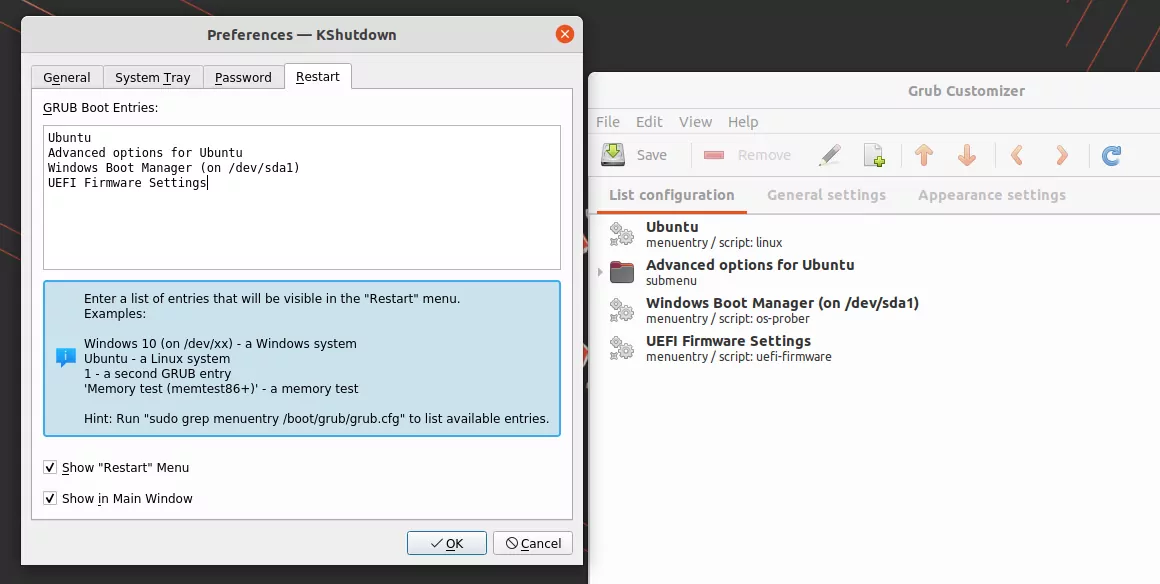
And it does not read the Grub menu automatically, though it can be set manually in ‘Tools -> Configure KShutdown -> Restart’. Use the app ‘Grub Customizer’ to get the menu entries.
Manually write Grub Menu entries (from grub-customizer)
While typing in my Ubuntu laptop, I was often making mistakes by tapping on touch-pad accidentally. The text cursor (aka caret) jumped to another place, and/or app window lost focus. It made me crazy since the built-in ‘disable touchpad while typing‘ option does not function in my HP laptop.
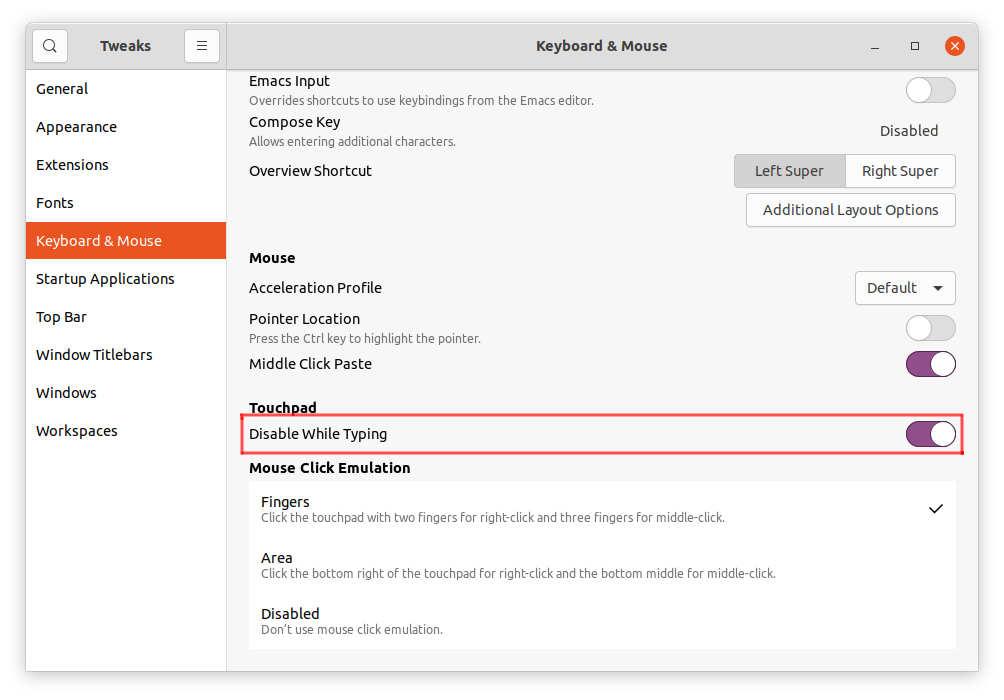
Option 1: system built-in option
GNOME has the option to disable touchpad while typing, which is enabled out-of-the-box in current Ubuntu releases. Users may access the settings either via ‘/org/gnome/desktop/peripherals/touchpad/‘ in Dconf Editor or using Gnome Tweaks tool.
Both configuration tool available to install in Ubuntu Software.
Disable touchpad while typing via Gnome Tweaks Tool
For Synaptics touchpad running on Xorg, like me, this option may not work. And, here are the few other choices I’m going to show you in this tutorial.
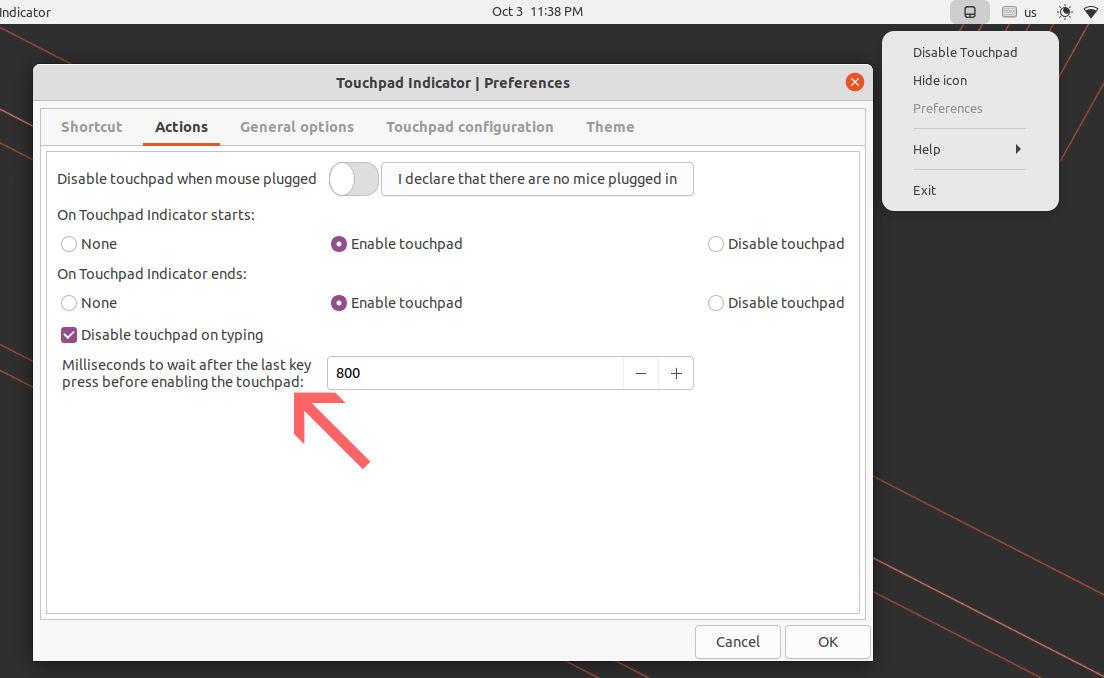
Option 2: Disable touchpad while typing via Touchpad-Indicator
A ten years old app, Touchpad-Indicator, has ability to toggle this function for all Ubuntu users.
It’s a free and open-source project developed and maintained by atareao team from Spain. It has option to disable touchpad while typing and set milliseconds to wait after the last key press before enabling touchpad.
It also allows to disable touchpad while mouse is plugged, toggle scrolling options and remap one-, two- and three-finger tap actions.
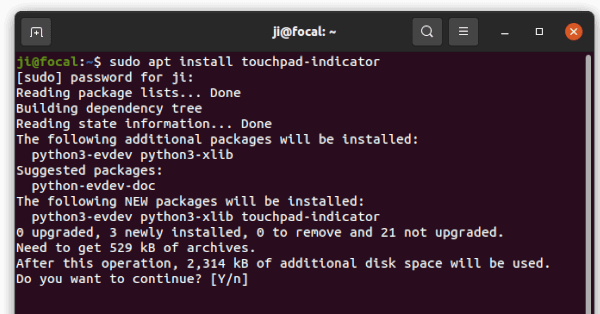
How to Install Touchpad Indicator in Ubuntu:
The software developer maintains an official PPA contains the software packages for all current Ubuntu releases (Ubuntu 18.04, 20.04, 21.04, 21.10) and old releases such as Ubuntu 12.04, Ubuntu 14.04, and Ubuntu 16.04.
1.) Firstly, open terminal from start menu or by pressing Ctrl+Alt+T on keyboard. When it opens, run command to add the PPA:
sudo add-apt-repository ppa:atareao/atareao
2.) Next, refresh package cache and install the app:
Option 3: Single command to disable touchpad while typing (for synaptics)
Touchpad indicator is great, however it’s a little bit heavy for the single function only. Without installing any third-party app, a single command can also do the trick!
The synaptics touchpad driver for Xorg server offers a command line tool “syndaemon” that monitors keyboard activity and disables the touchpad when the keyboard is being used.
Users can simply open terminal and run the command below to test it out:
syndaemon -i 0.8 -K -t -d
The command will run the service silently in background. And the parameters are:
-i 0.8 tells to wait 0.8 second after last key press before re-enabling the touchpad.
-K makes it ignore Modifier+Key combos, such as Ctrl, Alt, and/or Shift + key combinations.
-t tells to disable tapping / scrolling only. Mouse movement is still possible while typing.
-d runs the command as daemon, in background.
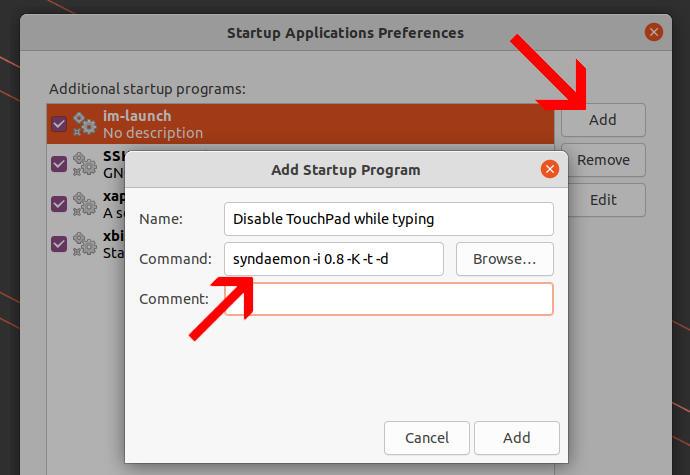
Syndaemon works until reboot. If you like this method, you may make it running automatically at start up via following steps:
1.) Firstly, search for and open ‘Startup Applications’ utility from overview screen.
2.) When it opens, click ‘Add’ button and type:
Name: Disable TouchPad while typing
Command: syndaemon -i 0.8 -K -t -d
Comment: optional
And finally click on ‘Add’ button will make it auto-start at login.
NOTE: It has downside in my case in Ubuntu 20.04 LTS. When trying to stop syndaemon either via “System Monitor” or using sudo kill -i Process-ID command, it causes touchpad tap to click not working until reboot!
Option 4: For Ubuntu with Xorg session (Libinput driver)
The function works out-of-the-box in my Ubuntu 22.04 with the default Wayland session. User may use Gnome Tweaks to toggle the option, see screenshots in Option 1.
If you’ve switch back to “Ubuntu on Xorg” session, then this method may help for those using libinput driver.
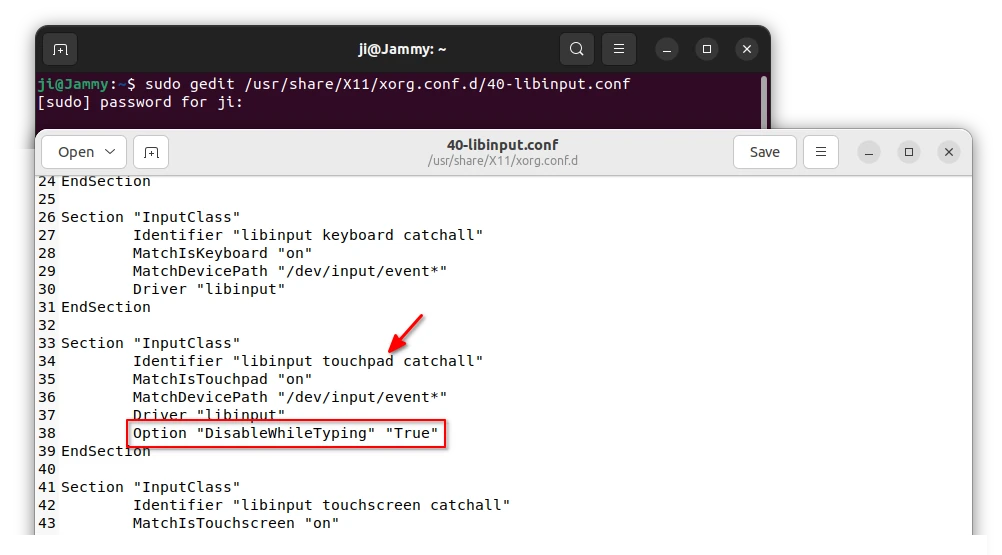
1. First, press Ctrl+Alt+T on keyboard to open terminal. When it opens, run the command to edit the config file:
If you’re trying this in Ubuntu 22.10, replace gedit with gnome-text-editor or nano.
2. When the file opens in text editor, find out the section that contains “Identifier “libinput touchpad catchall”“. Add rule Option “DisableWhileTyping” “True”, so it will look like:
After almost two years of development, the HexChat IRC client finally released new 2.6.0 version with a number of new IRCv3 features and strikethrough formatting support.
HexChat is a free open source Internet Relay Chat client that forked from XChat. It offers both command line and customizable graphical interface, allows to securely join multiple networks and talk to users privately.
The app supports features such as DCC, SASL, proxies, spellcheck, alerts, logging, custom themes, Python/Perl scripts, and even transfer files.
Add support for IRCv3 SETNAME, invite-notify, account-tag, standard replies, and UTF8ONLY
Add support for strikethrough formatting
Update network list (including Libra.Chat as the default)
Update to OpenSSL 1.1.1 on Windows
Fix text clipping issues by respecting font line height
Fix URLs not being escaped when opened
Fix misc IRC message parsing issues
Remove libnotify and libproxy dependencies on Linux.
Print ChanServ notices in the front tab by default
Add CBC mode support for fishlim plugin.
Rewrite plugin in python with CFFI This lowers memory usage and fixed conflicts with many C Python modules including pygobject.
How to install HexChat 2.16.0 in Ubuntu:
The Windows exe as well as source tarball are available to download at its official website.
For Ubuntu and other Linux, the client so far only available via universal Flatpak package which runs in sandbox. And below is how to install HexChat 2.16.0 flatpak in Ubuntu 18.04, Ubuntu 20.04, Ubuntu 21.04, Ubuntu 21.10 and their based systems.
1.) Firstly, open terminal by either searching from activities overview screen or press Ctrl+Alt+T key combination on keyboard.
2.) Next install the Flatpak daemon if you don’t have it, by running command in terminal:
sudo apt install flatpak
NOTE for Ubuntu 18.04, you have to add THIS PPA to be able to install the package.
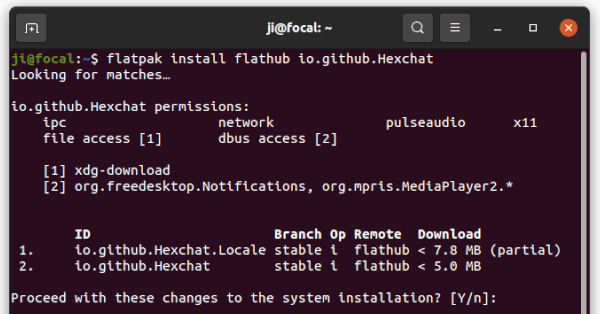
3.) Add the flathub repository that hosts the flatpak packages by running command:
4.) Finally install the HexChat IRC client via command:
flatpak install flathub io.github.Hexchat
NOTE the Flatpak package co-exists with native deb and snap, so you may have more than one app icons in overview search box. If so, you may run the command below in terminal to launch HexChat Flatpak:
flatpak run io.github.Hexchat
How to Remove HexChat:
To remove the HexChat flatpak package, open terminal and run command:
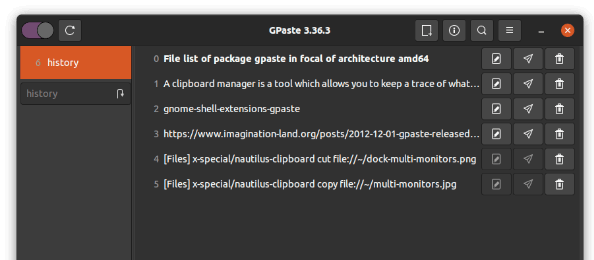
For those doing copy & paste actions frequently in Ubuntu Linux, GPaste remembers the clipboard history and allows to find them easily via few click.
The clipboard is the place to store the text, image, file path and all the stuff that you last copied (or cut). The content in clipboard will be overwritten once you do another copy & paste action. So, when you trying to find out what you’ve copied earlier, a clipboard manager will be helpful.
Install and Use GPaste:
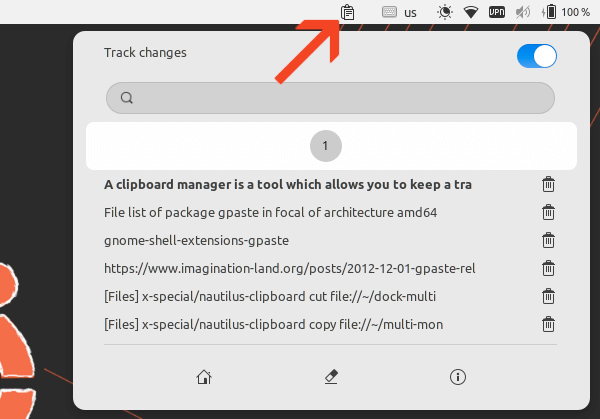
GPaste is a free open-source clipboard manager that keep a trace of what you’re copying and pasting. It offers an indicator applet in system tray, allows you to search from history, single click to copy to clipboard, so to paste to anywhere as you want. And, a global switch is present to toggle tracking clipboard changes.
By clicking on the home icon in the drop-down menu, it brings up the main app window. There you may do all the functions, including create, edit, and/or delete content from the clipboard history. And, the hamburger icon on header bar allows to change the app settings and keyboard shortcuts.
Install GPaste in Ubuntu Linux:
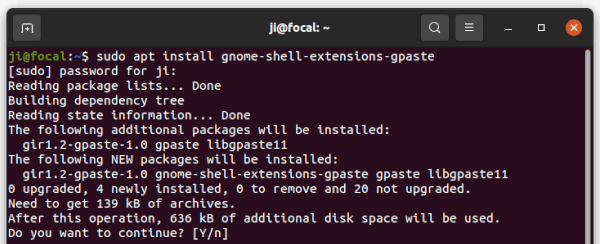
For Ubuntu with default GNOME desktop, open terminal either by searching from overview screen or by pressing Ctrl+Alt+T on keyboard.
When terminal opens, run command to install the gpaste and extension packages in Ubuntu 18.04 & Ubuntu 20.04:
sudo apt install gnome-shell-extensions-gpaste
NOTE for Ubuntu 21.04 and Ubuntu 21.10, the package name has changed (removed ‘s’ in ‘extensions’). So command will be:
sudo apt install gnome-shell-extension-gpaste
Other Linux, such as Fedora may install the clipboard manager via sudo dnf install gnome-shell-extension-gpaste command.
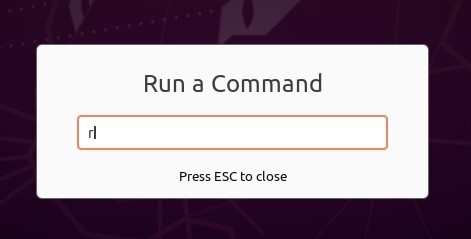
Restart Gnome Shell:
The indicator applet is provided by Gnome Extension, users have to restart GNOME Shell to allow working. To do so, press Alt+F2 key combination on keyboard, type r in pop-up ‘Run a Command’ dialog, and hit Enter.
For Wayland session, you need to log out and back in to restart Gnome Shell.
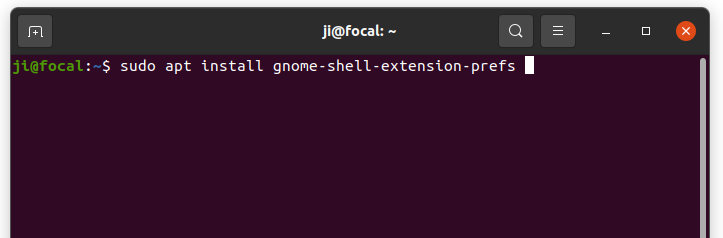
Enable GPaste Indicator:
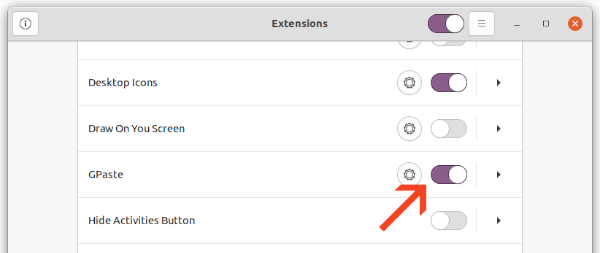
Search for and open gpaste from the overview screen will launch the main app window. For the indicator applet, enable it via Gnome Extensions app.
Firstly, open terminal (press Ctrl+Alt+T on keyboard) and install Gnome Extensions app if you don’t have it:
sudo apt install gnome-shell-extension-prefs
Next, launch ‘Gnome Extensions’ app, scroll down and turn on the slider icon to enable GPaste indicator:
And click on the gear button to change it settings as you like.
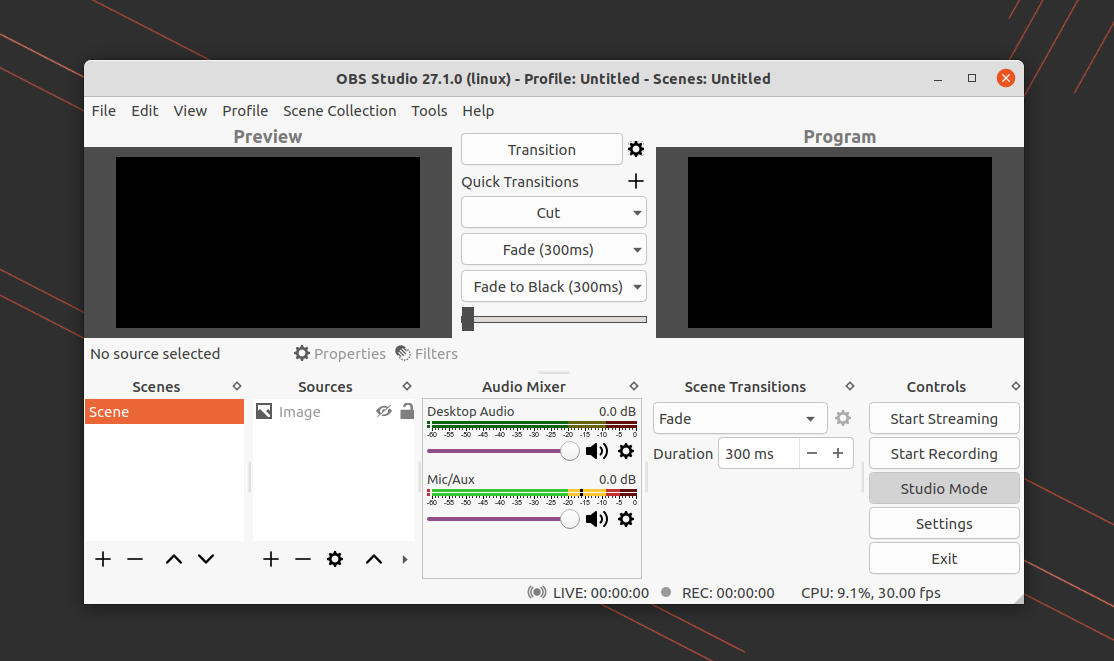
Free open-source live streaming app, OBS Studio 27.1.1, was released. Here’s how to install it in Ubuntu 18.04, Ubuntu 20.04, Ubuntu 21.04, Linux Mint 20, and derivatives.
OBS Studio 27.1.1 is a hot-fix release for version 27.1, which was released yesterday. It introduced YouTube integration, so users can connect YouTube account without using a stream key. And, it features a new “Manage Broadcast” button to create and manage YouTube streams, a chat dock for public and unlisted broadcasts, set settings on per stream base, and bandwidth testing support in the Auto-Configuration wizard.
Other features include a 18-scene multiview option, a “Mask Only” option to the stinger track matte, an option to draw safe areas in the preview, and a feature to browser sources to allow limited control over OBS.
OBS Studio 27.1 also features user interface tweaks and performance improvements, such as optimize media source to reduce CPU usage, re-enable drag & drop for scenes & sources on Linux, and more. See the release note for more details.
How to Install OBS Studio 27.1 in Ubuntu:
Universal Snap and Flatpak packages:
The Open Broadcaster Software is available as SNAP package, which can be installed via Ubuntu Software. If you have already installed the package, it will be updated to the new 27.1 automatically once the maintainer published it!
Also, the recording and live streaming app can be installed via universal Flatpak package via this page.
OBS Studio PPA:
The software has an official Ubuntu PPA for those prefer the classic deb package format. It so far supports for Ubuntu 18.04, Ubuntu 20.04, Ubuntu 21.04, and their based systems, e.g., Linux Mint 20, Elementary OS 6, and Zorin OS 16.
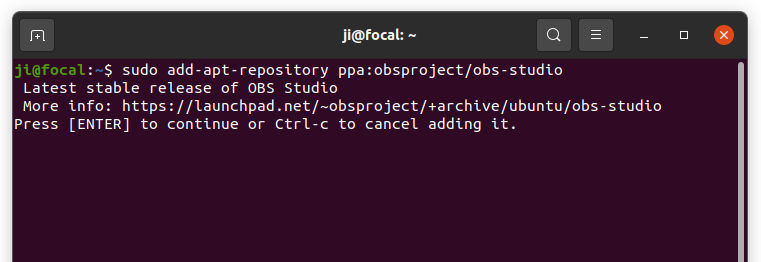
1.) To add the PPA, search for and open terminal from activities overview or press Ctrl+Alt+T on keyboard. When terminal opens, run command:
sudo add-apt-repository ppa:obsproject/obs-studio
2.) Update the system package cache. For Ubuntu 18.04 and some Ubuntu based distros, users have to manually refresh the system package cache by running command in terminal:
sudo apt update
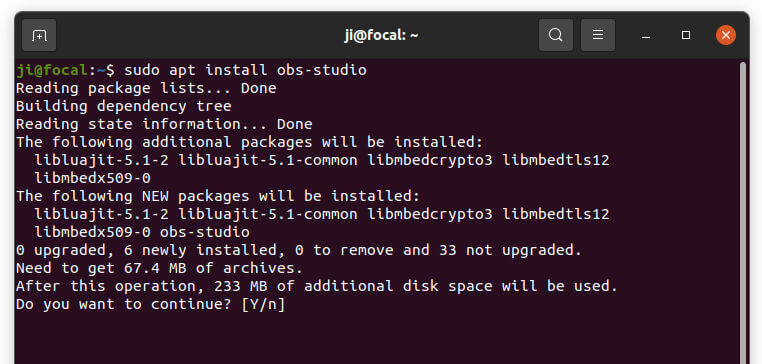
3.) Finally copy and paste the command below into terminal, and run to install the broadcaster app:
sudo apt install obs-studio
Or, upgrade the app via “Software Updater” (Update Manager) if an old version was already installed on your system.
How to Remove OBS Studio:
To remove the package, also run apt command in terminal with ‘remove’ flag:
sudo apt remove --autoremove obs-studio
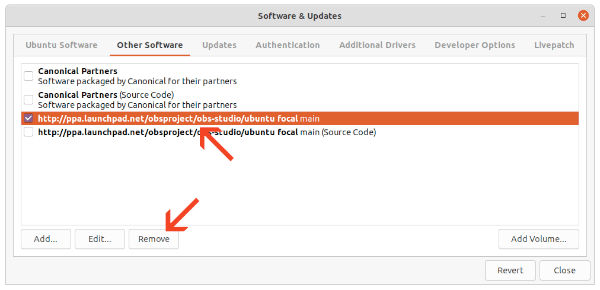
And remove the Ubuntu PPA either using Software & Updates utility by removing the relevant line from ‘Other Software’ tab.